Yachting World
- Digital Edition


Boom preventers: How to use one and why they’re worth the hassle to rig
- February 20, 2020
The two minutes it takes to rig a boom preventer properly can pay off in so many ways, yet still a lot of sailors consider it an unnecessary hassle. Pip Hare begs to differ

Preventers should be rigged from the end of the boom to avoid damage in an accidental gybe
Rigging a boom preventer will allow you to sail a true downwind course without a constant worry about crew safety. I also use it to pin the boom in its preferred position in light winds with sloppy seas.
When racing short-handed with a symmetric spinnaker it also allows me to use aggressive windward heel to make extra metres to leeward. Here are a few of my top pointers for getting the most out of this valuable set-up.
Fixing point
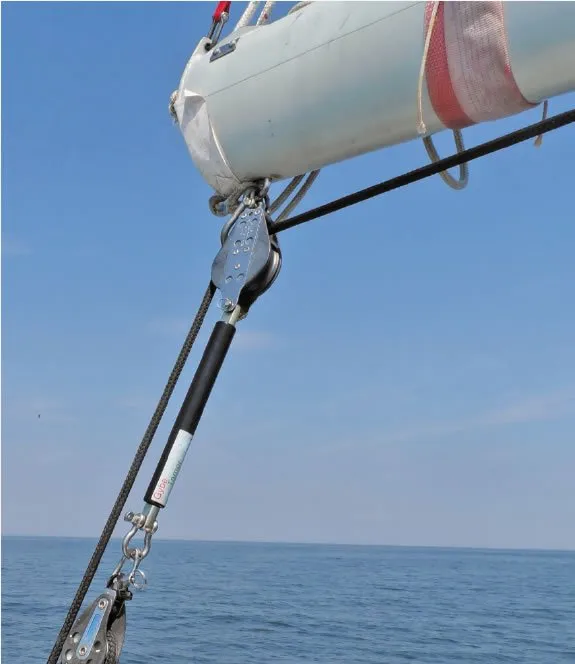
The preventer should be attached to the outboard end of the boom to avoid damaging the tube in the event of an accidental gybe . Some boom end castings have a designated hole through which a preventer can be attached.

A large bowline loop (the red striped line) affixes the preventer to the boom. The knot can be reached without sheeting the boom in to the boat
If this is not the case then a large bowline loop passed around the end of the boom between the clew and the end casting will work just as well. The loop should be long enough so it can be undone from the side deck without the need to re-centre the boom.
Alternatively, to avoid hauling the boom in every time the preventer is required, make a strop around two-thirds of the length of the boom with an eye in both ends. One end can be permanently attached to the boom and the other will be attached to the running part of the preventer.
The strop can be accessed easily from within the footprint of the deck while the mainsail is out. When not in use, the strop can be tensioned with an elastic cord from either the kicker fitting or inboard boom casting.
Article continues below…

Video: 5 of the scariest accidental gybes – could you get out of these?
1. The Southern Ocean stormer VO70 MAPFRE buries into a wave at high speed, slows down and when the apparent…

Video – installing and testing a rope preventer and boom brakes to safely manage accidental gybes
A shout, the mainsheet whips through the cockpit and the boom crashes onto the other side of the boat…
Think of the preventer as a part of your running rigging. It works in opposition to the mainsheet and so needs to be accessible from the cockpit and easy to trim in as you let the mainsail out. For maximum resistance to an involuntary gybe the preventer line should lead from the boom end as far forward as possible, then back to the cockpit.
I often use a forward mooring cleat in lieu of a turning block, making use of the fairlead to avoid toe-rail chafe. If you have no mooring cleats available then use a snatch block on the toe rail or mid-foredeck.
The preventer line should be trimmed from the cockpit using a winch. Often the best winches for this function are halyard winches as they tend not to be in permanent use. This may mean feeding your line under a sprayhood.
If you have absolutely no winches free, then it is also possible to take the line back along the deck to a stern mooring cleat. If choosing this option, check for chafe as the line passes down the deck and ensure the preventer leads into the cleat with a fair or open angle so it can be eased smoothly under load.
As soon as your preventer is rigged, make sure your crew are aware of what to do in the event of a gybe, both planned and accidental. For a planned gybe ease the preventer out as the mainsheet is pulled in. Once the attachment point can be reached safely, a crewmember should detach it, working from the leeward side of the boom in case of an early gybe.
Once gybed, set it up again on the other side. Accidental gybing with a preventer rigged can be alarming, especially in the dark, with the noise made by the sail and the windward heel of the boat. In most cases, if the main loads up from behind, the helmsman should gently steer the boat back onto the original gybe. Be aware that the windward heel caused by the backed mainsail will bear the boat away further, so take action promptly.
In the worst cases, boat speed will slow significantly, and steering the yacht back onto the original gybe becomes impossible. In this case the preventer must be eased under control. Make sure all crew are away from the path of the boom and traveller, then gently ease the preventer with sufficient wraps around the winch to maintain smooth control. Pull in the mainsheet as it becomes slack, then gybe the main as normal.
Boom preventer tips
- Do not tie off the preventer forward. This would require a crew member to go forward for a release in the event of a gybe, whether voluntary or not.
- Resist the temptation to improvise a ‘quick fix’ to avoid pulling in the main by, say, tying vang fittings to the toe rail.
- On longer passages regularly check your preventer for chafe, particularly where it crosses the toe rail, or if you are using a mooring cleat as a turning block.
- A preventer line should be around 1.5 times your boat length and the same diameter as your mainsheet. Double braid polyester is ideal.
First published in the September 2017 edition of Yachting World.
Rigging - Turnbuckles , Toggles , Wire & Rod Components, Norseman Cones & Fittings.
Furling Systems - Systems and replacement parts from a variety of Manufacturers.
Traveller Systems - Adjustable Track Systems for Mainsheet and other applications.
Sailboat Hardware - Rope Clutches, Blocks, Track & Fittings, Winches, etc.
Custom Parts - Custom items, or those out of production or otherwise unavailable.
Consultation - Special projects, research, or information not detailed on-site.
Copyright 1996 - 2024, Rig-Rite, Inc. Disclaimer Web Site maintained by The WATER Group
- BOAT OF THE YEAR
- Newsletters
- Sailboat Reviews
- Boating Safety
- Sailing Totem
- Charter Resources
- Destinations
- Galley Recipes
- Living Aboard
- Sails and Rigging
- Maintenance
- Best Marine Electronics & Technology

Rerigging the Boom
- By Ann Hoffner
- June 15, 2023
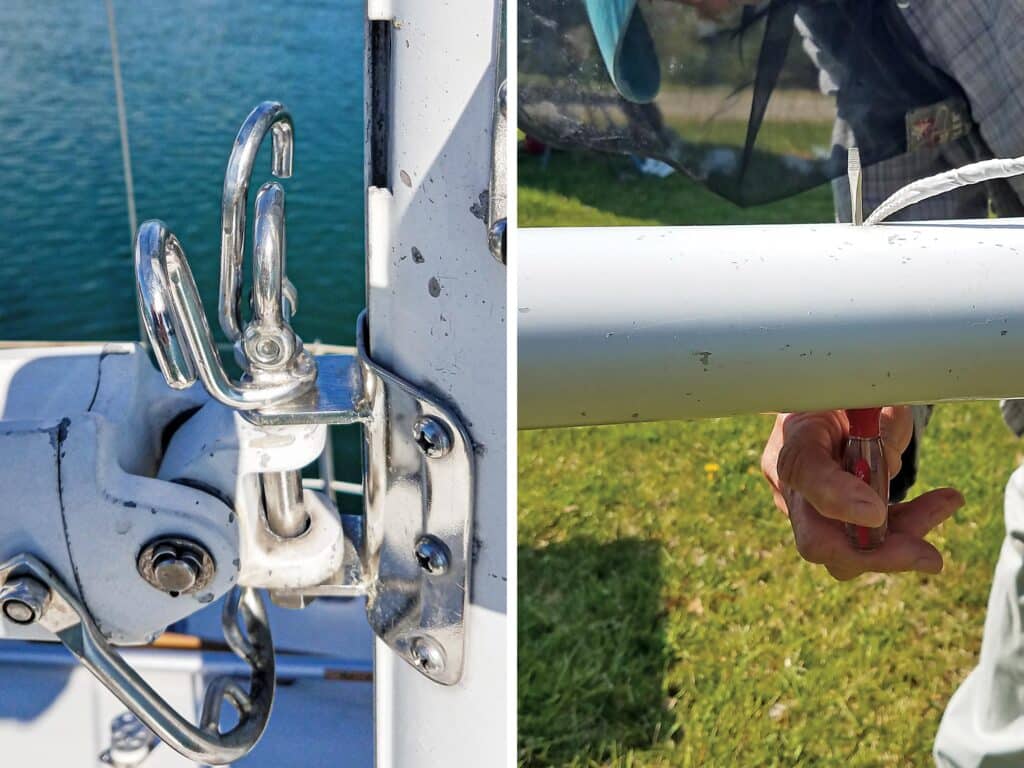
The mainsheet on our new Sabre 30 didn’t look right. It was the middle of a hot, airless July week. We’d bought the boat barely a month earlier, and now we were attempting to get it from New Jersey to Maine. Because of the lack of wind, the mainsail sagged as we motored up Long Island Sound. I had plenty of time to look at Ora Kali ’s boom but not a lot of incentive to solve any problems.
Then one day, we were tied to a mooring in the harbor at Scituate, Massachusetts, cheek by jowl with another Sabre 30. Wow, I realized: Our block-and-tackle arrangement is just wrong.
The weight of the boom and pressure on the mainsail on a small boat are light enough that the connection between boom and hand can be direct, but a boat of any size requires an arrangement of block-and-tackle to make it manageable.
Block-and-tackle reduces the forces necessary both to hold something in place and to lift it. In terms of mainsheet tackle, a block-and-tackle system makes it easier for the person in the cockpit to steady or control the boom and to sheet in the sail when there’s wind.
Ora Kali has three blocks in her mainsheet tackle. While the arrangement on the port side was fine for holding the boom in place, it did not take full advantage of the power for sheeting in. I took down the blocks and rearranged them. The correct arrangement gives a 3-to-1 advantage on the aft block-and-tackle, and employs the forward block mostly for turning.
The sloppy mainsheet tackle setup shouldn’t have been a surprise. This was not the first instance of the boom being rigged wrong. But Ora Kali was in such good shape for a 38-year-old boat when we bought it that I assumed something this basic would be correctly run.
When the seller bent on the sails the day before the sale, I was still dazzled by our good fortune in securing the boat and didn’t take careful notice of what he was doing. A week later, we took down the mainsail before we sailed off to inspect it for wear that might need repair and noticed that the tack cringle was hooked onto one of a pair of hooks normally used when reefing the sail. It became obvious why this was done: The gooseneck fitting was set up backward, putting the attachment point for a tack shackle behind the hooks. Useless. In fact, it turned out there was no tack shackle. It was a simple matter to reposition the reef hook/tack assembly, and I eventually found a tack shackle that fit.
Another puzzle we chose to work around in the interest of setting off for Maine was a barely functioning outhaul. An outhaul is used to tension the foot of the mainsail and attaches to the clew or clew car, then runs to the after end of the boom and around either an internal or external sheave and forward, where it can be adjusted. If the sail is fixed to the boom with slides or bolt rope, as it was on Oddly Enough , our Peterson 44, then an outhaul isn’t crucial for setting the general sail shape. In fact, we rarely touched ours.
With a loose-footed main, the outhaul has more work to do. The Sabre 30 is the first boat I’ve owned with a loose-footed main, and I didn’t understand what the rig was. The rope that attached to the clew car was not the same rope as emerged from an exit plate forward on the boom. When we tried pulling on either end, the car would budge only so far, and we never were able to fully stretch out the loose foot. I assumed that the outhaul had broken and a knot someone had made to add new rope to the original was jamming inside.
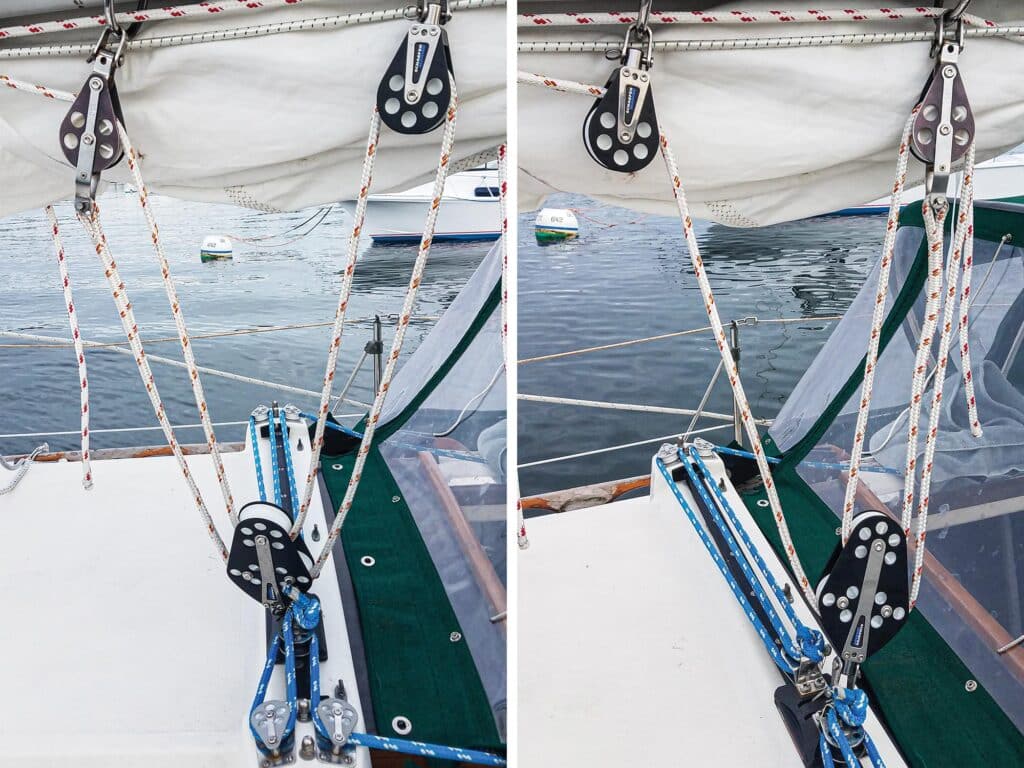
During the spring refit, I looked up in-boom outhaul rigs and saw that they usually include a block-and-tackle to add purchase for adjusting the mainsail foot. This is fixed midway by a bolt through the boom. I took Ora Kali ’s boom end off and discovered that the bolt holding the block had been run right through it rather than through a shackle, keeping it from swiveling. The two pieces of line were too big to run alongside each other freely. Between a seized block and the friction built up in the lines, the outhaul was useless.
The tricky part of this rerigging was snagging the shackle. I used a messenger line to pull the block-and-tackle into approximate position inside the boom, then ran a screwdriver through holes in the boom and the shackle.
The last piece of boom rigging that bothered me was the topping lift. On Ora Kali , this was a fixed length of 7-by-19 wire rope attached at the masthead with a small block at the other end. A Dacron rope ran from a shackle on the end of the boom, up over this block, down to the boom end sheaves, then inside to an exit sheave.
This is a fairly common way of rigging a topping lift, but I’m not a big fan of using wire in running rigging.
The primary purpose of the topping lift is to take the weight off the boom when the sails are furled and for reefing. On my previous cruising boats, I had topping lifts that doubled as a spare main halyard.
To fulfill both of these needs, I replaced the system with a single rope outhaul, shackling one end of the new topping lift to the after end of the boom, leading the other end over an unused masthead sheave, and installing a halyard exit plate at the bottom of the mast for the topping lift to run out and be adjusted. The lift is simpler, which I like, but running it over a masthead sheave puts it more in the way of the mainsail leach. To make sure we ease it when the sail is raised, I plan to bring the bitter end of the topping lift back to the cockpit to an existing set of sheet stoppers and a winch on the coachroof beside the main halyard and the mainsheet.
All in all, I now have a cleaner, more rationally rigged boom.
Ann Hoffner started sailing when she was 9 years old. Along with her husband, Tom Bailey, she spent 10 years cruising on their P-44, Oddly Enough , in the South Pacific, Australia and Borneo. Ora Kali , a nimble, shoal-draft Sabre 30, is now teaching them the joys of Maine coastal cruising.
- More: Hands-On Sailor , How To , Print May 2023 , rigging , sails and rigging
- More How To
How to Rig Everything in Your Favor
Is There a Doctor Aboard?

3 Clutch Sails For Peak Performance
It’s Time to Rethink Your Ditch Kit

Cruising the Northwest Passage
Balance 442 “Lasai” Set to Debut

A Legendary Sail

10 Best Sailing Movies of All Time
- Digital Edition
- Customer Service
- Privacy Policy
- Email Newsletters
- Cruising World
- Sailing World
- Salt Water Sportsman
- Sport Fishing
- Wakeboarding

DWYER MAST & RIGGING
The Aluminum Mast C ompany
Quality Sailboat Masts, Booms, Hardware and Rigging Since 1963
Dwyer Mast & Rigging manufactures high-quality sailboat masts, booms, hardware, and rigging. Originally founded in 1963 as Dwyer Aluminum Mast Company, the legacy continues as an OEM supplier by taking advantage of improved manufacturing methods to offer a wide range of products and services for the marine industry.
Our Services Include
Mast & Boom Extrusions // Dinghy & Keelboat Spars // Standing & Running Rigging // Hardware & Blocks // Round Tubing // OEM Supplier // Waterjet Technology // & more...
Manufacturing for the Marine Industry
Our formula for growth is simple - we never compromise with quality. By taking advantage of improved manufacturing methods and an ever-increasing volume, we have been able to maintain competitive prices and continue to provide much needed product to sailors, riggers, and boat builders.

Products & Servic es

Cont act Us
Wiktionary.org offers this defintion of the word vang .
Although the etymology is all very interesting. The latter is the one we are the most interested in. Below is a good video describing the benefits of the boom vang and when to use it.
[youtube https://www.youtube.com/watch?v=C31nGzO54O4&w=560&h=315]
The Boom Vang , in its simplest form, is a block and tackle arranged in such a fashion that it applies downward force (also upward force, see rigid vang) to the boom. This will allow the sailor to control the tension of the leech at all points of sail, regardless of the boom’s sheet tension.

RIGID VANGS – Most modern day cruisers and racers alike will use a version of this called a rigid vang. A rigid vang, a.k.a. hard vang, or boom kicker, gets its name because it not only is able to haul the boom down but also pushes it up. This is very handy for a few reasons. The ‘main’ reason (pun intended) is it allows the user a quick way to de-power the booms sail if needed and also helps to support the boom much like a boom topping lift. The last part makes reefing, dousing and storing of the boom all a bit easier.
In taking a look at who’s making these rigid vang systems we find no shortage in manufacturers: Boom Kicker , Barton Boom Strut , Bamar Rigid Vang , US Spars/Z Spar Vang , Selden Rod Kicker , Hall Spars Quick Vang , Vang Master , Forespar Yacht Rod , and Sparcraft Vang . Those are just the mechanical vang makers of the world (and I’m sure I’ve missed some).
On the hydraulic end of things, there are far less manufacturers. If your boat is already equipped with a hydraulic system of any kind you’ll likely recognize one of these brands: Navtec , Sailtec , Selden , and Harken , which are all makers of high quality hydraulic systems…including vangs.
Let us just focus on the ones that we know best and sell the most of here at The Rigging Company!

Forespar Yacht Rod is a tried and true system and our most popular model yet. It may not be the lightest or sleekest out there, but this vang has earned it’s rank among one of the most dependable in the rigid vang market. It is well suited for just about any racer/cruiser or dedicated cruising boat out there. The yacht rod uses a dependable coil spring as the return. Forespar vangs are adjustable, utilizing a very coarse adjustment (about every 4″) via a fast pin which allows the user a tool-less way to adjust the spring pre-load or boom kick height. The vang is constructed of one smaller anodized aluminum tube and one larger painted aluminum tube with cast anodized ends. Pricing is around the $870 – $1600 range, and they are available in just 3 different sizes. Mast brackets, block and tackles, boom lugs, all sold separately.

Hall Spars Quick Vang has also been around for a long time. Although Hall USA has recently announced its closing of business , I think shoppers will still find an inventory of these super high quality vangs with various distributors throughout the US. The Hall Spars Quick Vang has always had a great reputation, and their most recent iteration is even better. Typically, this vang is found on racer/cruisers and dedicated racing boats. Although there is no reason this couldn’t be found on a cruising boat in my opinion. This vang also offers a coil spring as the return mechanism. The springs pre-load can be finely adjusted to set the boom’s kick height (hex keys required). It consists of completely anodized aircraft grade aluminum tubing with solid aluminum machined ends. These systems can vary in price from $1000 to $2800 and are available in 7 different sizes/configurations. Purchase block and tackles are always included, varying from 8:1 to 60:1 depending on boat size and sail requirements. As with all of these systems, mast brackets and boom lugs are purchased separately.

Selden Rodkicker vangs have also been around a very long time and are rigged on many different styles of boats. It is likely they are equipped on more boats than any of the other manufacturers, from the club racer/cruiser, to the dedicated match racer, to the varying ranges of production cruising boats found in today’s sailboat market. Selden’s approach is slightly different in that it uses a gas spring (much like your gas strut on your hatchback) as the return. They also use a very attractive rectangular extrusion instead round tubing like Forespar and Hall. Selden’s Rodkicker vang does not offer any spring height adjustment. The ends are made of cast anodized aluminum (like Forespar). Price wise these are some of the most affordable systems on the market, ranging from just under $300 up to $1600 (hence their popularity). The Selden vangs come in 4 different sizes, and offer a soft and hard spring option within each size (they also offer the no spring option, but what’s the point? ). Purchase block and tackles, mast and boom brackets must be bought separately.

Hydraulic Vangs – Amongst the various hydraulic vang manufacturers you will see very similar design, functionality, and construction. It seems that Navtec, who also recently closed their doors , was the grandfather of all sailboat hydraulic system and cylinder design. The three big players left (see links at the top of this article) all have their own unique features and benefits, but are for the most part based on the same (Navtec) design. Whether we are talking about a double acting push pull vangs (reserved primarily for larger yachts with heavy booms) or gas return vangs, the gist is the same. There is a stainless steel piston rod with an aluminum piston that rides inside of an anodized aluminum cylinder/body. This is all accompanied by a series of seals that will need to be serviced/replaced once in while to keep things….sealed. The big deal is that all of these hydraulic vangs require the boat to be plumbed with hoses, a reservoir and a control panel that houses the pressure gauge and pump at a minimum. Besides just a basic vang cylinder (no plumbing, brackets, lugs or panels) costing as much as the most expensive mechanical vang mentioned above, these systems HAVE to be professionally installed thus making them the most expensive, but also the most robust option, by far.
~Some Final Thoughts~
All rigid vangs especially when properly installed and maintained will last a very (very) long time. Keep in mind, typically anything using fluid (and or gas) and seals will require service/ repair over time. One thing that all vangs require, regardless of whether choosing a simple block and tackle, mechanical, or hydraulic system, is for them to be installed properly; ensuring a properly mounted mast bracket and boom lug, rigging the vang in the correct orientation (not upside down), all the while achieving the appropriate boom to vang angle (approximately 30-45 degrees). This will ensure functionality, longevity and ease of use.
Have a question about which system might be right for you? Need your hydraulic vang serviced? Talk to our experienced sales staff for more information.
Thanks for the read. See you next time.
Similar Posts
Views from aloft.
Aloft on the South River at Liberty Marina. I am conducting an aloft inspection for insurance. The boat is a quite large Tayana 55 It turns out that the lower shroud tang has cracked! Bummer. An electric winch and a beautiful day once again from 75′ in the air. Thanks for taking a…
Garcia Yachts
I have always fancied the exploration designed yachts. They just scream heavy duty and robust, which I like for anything I’m going to be sailing around the world. Aluminum has been the choice material for many reputable exploration yachts of the past. Garcia Yachts of France seems to think, “why mess with success”. Take a…
Views From Aloft
Just another day at the office. Here I had to go aloft to take a perfectly good internal halyard that went to a brand new rope clutch and make it external. Don’t ask me why, it is just what the customer wanted. As we always say “as long as it is safe and functional”, it is…
AC and the VOR
Some big news in the two sailing events that will always have my full attention. The Americas Cup has announced the return of the classic (yet modernly equipped) J Class boats for the 35th edition of the Americas cup taking place in 2017, in Bermuda. This will add some class back into the highly modern,…
I am sure if you keep up with the Louis Vuitton Cup you have already seen this. Either way just go ahead and watch 2:09. [youtube=http://www.youtube.com/watch?v=TFjxEfg_mEw&w=420&h=315] W O W!! Thanks to the Americas Cup YouTube feed for allowing us American’s to actually watch some of the AMERICAS CUP! ;-0)
Take a Break from Your Cyber Monday!
[youtube http://www.youtube.com/watch?v=T4Cj-wztyMI?list=SP4D2712YsGHLERzC9eKTGN9WqlAP4qusk&hl=en_US&w=560&h=315] If you need to give your mind a break for a few minutes from the stress of online shopping, then kick back, relax and press play. Enjoy these highlights from day 16 of the Vendee Globe Challenge. The worlds very best sailors challenge each other in these high speed racing machines as they…
Leave a Reply Cancel reply
Your email address will not be published. Required fields are marked *
Save my name, email, and website in this browser for the next time I comment.
Hi, I am chasing a vang for my Cape 35 that supports the boom. Eye to eye for the band is 1700mm. Cheers, John.
We’d be glad to help. Any vang from any of the manufacturers listed in the article should work. Although some have different pin to pin measurements, most are adjustable, and are about the same for the given size unit. Can you send us pictures of what you have now for a boom and a mast attachment? Email [email protected] . Is there a specific manufacturer that you might prefer based on the article? Let us know in an email and we can set you up a complete DIY solution with instructions after we answer a few questions.
Thanks for Choosing…
Greetings, looking for a Hall Spars cast aluminum vang boom lug to replace mine which deformed and failed. It attaches to the underside of the boom with eight 5/16″ machine screws. Older model which came with a 1988 Sabre 38 MkII. Thank you.
Hey Carter, Thanks for contacting us, it took me a while and we’re super busy, but I have some info….
For the boom portion there are still parts available. Pricing is coming your way, but first let me know which on you need the externally mounted one one internally mounted one.
Use [email protected] to let us know which you would like and we’ll will get pricing and ship one out to you.
Thanks and We Hope that Helps, ~T.R.C.
Hi there, thanks for the reply. It’s an external lug with 8 fasteners. Here’s a photo:
https://www.dropbox.com/s/uicq8ctizs3eoyg/20180603_172037.jpg?dl=0
$219 in stock. Give us a call and we’ll get one shipped to you.
I am trouble shooting a Navtec boom vang. Vang does not pressurize. Trying to determine if the cylinder seals need replacing or the actual vang seals.
My advice is that if the cylinder is not holding pressure, you just re-build the entire unit and re-charge the return. Then we test the unit overnight. There are complete seal kits available for this. We recommend professional certified service to do this. Please let us know if we can help further.
Username or Email Address
Remember Me
Lost your password?
Review Cart
No products in the cart.

- Privacy Overview
- Strictly Necessary Cookies
This website uses cookies so that we can provide you with the best user experience possible. Cookie information is stored in your browser and performs functions such as recognising you when you return to our website and helping our team to understand which sections of the website you find most interesting and useful.
Strictly Necessary Cookie should be enabled at all times so that we can save your preferences for cookie settings.
If you disable this cookie, we will not be able to save your preferences. This means that every time you visit this website you will need to enable or disable cookies again.

Beginner’s Guide: How To Rig A Sailboat – Step By Step Tutorial
Alex Morgan

Rigging a sailboat is a crucial process that ensures the proper setup and functioning of a sailboat’s various components. Understanding the process and components involved in rigging is essential for any sailor or boat enthusiast. In this article, we will provide a comprehensive guide on how to rig a sailboat.
Introduction to Rigging a Sailboat
Rigging a sailboat refers to the process of setting up the components that enable the sailboat to navigate through the water using wind power. This includes assembling and positioning various parts such as the mast, boom, standing rigging, running rigging, and sails.
Understanding the Components of a Sailboat Rigging
Before diving into the rigging process, it is important to have a good understanding of the key components involved. These components include:
The mast is the tall vertical spar that provides vertical support to the sails and holds them in place.
The boom is the horizontal spar that runs along the bottom edge of the sail and helps control the shape and position of the sail.
- Standing Rigging:
Standing rigging consists of the wires and cables that support and stabilize the mast, keeping it upright.
- Running Rigging:
Running rigging refers to the lines and ropes used to control the sails, such as halyards, sheets, and control lines.
Preparing to Rig a Sailboat
Before rigging a sailboat, there are a few important steps to take. These include:
- Checking the Weather Conditions:
It is crucial to assess the weather conditions before rigging a sailboat. Unfavorable weather, such as high winds or storms, can make rigging unsafe.
- Gathering the Necessary Tools and Equipment:
Make sure to have all the necessary tools and equipment readily available before starting the rigging process. This may include wrenches, hammers, tape, and other common tools.
- Inspecting the Rigging Components:
In the upcoming sections of this article, we will provide a step-by-step guide on how to rig a sailboat, as well as important safety considerations and tips to keep in mind. By following these guidelines, you will be able to rig your sailboat correctly and safely, allowing for a smooth and enjoyable sailing experience.
Key takeaway:
- Rigging a sailboat maximizes efficiency: Proper rigging allows for optimized sailing performance, ensuring the boat moves smoothly through the water.
- Understanding sailboat rigging components: Familiarity with the various parts of a sailboat rigging, such as the mast, boom, and standing and running riggings, is essential for effective rigging setup.
- Importance of safety in sailboat rigging: Ensuring safety is crucial during the rigging process, including wearing a personal flotation device, securing loose ends and lines, and being mindful of overhead power lines.
Get ready to set sail and dive into the fascinating world of sailboat rigging! We’ll embark on a journey to understand the various components that make up a sailboat’s rigging. From the majestic mast to the nimble boom , and the intricate standing rigging to the dynamic running rigging , we’ll explore the crucial elements that ensure smooth sailing. Not forgetting the magnificent sail, which catches the wind and propels us forward. So grab your sea legs and let’s uncover the secrets of sailboat rigging together.
Understanding the mast is crucial when rigging a sailboat. Here are the key components and steps to consider:
1. The mast supports the sails and rigging of the sailboat. It is made of aluminum or carbon fiber .
2. Before stepping the mast , ensure that the area is clear and the boat is stable. Have all necessary tools and equipment ready.
3. Inspect the mast for damage or wear. Check for corrosion , loose fittings , and cracks . Address any issues before proceeding.
4. To step the mast , carefully lift it into an upright position and insert the base into the mast step on the deck of the sailboat.
5. Secure the mast using the appropriate rigging and fasteners . Attach the standing rigging , such as shrouds and stays , to the mast and the boat’s hull .
Fact: The mast of a sailboat is designed to withstand wind resistance and the tension of the rigging for stability and safe sailing.
The boom is an essential part of sailboat rigging. It is a horizontal spar that stretches from the mast to the aft of the boat. Constructed with durable yet lightweight materials like aluminum or carbon fiber, the boom provides crucial support and has control over the shape and position of the sail. It is connected to the mast through a boom gooseneck , allowing it to pivot. One end of the boom is attached to the mainsail, while the other end is equipped with a boom vang or kicker, which manages the tension and angle of the boom. When the sail is raised, the boom is also lifted and positioned horizontally by using the topping lift or lazy jacks.
An incident serves as a warning that emphasizes the significance of properly securing the boom. In strong winds, an improperly fastened boom swung across the deck, resulting in damage to the boat and creating a safety hazard. This incident highlights the importance of correctly installing and securely fastening all rigging components, including the boom, to prevent accidents and damage.
3. Standing Rigging
When rigging a sailboat, the standing rigging plays a vital role in providing stability and support to the mast . It consists of several key components, including the mast itself, along with the shrouds , forestay , backstay , and intermediate shrouds .
The mast, a vertical pole , acts as the primary support structure for the sails and the standing rigging. Connected to the top of the mast are the shrouds , which are cables or wires that extend to the sides of the boat, providing essential lateral support .
The forestay is another vital piece of the standing rigging. It is a cable or wire that runs from the top of the mast to the bow of the boat, ensuring forward support . Similarly, the backstay , also a cable or wire, runs from the mast’s top to the stern of the boat, providing important backward support .
To further enhance the rig’s stability , intermediate shrouds are installed. These additional cables or wires are positioned between the main shrouds, as well as the forestay or backstay. They offer extra support , strengthening the standing rigging system.
Regular inspections of the standing rigging are essential to detect any signs of wear, such as fraying or corrosion . It is crucial to ensure that all connections within the rig are tight and secure, to uphold its integrity. Should any issues be identified, immediate attention must be given to prevent accidents or damage to the boat. Prioritizing safety is of utmost importance when rigging a sailboat, thereby necessitating proper maintenance of the standing rigging. This ensures a safe and enjoyable sailing experience.
Note: <p> tags have been kept intact.
4. Running Rigging
Running Rigging
When rigging a sailboat, the running rigging is essential for controlling the sails and adjusting their position. It is important to consider several aspects when dealing with the running rigging.
1. Choose the right rope: The running rigging typically consists of ropes with varying properties such as strength, stretch, and durability. Weather conditions and sailboat size should be considered when selecting the appropriate rope.
2. Inspect and maintain the running rigging: Regularly check for signs of wear, fraying, or damage. To ensure safety and efficiency, replace worn-out ropes.
3. Learn essential knot tying techniques: Having knowledge of knots like the bowline, cleat hitch, and reef knot is crucial for securing the running rigging and adjusting sails.
4. Understand different controls: The running rigging includes controls such as halyards, sheets, and control lines. Familiarize yourself with their functions and proper usage to effectively control sail position and tension.
5. Practice proper sail trimming: Adjusting the tension of the running rigging significantly affects sailboat performance. Mastering sail trimming techniques will help optimize sail shape and maximize speed.
By considering these factors and mastering running rigging techniques, you can enhance your sailing experience and ensure the safe operation of your sailboat.
The sail is the central component of sailboat rigging as it effectively harnesses the power of the wind to propel the boat.
When considering the sail, there are several key aspects to keep in mind:
– Material: Sails are typically constructed from durable and lightweight materials such as Dacron or polyester. These materials provide strength and resistance to various weather conditions.
– Shape: The shape of the sail plays a critical role in its overall performance. A well-shaped sail should have a smooth and aerodynamic profile, which allows for maximum efficiency in capturing wind power.
– Size: The size of the sail is determined by its sail area, which is measured in square feet or square meters. Larger sails have the ability to generate more power, but they require greater skill and experience to handle effectively.
– Reefing: Reefing is the process of reducing the sail’s size to adapt to strong winds. Sails equipped with reefing points allow sailors to decrease the sail area, providing better control in challenging weather conditions.
– Types: There are various types of sails, each specifically designed for different purposes. Common sail types include mainsails, jibs, genoas, spinnakers, and storm sails. Each type possesses its own unique characteristics and is utilized under specific wind conditions.
Understanding the sail and its characteristics is vital for sailors, as it directly influences the boat’s speed, maneuverability, and overall safety on the water.
Getting ready to rig a sailboat requires careful preparation and attention to detail. In this section, we’ll dive into the essential steps you need to take before setting sail. From checking the weather conditions to gathering the necessary tools and equipment, and inspecting the rigging components, we’ll ensure that you’re fully equipped to navigate the open waters with confidence. So, let’s get started on our journey to successfully rigging a sailboat!
1. Checking the Weather Conditions
Checking the weather conditions is crucial before rigging a sailboat for a safe and enjoyable sailing experience. Monitoring the wind speed is important in order to assess the ideal sailing conditions . By checking the wind speed forecast , you can determine if the wind is strong or light . Strong winds can make sailboat control difficult, while very light winds can result in slow progress.
Another important factor to consider is the wind direction . Assessing the wind direction is crucial for route planning and sail adjustment. Favorable wind direction helps propel the sailboat efficiently, making your sailing experience more enjoyable.
In addition to wind speed and direction, it is also important to consider weather patterns . Keep an eye out for impending storms or heavy rain. It is best to avoid sailing in severe weather conditions that may pose a safety risk. Safety should always be a top priority when venturing out on a sailboat.
Another aspect to consider is visibility . Ensure good visibility by checking for fog, haze, or any other conditions that may hinder navigation. Clear visibility is important for being aware of other boats and potential obstacles that may come your way.
Be aware of the local conditions . Take into account factors such as sea breezes, coastal influences, or tidal currents. These local factors greatly affect sailboat performance and safety. By considering all of these elements, you can have a successful and enjoyable sailing experience.
Here’s a true story to emphasize the importance of checking the weather conditions. One sunny afternoon, a group of friends decided to go sailing. Before heading out, they took the time to check the weather conditions. They noticed that the wind speed was expected to be around 10 knots, which was perfect for their sailboat. The wind direction was coming from the northwest, allowing for a pleasant upwind journey. With clear visibility and no approaching storms, they set out confidently, enjoying a smooth and exhilarating sail. This positive experience was made possible by their careful attention to checking the weather conditions beforehand.
2. Gathering the Necessary Tools and Equipment
To efficiently gather all of the necessary tools and equipment for rigging a sailboat, follow these simple steps:
- First and foremost, carefully inspect your toolbox to ensure that you have all of the basic tools such as wrenches, screwdrivers, and pliers.
- Make sure to check if you have a tape measure or ruler available as they are essential for precise measurements of ropes or cables.
- Don’t forget to include a sharp knife or rope cutter in your arsenal as they will come in handy for cutting ropes or cables to the desired lengths.
- Gather all the required rigging hardware including shackles, pulleys, cleats, and turnbuckles.
- It is always prudent to check for spare ropes or cables in case replacements are needed during the rigging process.
- If needed, consider having a sailing knife or marlinspike tool for splicing ropes or cables.
- For rigging a larger sailboat, it is crucial to have a mast crane or hoist to assist with stepping the mast.
- Ensure that you have a ladder or some other means of reaching higher parts of the sailboat, such as the top of the mast.
Once, during the preparation of rigging my sailboat, I had a moment of realization when I discovered that I had forgotten to bring a screwdriver . This unfortunate predicament occurred while I was in a remote location with no nearby stores. Being resourceful, I improvised by utilizing a multipurpose tool with a small knife blade, which served as a makeshift screwdriver. Although it was not the ideal solution, it allowed me to accomplish the task. Since that incident, I have learned the importance of double-checking my toolbox before commencing any rigging endeavor. This practice ensures that I have all of the necessary tools and equipment, preventing any unexpected surprises along the way.
3. Inspecting the Rigging Components
Inspecting the rigging components is essential for rigging a sailboat safely. Here is a step-by-step guide on inspecting the rigging components:
1. Visually inspect the mast, boom, and standing rigging for damage, such as corrosion, cracks, or loose fittings.
2. Check the tension of the standing rigging using a tension gauge. It should be within the recommended range from the manufacturer.
3. Examine the turnbuckles, clevis pins, and shackles for wear or deformation. Replace any damaged or worn-out hardware.
4. Inspect the running rigging, including halyards and sheets, for fraying, signs of wear, or weak spots. Replace any worn-out lines.
5. Check the sail for tears, wear, or missing hardware such as grommets or luff tape.
6. Pay attention to the connections between the standing rigging and the mast. Ensure secure connections without any loose or missing cotter pins or rigging screws.
7. Inspect all fittings, such as mast steps, spreader brackets, and tangs, to ensure they are securely fastened and in good condition.
8. Conduct a sea trial to assess the rigging’s performance and make necessary adjustments.
Regularly inspecting the rigging components is crucial for maintaining the sailboat’s rigging system’s integrity, ensuring safe sailing conditions, and preventing accidents or failures at sea.
Once, I went sailing on a friend’s boat without inspecting the rigging components beforehand. While at sea, a sudden gust of wind caused one of the shrouds to snap. Fortunately, no one was hurt, but we had to cut the sail loose and carefully return to the marina. This incident taught me the importance of inspecting the rigging components before sailing to avoid unforeseen dangers.
Step-by-Step Guide on How to Rig a Sailboat
Get ready to set sail with our step-by-step guide on rigging a sailboat ! We’ll take you through the process from start to finish, covering everything from stepping the mast to setting up the running rigging . Learn the essential techniques and tips for each sub-section, including attaching the standing rigging and installing the boom and sails . Whether you’re a seasoned sailor or a beginner, this guide will have you ready to navigate the open waters with confidence .
1. Stepping the Mast
To step the mast of a sailboat, follow these steps:
1. Prepare the mast: Position the mast near the base of the boat.
2. Attach the base plate: Securely fasten the base plate to the designated area on the boat.
3. Insert the mast step: Lower the mast step into the base plate and align it with the holes or slots.
4. Secure the mast step: Use fastening screws or bolts to fix the mast step in place.
5. Raise the mast: Lift the mast upright with the help of one or more crew members.
6. Align the mast: Adjust the mast so that it is straight and aligned with the boat’s centerline.
7. Attach the shrouds: Connect the shrouds to the upper section of the mast, ensuring proper tension.
8. Secure the forestay: Attach the forestay to the bow of the boat, ensuring it is securely fastened.
9. Final adjustments: Check the tension of the shrouds and forestay, making any necessary rigging adjustments.
Following these steps ensures that the mast is properly stepped and securely in place, allowing for a safe and efficient rigging process. Always prioritize safety precautions and follow manufacturer guidelines for your specific sailboat model.
2. Attaching the Standing Rigging
To attach the standing rigging on a sailboat, commence by preparing the essential tools and equipment, including wire cutters, crimping tools, and turnbuckles.
Next, carefully inspect the standing rigging components for any indications of wear or damage.
After inspection, fasten the bottom ends of the shrouds and stays to the chainplates on the deck.
Then, securely affix the top ends of the shrouds and stays to the mast using adjustable turnbuckles .
To ensure proper tension, adjust the turnbuckles accordingly until the mast is upright and centered.
Utilize a tension gauge to measure the tension in the standing rigging, aiming for around 15-20% of the breaking strength of the rigging wire.
Double-check all connections and fittings to verify their security and proper tightness.
It is crucial to regularly inspect the standing rigging for any signs of wear or fatigue and make any necessary adjustments or replacements.
By diligently following these steps, you can effectively attach the standing rigging on your sailboat, ensuring its stability and safety while on the water.
3. Installing the Boom and Sails
To successfully complete the installation of the boom and sails on a sailboat, follow these steps:
1. Begin by securely attaching the boom to the mast. Slide it into the gooseneck fitting and ensure it is firmly fastened using a boom vang or another appropriate mechanism.
2. Next, attach the main sail to the boom. Slide the luff of the sail into the mast track and securely fix it in place using sail slides or cars.
3. Connect the mainsheet to the boom. One end should be attached to the boom while the other end is connected to a block or cleat on the boat.
4. Proceed to attach the jib or genoa. Make sure to securely attach the hanks or furler line to the forestay to ensure stability.
5. Connect the jib sheets. One end of each jib sheet should be attached to the clew of the jib or genoa, while the other end is connected to a block or winch on the boat.
6. Before setting sail, it is essential to thoroughly inspect all lines and connections. Ensure that they are properly tensioned and that all connections are securely fastened.
During my own experience of installing the boom and sails on my sailboat, I unexpectedly encountered a strong gust of wind. As a result, the boom began swinging uncontrollably, requiring me to quickly secure it to prevent any damage. This particular incident served as a vital reminder of the significance of properly attaching and securing the boom, as well as the importance of being prepared for unforeseen weather conditions while rigging a sailboat.
4. Setting Up the Running Rigging
Setting up the running rigging on a sailboat involves several important steps. First, attach the halyard securely to the head of the sail. Then, connect the sheets to the clew of the sail. If necessary, make sure to secure the reefing lines . Attach the outhaul line to the clew of the sail and connect the downhaul line to the tack of the sail. It is crucial to ensure that all lines are properly cleated and organized. Take a moment to double-check the tension and alignment of each line. If you are using a roller furling system, carefully wrap the line around the furling drum and securely fasten it. Perform a thorough visual inspection of the running rigging to check for any signs of wear or damage. Properly setting up the running rigging is essential for safe and efficient sailing. It allows for precise control of the sail’s position and shape, ultimately optimizing the boat’s performance on the water.
Safety Considerations and Tips
When it comes to rigging a sailboat, safety should always be our top priority. In this section, we’ll explore essential safety considerations and share some valuable tips to ensure smooth sailing. From the importance of wearing a personal flotation device to securing loose ends and lines, and being cautious around overhead power lines, we’ll equip you with the knowledge and awareness needed for a safe and enjoyable sailing experience. So, let’s set sail and dive into the world of safety on the water!
1. Always Wear a Personal Flotation Device
When rigging a sailboat, it is crucial to prioritize safety and always wear a personal flotation device ( PFD ). Follow these steps to properly use a PFD:
- Select the appropriate Coast Guard-approved PFD that fits your size and weight.
- Put on the PFD correctly by placing your arms through the armholes and securing all the straps for a snug fit .
- Adjust the PFD for comfort , ensuring it is neither too tight nor too loose, allowing freedom of movement and adequate buoyancy .
- Regularly inspect the PFD for any signs of wear or damage, such as tears or broken straps, and replace any damaged PFDs immediately .
- Always wear your PFD when on or near the water, even if you are a strong swimmer .
By always wearing a personal flotation device and following these steps, you will ensure your safety and reduce the risk of accidents while rigging a sailboat. Remember, prioritize safety when enjoying water activities.
2. Secure Loose Ends and Lines
Inspect lines and ropes for frayed or damaged areas. Secure loose ends and lines with knots or appropriate cleats or clamps. Ensure all lines are properly tensioned to prevent loosening during sailing. Double-check all connections and attachments for security. Use additional safety measures like extra knots or stopper knots to prevent line slippage.
To ensure a safe sailing experience , it is crucial to secure loose ends and lines properly . Neglecting this important step can lead to accidents or damage to the sailboat. By inspecting, securing, and tensioning lines , you can have peace of mind knowing that everything is in place. Replace or repair any compromised lines or ropes promptly. Securing loose ends and lines allows for worry-free sailing trips .
3. Be Mindful of Overhead Power Lines
When rigging a sailboat, it is crucial to be mindful of overhead power lines for safety. It is important to survey the area for power lines before rigging the sailboat. Maintain a safe distance of at least 10 feet from power lines. It is crucial to avoid hoisting tall masts or long antenna systems near power lines to prevent contact. Lower the mast and tall structures when passing under a power line to minimize the risk of contact. It is also essential to be cautious in areas where power lines run over the water and steer clear to prevent accidents.
A true story emphasizes the importance of being mindful of overhead power lines. In this case, a group of sailors disregarded safety precautions and their sailboat’s mast made contact with a low-hanging power line, resulting in a dangerous electrical shock. Fortunately, no serious injuries occurred, but it serves as a stark reminder of the need to be aware of power lines while rigging a sailboat.
Some Facts About How To Rig A Sailboat:
- ✅ Small sailboat rigging projects can improve sailing performance and save money. (Source: stingysailor.com)
- ✅ Rigging guides are available for small sailboats, providing instructions and tips for rigging. (Source: westcoastsailing.net)
- ✅ Running rigging includes lines used to control and trim the sails, such as halyards and sheets. (Source: sailingellidah.com)
- ✅ Hardware used in sailboat rigging includes winches, blocks, and furling systems. (Source: sailingellidah.com)
- ✅ A step-by-step guide can help beginners rig a small sailboat for sailing. (Source: tripsavvy.com)
Frequently Asked Questions
1. how do i rig a small sailboat.
To rig a small sailboat, follow these steps: – Install or check the rudder, ensuring it is firmly attached. – Attach or check the tiller, the long steering arm mounted to the rudder. – Attach the jib halyard by connecting the halyard shackle to the head of the sail and the grommet in the tack to the bottom of the forestay. – Hank on the jib by attaching the hanks of the sail to the forestay one at a time. – Run the jib sheets by tying or shackling them to the clew of the sail and running them back to the cockpit. – Attach the mainsail by spreading it out and attaching the halyard shackle to the head of the sail. – Secure the tack, clew, and foot of the mainsail to the boom using various lines and mechanisms. – Insert the mainsail slugs into the mast groove, gradually raising the mainsail as the slugs are inserted. – Cleat the main halyard and lower the centerboard into the water. – Raise the jib by pulling down on the jib halyard and cleating it on the other side of the mast. – Tighten the mainsheet and one jibsheet to adjust the sails and start moving forward.
2. What are the different types of sailboat rigs?
Sailboat rigs can be classified into three main types: – Sloop rig: This rig has a single mast with a mainsail and a headsail, typically a jib or genoa. – Cutter rig: This rig has two headsails, a smaller jib or staysail closer to the mast, and a larger headsail, usually a genoa, forward of it, alongside a mainsail. – Ketch rig: This rig has two masts, with the main mast taller than the mizzen mast. It usually has a mainsail, headsail, and a mizzen sail. Each rig has distinct characteristics and is suitable for different sailing conditions and preferences.
3. What are the essential parts of a sailboat?
The essential parts of a sailboat include: – Mast: The tall vertical spar that supports the sails. – Boom: The horizontal spar connected to the mast, which extends outward and supports the foot of the mainsail. – Rudder: The underwater appendage that steers the boat. – Centerboard or keel: A retractable or fixed fin-like structure that provides stability and prevents sideways drift. – Sails: The fabric structures that capture the wind’s energy to propel the boat. – Running rigging: The lines or ropes used to control the sails and sailing equipment. – Standing rigging: The wires and cables that support the mast and reinforce the spars. These are the basic components necessary for the functioning of a sailboat.
4. What is a spinnaker halyard?
A spinnaker halyard is a line used to hoist and control a spinnaker sail. The spinnaker is a large, lightweight sail that is used for downwind sailing or reaching in moderate to strong winds. The halyard attaches to the head of the spinnaker and is used to raise it to the top of the mast. Once hoisted, the spinnaker halyard can be adjusted to control the tension and shape of the sail.
5. Why is it important to maintain and replace worn running rigging?
It is important to maintain and replace worn running rigging for several reasons: – Safety: Worn or damaged rigging can compromise the integrity and stability of the boat, posing a safety risk to both crew and vessel. – Performance: Worn rigging can affect the efficiency and performance of the sails, diminishing the boat’s speed and maneuverability. – Reliability: Aging or worn rigging is more prone to failure, which can lead to unexpected problems and breakdowns. Regular inspection and replacement of worn running rigging is essential to ensure the safe and efficient operation of a sailboat.
6. Where can I find sailboat rigging books or guides?
There are several sources where you can find sailboat rigging books or guides: – Online: Websites such as West Coast Sailing and Stingy Sailor offer downloadable rigging guides for different sailboat models. – Bookstores: Many bookstores carry a wide selection of boating and sailing books, including those specifically focused on sailboat rigging. – Sailing schools and clubs: Local sailing schools or yacht clubs often have resources available for learning about sailboat rigging. – Manufacturers: Some sailboat manufacturers, like Hobie Cat and RS Sailing, provide rigging guides for their specific sailboat models. Consulting these resources can provide valuable information and instructions for rigging your sailboat properly.
About the author
Leave a Reply Cancel reply
Your email address will not be published. Required fields are marked *
Save my name, email, and website in this browser for the next time I comment.
Latest posts

The history of sailing – from ancient times to modern adventures
History of Sailing Sailing is a time-honored tradition that has evolved over millennia, from its humble beginnings as a means of transportation to a beloved modern-day recreational activity. The history of sailing is a fascinating journey that spans cultures and centuries, rich in innovation and adventure. In this article, we’ll explore the remarkable evolution of…

Sailing Solo: Adventures and Challenges of Single-Handed Sailing
Solo Sailing Sailing has always been a pursuit of freedom, adventure, and self-discovery. While sailing with a crew is a fantastic experience, there’s a unique allure to sailing solo – just you, the wind, and the open sea. Single-handed sailing, as it’s often called, is a journey of self-reliance, resilience, and the ultimate test of…

Sustainable Sailing: Eco-Friendly Practices on the boat
Eco Friendly Sailing Sailing is an exhilarating and timeless way to explore the beauty of the open water, but it’s important to remember that our oceans and environment need our protection. Sustainable sailing, which involves eco-friendly practices and mindful decision-making, allows sailors to enjoy their adventures while minimizing their impact on the environment. In this…

- Forums New posts Unanswered threads Register Top Posts Email
- What's new New posts New Posts (legacy) Latest activity New media
- Media New media New comments
- Boat Info Downloads Weekly Quiz Topic FAQ 10000boatnames.com
- Classifieds Sell Your Boat Used Gear for Sale
- Parts General Marine Parts Hunter Beneteau Catalina MacGregor Oday
- Help Terms of Use Monday Mail Subscribe Monday Mail Unsubscribe
Boom rigging
- Thread starter John6275
- Start date Oct 18, 2019
- Forums for All Owners
- Trailer Sailors
My wife and I are new to sailing. We are currently studying course material for a sail in learn in St Vincent the first part of December. We bought a Johnson 18 Weekender to have a step up when we started the course as it will be 101, 103, 104 and 114. There were only about 20 to 24 of these made, so very little on line. I'm sure my issue is generic so I'm looking for some help here. The boat did not come with a boom-vang attached but I believe I found the system intended for it. IN addition there is nothing rigged on the rear of the boom for reefing the main. However, there is a pulley as well as cleat near the stern end of the boom. I am going to attach photos of the boom and points in hope someone can help me install what I need. Hopefully someone has a similar boom set up and can send me some pics. Thanks for the help.
Attachments

I'll take a shot... I edited your photos to make it more simple. The red line is where the boom vang attaches to the mast and boom. The blue line is for jiffy reefing. The line should start from the padeye on the end of the boom, go up to the reef point on the sail, down to a block on the opposite side of the boom, and forward to the cleat. This setup was very similar to what was on my 17' O'Day DaySailer. And the last photo is the boom vang on my Siren, just to give you an idea what one looks like.

First of all welcome to the forum and also to the sailing community in general. I don’t see a pulley near the end of the boom for reefing. What makes sense from what I see is you tie a length of line to the padeye on the boom I see in the last photo. The line would run up and through the reef cringle (grommet in the sail), then down the other side, through the cheek block (pulley that you mention) and to the cleat I see in photo 2. To reef you lower the sail, hook the forward cringle over the horn and retighten the mainsail halyard, tighten the reef line and sail on. With the cleat near the mast on the boom you can reach everything from the cockpit. There are some other things I see in the photos that have me curious as to their purpose. There is a cable tied off to the bail on the mast?? There is a rope and what appears to be a cable tied to the aft end of the boom in photo 5??? Hope this helps.
thanks to you both. Added a couple more pics. So, the reefing line will attach on the starboard side of the boom aft, at the cleat (not sure what that type of point is called as I have not seen it in any of the books yet) and go up through the reef cringle and then down to the pully on port side aft on the boom. Then run forward to the cleat on the port side near the gooseneck on the boom.....correct? The new pic of the blue sheet system is I believe for the boom-vang. Not sure what the one cleat on the starboard side of the boom is for near the gooseneck. Unless it is for the end of the line through the outhaul, which is not that long. I believe something might be missing on aft end of boom but not sure. The line around the end of the boom is attached to the topping lift. Not sure if that's the norm on this type or not. Attaching a pic of boat the day we got it. Still cleaning and fixing on it but we are using it.

"There are some other things I see in the photos that have me curious as to their purpose. There is a cable tied off to the bail on the mast?? There is a rope and what appears to be a cable tied to the aft end of the boom in photo 5???" The line and cable on base of mast is how they had the haylards tied off to keep them from going over the top pulley. I believe that one is for the jib. On the aft of the boom is the line I mentioned above and the cable and pulley are for the outhaul....I believe.
John6275 said: thanks to you both. Added a couple more pics. So, the reefing line will attach on the starboard side of the boom aft, at the cleat (not sure what that type of point is called as I have not seen it in any of the books yet) PADEYE and go up through the reef cringle and then down to the pully CHEEK BLOCK on port side aft on the boom. Then run forward to the cleat on the port side near the gooseneck on the boom.....correct? CORRECT The new pic of the blue sheet system is I believe for the boom-vang. CORRECT Not sure what the one cleat on the starboard side of the boom is for near the gooseneck. ( I see a grey colored jam cleat on the port side but no cleat at all on the starboard? The jamb cleat is for the end of the reefing line) Unless it is for the end of the line through the outhaul, which is not that long. (How is the outhaul cleated now?) I believe something might be missing on aft end of boom but not sure. The line around the end of the boom is attached to the topping lift. Not sure if that's the norm on this type or not. (you don't have a rigid vang to hold the boom up when you drop the main so it's normal to have a topping lift for that purpose otherwise the aft end of the boom ends up on the cockpit floor. An adjustable topping lift can also be used to shape the sail in light wind) Attaching a pic of boat the day we got it. Still cleaning and fixing on it but we are using it. Click to expand
John6275 said: "There are some other things I see in the photos that have me curious as to their purpose. There is a cable tied off to the bail on the mast?? There is a rope and what appears to be a cable tied to the aft end of the boom in photo 5???" This is in your boatpic6.jpg The one piece is the line you define as your topping lift. Just aft of that is the shiny line that looks like a cable with sun reflecting off of it?? The line and cable on base of mast is how they had the haylards tied off to keep them from going over the top pulley. I believe that one is for the jib. (Makes sense now) On the aft of the boom is the line I mentioned above and the cable and pulley are for the outhaul....I believe. Click to expand
Hunter216 said: My comments/questions in RED Click to expand
The shiny cable is the back stay before it gets down to the pulley and splits. Thanks for your help as well. Hoping to attach a reefing line Sunday and take her back out.
John6275 said: The shiny cable is the back stay before it gets down to the pulley and splits. Thanks for your help as well. Hoping to attach a reefing line Sunday and take her back out. Click to expand
Hunter216 said: I was just looking at the full boat photo and was curious if the black object in the attached photo is a furling drum for the headsail? View attachment 171007 If you have a split backstay (typically a single cable from top of mast to a tang and then two cables leading to the corners at the stern) you might also have or could have a backstay adjuster. Basically a set of rollers and a block and tackle rig that let you “squeeze” the two short cables together putting more/less adjustable tension in the backstay. The purpose is to shape the sails as the adjuster lets you move the tip of the mast. This illustration is a little elaborate but it will give you the idea. View attachment 171008 Click to expand
I hope I’m not stepping out of line but the cables that support the mast (shrouds - stays) look sort of kinked in the full boat photo. I would recommend inspecting them carefully for any signs of damage (broken strands etc). Hard to do if the mast is stepped and they are under tension, easier and safer to check when the mast is down. If you trailer each time you sail and the “cables” are too long to just lash to the mast you can coil them carefully and secure that way for travel, just don’t bend them.
John6275 said: Yes, that's is a small roller furler for the jib My back stay comes down and connects to a pulley. Through that pulley is another cable anchored on the port side and then attached on the starboard side with a pulley- cleat like set up. Kinda like the main sheet or boom-vang. Was wondering if that is done correctly as well. I will post a pic of when I have it out and up Sunday. Let me know if I need to change something. Trying to get things set up correctly. Click to expand
Hunter216 said: I hope I’m not stepping out of line but the cables that support the mast (shrouds - stays) look sort of kinked in the full boat photo. I would recommend inspecting them carefully for any signs of damage (broken strands etc). Hard to do if the mast is stepped and they are under tension, easier and safer to check when the mast is down. If you trailer each time you sail and the “cables” are too long to just lash to the mast you can coil them carefully and secure that way for travel, just don’t bend them. Click to expand
John6275 said: So they usually all come off? Click to expand
Please, I know this may sound trivial, but if I hear the term "pulley" anymore, especially from our "experienced" forum members, I'm gonna scream! Here's some pictures.... You don't really need a high powered backstay adjuster on a boat this size.... some of the pictures show a mid cockpit traveler, others show the split mainsheet version with no traveler to allow space for the tiller.... study the pictures... try linking to various ones to get more.
Hunter216 said: The idea is to not kink the cable at any time, doing so can weaken it and if it breaks bad stuff happens The other issue is you don’t want them flopping around during transport. So having said that you don’t have to remove them any more than it takes to store them safely for transport. I would probably leave the cables going through the spreaders on and remove the pins that connect the turnbuckles to the hull. Pull the turnbuckle end down to the mast base and determine if you need to coil any excess If you don’t want to coil or the excess is just a little long you can lash a 2X2 or suitable size piece of wood to the side if the mast and then lash the cables to it. Nice straight lines with no sharp bends is what your after. Click to expand
John6275 said: I will look into tomorrow and get some more pics. I have note noticed any kinks but I want to be sure now. Click to expand
Well weather was beautiful today but no wind so no sailing and no pics. I did replace my main and jib halyard lines as well as the jib furler line. As my small boat has no extra cleats I'm curious how much extra line should I have on each halyard and how much is too much extra? The PO had both rigged where they tied together at the base of the mast in a mess but kept excess up and ends from coming loose and over the mast head. Probably not a bad idea but I'm sure not the right way from what I'm studying now. However , I have no place to hang excess line but maybe I could add some cleats to the mast? Also, it appears my main sail should have slugs on the luff to slide up the mast and mine does not. Going to set the mast tomorrow and check these things out, take some pics and post for help and direction.
I was looking up the very same information the other day! The rule of thumb with jib sheets is 1.5 times the boat length, or sufficient length that the lazy sheet can reach the clew other side of the boat. As for the mainsheet, it needs to be long enough to allow the boom to achieve a broad reach and still have about four feet left in the cockpit. It appears in your photos that your mainsail has a bolt rope. You can feed it into the mast opening, the same as you would with slugs. You can add slugs to the sail if you like, which allow for easier hoisting and furling.
- This site uses cookies to help personalise content, tailor your experience and to keep you logged in if you register. By continuing to use this site, you are consenting to our use of cookies. Accept Learn more…
- New Sailboats
- Sailboats 21-30ft
- Sailboats 31-35ft
- Sailboats 36-40ft
- Sailboats Over 40ft
- Sailboats Under 21feet
- used_sailboats
- Apps and Computer Programs
- Communications
- Fishfinders
- Handheld Electronics
- Plotters MFDS Rradar
- Wind, Speed & Depth Instruments
- Anchoring Mooring
- Running Rigging
- Sails Canvas
- Standing Rigging
- Diesel Engines
- Off Grid Energy
- Cleaning Waxing
- DIY Projects
- Repair, Tools & Materials
- Spare Parts
- Tools & Gadgets
- Cabin Comfort
- Ventilation
- Footwear Apparel
- Foul Weather Gear
- Mailport & PS Advisor
- Inside Practical Sailor Blog
- Activate My Web Access
- Reset Password
- Pay My Bill
- Customer Service

- Free Newsletter
- Give a Gift

How to Sell Your Boat

Cal 2-46: A Venerable Lapworth Design Brought Up to Date

Rhumb Lines: Show Highlights from Annapolis

Open Transom Pros and Cons

Leaping Into Lithium

The Importance of Sea State in Weather Planning

Do-it-yourself Electrical System Survey and Inspection

Install a Standalone Sounder Without Drilling

When Should We Retire Dyneema Stays and Running Rigging?
Rethinking MOB Prevention

Top-notch Wind Indicators

The Everlasting Multihull Trampoline
Check Your Shorepower System for Hidden Dangers
How Dangerous is Your Shore Power?

DIY survey of boat solar and wind turbine systems

What’s Involved in Setting Up a Lithium Battery System?
The Scraper-only Approach to Bottom Paint Removal

Can You Recoat Dyneema?

Gonytia Hot Knife Proves its Mettle
How to Handle the Head

The Day Sailor’s First-Aid Kit
Choosing and Securing Seat Cushions

Cockpit Drains on Race Boats

Re-sealing the Seams on Waterproof Fabrics

Safer Sailing: Add Leg Loops to Your Harness

Waxing and Polishing Your Boat

Reducing Engine Room Noise

Tricks and Tips to Forming Do-it-yourself Rigging Terminals

Marine Toilet Maintenance Tips

Learning to Live with Plastic Boat Bits
- Safety & Seamanship
- Sails, Rigging & Deck Gear
Tools to Tame the Jibe
Boom brakes and shock-absorbing accessories get a mixed review..
The loads of a flying jibe in late summer squall are enough to shred sails, rip out deck or boom fittings, bend or break the boom gooseneck, or even bend the boom itself. The novice sailor learns very quickly to be wary of an unintentional jibe.
There are three approaches to minimizing the carnage of an unintentional jibe. The first method is to use a preventer. The second method is to slow the boom by using a braking device. Common braking devices use a control rope and a friction-device to provide adjustable restraining force. Finally, you can use more elastic lines in your running rigging (mainsheet and/or traveler) or add short nylon snubbers in your existing running rigging to absorb some of the shock.
What We Tested
We tested two types of load-reducing devices: shock absorbers that reduce the peak loads on the mainsheet and associated hardware; and friction devices (brakes) that rein in the boom as it crosses the deck. Weve looked at both types of devices before. In Testing a Dynamic Travele r ( Practical Sailor , January 2016), we evaluated the effect of using a moderately elastic climbing rope for the traveler line. In What Can a Boom Brake Do For You? ( Practical Sailor , January 1994), we looked at the Walder Boom Brake and the Dutchman Boom Brake introduced by Martin Van Breems, developer of the Dutchman sail-flaking system (see “T aming the Main ,” PS February 2008).
Among the shock-absorber approaches, we tried climbing rope in three configurations: in the traveler, as a snubber between the mainsheet fiddle block and boom bail, and finally, as a replacement for the mainsheet itself. We also tested the Gybe Tamer GT-3, a pneumatic tension device.
In the friction device category, we looked at a climbers figure-8 device and Captain Dons Boom Brake, which is a marine version of the climbers figure-8. (The French company Wichard makes a similar, the Gyb’Easy, that we plan to test in the future.) The results of our tests are shown in the adjacent Value Guide (Right) Jibe Taming Devices, which also includes data on the products in the first test.
How We Tested
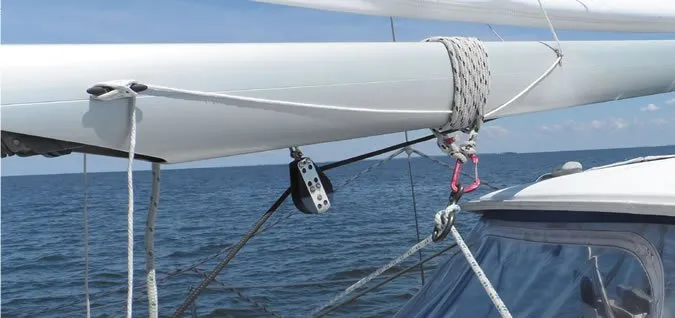
We attached a load cell between the boom and mainsheet to gather baseline load data. The traveler was centered, and the mainsheet was slack, allowing the boom to set just aft of the shrouds when the boat was sailing downwind. We recorded peak loads when jibing and while sailing to windward. We then tested each shock-absorbing device in sequence. Concerned about possible equipment damage, we did not try to record loads in winds greater than 12 knots.
After the initial light-wind testing, we compared the climbers figure-8 and Captain Dons Boom Brake in winds up to 20 knots true wind. We tried each device attached at two locations: toward the forward end of the boom (where a boomvang might attach) and at the boom end.
Shock Absorbers
Because our load cell had a 1/2-second sampling rate, we could not be certain to capture the brief peak force when the traveler car smashes into the end of the track. For this reason, and to avoid the risk of any damage to the traveler car, we kept the traveler centered.
Dynamic Traveler Line
(8 mm climbing rope)
This rope was featured in the previous Practical Sailor report ( Testing a Dynamic Travele r, January 2016), and has now been in regular use for five years. Ours came from Mammut, but other brands are available through rock-climbing equipment suppliers. After several tests and load calculations for higher winds, it appears quite difficult to reach peak loads that might harm any gear when this traveler line is in place. At maximum load, it simply stretched a few inches to leeward.
Bottom line: In field-testing, dynamic line wears slightly faster than polyester double-braid, depending on the traveler design, but it is still worth the extra expense in our view. See the Testing a Dynamic Traveler for more details. This is our Best Choice for cruisers and racers alike.
Nylon Pendant
A pendant for the mainsheet is standard equipment on some boats; it reduces weight and removes some mass from the boom end. We werent impressed with the way it worked on the test boat, because it allowed the mainsheet to twist too much, and shock absorption was no better than a nylon traveler line.
Bottom line: This might work well with for smaller boats with smaller power ratios on the mainsheet.
Gybe tamer GT-3
Made in Great Britain, the Gybe Tamer looks like a heavy-duty door spring and operates the same way. It extends as wind pressure increases, but during a rapid jibe it retracts, pulling a few inches of slack as the boom crosses the boats centerline. When the mainsheet loads up again at the end of a jibe, the Gybe Tamer extends again to absorb the shock.
The Gybe tamer comes in three different sizes to match mainsail area: GT-1, up to 162 square feet; GT-2, 162-353 square feet, GT-3, 352-485 square feet, and custom larger sizes. To function properly, the sizing needs to be correct, because there is no way to adjust the tension. All the Gybe Tamers are the same length compressed (8 inches, pin to pin) and extended (12 inches, pin to pin). Cruising catamarans don’t heel to absorb energy and spill wind, so they will likely require a device that is one-size larger than the recommended size.
We used a GT-3 on a 32-foot, 9,000-pound catamaran with a 350 square-foot mainsail. With the mainsheet trimmed and the boat sailing upwind, it began to extend when the wind reached 12 knots. A drawback is that the device can only absorb 80 foot-pounds of energy. By comparison, the setups incorporating climbing rope continued to stretch and absorb energy as loads increased well beyond 80 foot-pounds. Interestingly, the Gybe Tamer would not extend when we tried it in conjunction with the nylon dynamic traveler line. The rope apparently absorbed all load during the jibe.
The makers suggest installing the device either at the traveler or on the boom. The boom is preferable; if it is mounted on the lower mainsheet block it can flop around on the deck in light winds, potentially scratching the gel coat.
Bottom Line: Inserting this device into the mainsheet tackle adds several unnecessary complications. If the Gybe Tamer offered clear benefits over some of the other methods we tried, we might recommend it-but it doesn’t.
Boom Brakes
A boom brake requires careful attention to rigging details. It must be attached to the boom far enough aft to apply leverage. Generally, the recommended attachment point is located about 1/3 of the length of the boom aft of the mast. If installed too far forward, the braking force is inadequate or inconsistent. It is also critical that the anchor points on the deck and boom are situated so that the control line can maintain tension throughout the jibe.
Don’t use high-modulus (low-stretch) line. Tension on the control line varies as the boom crosses the deck, and a moderate amount of stretch helps control friction. Excessive stretch, however, can cause inconsistent braking. We liked a very limp 3/8-inch polyester double braid like Samson LS when the brake was positioned at the boom end, and 1/2-inch Samson LS when the brake was positioned forward. We found that stiff line would often jam up partway through the jibe in lighter winds even if we released tension completely. In these cases, we would have to go forward to free the boom-something we like to avoid. Most sailors lead the control line to a winch to adjust tension, others use block-and-tackle to add tension, but this adds clutter to the side deck.
A boom brake can also serve as a preventer if you intentionally over-tension the control line, a tactic used by some singlehanders. The arrangement allows them to lock the boom with a single line and quickly release the boom after a jibe/knock down, all from the relative safety of the cockpit. A boom brake is not as effective as a true preventer (see illustration), though. In our on-the-water tests, the brakes allowed enough boom movement for the sail to fully back, when a conventional preventer would have only allowed a flutter.
Another downside to a boom brake is that the control lines exert a downward force that affects sail shape. If the control line is eased enough to allow proper mainsail twist, as soon as the mainsail begins to back, the boom drops, the control line goes slack, and the boom can whip across.
The problem with these devices is that ensuring a controlled jibes requires finding the right line tension and wraps as wind speed changes. Part of the reason for this is that a jibe starts with a light nudge, as the wind first gets behind the sail, then reaches a peak as the boom crosses the centerline, and finally requires massive braking force as it approaches the spreaders.
Kong Figure 8
Figure 8s are commonly used in climbing to control descent on a single line. Several virtually identical figure 8s are available from climbing gear companies. They are rated to 7,850 pounds and will slide at less than 2,000 pounds. We can’t imagine a scenario in which the figure 8 itself would fail, as some proponents of marine boom brakes suggest. Although a climbers figure 8 lacks the extra hook that boat-specific brakes add to make it easier to adjust friction, you can make two wraps to increase friction in higher winds. Made of anodized aluminum, corrosion should not be a problem.
Bottom Line: Because of the relatively low price, climbing figure-8s are recommended for anyone looking for an inexpensive way to experiment with a boom brake.
Captain Dons Boom Brake
Made from 316 stainless steel, Captain Dons Boom Brake is a maritime evolution of the figure-8, offering greater range of friction adjustment, which can be easily tweaked by looping the control line over a small hook in the top circle (see photos). Although looping the control line over this hook resulted in a jerky release during our testing in higher winds, the smoother stainless-steel finish resulted in a more predictable motion in the low-wind settings compared to a climbers figure 8.
Bottom Line: Captain Dons Boom Brake and similar marinized figure-8s are a good solution for boats 25-40 feet who have a little extra money to spend on deck gear and prefer stainless steel over anodized aluminum.
The Walder and the Dutchman were not retested, since they are unchanged since our last test. In that report, testers reported similar problems to those we found in this test. In order for these devices to work properly, the sailor needs to make frequent adjustments to the control line to ensure the correct amount of friction. The full report on these devices will be linked to in the online version of this report.

A traveler control line that uses dynamic climbing rope offers a simple way to greatly reduce the risk of damage during an unintentional jibe, but it will not slow down the booms potentially dangerous traverse. For this reason, some boaters may be more satisfied with one of the devices we tested. A stretchy nylon pendant, because it is so short, doesn’t offer adequate shock absorption on bigger boats, but it might make sense on smaller boats, if it fits.
As for the boom brakes: in lighter winds, testers found that adjusting friction was a nuisance, and once we added a shock-absorbing traveler line, the braking device was superfluous. In moderate wind, getting the right adjustment required some practice-too much friction and it would not jibe, too little and it jibed hard. Moreover, the lines were always in the way and required adjustment with every significant change wind speed. Neither of these problems will bother the sailor embarking on a long tradewind passage, but coastal cruisers in variable wind regions might find a boom brake to be more trouble than it is worth.
At the end of testing, we removed the boom brakes and returned to using fixed preventers to prevent unintentional jibes. To help absorb shock loads during a jibe, we used a traveler line made of climbing rope. Finally, we perfected our jibing routine, carefully handling the mainsheet to minimize shock loads. Weve met a sailors who sing the praises of their boom brake, and single-handed racers use them as well. However, for most sailors, simply changing to a moderately elastic line in the traveler and using a preventer when needed will offer adequate protection against gear damage-but you will still have to keep your head down.
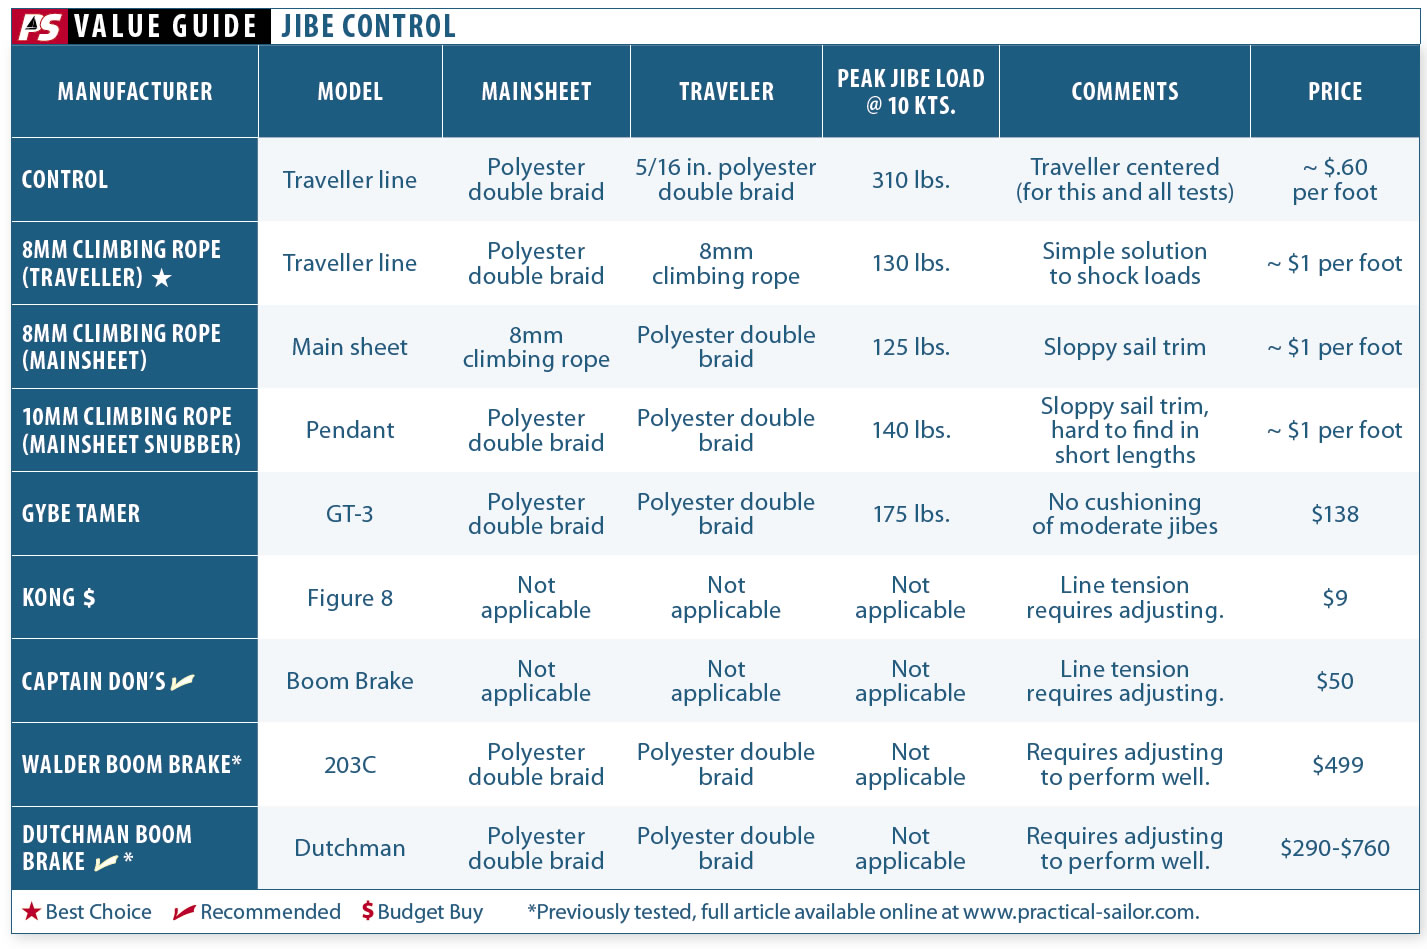
Controlled jibes with the braking devices we tested requires constant monitoring of the line tension. Too little friction and the boom races across nearly unimpeded. Too much friction and the jibe will not start unless we turn ridiculously far to leeward, creating unacceptable risk of a harsh jibe that might force the boat to round-up.
The fundamental problem, which no constant friction device can get around, is that a jibe begins with very little force, but then requires massive braking force as it approaches the spreaders.
The Gybe Tamer is designed to deal with the second force, but it has other issues that caused it to fall out of favor with our testers.
- The Gybe Tamer extends from eight inches when closed to 12 inches when under load.
- You can adjust friction on the Captain Don Boom Brake without detaching the brake from the boom by looping the control line over the hook. Other changes require re-reeving, which is quick and easy if the devise is attached with a carabiner or snap hook.
- Captain Don’s caribiner has four basic recommended friction settings. Shown here is one of the settings that can’t be exactly replicated when using the figure 8.
- The climber’s figure 8 is a very affordable device compared to marine versions, allowing you to try a boom brake on for size.
- The Dutchman Boom Brake uses three sheaves that the line wraps around in a serpentine fashion. The upper sheaves are fixed while the lower sheave can rotate between friction plates. By adjusting a knob on the side, more or less friction can be applied to the lower sheave as it is needed.
- The Best Prevention is a Preventer
- Bob’s Boom Brake
- Dutchman Boom Brake
- Mammut Climbing Rope
- Walder Boom Brake
- Controlling Jibes With Boom Brakes
RELATED ARTICLES MORE FROM AUTHOR

How Can I Keep My Kids Safe Onboard?
Leave a reply cancel reply.
Log in to leave a comment
Latest Videos

40-Footer Boat Tours – With Some Big Surprises! | Boat Tour


Electrical Do’s and Don’ts

Bahamas Travel Advisory: Cause for Concern?

Island Packet 370: What You Should Know | Boat Review
- Privacy Policy
- Do Not Sell My Personal Information
- Online Account Activation
- Privacy Manager

By Product Categories
Small Boat Blocks
Big Boat Blocks
Complementary Hardware
Travelers & Genoa Leads
Mainsail Handling
Headsail Handling
Mooring Solutions
Spare Parts
Accessories
Harken Canvas
Fly Soft-Attach Blocks
Carbo Air Blocks
Small Boat Classic
Flip-Flop Small Boat
GP Catamaran Ceramic Mainsheet Systems
Protexit™ Exit Blocks
Through-Deck
Wire High-Strength
Dinghy Vang
Small Boat Deck Organizers
Midrange Classic
Midrange Deck Organizers
Zircon Blocks
Element Blocks
Black Magic Air Blocks
Cruising ESP Blocks
Megayacht Blocks
Stainless Steel Blocks
Black Magic Air Runners
FlatWinder Powered Blocks
Mastbase Blocks
Over-the-Top
Crossover Blocks
Big Boat Deck Organizers
Cam Cleats & Kits
Cam Cleat Accessories
Cam Cleat Bases
Stand-Up Bases
Deck Organizers
Spinnaker Pole Cars
Soft Attachments
Fixed Padeyes
Removable Padeyes
Bolt-Down Fairleads
Grand Prix Jib Leads
Halyard Tensioners
Tiller Extensions
Peter's Desk Drawer
Dinghy Jib Leads
Crossbow Pivoting Self-Tacking Jib Traveler
13 mm Micro
22 mm Small Boat
27 mm Midrange
32 mm Big Boat
Windward Sheeting
42 mm Mini-Maxi
T-Track Genoa Lead
Access Rail System
13 mm AA Battcar System
22 mm A Battcar System
27 mm B Battcar System
32 mm C Battcar System
18 mm Switch Battcar System
26 mm Switch Battcar System
26 mm Trysail Switch
32 mm Switch Battcar System
32 mm Trysail Switch
40 mm Switch Battcar System
40 mm Trysail Switch System
Furling Mainsail Outhaul Systems
Single Line Reefing
Harken Vang-Master
Carbo Racing Foil
Small Boat Furling
Small Boat Underdeck
Reflex Furling
MKIV Jib Reefing & Furling
MKIV Underdeck Jib Reefing & Furling
Furling Accessories
Powered Furling
MKIV Ocean Furling
SnubbAir (Not a Winch)
Grand Prix Winches
Air Winches
Circuit Breakers
Analog Switches
Digital System Switch
Aluminum, Chrome & Bronze Winch Handles
Carbo OneTouch Locking Winch Handle
Service Kits
CLR Mooring Winches
Electric Captive Reel Winches
Hydraulic Captive Reel Winches
UniPower Radial
Single-Acting Integral Backstay Adjuster
Single-Acting Cylinders
Locking Cylinders
Double-Pull Cylinders
Grand Prix Cylinders
Hydraulic Cylinder Rod End Blocks
Hydraulic Cylinder End Fittings
Control Valves
Control Manifolds
Control Panels
Compact Control Panel
Rotary Pumps
Hydraulic Pump Handles
Power Systems
Repair Kits
Ball Bearings
Block Spare Parts
Traveler Cars
Furling Spare Parts
Winch Spare Parts
Winch Service Kits
Blockheads Gear
Promo & Gifts
Marine Grip
harkengear.com
Jeep/Truck tops
Garage storage
One-design Covers
Boat accessories
Canvas bags
By Type of Sailing
Dinghy / One-Design
Offshore Racing
Coastal / Day Cruising
Bluewater Cruising
Megayachts / Custom
Service Guide
Tech/Service
deck layouts
Data Sheets (SDS)
How to choose
System diagrams
Calculators
Reeving diagrams
Traveler Purchase Selection Guide
How to Choose
Testimonials
Hoister Videos
Request a Quote
Request Samples
Fabric details
Cover Styles
Canvas Videos
Contract Services
Materials and Components
Our Equipment
Contract Cut-and-Sew Project Spotlight
- Harken at the front
- Safety & Rescue
Support / Selection tools / System diagrams
Boom Vang Systems
The vang allows vertical adjustment of the boom, and is an extremely important tool to shape the main for speed. Tension the vang to tighten the leech, flatten the sail and bend the mast. Cruisers use the vang to keep the boom from rising when sailing downwind and abraiding the main.
Typical boat length: Small Boat: 22' - 28' (6.7 - 8.5 m) Midrange: 29' - 34' (8.8 - 10.4 m) Big Boat: 35' - 42' (10.7 - 12.8 m)
This simple 4:1 self-cleating vang is used on small dinghies.

The basic 4:1 fiddle block vang is commonly used on dinghies and small keelboats.

8:1 Cascaded Fiddle
A doubling block increases the purchase of the vang to 8:1. The load on the fiddle blocks is halved so they can be used safely on larger boats.

4:1 Cascaded Kicker
This rigid rod vang utilizes a simple 4:1 tackle. The rod also serves as a topping lift for the boom. Used on cruising and racing boats.

6:1 Double-ended Cascaded Kicker
Many racers rig the vang with a double-ended control line led down each side of the boat.

Product Categories
- United States
- New Zealand
- United Kingdom

What is a Sailboat Boom Vang?

Last Updated by
Daniel Wade
June 15, 2022
A boom vang is a set of blocks and lines or an adjustable pole used to pull the boom down and shape the sail.
The boom vang (or “kicking strap”) is a system used to control the shape of the sail. It counteracts the upward force of the boom jack and the mainsail by pulling the boom downward. This results in the ability to control the shape of the sail.
Table of contents
Boom Vang vs. Mainsheet
What's the difference between the boom vang and the mainsheet? On many sailboats, the boom vang and the mainsheet look similar, as both use a set of blocks to control the motion of the boom.
The easiest way to tell the difference between the boom vang and the mainsheet is location. The boom vang typically begins close to the base of the mast and connects to the base of the boom at about a 45-degree angle.
The mainsheet is much further back and generally vertically-oriented. Sometimes, the mainsheet is located far at the end of the mast and connected to the stern of the vessel. Just remember boom vang forward, mainsheet aft.
What Does a Boom Vang Do?
A boom vang is a simple device consisting of a pole or a set of blocks and lines. The primary purpose of the boom vang is to control the vertical orientation of the boom and to exert a downward force on it.
Without the boom vang, the wind would blow the sail uncontrollably and make it difficult to maneuver efficiently. The mainsheet, which appears to exert downward pressure on the boom, wouldn't be able to adjust the sail effectively without a separate system like a boom vang.
Importance of the Boom Vang
A properly-adjusted boom vang becomes more important as you let out the mainsheet. The further from the centerline the boom travels, the less downward force the mainsheet provides.
This means that you'd lose a tremendous amount of control without a boom vang, especially as you loosen the sheet. A boom vang exerts a constant downward force on the sail regardless of what position the boom is in. This keeps the sail shape consistent in all conditions.
Boom Vang Types
There are two primary types of boom vangs used on sailboats today. The first and most common type is the standard boom vang. Standard boom vangs consist of a block and tackle arrangement that mounts to the base of the mast and bottom of the boom.
The second type is the hydraulic boom vang , which is more advanced and offers unique benefits. The hydraulic boom vang uses a hydraulic piston that looks like an oversized automobile shock or door opener.
The benefit of a hydraulic boom vang is that it holds the vertical position of the boom without assistance. It's rigid in both directions and doesn't require upward force to keep the boom in place.
Hydraulic boom vangs are costlier than traditional block-and-tackle setups. That said, they're easy to install and generally simple to operate. Hydraulic boom vangs are common on newer sailboats, especially those that exceed 30 feet in length.
What is a Boom Gnav?
A boom gnav is one of the most intuitive pieces of sailboat equipment. The word "gnav" is "vang" spelled backward, and it performs the exact same task on the opposite end of the boom.
A boom gnav exerts a downward force on the boom to counteract the upward force of the wind or rigging. A boom gnav pushes the boom down, whereas a boom vang pulls it down. Not all sailboats have a boom gnav, and those that do often use it as a substitute for a boom vang.
Boom gnav systems are most common on small sailboats , where the added lower triangle of a boom vang gets in the way. A boom gnav takes up no extra cockpit space as it mounts atop the boom and to a higher point on the mast.
In other words, the boom gnav operates within the sail area, which is a part of the boat that's already unusable due to the sail. A boom gnav is usually a pole that adjusts by sliding forward and aft on the boom, which changes the angle and downward force.
Boom Vang Maintenance
Maintenance is essential to keep your sailboat in safe and working condition, and the boom vang is no exception. There are a few boom vang parts you should inspect and maintain regularly.
Check the Mounting Points
The mounting points of the boom vang are subjected to a considerable amount of force, and they should be inspected regularly. Look for signs of corrosion (galvanic or otherwise) and bending.
If you notice any deformation, replace the mounting points and hardware with marine-grade hardware. Make sure the aluminum mast is solid, as corrosion can weaken the areas around the mounting holes.
Inspect Blocks and Tackle
For traditional boom vangs, regularly inspecting the blocks and lines can prevent problems down the road. Over time, nylon lines become salt and sun-damaged and begin to fray. If the lines are brittle and leave excessive dust on your hands, it may be time to replace them.
Blocks are generally reliable and don't require a significant amount of maintenance. That said, you should inspect your blocks and make sure they spin freely. If they don't (or they become too loose), they could be failing and should be replaced with high-quality marine blocks.
Hydraulic Boom Vang Maintenance
Hydraulic boom vangs are simpler than traditional block and tackle setups, but they still require regular inspection. A hydraulic boom vang uses a piston and a working fluid instead of lines and pulleys.
On hydraulic boom vangs, the primary failure points are the seals and the mounting points. If your boom vang begins to leak, you'll notice a decrease in stability, and the vang won't hold tension.
Another common failure point is the spring, which can weaken or break and make the vang almost unusable. In most cases, the best option when your hydraulic boom vang fails is to replace it entirely.
What is a Boom Jack?
A boom jack (also known as a lazy jack) is the rigging that exerts an upward force that the boom vang or boom gnav counteracts. The boom jack begins at the boom and reaches up to the top of the mast.
Boom jacks resemble any other rigging on a sailboat. They roughly form the triangular shape of the sail and usually mount to the boom at multiple points.
A typical boom jack begins as a single line at the top of the mast. About 1/4 of the way down the mast, it splits into two lines. At the halfway point, each end of the two lines splits again into four. These four lines run down to the boom and mount evenly-spaced apart.
The purpose of the boom jack is to exert even upward force on the boom. The tension of the boom jack is set as to counteract the tension of the boom vang, which holds the boom at a steady 90 degrees. The boom jack line runs down from the top of the mast to a block or cleat on the opposite end of the boom vang.
Adjusting the Vang
Generally speaking, the boom vang isn't as important when traveling upwind as it is when traveling downwind. This is especially true once you've maxed-out your mainsheet traveler.
At this point, the vang controls the twist of the mainsail. With an improperly-adjusted vang (or lack thereof), you could experience a lot of up-and-down play of the boom. This can cause you to lose control of the mainsail.
A properly-adjusted boom vang can help you keep your mainsail shaped correctly and keep your boom in the proper position. It also gives you precise control of your speed when traveling downwind.
Related Articles
I've personally had thousands of questions about sailing and sailboats over the years. As I learn and experience sailing, and the community, I share the answers that work and make sense to me, here on Life of Sailing.
by this author
Sailboat Parts
Learn About Sailboats
Most Recent

What Does "Sailing By The Lee" Mean?
October 3, 2023

The Best Sailing Schools And Programs: Reviews & Ratings
September 26, 2023
Important Legal Info
Lifeofsailing.com is a participant in the Amazon Services LLC Associates Program, an affiliate advertising program designed to provide a means for sites to earn advertising fees by advertising and linking to Amazon. This site also participates in other affiliate programs and is compensated for referring traffic and business to these companies.
Similar Posts

Affordable Sailboats You Can Build at Home
September 13, 2023

Best Small Sailboat Ornaments
September 12, 2023

Discover the Magic of Hydrofoil Sailboats
December 11, 2023
Popular Posts

Best Liveaboard Catamaran Sailboats
December 28, 2023

Can a Novice Sail Around the World?
Elizabeth O'Malley

4 Best Electric Outboard Motors

How Long Did It Take The Vikings To Sail To England?

10 Best Sailboat Brands (And Why)
December 20, 2023

7 Best Places To Liveaboard A Sailboat
Get the best sailing content.
Top Rated Posts
Lifeofsailing.com is a participant in the Amazon Services LLC Associates Program, an affiliate advertising program designed to provide a means for sites to earn advertising fees by advertising and linking to Amazon. This site also participates in other affiliate programs and is compensated for referring traffic and business to these companies. (866) 342-SAIL
© 2024 Life of Sailing Email: [email protected] Address: 11816 Inwood Rd #3024 Dallas, TX 75244 Disclaimer Privacy Policy

Sailboat Hardware
FREE SHIPPING ON ALL ORDERS OF $150, UNDER 50LBS
- Shop Products ▼
- Order Status
- Shipping Return
- Request Quote

Welcome to US Rigging Supply, your premier destination for top-quality rigging supplies and solutions. At US Rigging, we pride ourselves on being a trusted source for a wide range of rigging products, from wire rope and slings to hoists and hardware. With a commitment to excellence and safety, we cater to the diverse needs of industries such as construction, maritime, and manufacturing. Whether you are a seasoned professional or a DIY enthusiast, our user-friendly platform offers a comprehensive selection of reliable rigging equipment, accompanied by expert guidance and resources. Explore our extensive catalog and experience unparalleled service as you embark on your rigging projects with confidence. At US Rigging, we elevate your lifting and rigging experience to new heights.
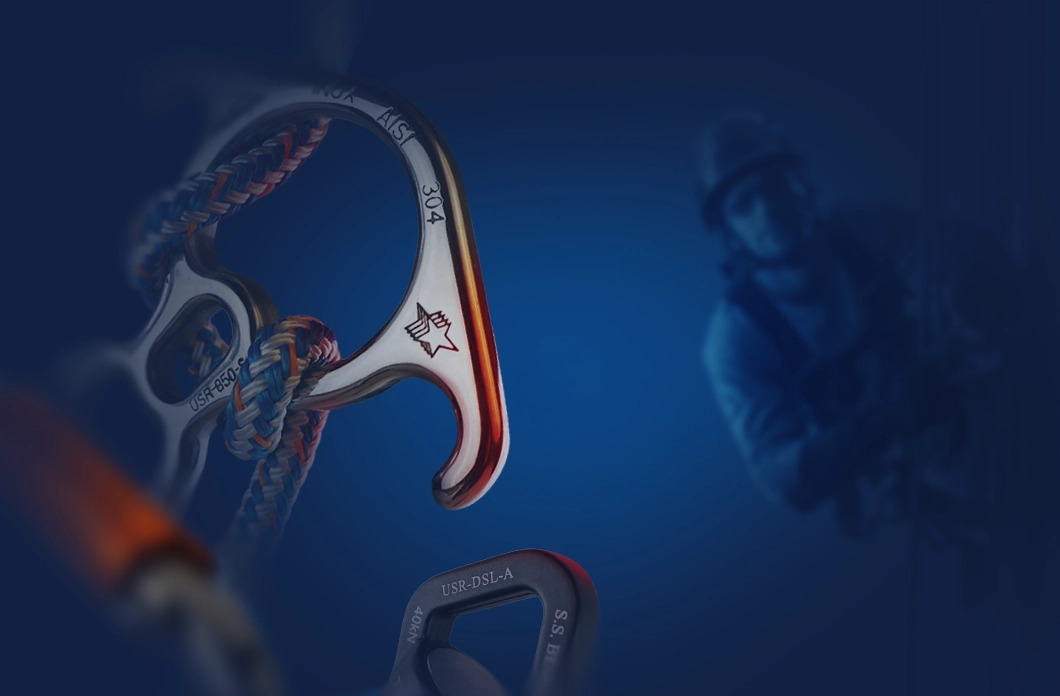
TRENDING ITEMS

Gripple No. 1 Express Wire Rope Grip Joiner

Gripple Gripple® Lockable Wire Rope Grip - For 1/8”
DuraBrite 316 Stainless Steel Eye Bolt

DuraBrite 316 Stainless Steel Eye Nuts

Gripple No. 2 - Express Wire Rope Grip

Gripple Gripple Replacement Standard Wire Rope Grip - No. 3 - WLL 200 lbs.

Safe-T-Strap 4' Low Rise Safety Strap w/ D-Ring

Gripple Gripple Standard Loop Hangers - No. 2 - WLL 100 lbs. HVAC, lighting, electrical - (SOLD IN PACKS)
Gripple Gripple Express Loop Pipe Hangers - XP 1 - WLL 25 lbs. - Ideal for signage, shop fitting, lighting, and other lightweight fixtures

DuraBrite 5/8" - Tactical 316 Stainless Steel Trigger Snap

Safe-T-Strap 4' Residential Choker Strap w/ D-Ring & Loop

SWAGE-IT Swage-Right Swager - Light-Duty, Single Cavity - 1/16" Wire Rope
U.S. Rigging Supply is your trusted partner for rope, safety and rigging products. Trusted for over 40 Years. U.S. Rigging Supply is a certified ISO 9001:2015 standard company.
SHOP ROPE BY CONSTRUCTION
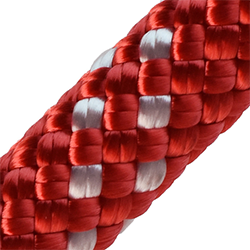
GEAR YOU WILL LOVE

Kong KNG-538-12

ProClimb Twist Lock Oval I-Beamer

ProClimb Triple Lock Oval I-Beamer

Swage-Right Deluxe SRS Hand-Swaging Tool Kit w/ Cutter
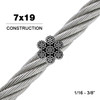
Swage-Right 7x19 | 304 Stainless Steel Guy Wire Rope (Aircraft Cable)

Pelican Rope 1/2" - Arborist-16™ Freedom Arborist Climbing Line

Pelican Rope 5/8" - 3 Strand Composite Vertical Lifeline - Hook & Thimble
ProClimb Twist Lock Modified D Steel Carabiner

ProClimb Copper Head Carabiner

ProClimb Large Aluminum Rope Pulley
Swage-Right Medium-Duty 6-Cavity Swager

Shop Arborist
U.S. Rigging Supply offers quantity price breaks on most items and special quotes for orders exceeding our price breaks. If you currently are or would like to become a distributor of our products, please call 888-260-7444 for current distributor pricing.
Recent Blog Posts
The Importance of Using Tool Lanyards on the Jobsite - ProClimb Self-Locking Tool Lanyards
Tool lanyards are an essential piece of safety equipment for any worker who works at heights. They c
Continue Reading

Why do we call it Guy Wire?
Have you been curious where the term "guy wire" came from? Perhaps you've wondered whether the corre
U.S. RIGGING CINEMA
Prolift Rigging
Industry expertise for industry leaders full-service industrial rigging , transport , and warehousing solutions to safely complete your mission-critical projects with exacting precision & uncompromising success.
Discover The Many Different Ways We Can Help You
Heavy Lifting and Rigging
Warehousing
Project Management
Crane Service
Project Buffering

ProLift Rigging
With a growing international footprint of strategically placed locations, ProLift is uniquely positioned to help you wherever your job site may be.
The Prolift Promise
ProLift Rigging is committed to helping you minimize risk in your projects by providing safe and innovative solutions to navigate both expected and unexpected obstacles. Our continuing promise is to always be an honest, transparent and professional partner, as we help meet mission-critical deadlines and deliver predictable outcomes to our clients.
Jesse Taylor, ProLift CEO
Featured Projects
Crane install with custom cantilever.
View Project
Phoenix Data Center Construction
Jack and slide transformer install, discover how prolift can help you.
THE 10 BEST Moscow Boat Rides & Cruises
Boat rides & cruises in moscow.
- Boat Rentals
- Scuba & Snorkeling
- Fishing Charters & Tours
- Water Sports
- Stand-Up Paddleboarding
- Surfing, Windsurfing & Kitesurfing
- Kayaking & Canoeing
- Waterskiing & Jetskiing
- Parasailing & Paragliding
- River Rafting & Tubing
- Dolphin & Whale Watching
- Speed Boats Tours
- Submarine Tours
- 5.0 of 5 bubbles
- 4.0 of 5 bubbles & up
- 3.0 of 5 bubbles & up
- 2.0 of 5 bubbles & up
- 3rd Transport Ring (TTK)
- District Central (TsAO)
- Garden Ring
- District Northern (SAO)
- Good for Big Groups
- Good for Couples
- Good for a Rainy Day
- Budget-friendly
- Good for Kids
- Hidden Gems
- Honeymoon spot
- Good for Adrenaline Seekers
- Adventurous
- Things to do ranked using Tripadvisor data including reviews, ratings, photos, and popularity.

1. Flotilla Radisson Royal

2. Moscow River Boat Tours

3. Sup-Club

4. Akvanavt Diving Centre

5. Diving Center Crocus City Oceanarium

6. CheapRussia Tours
7. Kite School Kiteclass

8. SUP Center

9. Erwin. Reka
11. Easy Russia Tour Guide
12. Lovely Russia Tours

13. Capital River Boat Tours - Moscow Centre

14. Alfa Centr
15. Diving Club Divers

16. Sup Outdoor

17. MORE MOSCOW
19. Soho Sailing Style

20. Mosparokhodstvo
21. Diving Center Crocodile

22. Dive-Project

24. Kosinskiy Children Marine Club

25. Kayak Moscow
26. DIVECLUB CHE

27. FLOW Moscow

28. Moswake

29. Morskiye Volki

30. S-cruises
What travelers are saying

- CheapRussia Tours
- Easy Russia Tour Guide
- Lovely Russia Tours
- MORE MOSCOW
- Insider Moscow Tours
- Flotilla Radisson Royal
- Moscow River Boat Tours
- Capital River Boat Tours - Moscow Centre
- Diving Center Crocus City Oceanarium

IMAGES
VIDEO
COMMENTS
A large bowline loop (the red striped line) affixes the preventer to the boom. The knot can be reached without sheeting the boom in to the boat. If this is not the case then a large bowline loop ...
Since 1961, RIG-RITE has engineered, manufactured and distributed Spars, Rigging and Hardware Systems for Sailboats. RIG-RITE stocks the largest variety of related Systems and Hardware available anywhere, Specializing in original replacement parts for Systems on yachts built the world over. Spars - Masts, Booms, Spreaders, Spinnaker Poles ...
Captain John with 25+ years of experience shows you the no-nonsense cruising skills you need for safer sailing worldwide. Visit his website at https://www.sk...
The preventer, unlike the boom brake, is to be rigged to the very outboard end of the boom via a pad eye and pendant (see diagram). Many people come up with their own inventions but do not realize that taking shortcuts can lead to boom failure. Here are some tips to rigging your boom preventer properly: always use an outboard attachment point.
The last piece of boom rigging that bothered me was the topping lift. On Ora Kali, this was a fixed length of 7-by-19 wire rope attached at the masthead with a small block at the other end. A Dacron rope ran from a shackle on the end of the boom, up over this block, down to the boom end sheaves, then inside to an exit sheave.
Quality Sailboat Masts, Booms, Hardware and Rigging Since 1963. Dwyer Mast & Rigging manufactures high-quality sailboat masts, booms, hardware, and rigging. Originally founded in 1963 as Dwyer Aluminum Mast Company, the legacy continues as an OEM supplier by taking advantage of improved manufacturing methods to offer a wide range of products ...
In sailing, a boom is a spar (pole), along the foot of a fore and aft rigged sail, that greatly improves control of the angle and shape of the sail. The primary action of the boom is to keep the foot flatter when the sail angle is away from the centerline of the boat. The boom also serves as an attachment point for more sophisticated control lines.
The Boom Vang, in its simplest form, is a block and tackle arranged in such a fashion that it applies downward force (also upward force, see rigid vang) to the boom. This will allow the sailor to control the tension of the leech at all points of sail, regardless of the boom's sheet tension. Although more purchase may be necessary, typically ...
The boom is an essential part of sailboat rigging. It is a horizontal spar that stretches from the mast to the aft of the boat. Constructed with durable yet lightweight materials like aluminum or carbon fiber, the boom provides crucial support and has control over the shape and position of the sail.
MAST AND BOOM SECTIONS. When specifying spar and boom sections, rig designers will calculate your boat's righting moment according to its displacement, ballast ratio, draft and beam, and then size accordingly. ... The deceptive simplicity of the typical sailboat rig can lead to a kind of benign neglect on the part of the boat owner. Since so ...
Boom Gallows: Boom gallows are a great solution for offshore boats, but are rare on cruising boats, and don't suit many coastal craft. The boom crutch, often removable, is the small-boat equivalent. Pendant to Backstay: This limits the movement but does not eliminate it. It also can harm the backstay. Twin Mainsheets: Creating a perfect triangle, twin mainsheets hold the boom in securely.
Boom rigging. My wife and I are new to sailing. We are currently studying course material for a sail in learn in St Vincent the first part of December. We bought a Johnson 18 Weekender to have a step up when we started the course as it will be 101, 103, 104 and 114.
The boom is an essential part of sailboat rigging that must be properly maintained. The same goes for all the blocks, lines, winches, and cleats that work with the boom. Aluminum Boom Maintenance. Aluminum booms require inspection and hardware maintenance. Galvanic corrosion can compromise the strength of the boom, and it's especially common in ...
A boom brake requires careful attention to rigging details. It must be attached to the boom far enough aft to apply leverage. ... Part of the reason for this is that a jibe starts with a light nudge, as the wind first gets behind the sail, then reaches a peak as the boom crosses the centerline, and finally requires massive braking force as it ...
The vang allows vertical adjustment of the boom, and is an extremely important tool to shape the main for speed. Tension the vang to tighten the leech, flatten the sail and bend the mast. Cruisers use the vang to keep the boom from rising when sailing downwind and abraiding the main. Typical boat length: Small Boat: 22' - 28' (6.7 - 8.5 m)
A boom jack (also known as a lazy jack) is the rigging that exerts an upward force that the boom vang or boom gnav counteracts. The boom jack begins at the boom and reaches up to the top of the mast. Boom jacks resemble any other rigging on a sailboat. They roughly form the triangular shape of the sail and usually mount to the boom at multiple ...
PLEASE NOTE: THIS VIDEO HAS BEEN UPDATED WITH ENHANCED GRAPHICS AND IMPROVED SOUND. CHECK IT OUT HERE https://youtu.be/tRgWtPaCQQcA beginners guide to sailbo...
Our sailboat blocks, boat deck hardware, and wide array of other marine hardware and supplies will keep your boat in shape. ... Sailboat Rigging Accessories . Ball Stoppers & Donuts; Gate Eye; Gate Hook; Spar Hardware; ... Mast & Boom Fittings; Sailboat Keelbands; Sailboat Tracks; Self Tacking Jib System; Sliding Fairlead Systems; Sliding Systems;
316 Stainless Steel Eye Nuts. $1.99. Part #:G-RG-02.5SRF. U.S. Rigging Supply is your trusted partner for rope, safety and rigging products. Trusted for over 40 Years. U.S. Rigging Supply is a certified ISO 9001:2015 standard company.
Share your videos with friends, family, and the world
We provide full-service rigging, transportation, and warehousing solutions to streamline your business operations and increase your project success. Skip to main content Request Quote. Prolift Rigging (855) 900-9111 [email protected]. About Our Story; News; Projects; Services ...
Explore the scenic and historic attractions of Moscow from the water with the best boat tours and cruises. Enjoy the views of the Kremlin, the Cathedral of Christ the Savior, and the Sparrow Hills on a relaxing or informative boat ride. Or, spice up your trip with some water sports and activities in Moscow. Find out more on Tripadvisor.