Change Price Set
The plans include written instructions, CAD drawings and a bill of materials. These instructions have been tested thoroughly so that you can enjoy building your model with ease.
Each model requires a 2-channel radio with one steering servo and one arm type sail servo. These can be purchased at www.towerhobbies.com . If you do not have any radio equipment we recommend the Futaba 2DR 2-Channel AM/1 S3003/1 S3801 Radio/Servo package. For the sail control any arm type servo with 150 in-oz of torque or more is adequate.
If you're interested in designing your own model, but want a proven design to work from, the plans for each model also provide a good starting point.
After you come home from a pleasant sail, the LS models break down and hang easily on a wall with only two pegs. They fit easily into any size car and set up in about 30 seconds. With such durability and easy use, these models are sure to be hours of fun all year long.
In addition to complete tested designs, I also offer free RC landsailer design tips & tools for those of you who prefer to design your own models from scratch.
HOME PAGE | PRODUCTS | PRICE LIST | PHOTO GALLERY & VIDEO CLIPS DESIGN TOOLS & TIPS | RELATED LINKS | FAQ's
KRIS SELUGA | MILFORD, CT | [email protected]


Build your own radio controlled yacht
Are you ready to embark on the exciting journey of building your very own model rc yacht.
Our comprehensive eBook has clear building instructions and step-by-step photography for the Racing Sparrow 750mm RC Yacht.
What we cover in our boat building eBook
Download a sample of our eBook
Even those with limited building experience can join in on the fun with minimal materials and a simple toolset. Our eBook by New Zealander Bryn Heveldt covers strip planking, fibreglass strengthening, mould and casting techniques, electrics installation, spray painting and masking, sail making and tuning.
To get started on your Racing Sparrow model RC yacht project, purchase our eBook and download the PDF now.

Racing Sparrow blog
We share tips and stories from the model boat building community. See all Blog Posts.

The Design Rationale for the RacingSparrow 750

Radio Controlled Yacht Electrics - For Beginners

Model Yacht Design: Pushing the Limits with Racing Sparrow

Using 3D Programs to Design Boats: A Beginner's Journey with Fusion 360
Free model boat plans.
We provide a number of different boat plans that you can build using techniques covered in our full eBook.
You can download plans for boats of different sizes and specifications.

What our customers say about Racing Sparrow
Being a complete novice, I purchased your book a couple of years ago and built two racing sparrows. Building on this experience I then went on to build, from scratch, an IOM (Triple Crown design). I've since joined a local club and sail virtually every weekend. I would just like to thank you for your endeavours which have allowed me to enter a world I never thought was in my reach.
John Sterland, Australia
Coming upon your book, "Build your own Radio Controlled Yacht" in the Napier Public Library, I am hugely impressed. The combination of your superb photos and illustrations with your easy writing style make it a standout publication and I hope it does well for you.
Richard Spence, New Zealand
Thanks for an excellent design in your RG65. I trialled her again today in a solid 20 knots gusting higher. Even so in a steep chop and fingers off the rudder she drove upwind remarkably well, balanced perfectly. Very impressed that a model boat can handle that with a large rig. I found the book excellent. Ive built several big boats, plus a few skiffs and without that resource building such a good boat would have been impossible.
Mike Bennett
Boats built by the Racing Sparrow community
We continue to be amazed at the beautiful model RC boats created by Racing Sparrow enthusiasts . Send your images to info@racingsparrow.co.nz.
Take a look at the full boat gallery page. So many fine model yachts!
Eric Rosenbaum , USA
May 4, 2009

John Sheehan's 750 - stunner!
Oct 28, 2009

80% RG65 , Auckland, New Zealand
Apr 25, 2015

John Goodyear , England
Mar 20, 2009

More about Racing Sparrow
When I was nine years old my father, Ross Heveldt taught me to sail down at Bucklands Beach in Auckland. My wee optimist dinghy was called 'The Racing Sparrow', the nickname my uncle Bruce Curry gave to me when I was a small boy. Apparently I had an abundance of energy.
I studied at Whanganui School of Design and have been a designer / developer since 1998. I live in New Zealand.
Best wishes and happy sailing, Bryn Heveldt.
To contact me please email: info@racingsparrow.co.nz

Land Yacht build Plans.
These detailed instructions will allow you to construct this land yacht in a few days. This is a great project for the do-it-yourself. The whole family can help in the construction and it will give everyone a feeling of ownership. And the best part: It’s very affordable to run!
The position of the rear wheels axles gives it a low center of gravity and very predictable cornering behavior. And as this land yacht has been integrally designed considering the sail tester results (click on “The Sail Tester” button above), it was calculated to have the best stability for beginners and family use.
You can easily build this land yacht yourself with these comprehensive plans. I’ll give you the 3D CAD drawings and dimensions of every part that needs to be made, along with lists of materials, cutting lists and detailed building instructions. Everything you need to build your own landyacht. Plans and instructions are clear and are very easy to follow.
These plans are high quality C.A.D designs (Autodesk-INVENTOR). They have been formatted to be read using adobe reader. It’s a simple but effective land sailer to build with basic materials. I think you will really enjoy building and riding it as well.
I look forward to helping you with your project. So if for any reason during construction you have a question, just e-mail me.

Get the Landyacht Build Plans
GET the Land Yacht complete and detailed construction plans, instructions and lists of materials (.pdf)
Feel the speed, just 10 cm off the ground..
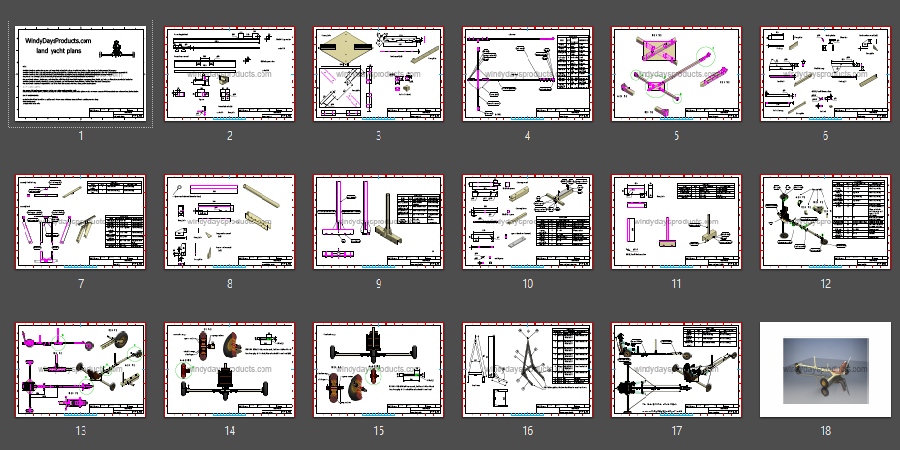
The manual include step-by-step progressive construction drawings with sub-assemblies, weldments, angles etc… Basically, you start at the beginning of the plans & work your way through step-by-step. Frame drawings show you how to start by making a tube base frame and then progressively build upon that starting point.
All materials are readily available worldwide. Tube notches are NOT needed to build the frame (they are all straight cuts). Lathe work is NOT needed for this project.


Introduction: Land Yacht

For our senior design project, we were tasked with designing, analyzing, and building a land yacht. A land yacht is basically a wind-powered cart that supports a single rider who trims the sail and steers the cart. Our design utilizes a three-wheeled chassis to supports the rider while he/she trims the sail with his hands while steering with his feet. This instructable is a guide to building the land yacht. Once built, it can be used on most terrains, including sand, dirt, grass, or concrete.
1 - A500 Hot Roll Pipe (1.25" x Sch 40 x 60")
1 - A500 Hot Roll Pipe (1.25" x Sch 40 x 48")
2 - A500/A513 Hot Rolled Mild Steel Rectangle Tube (1" x 1.5" x 24")
1 - 6061-T6 Aluminum Pipe (1.25" x Sch 40 x 72")
1 - 6061-T6 Aluminum Pipe (1.25" x Sch 40 x 84")
Mast Collar
1 - Aluminum Pipe (2.0" x Sch 40 x 24")
1 - A500 Hot Roll Pipe (2" x Sch 40 x 12")
Mast/Boom Connector
1 - Model 2T-7 Aluminum-Magnesium Tee (1.25")
1 - 6061-T6 Aluminum Pipe (1.25" x Sch 40 x 60")
1 - A36 Hot Rolled Mild Steel Round Bar (0.625" x 48")
1 - Tapered Head Tube
1 - Sunlite Threaded MX Fork
1 - Mild Steel Round Bar (0.625" x 24")
5 - Rigid Pulleys (1.5")
2 - Sealed Ball Bearings (0.625" shaft diameter x 1.375" housing diameter)
1 - 550 Cord (15')
1 - Uline Solid Rubber Wheel (10" OD)
2 - Uline Pneumatic Wheel (10" OD)
1 - Triangular Sail (5' x 10.5')
Step 1: Tools Required
Metal Band Saw
Miter Grinder
Drill Press
Bench Grinder
Tap and Die Set
Sewing machine
Step 2: Measuring/Cutting the Sail

The first part of this build is preparing the sail for the land yacht. Our land yacht utilizes a sail that has a 5-foot boom and a height of 10.5 feet. This sail height was determined to work with the size of the land yacht. Our team used a much larger sail from a sailboat that will need to be cut to the right dimensions. The first measurement should be 10.5 feet from the top of the sail. The next measurement is 5 feet, horizontally on the sail. You will notice, however, that after you have measured 10.5 feet from the top, there is not enough room to extend 5 feet horizontally on the boom. Therefore, you will need to measure the height of the sail to be more than 10.5 feet until you reach 5 feet in length for the boom. This was accomplished with a sail height of 11.5 feet. Once the measurements are finished, you can now cut the sail. Make a straight, horizontal cut along the foot (bottom) end of the sail.
Step 3: Folding the Edges of the Sail

In order to fit the mast and boom piping onto the sail, a sleeve will need to be created along the luff (height) and foot (bottom) sections of the sail. This sleeve should be measured at 3" in length. To measure, take one section of the sail and fold it over onto itself until you reach 3" in length. Then, mark this length in several sections to make it easier for yourself when sewing.
Step 4: Sewing the Sail

Once the sail dimensions have been marked and the sleeve has been marked, it is ready to be sewn. The sewing must be done utilizing a sewing machine. If you do not know how to use a sewing machine you can watch videos to understand the process. Taking the bottom section of the sail, fold it back onto itself until it lines up with the marks you created. These marks are your guide as you are sewing the sail. Complete this for the bottom section and the top section of the sail.
Step 5: Final Cuts/sews of the Sail

Remember that the sail height is currently at 11.5 feet. This needs to be taken down to 10.5 feet. Using scissors, cut off one foot of the top section of the sail. Make a horizontal cut. The top of this sail will now need to be sewn so that the sail threading does not unravel. Make a horizontal stitching at the top of the sail where it was cut. The clew end of the sail is currently open after making the sleeve. This end will need to be sewn shut. Fold the very end of the clew onto itself and sew this section closed. A 4" x 4" square will need to be cut and sewn at the tack end of the sail. This is in order for the mast-boom connector to fit.
Step 6: Rear Notching

Parts: Main tube (A500 Hot Roll Pipe) Tools: Angle grinder, cutting wheel.
- Using the rear tube as a guide for diameter, remove material from the end of the main tube as to fit the rear tube inside of the notch being created.
End Result: Rear tube fits snug into the main tube at a 90 degree angle ready for a strong weld.
Step 7: Front Notching

Parts: Main tube (A500 Hot Roll Pipe)
Tools: Horizontal/vertical metal cutting band saw, angle grinder, cutting wheel
- Using the horizontal/vertical metal cutting band saw, cut a 45 degree angle from the front of the main tube. Ensure this operation is done at a 90 degree offset from the rear notching.
- Notch the 45 degree cut to fit the head tube. This can be done with both the angle grinder and the cutting wheel.
End Result: The head tube fits into the notch ready for a strong weld.
Step 8: Rear Axle Threading

Parts: A36 Hot Rolled Mild Steel Round Bar (0.625" x 48")
Tools: Bench vice, vice grips, 5/8" Hex UNC threading die, cutting oil.
- Place the rear axle in the axle into the bench vice so that it is perpendicular to the ground. Ensure the vice is tightened enough so that the axle does not move or rotates while threading.
- Grip the 5/8" Hex UNC threading die TIGHTLY with the vice grips.
- Place the 5/8" Hex UNC threading die over the axle and begin to rotate while applying a large downward force. Apply a generous amount of cutting fluid. (Use a team member to ensure the die is perpendicular to the axle. Once the first few threads have begin to cut, the rest will follow the path that they have made. So any any mistake made in the beginning will not self correct and will ruin the axle)
- Continue to turn the die until two full inches have been completely threaded. Apply cutting oil often.After every 1/4 turn, counter rotate an 1/8 of a turn to brake the chips that have formed.
- Repeat for the other side of the axle.
End result: Rear axle threaded 2" on both sides fitting a 5/8" UNC nut.
NOTE: To protect the threads, place a nut on finished threads while storing or working on axle.
Step 9: Rear Axle Assmbly

Parts: A500 Hot Roll Pipe (rear tube), A36 Hot Rolled Mild Steel Round Bar (threaded axle), 2x Uline Pneumatic Wheel (rear wheel), 2x Sealed Ball Bearings (rear bearings)
Tools: 2x adjustable wrench.
- Using a file, remove an inch of this seam until rear axle bearing fits flush into rear tube.
- Insert threaded axle into to rear tube. There should be 3" of excess axle protruding from each end of the rear tube. (This is where the rear wheels and but will be)
- Insert rear bearings into the rear tube over the threaded axle. The bearings should be flush with the edge of the rear tube.
- Place wheels onto the rear axle. Ensure that the the side of the wheels with the bearings (the "long part" is facing inwards touching the rear tube.
End Result: Completed rear axle Assembly with all mentioned parts. Wheels spin freely and do not rattle.
Step 10: Rear Brace Members

Parts: 2x A500/A513 Hot Rolled Mild Steel Rectangle Tube (1" x 1.5" x 24")
Tools: Horizontal/vertical metal cutting band saw, angle grinder, cutting wheel.
- Cut 45 degree angle on both ends of the brace member using the Horizontal/vertical metal cutting band saw. The cuts should be made, as shown, in an orientation to connect the main and rear tube together.
- Using the angle grinder and cutting wheel, notch the brace member that that it cups the rear and main tube allowing for a strong weld to be made.
- Repeat with the second brace member.
End Result:Finished brace members cut and notched to fit into the main and rear tube for extra support.
Step 11: Head Tube Assembly
Parts: Tapered Head Tube, Sunlite Threaded MX Fork, Head Tube Bearing Stack.
Tools: Adjustable wrench.
- Using the instructions that came with the Head Tube Bearing Stack, assemble the first three components (bottom cup, bearing, and washer) onto the fork neck)
- Place the Tapered Head Tube on the fork neck ensuring that the head tube is seated into the bottom cup pf the bearing stack.
- Again using the included bearing stack instructions, place the bearing, top cup, and washer onto the fork. Ensure that the head tube is seated in the top cup. (the head tube should only be touching the top and bottom cup's and nothing else)
- Using the provided head tube nut. Tighten the the bearing stack/head tube assembly onto the threaded fork. The head tube should have no wobble and should be able to easily spin freely.
End Result: Front fork, head tube, and bearing stack all successfully assembled to complete the front end assembly.
Step 12: Welding the Chassis
Once the head tube has been assembled and the chassis is all ready, it is time to have everything welded. The mast holder can be slid through the 5' chassis pipe. It should be slid 1' back from the front and welded there. The rear of the chassis, where the 5' and 3.5' pipes meet perpendicular, can be welded together. The 2' support beams, as seen in previous pictures, can be welded. The head tube will need to be welded to the front of the chassis at a 45-degree angle. Lastly, the foot bar can then be welded to the top of the fork, seated perpendicular and parallel to the ground.
Step 13: Mount a Seat
The seat you choose can be up to you based on your size and comfort needs. For this particular project we chose a typical cheap folding metal chair.
Saw the legs off just below the actual seat portion so that all you have is the back of the chair, and the supports that lead down only as far as the seat. The hinges that allow the chair to fold should also remain included so the back can fold down.
Arrange the chair where you want it to sit on the chassis, centered on the long part of the chassis, above the rear axle and over the supports. Mark out 3-4 spots in a triangle or square shape on the chassis that would fit under the metal seat portion of the chair.
Drill holes through the seat and through the steel chassis. Select a bolt that's long enough to go through the chair and chassis, secure everything together with a washer and nut.
Step 14: Mast Assembly

Because the mast is too long and too expensive to ship at its full length of 13 feet, you'll have to put the two pieces together as tightly as possible.
We used an aluminum collar with a 2" inner diameter that was just big enough to hold the outer diameters of the two main mast pieces. Slide both mast pieces into the collar where they meet roughly in the middle. Drill through the aluminum and secure with nuts and bolts that will reach all the way through. One or two bolts per mast piece should do. Try to sand out any sharp edges to avoid cutting your sail.
Similarly for the boom, you will bolt in a t-shaped pipe (mast-boom connector) to one end of the aluminum pipe. Make sure not to push the boom all the way through the intersection. That remaining space in the t-pipe should have an inner diameter significantly larger than the outer diameter of the mast because it will need to be able to swing around.
Before you slide the sail on and put everything together, mark out where on the boom you want to place your Eye Bolts (the bolts with the loop on the end). Then drill through and secure them with a nut. Mark the same spots on your sail where your boom will sit, you will need to cut small holes so the loop end will stick out from under the boom. This is where you will thread your paracord rigging.
Recommendations

Books and Bookshelves Contest

Made with AI - Autodesk Design & Make - Student Contest

Engineering in the Kitchen - Autodesk Design & Make - Student Contest

Rosinka Moscow BY and FOR Rosinka residents
- What is Rosinka Moscow
Archive for the ‘PLANS AND PLACES’ Category
Cirque du soleil in moscow.
Posted by Rosinka Moscow in PLANS AND PLACES . Leave a comment
The Dralion show of the Cirque du Soleil will come to Moscow beginning March 6 at the Luzhniki Palace of Sports. For more information and tickets, visit the website:
http://www.cirquedusoleil.com/en/shows/dralion/default.aspx
Share this:
Russian restaurant.
Posted by Rosinka Moscow in PLANS AND PLACES , Restaurants . Leave a comment
Are you looking to experience Russian food and drinks? If so, try Mari Vanna located in the city (Address: Spiridonyevsky lane 10a ).
http://www.marivanna.ru/msk/#/about/
Recommended by a resident
AWO arts and crafts festival

Miss Universe in Moscow: November 5th and 9th
Miss Universe is coming to Moscow this year. You can purchase tickets for the Preliminary Competition on November 5 th or the Finals Competition on November 9 th . The events will be held at Crocus City Hall.
For more information, including how to purchase tickets, visit this site:
http://missuniverse.com/pageant/tickets
Halloween offer from Monfetti party shop
Posted by Rosinka Moscow in PLANS AND PLACES , SHOPPING, SERVICES AND TIPS , Where can I find...? , YES WITH KIDS . Leave a comment

Harvest Ball- 16 November

Movie showings in English: 12th October
Posted by Rosinka Moscow in General information and tips , PLANS AND PLACES . Leave a comment
English Library in Moscow
Did you know that there is an American Center in Moscow with an English library? The library contains over 8,000 books that can be borrowed and cover a range of subjects including business, history, and children’s themes. The online catalog and more information can be found at this link:
http://www.amc.ru/?section=library
Moscow Symphony Orchestra

Follow Blog via Email
Enter your email address to follow this blog and receive notifications of new posts by email.
Email Address:
- 18,490 hits
- February 2014
- January 2014
- November 2013
- October 2013
- September 2013
- August 2013
- February 2013
Blog at WordPress.com.
- Already have a WordPress.com account? Log in now.
- Subscribe Subscribed
- Report this content
- View site in Reader
- Manage subscriptions
- Collapse this bar
- Classifieds
- Remember Me Forgot Password?
- Boats Sailboats Discussion rc land yacht
- Electric Flight
- Advertising
- Our Sponsors
- Review Policies
- Terms of Service
- Privacy Policy
- Site History
- Mark Forums Read
- Member Search
- Upcoming Articles
- Do Not Sell My Data
- Manage Consent
- Back to Top
- Popular Professionals
- Design & Planning
- Construction & Renovation
- Finishes & Fixtures
- Landscaping & Outdoor
- Systems & Appliances
- Interior Designers & Decorators
- Architects & Building Designers
- Design-Build Firms
- Kitchen & Bathroom Designers
- General Contractors
- Kitchen & Bathroom Remodelers
- Home Builders
- Roofing & Gutters
- Cabinets & Cabinetry
- Tile & Stone
- Hardwood Flooring Dealers
- Landscape Contractors
- Landscape Architects & Landscape Designers
- Home Stagers
- Swimming Pool Builders
- Lighting Designers and Suppliers
- 3D Rendering
- Sustainable Design
- Basement Design
- Architectural Design
- Universal Design
- Energy-Efficient Homes
- Multigenerational Homes
- House Plans
- Home Remodeling
- Home Additions
- Green Building
- Garage Building
- New Home Construction
- Basement Remodeling
- Stair & Railing Contractors
- Cabinetry & Cabinet Makers
- Roofing & Gutter Contractors
- Window Contractors
- Exterior & Siding Contractors
- Carpet Contractors
- Carpet Installation
- Flooring Contractors
- Wood Floor Refinishing
- Tile Installation
- Custom Countertops
- Quartz Countertops
- Cabinet Refinishing
- Custom Bathroom Vanities
- Finish Carpentry
- Cabinet Repair
- Custom Windows
- Window Treatment Services
- Window Repair
- Fireplace Contractors
- Paint & Wall Covering Dealers
- Door Contractors
- Glass & Shower Door Contractors
- Landscape Construction
- Land Clearing
- Garden & Landscape Supplies
- Deck & Patio Builders
- Deck Repair
- Patio Design
- Stone, Pavers, & Concrete
- Paver Installation
- Driveway & Paving Contractors
- Driveway Repair
- Asphalt Paving
- Garage Door Repair
- Fence Contractors
- Fence Installation
- Gate Repair
- Pergola Construction
- Spa & Pool Maintenance
- Swimming Pool Contractors
- Hot Tub Installation
- HVAC Contractors
- Electricians
- Appliance Services
- Solar Energy Contractors
- Outdoor Lighting Installation
- Landscape Lighting Installation
- Outdoor Lighting & Audio/Visual Specialists
- Home Theater & Home Automation Services
- Handyman Services
- Closet Designers
- Professional Organizers
- Furniture & Accessories Retailers
- Furniture Repair & Upholstery Services
- Specialty Contractors
- Color Consulting
- Wine Cellar Designers & Builders
- Home Inspection
- Custom Artists
- Columbus, OH Painters
- New York City, NY Landscapers
- San Diego, CA Bathroom Remodelers
- Minneapolis, MN Architects
- Portland, OR Tile Installers
- Kansas City, MO Flooring Contractors
- Denver, CO Countertop Installers
- San Francisco, CA New Home Builders
- Rugs & Decor
- Home Improvement
- Kitchen & Tabletop
- Bathroom Vanities
- Bathroom Vanity Lighting
- Bathroom Mirrors
- Bathroom Fixtures
- Nightstands & Bedside Tables
- Kitchen & Dining
- Bar Stools & Counter Stools
- Dining Chairs
- Dining Tables
- Buffets and Sideboards
- Kitchen Fixtures
- Wall Mirrors
- Living Room
- Armchairs & Accent Chairs
- Coffee & Accent Tables
- Sofas & Sectionals
- Media Storage
- Patio & Outdoor Furniture
- Outdoor Lighting
- Ceiling Lighting
- Chandeliers
- Pendant Lighting
- Wall Sconces
- Desks & Hutches
- Office Chairs
- View All Products
- Side & End Tables
- Console Tables
- Living Room Sets
- Chaise Lounges
- Ottomans & Poufs
- Bedroom Furniture
- Nightstands
- Bedroom Sets
- Dining Room Sets
- Sideboards & Buffets
- File Cabinets
- Room Dividers
- Furniture Sale
- Trending in Furniture
- View All Furniture
- Bath Vanities
- Single Vanities
- Double Vanities
- Small Vanities
- Transitional Vanities
- Modern Vanities
- Houzz Curated Vanities
- Best Selling Vanities
- Bathroom Vanity Mirrors
- Medicine Cabinets
- Bathroom Faucets
- Bathroom Sinks
- Shower Doors
- Showerheads & Body Sprays
- Bathroom Accessories
- Bathroom Storage
- Trending in Bath
- View All Bath
- How to Choose a Bathroom Vanity

- Patio Furniture
- Outdoor Dining Furniture
- Outdoor Lounge Furniture
- Outdoor Chairs
- Adirondack Chairs
- Outdoor Bar Furniture
- Outdoor Benches
- Wall Lights & Sconces
- Outdoor Flush-Mounts
- Landscape Lighting
- Outdoor Flood & Spot Lights
- Outdoor Decor
- Outdoor Rugs
- Outdoor Cushions & Pillows
- Patio Umbrellas
- Lawn & Garden
- Garden Statues & Yard Art
- Planters & Pots
- Outdoor Sale
- Trending in Outdoor
- View All Outdoor
- 8 x 10 Rugs
- 9 x 12 Rugs
- Hall & Stair Runners
- Home Decor & Accents
- Pillows & Throws
- Decorative Storage
- Faux Florals
- Wall Panels
- Window Treatments
- Curtain Rods
- Blackout Curtains
- Blinds & Shades
- Rugs & Decor Sale
- Trending in Rugs & Decor
- View All Rugs & Decor
- Pendant Lights
- Flush-Mounts
- Ceiling Fans
- Track Lighting
- Wall Lighting
- Swing Arm Wall Lights
- Display Lighting
- Table Lamps
- Floor Lamps
- Lamp Shades
- Lighting Sale
- Trending in Lighting
- View All Lighting
- Bathroom Remodel
- Kitchen Remodel
- Kitchen Faucets
- Kitchen Sinks
- Major Kitchen Appliances
- Cabinet Hardware
- Backsplash Tile
- Mosaic Tile
- Wall & Floor Tile
- Accent, Trim & Border Tile
- Whole House Remodel
- Heating & Cooling
- Building Materials
- Front Doors
- Interior Doors
- Home Improvement Sale
- Trending in Home Improvement
- View All Home Improvement
- Cups & Glassware
- Kitchen & Table Linens
- Kitchen Storage and Org
- Kitchen Islands & Carts
- Food Containers & Canisters
- Pantry & Cabinet Organizers
- Kitchen Appliances
- Gas & Electric Ranges
- Range Hoods & Vents
- Beer & Wine Refrigerators
- Small Kitchen Appliances
- Cookware & Bakeware
- Tools & Gadgets
- Kitchen & Tabletop Sale
- Trending in Kitchen & Tabletop
- View All Kitchen & Tabletop
- Storage & Organization
- Baby & Kids

- View all photos
- Dining Room
- Breakfast Nook
- Family Room
- Bed & Bath
- Powder Room
- Storage & Closet
- Outdoor Kitchen
- Bar & Wine
- Wine Cellar
- Home Office
- Popular Design Ideas
- Kitchen Backsplash
- Deck Railing
- Privacy Fence
- Small Closet
- Stories and Guides
- Popular Stories
- Renovation Cost Guides
- Fence Installation Cost Guide
- Window Installation Cost Guide
- Discussions
- Design Dilemmas
- Before & After
- Houzz Research
- View all pros
- View all services
- View all products
- View all sales
- Living Room Chairs
- Dining Room Furniture
- Coffee Tables
- Home Office Furniture
- Join as a Pro
- Interior Design Software
- Project Management
- Custom Website
- Lead Generation
- Invoicing & Billing
- Landscape Contractor Software
- General Contractor Software
- Remodeler Software
- Builder Software
- Roofer Software
- Architect Software
- Takeoff Software
- Lumber & Framing Takeoffs
- Steel Takeoffs
- Concrete Takeoffs
- Drywall Takeoffs
- Insulation Takeoffs
- Stories & Guides
- LATEST FROM HOUZZ
- HOUZZ DISCUSSIONS
- SHOP KITCHEN & DINING
- Kitchen & Dining Furniture
- Sinks & Faucets
- Kitchen Cabinets & Storage
- Knobs & Pulls
- Kitchen Knives
- KITCHEN PHOTOS
- FIND KITCHEN PROS
- Bath Accessories
- Bath Linens
- BATH PHOTOS
- FIND BATH PROS
- SHOP BEDROOM
- Beds & Headboards
- Bedroom Decor
- Closet Storage
- Bedroom Vanities
- BEDROOM PHOTOS
- Kids' Room
- FIND DESIGN PROS
- SHOP LIVING
- Fireplaces & Accessories
- LIVING PHOTOS
- SHOP OUTDOOR
- Pool & Spa
- Backyard Play
- OUTDOOR PHOTOS
- FIND LANDSCAPING PROS
- SHOP LIGHTING
- Bathroom & Vanity
- Flush Mounts
- Kitchen & Cabinet
- Outdoor Wall Lights
- Outdoor Hanging Lights
- Kids' Lighting
- Decorative Accents
- Artificial Flowers & Plants
- Decorative Objects
- Screens & Room Dividers
- Wall Shelves
- About Houzz
- Houzz Credit Cards
- Privacy & Notice
- Cookie Policy
- Your Privacy Choices
- Mobile Apps
- Copyright & Trademark
- For Professionals
- Houzz vs. Houzz Pro
- Houzz Pro vs. Ivy
- Houzz Pro Advertising Reviews
- Houzz Pro 3D Floor Planner Reviews
- Trade Program
- Buttons & Badges
- Your Orders
- Shipping & Delivery
- Return Policy
- Houzz Canada
- Review Professionals
- Suggested Professionals
- Accessibility
- Houzz Support
- COUNTRY COUNTRY
New & Custom Home Builders in Elektrostal'
Location (1).
- Use My Current Location
Popular Locations
- Albuquerque
- Cedar Rapids
- Grand Rapids
- Indianapolis
- Jacksonville
- Kansas City
- Little Rock
- Los Angeles
- Minneapolis
- New Orleans
- Oklahoma City
- Orange County
- Philadelphia
- Portland Maine
- Salt Lake City
- San Francisco
- San Luis Obispo
- Santa Barbara
- Washington D.C.
- Elektrostal', Moscow Oblast, Russia
Featured Reviews for New & Custom Home Builders in Elektrostal'
- Reach out to the pro(s) you want, then share your vision to get the ball rolling.
- Request and compare quotes, then hire the Home Builder that perfectly fits your project and budget limits.
Before choosing a Builder for your residential home project in Elektrostal', there are a few important steps to take:
- Define your project: Outline your desired home type, features, and layout. Provide specific details and preferences to help the builder understand your vision.
- Establish a budget: Develop a comprehensive budget, including construction expenses and material costs. Communicate your budgetary constraints to the builder from the beginning.
- Timeline: Share your estimated timeline or desired completion date.
- Site conditions: Inform the builder about any unique site conditions or challenges.
- Local regulations: Make the builder aware of any building regulations or permits required.
- Custom Homes
- Floor Plans
- House Framing
- Land Surveying
- Site Planning
What do new home building contractors do?
Questions to ask a prospective custom home builder in elektrostal', moscow oblast, russia:, business services, connect with us.
IMAGES
VIDEO
COMMENTS
The first step in designing this land yacht was assembling all the required RC gear. This really dictates the layout and physical size of your land yachts 'body' For a functional land yacht you only need a very basic RC setup: 2chanel transmitter & receiver; 1x battery pack; 1x servo switch (on off switch) 1x steering servo (i used a 17g servo)
Stiletto! A 1/4 scale R/C model of my America's Cup winning US 203. It has many of the same features found on full size land yachts. I Including a double-tapered wing mast and weight-tuned suspension. Stiletto is not a "sailboat on wheels", rather, it is a true land yacht model. With a top speed of over 30 MPH, you won't find a better kit ...
No plan, but I built several 25 years ago and they rocked. I used mylar for the sail and airplane wheels on a canard-style design, and the land yacht was very responsive. Even in light winds it accelerated very quickly and reached pretty high speeds (faster than the wind) but tacking and running into the wind were tough because the yacht was so lightweight - it would not carry its speed well ...
Here is a selection of plans and resources. Everything from a 375mm boat right up to a 1500mm fast yacht. 7 designs absolutely free to download. ... easy, and affordable home build RC yacht. RS-RG65 - 650mm plans, measures to international RG65 rules. A full forward hull and a straight stern. This boat has proven to be a very fast and ...
First real running (with decent wind) of our DIY RC sail car.Based on this design from IceFlyingTim: https://www.youtube.com/watch?v=RfUXuYVOCU4&list=PLikL-g...
When used on inline skates or skate boards you can notice great differences in bearing performance because each set of bearings is supporting 20-40 pounds. On a model landsailer each set of bearings supports about 1-2 pounds. This small load makes the advantages of "better" bearings much smaller.
Step 3: Construction. The model would be made out of the following parts: -5mm thick plywood (the laser file I used occupied a 300x600mm area, but the parts can be rearranged) -3000mm of 8mm diameter aluminium rods. -Plastic screws. -Fabric for a sail (approxiamately 800x300mm) -3xWheels.
The plans include written instructions, CAD drawings and a bill of materials. These instructions have been tested thoroughly so that you can enjoy building your model with ease. Each model requires a 2-channel radio with one steering servo and one arm type sail servo. These can be purchased at www.towerhobbies.com. If you do not have any radio ...
A close-up look at my 3D Printed RC land yacht project.
Instructions on building (Do It Your-Self) the hull of the ITF 3/4 PVC RC Land Sailor
R/C Landsailer. By nospacers in Circuits Remote Control. 9,576. 27. 8. This is a home made landsailer using a wing sail instead of a traditional fabric sail. The sail is constructed with a foam board inner structure and wrapped with poster board to create the airfoil shape. The frame is simple enough, just 2 aluminum strips bolted together ...
Our eBook by New Zealander Bryn Heveldt covers strip planking, fibreglass strengthening, mould and casting techniques, electrics installation, spray painting and masking, sail making and tuning. To get started on your Racing Sparrow model RC yacht project, purchase our eBook and download the PDF now.
Discussion LS-1 Land Yacht Plans? Sailboats. buddy code for a bat 1. not sure if its good at all the warehoused, but i got mine from the east USA warehouse. $69.94 good for 14 days good till 1 march 2016
I'll give you the 3D CAD drawings and dimensions of every part that needs to be made, along with lists of materials, cutting lists and detailed building instructions. Everything you need to build your own landyacht. Plans and instructions are clear and are very easy to follow. These plans are high quality C.A.D designs (Autodesk-INVENTOR).
Part 2 Instructions On Building The IFT PVC RC Land Sailor. Mast, Boom And Sail Plan Build.
The first part of this build is preparing the sail for the land yacht. Our land yacht utilizes a sail that has a 5-foot boom and a height of 10.5 feet. This sail height was determined to work with the size of the land yacht. Our team used a much larger sail from a sailboat that will need to be cut to the right dimensions.
Archive for the 'PLANS AND PLACES' Category. 10 Feb. Cirque du Soleil in Moscow. Posted by Rosinka Moscow in PLANS AND PLACES. Leave a comment. The Dralion show of the Cirque du Soleil will come to Moscow beginning March 6 at the Luzhniki Palace of Sports. For more information and tickets, visit the website:
Get directions to Yuzhny prospekt, 6к1 and view details like the building's postal code, description, photos, and reviews on each business in the building
Manny. Aug 29, 2007, 01:15 PM. #3. DarthDude. DarthDude. Landlubber. Ouch.... I was actually contemplating building me a land yacht out of some wood, the wheels, wishbones and McPherson struts off my old Tamiya TA02 and the old mast and sails off my Fairwind..... then going on down to the local r/c car track and SERIOUSLY annoy the guys running ...
They perform local market research to determine whether the prospective homesites make sense in the Elektrostal', Moscow Oblast, Russia market, as well as survey the land on which the custom house will be built to make sure it is suitable for construction. Custom house building companies also obtain the necessary permits.
The city covers an area of 2511 km2, while the urban area covers 5891 km2, and the metropolitan area covers over 26000 km2. Moscow is among the world's largest cities, being the most populous city entirely in Europe, the largest urban and metropolitan area in Europe, and the largest city by land area on the European continent. - Wikipedia