[email protected]

Category: Our Catamaran Build Kits
Recommended equipment.
Quality suppliers & manufacturers
The schionning team have a lot of contact with equipment suppliers and manufacturers, and hear feedback on certain brands or systems from our many customers. there are many schionnings cruising the world and testing products longevity and the customer service offered by the manufacturer., on this page we will list products and companies that we know to provide above average quality and service. it is always growing, and if your company provides equipment used on our designs and you would like to be included - please contact us., engines & drive systems.

Visit: https://oceanvolt.com
Batteries, Power Management

LITHIUM POWER (VIC)
Back in 2013 I knew that my boat batteries were reaching the end of their lives, I had been researching LiFePO4 cells for a few years and decided that I should install them. Unfortunatly I was unable to find a local supplier. So Lithium Power was established.
Technical Information
The technical information page is a collection of documents (mostly in pdf format) on the materials and systems used in schionning catamarans. including data sheets, engineering information, strength comparisons of each core material and informative articles from jeff outling the design of certain system such as engine choices and main sheet systems., detailed engineering data for your research, we understand that getting your head around the process of building your own boat, or having one built, can take a little while. to gain a greater understanding of the materials used in our designs, the below data sheets have been supplied by atl composites, and contain all of the technical data you could need regarding the composites we use. in addition are articles or documents written by jeff about certain systems used on our designs and why., all technical information and data sheets on west system/duflex/durakore provided courtesy of atl composites. for more information please see the atl composites website here., documents library.
Information Sheet – CE CERTIFICATION PROCESS
- Mainsheet Systems for Catamarans
- Motor Choices for Schionning Designs
- Weight and Weight Distribution Schionning Designs
- Schionning Designs Sailing Performance and Tips
- Hull Shapes and Performance – Power Designs
- Outboard Engines VS Diesels – Written by Ross McCombe
- An Outboard Installation That Works – Ross McCombe Follow up
- Data Sheet – DUFLEX BALSA for Catamaran Kit Builds
- Data Sheet – DUFLEX FOAM
- Data Sheet – FEATHERLIGHT Paper Honeycomb
- Data Sheet – WEST SYSTEM R105
- Data Sheet – PUMP SYSTEMS
- Data Sheet – MICROFIBRE BLEND 403
- Data Sheet – MICROLIGHT 410
- Data Sheet – MICROSPHERES 411
- Information Sheet – USING FILLERS
- Data Sheet – KINETIX RESIN Thixotropic
- Information Sheet – DURAKORE PLANKS 413
- Data Sheet – DURAKORE PLANKING 414
Kit Materials Contents
Kit materials' contents, so if you order a schionning kit, what exactly is going to arrive see an overview of the materials you will receive, and what each is used for during the build process. fibreglass cloth or tapes microspheres, microballoons or microfibers take a closer look and you can answer these questions., our schionning kits are a no nonsense, common-sense approach to building a boat. we offer great service, fast delivery and access to anything you could need for your boat straight from the supplier to your door. our construction plans and kits are sold with 100% professional boatbuilder support via phone and email, any time you're unsure or just need a second opinion, we're here..

Our kits contain all of your basic materials to build your boat to a faired shell stage, ready for painting and fit-out. We have sail-away costing estimates available for all of our standard designs, and this will give you an accurate idea of the overall cost of your project. This costing varies depending on your level of finish, as you can imagine different options vary greatly in price.
Below is a quick glance at what your Schionning Kit will include and what each item is primarily used for, we hope this is helpful and if you should require more detailed information please don’t hesitate to contact our office.
What do I actually receive?

DUFLEX PRE-LAMINATED PANELS
DuFlex pre-laminated panels are the main and most important material used in our kits, predominantly in the flat panel designs, however they are used in Strip-planked designs also, though to a lesser extent. These panels are 2400mm x 1200mm and are CNC routed to speed up build time on our Wildernes X Series, as well as some of our power designs. For internal furniture, a paper honeycomb core is used instead of the end-grain balsa wood core that is used for main structural areas. The use of this is purely to save weight in the shell and therefore produce a faster, more responsive catamaran.

KINETIX LAMINATING RESIN & HARDENER

WEST SYSTEM EPOXY RESINS

FIBREGLASS TAPES (DOUBLE BIAS)

CARBON FIBRE CLOTH

FIBREGLASS CLOTH
The kit process, building your own boat can be a daunting prospect, however to demonstrate each step in the kit assembly process, we've created this guide for you to study. as you can see our kits are the ultimate in building efficiency and have been streamlined over 30+ years to ensure that you're on the water faster and with less effort., how does it all go together.

The first step to building your dream catamaran begins with a strongback – this is a square frame used to position the temporary frames that will be used to form the hull shape. This frame will be set up and must be square and accurate, a string or laser level can be used to achieve this.

The forebeam is now installed along with the striker attachment fitting, as shown above. The bridgedeck is installed shortly after and taped onto the bulkheads with webs installed, this now completes what is a quite stiff and strong platform to work on.

Now that the bridgedeck is in place, the forward webs and dash will be fitted. At this stage, all furniture and internal work begins, with the main panels left off for ease of access when working.

Material Choices
Schionning material choices, solutions that work best for catamarans & why, our designs are based on cored composite construction techniques using west system epoxy resin and knitted fabrics. but given the range of today's composite technologies, which solution works best for catamarans and why written by jeff schionning, selecting the correct materials, resin choices.

It also fully protects the boat against water absorption and it can not develop the dreaded Osmosis.
We choose ATL Composite’s resin systems for their superior quality, reliability and value for money.
Having worked closely with the ATL Composites team and their products for many years, we know we can stand by their material solutions, and rely on great service should something unexpected happen.

This may not seem important but when working with a material for an extended period of time, the small things make all the difference.
CORES Which One to Use?

- End-Grain Balsa – 150kg per cubic metre
- Superlight Balsa – 94kg per cubic metre
- Western Red Cedar – 360-380kg per cubic metre
- Foam – 80kg per cubic metre
BALSA END GRAIN (150 kg/cubic metre)
Balsa has very good values and we can produce a shell using a very light laminate. It will be very stiff and very resilient to fatigue.
It has exceptional qualities including very high compression strength, extremely good sheer capabilities and fantastic sheer stiffness.
Compressive strength is the resistance to collapsing when pressure is applied perpendicular to the surface as when pushing directly onto the material with the point of your finger. Balsa is far stronger than Foam (80kg/cubic metre) in compression.
Balsa is also very strong in shear. This is when the core sample is held flat between your hands, one hand slid one way and the other slid the opposite way, when the core tears through the middle the core has failed in sheer. The amount of stretch you feel before the core shears is shear stiffness. To compensate for sheer weakness the core is made thicker. So 13mm Balsa may be equal in sheer to 19mm Foam.
(80 to 200 kg/m³)
There are many boats sailing that are built from foam as it’s mechanical properties are good for boat building.
- Initially one would expect this cat shell to be lighter as it is ½ the weight of Balsa. We do have to compensate for its weaknesses and will then add to the reinforcement the reinforcement on the outside to spread that compression load over more core and need a triaxial type weave to compensate for the veneer content that runs fore and aft on the Durakore.
- Secondly, we need to increase the Core thickness to compensate for the shear value, usually neutralizing the weight advantage.
- We only use structural foam core that is closed-cell and cross-linked.
The end result using foam core amounts to a very similar total boat weight. Professional builders can achieve a good result but usually use vacuum bagging and very good molds to achieve this.
Secondary Issues
Balsa can absorb water. It needs extreme neglect to rot (very unusual). Water soaks along the end grain quickly. It travels very slowly across the grain. We use balsa under the waterline especially because of it’s high compression strength for beaching etc. any core type must be sealed. Damage to all cores results in the same sort of repair. Notice a damp spot remaining when drying out to anti-foul… simply grind back the surface glass exposing the core, dry it out and re-glass – it’s that easy.
Timber cores are cheaper than Foam in most cases.
A light, high tech cat returns a far better (often 2 – 3 times) re-sale than lower tech materials. Often saving $10,000 on materials initially, loses $200,000 on re-sale – a serious reality.
Our boats can be built using Balsa, Foam or Western Red Cedar. Combine strength, stiffness, lightness and cost, with ease of use – it just makes good sense!
- BUILDING RAKU FROM A KIT
- Duflex Kit Construction in 9 Steps
BUILD YOUR RAKU CAT WITH A DuFLEX KIT BY FOLLOWING THESE NINE BASIC STEPS

Step 1. Kit Design
Work with us to finalise the details of the design you have chosen including any design options or additional modules to be included in the kit.
We will determine the laminates, the number of panels required for each laminate, create the cutting files and prepare a quote for the kit if it is not already priced.
Once the design details and pricing are confirmed you are ready to place your order.

Step 2. Unpacking
2. The kit arrives at your workshop door, usually by container, as a stack of 1.2m x 2.4m routed composite panels ready to be joined. The shipment will normally include additional reinforcements, resins, and ancilary products as specified.
Unpack the shipment and stack the panels out of the way of the space where the panels will be joined.
If you have purchased a joined kit many of the panels will already be joined up to the length that can be shipped in a container (12m).

Step 3 Joining the Panels
Set up the work space where the panels are to be joined.
The panels have a scarf join called a Z join that facilitate the join without needing tapes.
The joining can be done with a heated Z press that cures the epoxy join quickly. Alternatively they can be joined with clamping pressure.
If the panel are are being joined with the Z press you will need an elevated work bench the full length of the longest panels you are using. (image below).
If you are joining them with a clamping technique the space can be on the factory floor.
A nesting booklet is provided with the kit to show how the panels are joined (right)

Joining the panels with clamping pressure

Panels are being joined into a single long panel by painting the surfaces of the scarf join with epoxy screwing through plywood battens that have a release film applied to one side.
Joining the panels with the Z Press

Step 4 Stacking Joined Panels
Once the joins are cured the panels are stacked to one side until they are needed for the job. The inividual parts should not be cut free of the panels until they are required.
Bulkhead and floor panels will be needed before the hull sides and cabin top so they should be left to the front of the stack wherever possible.

Step 5. Separating the Parts
When assembly is ready to begin the individual parts are separated from the panels by cutting the joining tabs. It is likely you will be building onto moulded hull bottoms that have been built from strip planking or another method of building moulded components. The process for building moulded components is described in another article.

Step 6. ASSEMBLY
As the joined panels are assembled onto the job you will need to apply glass tapes to the joins as specified in your plans.
Panels can be surfaced and coated inside and out with high build while they are on the workshop floor to minimise fairing time once they are assembled to the boat. The paint on the panels shown here has been kept back from the edges to provide a good bond for the tapes.

Smaller items such as steps, seats and dagger cases are nested into the kit and for the more complex parts diagrams are provided to assist with the assembly process.

Step 7. Interior
Interior kits can be ordered with the primary kit, or they can be ordered later when final decisions have been made about the interior arrangement.
A compromise solution is to order the interior as a set of plain planels that can be cut to shape on site after finalising the layout.

Step 8 Fairing, Painting, Hardware Installation
8. The DuFLEX construction process goes a long way to minising the amount of fairing that has to be done, but inevitably any boat that has not come out of a female mould will require some level of fairing and surface preparation prior to painting.
The fillers and resin systems required for the fairing work are normally supplied as part of the kit.
Hardware installation is the same as for any other form of construction using high density core inserts or consolidated laminate in way of fittings.

Step 9. Sailing
Go Sailing. This Barefoot 40 Catamaran was built entirely with a Duflex kit in Foam/Glass and Epoxy resin systems from ATL Composites

DuFLEX Kits are manufactured and supplied world wide by ATL Composites
atlcomposites.com.au
And in Europe by VDL Composites
www.vonderlinden.de/her/28/vdL-Composites-GmbH
For more information on DuFLEX and associated Products
atlcomposites.com.au/category/27/DuFLEX

Join the Newsletter

- Scroll to top
How To Create the Perfect Cruising Catamaran Layout
As an Amazon Associate, we earn from qualifying purchases. We may also earn commissions if you purchase products from other retailers after clicking on a link from our site.
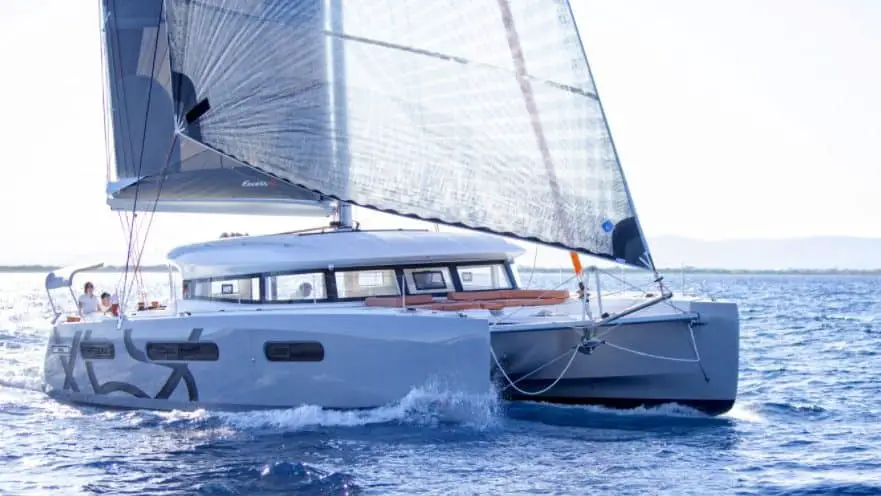
More than ever before, sailing fans are gaining an interest in catamaran layouts and designs that define performance. Many others are also looking into either buying a cruising catamaran or designing and building one. While building a catamaran is no piece of cake, this article shows you how to create the perfect cruising catamaran layout.
To create the perfect catamaran layout, carefully consider factors like a good hull design, optimal helm station placement, boat stability, and adequate load-carrying capacity. Excellent galley positioning, ease of handling, and spacious living and sleeping quarters are also crucial.
The modern cruising catamaran is a far cry from the simple Polynesian double canoe of old. That’s because structural innovations and new composite materials have resulted in multihulls with impressive cruising abilities. Keep reading to learn more about exceptional catamaran layouts.
The Changing Trends in Catamaran Designs
The early cruising catamaran designs resulted in boats that could sail much faster than traditional sailing boats. In addition, they could glide with ease in shallow waters and required less wind and crew. Unfortunately, these cruising cats were heavy, had small, cramped interiors, and boasted somewhat challenging handling abilities.
Today’s cruising catamarans are different. They boast the utmost comfort, high speeds, and the safety of a well-designed cruising yacht. They are also more exciting, visually appealing, deliver the smoothest of rides, and sport more spacious interiors.
Have a look at the below video showcasing the top ten cruising catamarans:
Features To Look Out for in Catamaran Design Layouts
Cruising catamaran designers understand what most sailors look for in a cruising vessel. They, therefore, design cruising multihulls that address these pertinent issues and more. Some of the features you might want to consider having in your dream boat include the following:
- Responsive performance. Outstanding performance allows for pleasurable cruising and ensures your safety since you have more options during difficult weather.
- Excellent load-carrying ability . This allows you to have an extended cruising vacation or ocean crossing.
- Boat stability . Go for lightweight, robust construction, which results in a lot of buoyancy.
- A low center of gravity for smooth rides and enhanced performance. Centering weight around a low center of gravity improves the overall sailing quality, reduces pitching movement and reduces the risk of capsizing .
- Adequate bridgedeck clearance to reduce slamming and provide better performance in rough conditions. A high bridgedeck also means less noise and slapping action from the waves hitting the boat bottom, thus ensuring a quieter, smoother ride.
- Comfortable sailing. To enjoy a quality life on board, you need comfort while at sea. Thus, elements like gentle movement, no creaks or groans, no bridgedeck slamming, and minimal pitching are essential for quality, peaceful and restful sleep.
Now that you know what a cutting-edge catamaran features, let’s look at how to create the perfect cruising catamaran layout.
Build a Larger-Sized Catamaran
The early catamarans ranged between 36-42 feet (10.9-12.8m). At the time, this appeared to be a good size in terms of safety and ease of handling. However, the boats were heavy, and the additional drag and displacement adversely affected their performance and windward ability.
It’s now possible to make the new generation catamarans lighter, larger, and more spacious with excellent power-to-weight features. The current trend is larger-sized catamarans in the 45-50 feet (13.7- 15.2) range. Composite engineering and technologically advanced equipment such as furling systems, electric winches, and autopilot make it easier for a smaller crew to sail larger boats with confidence. And to do so without compromising safety or stability.
Get the Best Catamaran Hull Design
A cruising catamaran’s performance depends on three main aspects; its length, the sail area, and the boat’s weight. Long boats are generally fast. A light boat with more sail area is also faster than a heavier boat with less sail area. In other words, you can make a multihull faster by making it longer, lighter, or adding more sail.
However, there are exceptions to this rule; a boat with too much sail area is more likely to capsize if there are brisk winds. Also, if the boat’s design makes it too light, it’ll be unable to handle much punishment, while a hull design that’s too slim would make the vessel incapable of carrying any significant loads. But that’s not all; if the boat is too long or too large, it’ll become grossly exorbitant. Narrow hull shape might also mean smaller cabins.
Nonetheless, these three factors alone are not enough to determine a cruising catamaran’s performance. While faster boats boast finer hulls, the wetted surface area tends to increase as fineness increases; thus, fine hulls end up becoming less fast in low wind speeds. Also, very wide hulls mean a reduction in actual performance.
The Prismatic Coefficient (Cp), a measure of how full the ends of the hull get, is the most essential design hull shape factor for any catamaran. A high Cp equals high speeds, although you can still use a lower Cp if you have fine hulls. Nevertheless, the key to a good Catamaran design is a higher Cp for fast sailing.
To achieve a high Cp, there are several things you can do:
- Fit bulb bows . Unfortunately, the bulb bows tend to slam in a seaway when you do this.
- Have an extensive planning aft section . However, this can increase the wetted surface area, WSA and lead to additional challenges.
- Flatten out the hull rocker and add a bustle aft. This helps to add displacement aft.
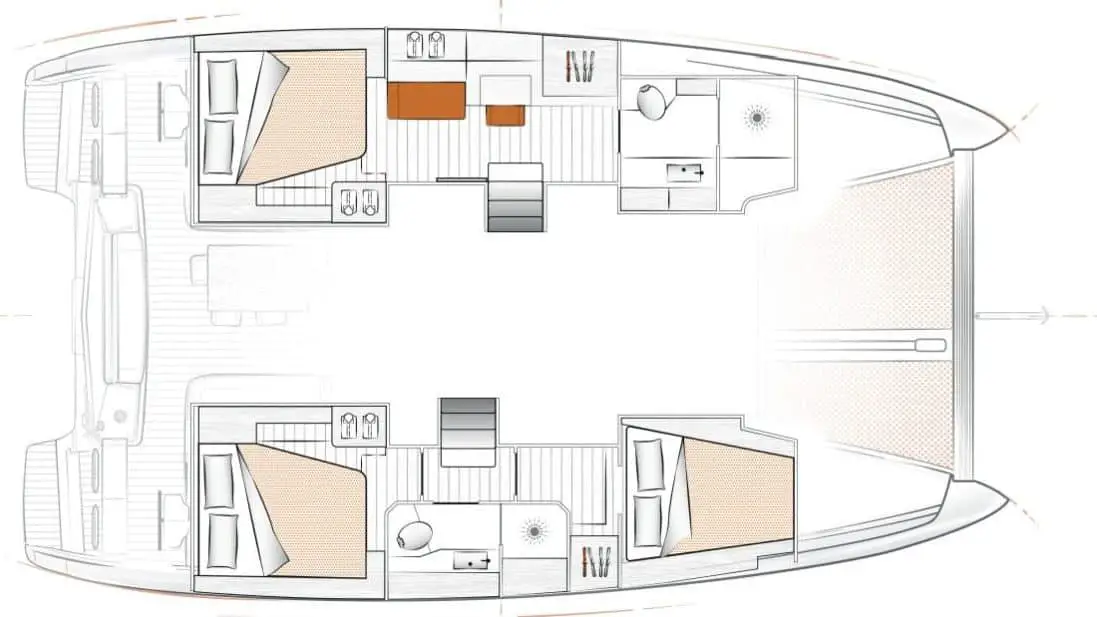
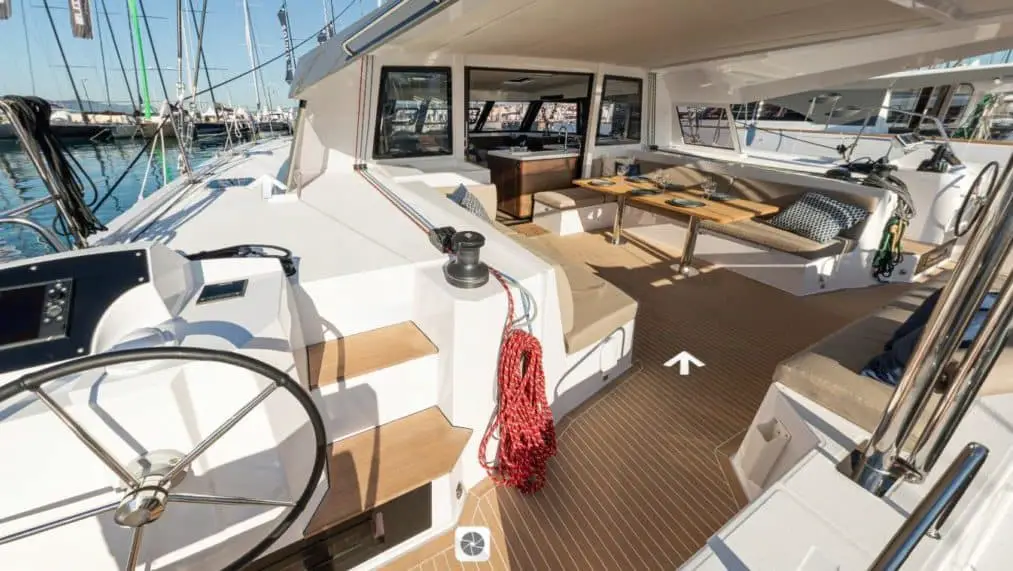
Build Convertible Main Living Spaces
The open cockpit is now a thing of the past. Instead, pioneering designers for catamaran manufacturers like Nautitech, Gunboat, and Catana now replace traditional-style salons, cockpits, and cabins with spacious indoor and outdoor living spaces. The concept involves merging separate saloon and cockpit areas with duplicate lounge spaces and the use of hard-wearing composite materials.
You can also design the cabin to suit your preferences. You may decide to add a cabin or remove one, add a bathroom, have the forward berth in the hull or on the wing deck.
- The design enhancements boost usable space while opening up the living areas.
- It reduces time and costs for interior maintenance and cleaning.
- Large windows bring in more light, increasing visibility.
- Luxurious, spacious, and airy owners’ cabins provide more comfortable living space.
Bulkhead Helm Stations vs. Twin Stern Steering
Many catamaran owners have traditionally preferred bulkhead steering. This helm position remains popular, but twin stern steering positions come with more advantages since they provide greater sails visibility. The twin stern positions are also best suited for racing or day sailing since they often lack adequate protection for extended cruising.
Exposed helms are not ideal for a long ocean passage. Go for a safe, secure, and well-protected helm station that provides good visibility and comfortable space for long watches. Again, it’s best to have all control lines at the helm to establish a static control station. Also, have all push-button-controlled winches, instruments, windlass, and autopilot prominently located inside the cockpit.
- Twin stern steering positions give you a better view of the sails
- You get a better feel for overall sailing conditions.
- Twin stern steering positions lack the necessary protection for extended cruising.
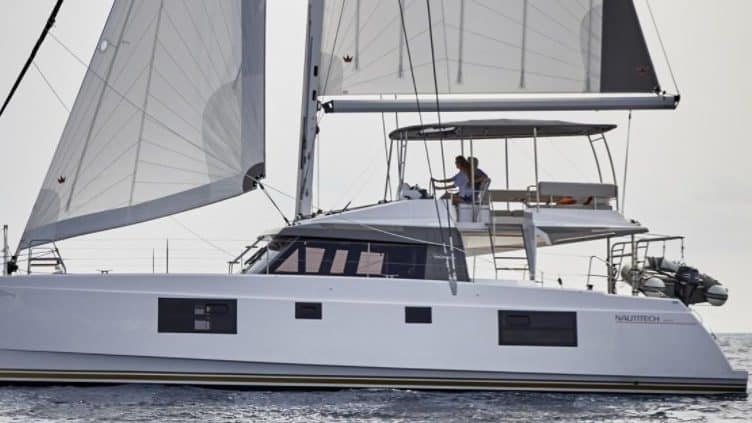
Go for the Flybridge Design
The flybridge design is appealing because it offers excellent visibility, more comfort, and additional entertainment and lounging space for everyone on board. Unfortunately for smaller boats – those below 50 feet (15.24m), there is minimal protection from the elements. As such, you might want to consider adding enclosures to offer protection. The flybridge, thus the helm, remains cut off from the vessel, which makes communicating with the crew a challenge.
- It provides great visibility.
- It offers comfortable spacing.
- It might be unsafe to move from the cockpit to the flybridge in bad weather.
- It isn’t easy to communicate with the crew.
Daggerboards vs. Fixed Keels
Average cruising catamarans typically utilize fixed keels while high-performance cats have daggerboards . Fixed keels allow you to beach your catamaran easily, and your hull remains intact if a collision occurs. While you lose some angle when sailing upwind, you gain more interior space in the hulls that you can put to good use.
Daggerboards are essential in a performance cruising catamaran since they guarantee that the boat delivers good upwind sailing, including during difficult situations. During long passages, they allow you to point better upwind though the drawback is that they consume much interior space within the cruising catamaran’s hulls.
Since flying on foils ( hydrofoils ) isn’t that practical on cruising catamarans, designers of larger-sized boats have also come up with modified daggerboards. These daggerboards produce lift and prevent leeway, too, thereby improving performance significantly, as seen with the Catana 59’s curved daggerboards. These foil-like daggerboards lift the boat ever so slightly upon reaching higher speeds, making it feel less heavy and much faster.
At the end of the day, calculating the performance of a boat sailing in a wide range of varying seas and winds might not be easy – despite a daggerboard or fixed keel configuration. This is because upwind speed depends not only on the sails’ quality but also windage and the height of the bridgedeck beyond the water.
- The design innovations -curved daggerboards and hydrofoils- improve catamaran performance significantly.
- Daggerboards enable you to access otherwise inaccessible anchorages.
- Daggerboards take up hull space in the hulls of your vessel.
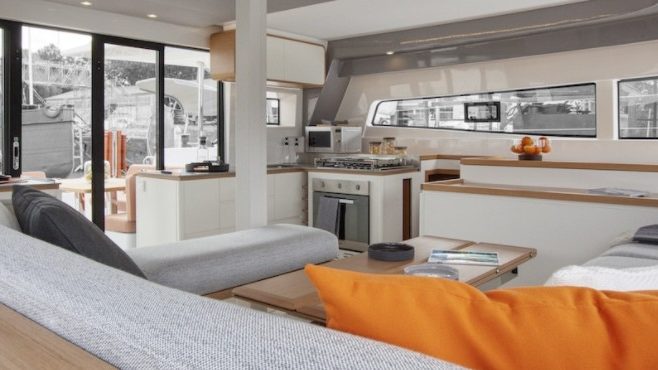
Galley Up vs. Galley Down
Galley layout are becoming more and more important as more people, including families, start sailing regularly. While at sea, your galley needs to be a safe place, well-ventilated, and functional. Everything should be well-thought-out for the sailor’s comfort, including handholds to make it safer to move around the boat.
While the galley location can either be up the bridgedeck or down in the hull, galley up appears to be the most popular trend. This makes the galley the focal point of both the living space and entertainment areas.
If you have a family, this placement is ideal since you make your meals from the galley and get to spend most of your time here. Many cruising families and couples prefer this arrangement and find separating the galley down the hull unappealing. Besides, carrying hot food up and down the staircase is unsafe.
Still, galley down is ideal for charter boats since it offers a private cooking area and uses up hull space efficiently.
- Having the galley on the bridgedeck is ideal for families and cruising couples.
- Placing the galley on a similar level with the serving area and cockpit is safer and less tiring.
- There’s better ventilation on the bridgedeck, making for comfortable cooking.
- There’s less kitchen privacy galley up.
- On smaller catamarans, this layout can impact the size of the saloon seating area significantly.
Production Catamaran vs. Custom
The choice of either a production catamaran or a custom design might seem pretty straightforward. Production catamarans from major brands come backed by proven designs, dependable construction, solid warranties, and many years of experience. The catamarans are easy to service, source for parts, and most – particularly the owner’s versions – hold on to their value, making them much easier to resell.
On their part, custom boats are fantastic in that you can tailor them to your exact needs. However, they might be more challenging to maintain or service. That’s because of parts unavailability and lack of construction knowledge.
Choose Quality Construction Materials
The best quality materials to use on your catamaran are both light and robust. While carbon fiber is great, plywood, plywood/epoxy, and strip-cedar are excellent materials too. What’s more, they are also affordable, so you don’t have to get too hung up on cutting-edge building materials. What matters is build quality; thus, a well-built plywood catamaran boat can last as long as a boat made from more high-tech materials.
Combining various materials also helps combat some of the issues that plague plywood boats in terms of resale value. At times, the design tends to make the boats appear pretty dated.
- Plywood and strip-cedar materials are affordable and provide excellent build quality.
- Plywood boats may have a lower resale value than those built with modern materials.
Consider Ease of Handling
An important factor in handling a cruising catamaran is deck layout. Most cruising catamarans sailed short-handed , so if your boat has one helm, all lines should run back here to allow for a static control station for the entire boat.
The other essential element is visibility from the helm. The 360 degrees of visibility while maneuvering, docking, or underway is crucial to your boat’s safety, as well as life and property. As such, you should be able to view both bows, or at least the pulpits and sterns, while standing at the helm. If not, you may have challenges handling the boat due to blind spots.
Consider the Load Carrying Capacity
A well-designed catamaran is enjoyable to sail in all weather conditions. It’s also much easier to handle than a monohull because of its widely spaced twin engines. But when you immerse extra hull depth, the vessel gets sluggish and moves slower, maneuvering in tight spots or when docking becomes more challenging. Furthermore, the hull submersion reduces bridge deck clearance, leading to hull slamming.
To allow for adequate load carrying capacity, you need a design that provides a generous displacement. This helps to ensure that you maintain reasonable bridge deck clearance even when fully loaded. It also allows you to avoid digging big holes in the water as you drag your transoms.
Displacement refers to the amount of buoyancy designed into the hulls, which essentially means that your boat will cruise better if its weight is less than your designed displacement.
Note that an overloaded catamaran not only loses out on performance but eventually, on safety too. To counter this, choose a lightweight catamaran with hulls bearing cored construction and interiors made of lightweight materials.
Remember, when you go cruising, you will need to carry fuel, extra water, supplies, equipment, and amenities, translating into thousands of extra pounds. Therefore, try and avoid the following design errors to ensure that your catamaran has an adequate load-carrying capacity:
- Avoid putting in place too much accommodation space.
- Avoid building a heavy boat ‐ use low-tech construction materials.
- Avoid installing inboards in a small boat.
- Lightly constructed catamarans perform faster and carry more weight.
- Cored construction makes for a strong and stiff catamaran, thus enabling good performance.
Final Thoughts
A well-designed cruising catamaran is a joy to behold. Today’s modern technological advancements mean that you can buy or build a light but strong cruising catamaran. And as you can see from this article, there are many excellent cruising catamaran layouts that you can choose from.
However, whichever layout you decide on needs to fit your sailing needs and purposes to ensure you remain comfortable and safe while at sea. Above all, ensure that you go for a vessel that you can handle with ease in all weather conditions.
Owner of CatamaranFreedom.com. A minimalist that has lived in a caravan in Sweden, 35ft Monohull in the Bahamas, and right now in his self-built Van. He just started the next adventure, to circumnavigate the world on a Catamaran!
Leave a Reply Cancel reply
Your email address will not be published. Required fields are marked *
Save my name and email in this browser for the next time I comment.
Recent Posts
Must-Have Boat Gear for Catamaran Sailors!
Sailing is probably the most gear-intensive activity I've ever done; there are so many decisions to be made about what gear to buy now, for tomorrow, and what to definitely never buy. The gear on...
6 Best Trailerable Trimarans For Bluewater and Coastal Sailing
Having a boat costs a lot of money, even when you are not using it, marina fees, etc. And once it is in the water most sailors never go very far from their "home marina" and sailing will be somewhat...
How To Build A Catamaran? (A Step-By-Step Guide)
Are you excited about the prospect of building your own catamaran? With a little research, planning, and the right tools, you can turn your vision into reality in no time.
In this step-by-step guide, well show you how to make the most of this incredible boatbuilding project.
From selecting the materials and planning the design to constructing the hulls and deck and outfitting the boat, well walk you through everything you need to know to build a catamaran of your own.
So, grab your tools and lets get started!
Table of Contents
Short Answer
Building a catamaran requires careful planning and a lot of patience.
The first step is to decide on the design and the materials you will use.
You will need plans for the project, along with lumber and other materials such as fiberglass and epoxy.
The next step is to build the catamaran frame, which involves cutting and fitting the wood pieces together to form the hulls and decks.
Finally, you will need to attach the decking, add the rig and sails, and finish the project with paint and varnish.
Benefits of Building a Catamaran
Building a catamaran can be a very rewarding experience.
Not only will you have the satisfaction of creating something with your own hands, but you will also have a boat that is uniquely yours.
Catamarans offer many benefits over traditional monohull boats, making them an ideal choice for those looking for a reliable and efficient ride.
These benefits include greater stability, more space, improved fuel efficiency, and greater speed.
Stability is one of the biggest advantages of catamarans.
The two hulls provide a wider base that helps to keep the boat from rocking and rolling in rough waters.
This makes for a much smoother and safer ride, even in choppy waters.
Additionally, the two hulls create an open area between them that is perfect for storing equipment, making it ideal for longer trips.
Catamarans are also more fuel efficient than monohulls.
This is because the two hulls provide lift, allowing the boat to glide through the water more easily.
This means you won’t need to use as much fuel to power your boat, allowing you to save money in the long run.
Finally, catamarans are faster than monohulls.
This is due to the increased surface area of the two hulls, which allows the boat to move more easily through the water.
This makes them ideal for those who want to travel quickly and efficiently.
Overall, building a catamaran can be a fun and rewarding experience.
With the right materials and tools, you can create a boat that is unique to you and offers many benefits over traditional monohull boats.
With the right planning and construction process, you can create a catamaran that will be the envy of your peers.
Selecting the Materials

Selecting the right materials is a crucial step in building a catamaran.
The type of material you choose will depend on the size and type of catamaran you are building, as well as your budget and experience.
Catamarans are typically constructed from wood, aluminum, or fiberglass.
Each of these materials has unique advantages, so it is important to research the pros and cons of each before making a decision.
Wood is the traditional material used to build catamarans and is often the most cost-effective option.
Wooden catamarans are strong and stable, and they can be custom-built to any size or shape.
However, wood requires a lot of maintenance and can be susceptible to rot and water damage.
Aluminum is a great option for larger catamarans, as it is lightweight and resistant to corrosion.
It is also relatively easy to work with and can be welded together to create a strong and durable structure.
However, aluminum is a more expensive material and is not as flexible as wood or fiberglass.
Fiberglass is the most popular material for building catamarans, as it is lightweight, strong, and resistant to corrosion.
Fiberglass is also relatively easy to work with and can be shaped to create unique designs.
However, fiberglass is also the most expensive option and can be difficult to repair if damaged.
Once you have selected the material, it is important to purchase the right amount for the project.
Make sure to measure the catamaran carefully and purchase enough material to account for any mistakes or waste.
It is also important to purchase high-quality materials that will last for years.
With the right materials, you can build an amazing catamaran that you will enjoy for years to come.
Planning the Design
When planning the design of your catamaran, youll need to consider a variety of factors, including the size, shape, and type of material youll be using.
Consider the size and weight of the catamaran and the type of water it will be used in.
Youll also need to think about how the catamaran will be used, such as for recreational or commercial purposes.
When it comes to the shape of the catamaran, the most common design is the two-hulled V-shape.
This shape is ideal as it offers stability and is easy to maneuver.
However, depending on the type of use, other shapes, such as the three-hulled catamaran, may be better suited.
The material you choose for your catamaran will also play a role in the design process.
Common materials used to build catamarans are wood, fiberglass, aluminum, and composites.
Each material has its own advantages and disadvantages, so its important to research and select the best material for your project.
Finally, when planning the design, youll need to consider the outfitting of the boat.
This includes items such as decking, seating, and a helm station.
Make sure to think about the type of equipment youll need for your catamaran, and consider how it will be installed.
By taking the time to plan the design of your catamaran, you can ensure that you get the best possible outcome.
Doing your research, selecting the right materials, and choosing the right outfitting will all help you create an amazing catamaran that will last for years to come.
Constructing the Hulls and Deck

Constructing the hulls and deck of a catamaran is perhaps the most important and time-consuming step in building a catamaran.
You will need to plan the design of the hulls and deck carefully to ensure that your catamaran is strong, stable, and seaworthy.
When constructing the hulls, you will need to use strong and light materials that are suitable for marine environments.
Fiberglass is a good choice for this, as it is strong and lightweight.
You will need to cut and shape the fiberglass to fit the shape of the hulls, and you will need to use a strong adhesive to bond the pieces together.
The deck of the catamaran will need to be strong and stable enough to support the weight of the passengers and cargo.
You will need to construct the deck out of marine-grade plywood, and you will need to use a strong adhesive to bond the pieces together.
You may also need to add extra support beams to the deck for added strength.
Once the hulls and deck have been constructed, you will need to sand and finish them to ensure a smooth and watertight surface.
You may need to use a sealer or primer to protect the wood and fiberglass from the elements.
Finally, you will need to attach the hulls and deck together.
This can be done with bolts, screws, or other fasteners.
You may also need to use a water-resistant sealant to ensure a watertight connection between the hulls and deck.
Outfitting the Boat
Outfitting a catamaran is an essential part of the build process.
Once the hulls and deck are constructed, you’ll need to ensure that all the necessary components are in place for a successful voyage.
This includes items such as masts, sails, rudders, and outriggers.
It is critical to ensure that the boat is outfitted with the right components for its size and purpose.
For example, if you are building a small catamaran for speed and agility, you’ll need to outfit it with a light and responsive mast and sail.
If you are building a larger craft for comfort and luxury, you’ll need to outfit it with a heavier and more resistant mast and sail.
Additionally, you’ll need to select the right outriggers and rudders for the catamaran’s size and purpose.
Outfitting a catamaran can be a complex process, and it is important to do the research and plan ahead.
Taking the time to select the right materials and components will ensure that your boat is outfitted for success.
Additionally, it is important to use quality materials and components to ensure a safe and successful voyage.
With careful planning and quality components, you can outfit your catamaran for a successful journey.
Acquiring the Right Tools

When it comes to building a catamaran, having the right tools can make all the difference.
To get started, you’ll need a variety of hand tools, including saws, drills, sanders, and screwdrivers.
You’ll also need power tools like routers, biscuit joiners, and angle grinders.
It’s also important to have safety equipment like safety glasses, ear protection, and respirators.
You’ll also need a variety of measuring tools, such as rulers, calipers, and tape measures.
Finally, you’ll need a selection of glues, adhesives, epoxies, and sealants.
With the right tools, you’ll be able to complete your catamaran project safely and efficiently.
Researching and Planning Your Build
Researching and planning your build are essential steps in the process of building a catamaran.
The first step is to become familiar with the design and construction of catamarans.
Start by researching different types of catamarans, from the small and lightweight recreational boats to the larger and more luxurious cruising vessels.
Learn about the advantages and disadvantages of the different types of catamarans and determine which type is best suited to your needs.
Once you have a good understanding of the different types of catamarans, you can begin researching the materials and tools you will need for your project.
You will need to choose the type of wood you will use for the boats hulls and deck, as well as the type of fiberglass and resin you will use for the hulls and deck.
You will also need to choose the type of engine you will use and the type of rigging and sail you will use.
Once you have selected the materials and tools you will need for your project, you will need to create a plan for the construction of your catamaran.
You will need to determine the size and shape of your boat, the types of joints you will use to construct the hulls and deck, and the type of engine and rigging you will need.
You should also plan out the sequence of construction steps, so that you can build the catamaran in the most efficient way.
Finally, you will need to research the best ways to protect your catamaran from the elements.
You will need to determine what type of paint or varnish to use on the hulls and deck, and you will need to research the most effective ways to protect your boat from the sun, wind, and water.
By taking the time to research and plan your build, you will be able to create a catamaran that is well-built, efficient, and beautiful.
With the right research and planning, you can create an amazing catamaran that will be the envy of your friends.
Final Thoughts
Building a catamaran is a rewarding experience that can be achieved with the right approach and materials.
With a clear plan, the right tools, and a good understanding of woodworking and fiberglass techniques, you can build an amazing catamaran to share with your family and friends.
So what are you waiting for? Get started on your own catamaran build today and all the rewards that come with it!
James Frami
At the age of 15, he and four other friends from his neighborhood constructed their first boat. He has been sailing for almost 30 years and has a wealth of knowledge that he wants to share with others.
Recent Posts
Does Your Boat License Expire? Here's What You Need to Know
Are you a boat owner looking to stay up-to-date on your license requirements? If so, youve come to the right place! In this article, well cover everything you need to know about boat license...
How to Put Skins on Your Boat in Sea of Thieves? (Complete Guide)
There is a unique sense of pride and accomplishment when you show off a boat you customized to your exact specifications. With Sea of Thieves, you can customize your boat to make it look like your...
Did You Know That We Offer Contract to Closing Services? Click Here to Find Out More.
Need Marine Financing? Apply Here With Our Partner, First Approval Source
- Catamaran Interviews
- Catamaran Reviews
- Buying Advice
- Selling Advice
- Woods Design Advice
- Americat 3014
- Balance 526
- Bali 40 Catspace
- Beneteau Blue II
- Broadblue 346
- Broadblue 38 Prestige
- Broadblue 385
- Broadblue 435
- Broadblue 46
- Catalac 10M
- Catalac 11M
- Catalac 12M
- Catalac 900
- Catana 42 S
- Chris White 48 Voyager
- Chris White 55
- Corsair F28 R
- De Villiers
- Dolphin 460
- Endeavour 30
- Endeavour 35 Victory
- Endeavour 36
- Endeavour 44
- Endeavour 44 TrawlerCat
- Fortuna 36 Island Spirit
- Fortuna 401 Island Spirit
- FP 32 Maldives
- FP 35 Tobago
- FP 37 Antigua
- FP 38 Athena
- FP 39 Fidji
- FP 40 Lavezzi
- FP 40 Lucia
- FP 40 Summerland MY
- FP 41 Lipari
- FP 42 Astrea
- FP 42 Venezia
- FP 43 Belize
- FP 44 Helia
- FP 44 Orana
- FP 46 Bahia
- FP 46 Casamance
- FP 48 Salina
- FP 56 Marquises
- FP 57 Sanya
- FP 60 Eleuthera
- FP Saona 47
- Gemini 3000
- Gemini 3200
- Gemini 3400
- Grainger 420 Mystery Cove
- Hirondelle 7M
- Lagoon 37 TPI
- Lagoon 42 TPI
- Lagoon 43 PC
- Leopard 39 PowerCat
- Leopard 45 Classic
- Leopard 47 PowerCat
- Leopard 51 PowerCat
- Leopard 53 PowerCat
- Maine Cat 30
- Maine Cat 41
- Matrix 450 Vision
- Matrix 760 Silhouette
- Maverick 400
- Maverick 420
- Maverick 440
- Nautitech 40
- Nautitech 442
- Nautitech 46 Open
- Nautitech 47
- Outremer 40
- Outremer 45
- Outremer 50 Standard
- Outremer 55
- Privilege 37
- Privilege 39
- Privilege 42
- Privilege 43
- Privilege 435
- Privilege 45
- Privilege 465
- Privilege 48 Transcat
- Privilege 482
- Privilege Serie 5
- Prout 31 Quest
- Prout 33 Quest
- Prout 34 Event
- Prout 35 Snowgoose
- Prout 37 Snowgoose
- Prout 37 Snowgoose Elite
- Prout 38 Manta
- Prout 39 Escale
- Royal Cape 45
- Royal Cape 530 Majestic
- Royal Cape Majestic 500
- Sailcraft 30 Iroquois
- Sailcraft 32 Comanche
- Sailcraft 35 Cherokee
- Sailcraft 41 Apache
- Sailcraft 44 Apache
- Wildcat 350
- Seawind 1000
- Seawind 1160
- Seawind 1200
- Seawind 1260
- Seawind 1600
- Solaris 36 Sunrise
- Solaris 36 Sunstar
- St Francis 44
- St Francis 48
- St Francis 50
- Stealth 11.8
- Heavenly Twins 26
- Ocean Twins 38
- Voyage 380 Maxim
- Voyage 400 Norseman
- Voyage 430 Norseman
- Voyage 450 Cabriolet
- Voyage 47 Mayotte
- Wharram 38 Tiki
- AMI 320 Renaissance
- Woods 22 Wizard
- Woods 35 Banshee
- Woods 35 Flica
- Woods 36 Scylla
- Woods 36 Vardo
- Woods 38 Transit
- Woods 40 Meander
- Xquisite X5
- Xquisite X5+
Catamaran Hull Design
- Post author By Rick
- Post date June 29, 2010
- 2 Comments on Catamaran Hull Design

Part 1: Notes from Richard Woods
Since the America’s Cup experimented with going multihull, there’s been a lot of interest in catamaran performance and the catamaran hull designs that define performance. Many guys are investigating whether to buy a catamaran or design and build their dream boat. Let it be said here that building a large catamaran is not for the faint of heart. People begin building 100s of boats a year, yet few are ever completed, as life always seems to have a way of interfering with a good boat build.
Never the less, since the rest of this website is about selecting and buying a boat , it only seems fair to have at least one webpage that covers catamaran design. This page contains notes on boat hull design goals and an accompanying page from Terho Halme has mathematical formulas used in actual catamaran hull design. It has become a popular research stop and an important reference to the catamaran design community.
The content of this page was reproduced from the maestro of Catamaran designs, renown British naval architect, Richard Woods, who not only designs catamarans, he sails them across oceans…. repeatedly. He has a lot to say on the subject of catamaran hull design.
“…When it’ all said and done, the performance of a sailing catamaran is dependent on three primary specs: length, sail area and weight. If the boat is longer it generally means it’ a faster boat. If she has more sail area, it means she’ a faster boat and if she’ light it means she’ a faster boat. Of course, there are limits: Too much sail area capsizes the boat in brisk winds. If the boat is designed too light, she will not take any kind of punishment. Too slim a hull design and the boat becomes a large Hobie Cat capable of only carrying your lunch. Of course, too long and large and you’d have to be Bill Gates to afford one. Then there are lot of additional and very important factors like underwater hull shape, aspect ratios of boards and sails, wet deck clearance, rotating or fixed rigging and so on….” Richard Woods
All Catamarans are not equal, but all sailboats have two things in common: They travel on water and they’re wind powered, so the Catamaran design equations in the 2nd part should apply to every catamaran from a heavy cruising Cat to a true ocean racer.
Richard Wood’s comments on catamaran design:
We all know that multihulls can be made faster by making them longer or lighter or by adding more sail. Those factors are the most important and why they are used as the basis of most rating rules. However using just those figures is a bit like determining a cars performance just by its hp and curbside weight. It would also imply that a Tornado would sail as fast forwards as backwards (OK, I know I just wrote that a Catalac went faster backwards than forwards)
So what next?? Weight and length can be combined into the Slenderness Ratio (SLR). But since most multihulls have similar Depth/WL beam ratios you can pretty much say the SLR equates to the LWL/BWL ratio. Typically this will be 8-10:1 for a slow cruising catamaran (or the main hull of most trimarans), 12-14:1 for a performance cruiser and 20:1 for an extreme racer.
So by and large faster boats have finer hulls. But the wetted surface area (WSA) increases proportionately as fineness increases (for a given displacement the half orange shape gives the least WSA) so fine hulls tend to be slower in low wind speeds.
The most important catamaran design hull shape factor, is the Prismatic Coefficient (Cp). This is a measure of the fullness of the ends of the hull. Instinctively you might think that fine ends would be faster as they would “cut through the water better”. But in fact you want a high Cp for high speeds. However everything is interrelated. If you have fine hulls you can use a lower Cp. Most monohulls have a Cp of 0.55- 0.57. And that is about right for displacement speeds.
However the key to Catamaran design is you need a higher Cp if you want to sail fast. So a multihull should be at least 0.61 and a heavy displacement multihull a bit higher still. It is difficult to get much over 0.67 without a very distorted hull shape or one with excessive WSA. So all multihulls should have a Cp between 0.61 and 0.65. None of this is very special or new. It has been well known by naval architects for at least 50 years.
There are various ways of achieving a high Cp. You could fit bulb bows (as Lock Crowther did). Note this bow is a bit different from those seen on ships (which work at very specific hull speeds – which are very low for their LOA). But one problem with them is that these tend to slam in a seaway.
Another way is to have a very wide planing aft section. But that can increase WSA and leads to other problems I’ll mention in a minute. Finally you can flatten out the hull rocker (the keel shape seen from the side) and add a bustle aft. That is the approach I use, in part because that adds displacement aft, just where it is most needed.
I agree that a high Cp increases drag at low speeds. But at speeds over hull speed drag decreases dramatically on a high Cp boat relative to one with a low Cp. With the correct Cp drag can be reduced by over 10%. In other words you will go 10% faster (and that is a lot!) in the same wind and with the same sails as a boat with a unfavorable Cp. In light winds it is easy to overcome the extra drag because you have lots of stability and so can fly extra light weather sails.
The time you really need a high Cp boat is when beating to windward in a big sea. Then you don’t have the stability and really want to get to your destination fast. At least I do, I don’t mind slowly drifting along in a calm. But I hate “windward bashing”
But when you sail to windward the boat pitches. The sea isn’t like a test tank or a computer program. And here I agree with Evan. Immersed transoms will slow you down (that is why I use a narrower transom than most designers).
I also agree with Evan (and why not, he knows more about Volvo 60 design than nearly anyone else on the planet) in that I don’t think you should compare a catamaran hull to a monohull, even a racing one. Why chose a Volvo 60/Vendee boat with an immersed transom? Why not chose a 60ft Americas Cup boat with a narrow out of the water transom??
To be honest I haven’t use Michelet so cannot really comment. But I have tested model catamarans in a big test tank and I know how inaccurate tank test results can be. I cannot believe that a computer program will be better.
It would be easy to prove one way or the other though. A catamaran hull is much like a frigate hull (similar SLR, L/B ratios and Froude numbers) and there is plenty of data available for those. There is also a lot of data for the round bilge narrow non planing motorboats popular in the 1930’-50’s which again are similar to a single multihull hull.
One of the key findings I discovered with my tank test work was just how great the drag was due to wave interference between the hulls. Even a catamaran with a modern wide hull spacing had a drag increase of up to 20 % when compared to hulls at infinite spacing. One reason why just flying a hull is fast (the Cp increases when you do as well, which also helps). So you cannot just double the drag of a single hull and expect to get accurate results. And any speed prediction formula must include a windage factor if it is to give meaningful results.About 25 years ago we sailed two identical 24ft Striders next to each other. They were the same speed. Then we moved the crew of one boat to the bow. That boat IMMEDIATELY went ½ knot faster. That is why I now arrange the deck layout of my racing boats so that the crew can stay in front of the mast at all times, even when tacking or using the spinnaker.
I once raced against a bridge deck cabin catamaran whose skipper kept the 5 crew on the forward netting beam the whole race. He won.
Richard Woods of Woods Designs www.sailingcatamarans.com
- Tags Buying Advice , Catamaran Designers

Owner of a Catalac 8M and Catamaransite webmaster.
2 replies on “Catamaran Hull Design”
I totally agree with what you say. But Uli only talk sailing catamarans.
If only solar power. You need the very best. As limited watts. Hp.
The closer to 1-20 the better.
Closing the hulls to fit in cheaper marina berth. ?
You say not too close. But is that for sailing only.
Any comment is greatly appreciated
Kind regards Jeppe
Superb article
Leave a Reply Cancel reply
Your email address will not be published. Required fields are marked *
Save my name, email, and website in this browser for the next time I comment.
Time For a Catamaran Adventure
Isn't Time For Yours?
Building Your Own Catamaran
Building your own catamaran is another option to getting into your own boat. In this page we will go over the advantages, considerations, and a detailed history and journal of our boat-building adventure with Light Wave . We hope this will give you a clear picture of what lies ahead if you go this route, including:
- Construction methods
- 9 essential design features
- Review of the four leading catamaran designers for home builders
- Construction times
- Budget: How much did it cost to build a basic cruising catamaran?
- Layout of our catamaran, LightWave , and lots of pictures
- Carllie’s article from September 2000 Multihulls Magazine: “The Boat Builder’s Wife “
- Equipment outfitting
- Radio and communication outfitting
- Dinghy selection and considerations
- Having a boat custom-built for you
Because of the huge dollars needed to buy a new or even a used catamaran, we would never have gotten a catamaran if we hadn’t built it ourselves.
Let’s start by saying that building any type of larger boat, especially a catamaran, can be one of the most intellectually and physically challenging things you will ever do.
It has been said that building a large boat is the closest a man can come to giving birth to a baby. In other words there is going to some discomfort and pain along the way; you will question yourself on whether this was such a good idea; it’s very difficult to reverse the decision; and though friends will support you, you will be on your own most of the time with your significant other if he/she is game.
Know your boat
You will intimately know every part of your boat. You will know where every wire, hose, bolt, bulkhead, rib, and support is because you installed them!
Pride of ownership
We have often thought what it would be like to just buy a boat from a manufacturer, and know that while owners who have spent a lot of cash (or future life to pay off the lien) their often possessive and competing-with-the Joneses could not begin to compare to our quiet glow of happiness and akinship we feel with Light Wave .
Our boat is like part of the family. So much time was spent on her that we have a major emotional investment. Every time we see our vessel – from a distance at anchor or approaching her in our marina, we say, “What a pretty boat! I can’t believe we built it!” Then that sense of accomplishment settles back in and we feel we have indeed earned the privilege of all of the beautiful experiences we have had sailing, cruising, exploring the beautiful BC Coast and much further a field (or should we say “an ocean”?).
You will be able to pay for the materials as you go and “donate” your time to the cause.
Get a newer design
Many of the production boats that are out there are designs of many years ago because the manufactures have to recoup their capital investment on the mold and production setup. When you build your own you have much newer designs to draw from.
Details on Our Boat Building Adventure
We had sailed our first boat Wave Dancer for five years and had many adventures on the British Columbia coast. In May 1996, I had just returned from a little one-week solo trip in the Gulf Islands of BC when I bought the book, The Cruising Multihull by Chris White (Future link to book review on our web site).
This is the book that got me going (Carllie was not yet convinced). I must have read it a half dozen times over the next 6 months, each time becoming more convinced that this was the way to go for our next boat. It was really still pre-internet web site days so I wrote to all the designers that were listed in the back of the book. Over the next several weeks packages of information started appearing in the mailbox (there is just something about getting packages in the mail – I guess it’s the anticipation). I would pour over these preliminary printed pages with pictures and accommodation layouts. Next, I put a few dollars down to buy the information packages and study plans from the top prospects.
I waited patiently for the study plans. It was like the night before Christmas when I was kid. Oooh the wait! Finally they came, and again I carefully scrutinized the next level of detail. Things were getting a little more serious. The top contenders were:
- Richard Woods
- Chris White
- James Wharram
Click here to read my comments and reviews on their catamaran designs as well as those of Jeff Schionning.
I remember initially drooling over the Atlantic 42 by Chris White, still one of my favorite designs. It seemed to be so seaworthy (by the way if I run into about $800,000 USD any time soon, I am going to buy an Atlantic 55). The most important piece of advice that came out of the material was from Richard Woods:
“Build the smallest boat you‘d be happy with it.”
Axiom #1: The hours to build a catamaran is in almost in direct proportion to its weight.
Which brings us to Axiom #2:
Axiom #2: It takes about 1 hour to create 1 pound of finished boat.
In our case we spent 3,500 hours ( click here for full details on the construction hours ) to build a 4,000 lb. boat (just a little less than 0.9 hours per pound). If a boat’s empty weight is 8,000 lbs., it will probably take about 6,000 hours to build.
When you think about it, you can only mix and handle so much material per hour. More boat weight, more material, more hours. Sure there are some economies of scale on a bigger boat, but usually the systems become more complex and these take longer to install.
This decision process took 8 months and I figured we’d launch in 6 months. It was now January of 1997. Little did we know it would be 26 months and 3,500 hours between the two of us until we launched on June 5, 1999. We ordered the full plans and we were off and running.
We were ready to build, but where would we start the process? First of all, we live in a tiny 480 sq. ft. apartment in Vancouver. Back-yard building wasn’t exactly an option so I found a small garage nearby that we rented for 5 months.
After about 4 months in the garage, I had made all the small parts and it was time to build the hulls. This meant that we had to go larger facilities. We found space at Shelter Island Marina and Boatyard in Richmond. This is the biggest boat yard in the Vancouver area with dozens of commercial and private projects, big and small, under way.
We were out of money by then, so we sold our first boat so we could buy resin and fiberglass. It was a traumatic time as we said goodbye to our beloved Wave Dancer . We were now committed. We than had all the foam for the hull cores, barrels of resin, and huge rolls of matting and roving needed for the fiberglass skins delivered to our “domed stadium”. We kicked ourselves many times that we didn’t take a picture of this raw material stacked in one corner of the empty shed, so we could later show “before” and “after” photos. It was time to build the hulls.
Over the next several months we proceed to join the hulls with the beams I had built in the garage, and then to install the cuddy cabin, cockpit, and decks. By the spring of 1998, it was staring to look like a catamaran. Through the spring and summer of 1998, we continued with the major structural components: mini-keels, hatches, stairs, and interior. Then we went on to the very laborious work of fairing the boat before painting. Don’t under estimate that job!
By October 1998 we were ready to prime the boat and start painting. I really thought this would go quickly. I forgot that I would have to do two more complete sandings to sand off and finish the two layers of primer application. In addition we had to fill countless pinholes – a laborious process somewhat like hiking up a mountain – each time you get to what you think is the top, you see another summit!
The boat seemed to get bigger and bigger. Believe me, there is a lot of surface area on a catamaran. I clearly remember that last sanding: I had reached the end of my physical and mental endurance – I was exhausted. I was ready to move on to the next phase – any phase but more sanding!
We now started spray-painting the hulls bright yellow. It was around this time we decided on our boat name of Light Wave . The painting took over a month: the hulls being the easy part, it was the topsides, the nonskid, and all the masking and prep that seemed to take forever. Happily, the worst of the dust was gone.
By March 1999 we were in the home stretch. The center bridge deck cabin was completed so we took a week off from our paid jobs and lived on the boat in the shed so we could work all day and not waste time commuting. March, April and May were frantic months as we finished all the final touches: engine installation, rudders, windows, deck fittings, electrical, plumbing, mast, and rigging. See our outfitting page (for more details on what we picked and why, and things we would do differently now.
Initially, our electronic systems were relatively basic but included GPS and autopilot see the following link for all our electronic outfitting choices and reasoning for more details.
It was May 22, 1999 and we decided that Saturday, June 5th would be “Launch Day” so we could send invitations to all of our friends. On the Friday night before Launch Day, we still had a number of final things to do, many of them outside. Unfortunately it was pouring rain. We were tired and very wet but the boat had to go into the water next day so we persevered on till everything was ready.
The moment of truth came as Light Wave was lowered into the water. While still in the slings of the Travelift, I jumped aboard to check for leaks. Of course there weren’t any! More food and laughs and tours of the boat for all attending. It was a great day.
Emotionally drained that night, we slept in Light Wave in the water for the first time. It was another week before we actually went out for our first trip as we had to sell the shed, setup sails, and install some final deck hardware.
To sum it up, building a catamaran was a great experience. We learned a lot. Carllie and I grew closer together through it all. We had a great time doing it. We had a beautiful catamaran to show for it. Now it was time for a catamaran adventure !
HOME / INDEX PAGE

The challenge of building a trimaran from beachcat hulls
Hi Mike! Let me first say I appreciate the depth of information on your web site :)
I've been ‘oogling’ it for years. But now I have a question regarding the potential of building a trimaran out of some old 18' cat hulls. How would you suggest I proceed and what might I expect from the result ?
….. Josh from Kalispell, MT.
ANSWER : Tks Josh … always pleased to hear my work is proving of value to others.
I first need to say that using cat hulls is not a perfect fit for either the vaka (center hull) or even the amas (floats) but sometimes we can make something work as a fun project. The vaka will be the biggest challenge. I could briefly answer your question with just a list of do’s & don’ts , but I think a more detailed reply will give you some specifics and cover a broader range of related questions, so here we go.
First step is to make a weight estimate starting with what a ship designer would call the “Lightship weight” (boat ready to sail, but no supplies, crew or their personal equipment). You then need to decide what weight you wish to tack-on to form the Design Displacement . This we call the ‘Deadweight’. The very minimum would be for solo day sailing .. say 200 lbs added to the Lightship weight, but for an 18footer, this will likely be more like 350lbs as an absolute minimum.
So let’s assume the boat and its rig and gear weigh 550 lbs. Now with 350lbs added, the required Design displacement will now be 900lbs. The volume to support that will be 900/64 = 14 cu.ft. (1 cuft displaces 64 lbs of seawater, or use 62.4 for fresh water)
The difficulty with a trimaran over a beachcat, is that there is initially only ONE hull to provide this buoyancy volume, compared to two for a catamaran, so right away, one can see why a single catamaran hull is WAY too small for a vaka. Let’s say these are your 3 hulls.
Place the widest one with most volume in the center.

Obviously, if you kept the hull in this level position, your trimaran would be dragging 3 hulls through the water with far more drag than for a catamaran.
So you need to lower the central hull, so that it will support your 900 lbs .. requiring 14 cu.ft volume under the waterline. It will clearly not have the volume needed so what can be done ? There are 3 basic ways to go. You can lengthen it, widen it, or sink it deeper. Using all three would be best if designing a new vaka but I suggest that sinking it deeper will be the easiest, as you can then just raise the sides. But you will probably need some frames to support the deeper hull section as the hull will now have to accept more hydrostatic pressure.
It will now look more like this:

You can either raise the sides (C) or a better solution would be to combine this with side extensions (D) to give yourself some form of central cockpit as well as more width to later attach your cross beams (akas). Exactly how deep this central hull will need to go, will decide how practical this whole ‘conversion’ will be, and it’s quite possible you will need to do some major surgery to this central hull (or build a new one) to get the buoyancy volume you need. If you are not already familiar with how to calculate this, I suggest you study this page from the design section.
https://www.smalltridesign.com/Trimaran-Articles/design/simpsons-rule.html
A very rough idea of the sectional area (marked as ‘buoyancy’ in the above sketch) can be obtained by assuming a Block Coefficient* of 0.5. For this, double your required volume and divide by your waterline length .
- Block Coefficient is the ratio of actual hull volume to an encompassing ‘block’, that has dimensions equal to: your waterline length: your waterline beam: and underwater water depth (design draft)..
So in this case, this will be 2 x 14 / 17.5 or 1.60 sqft, which will roughly require a beam and draft of (1.60 0.5 ) or 1.265 ft for both waterline beam and for draft .
If your hull is much smaller, you either have to go deeper than 1.3ft draft OR find ways to widen that hull to get the cross-sectional area you need. (Typically, a central trimaran hull has a waterline width of about double that of the ama beam).
Moving forward .. let’s assume you now have chosen your best workable solution for the vaka.
As far as the overall beam is concerned, the issues involved and a way to select a suitable beam is already explained in this Q&A from earlier this month.
We now need to connect the amas with the main hull using beams. As I understand you are planning to use a similar folding system to my W17 and using my design of fiberglass hinge and latch , I will explain what you will need.
Beam and latch strength will be defined by the maximum righting moment that the ama can apply, plus a safety factor.
As a safety factor, it is common to apply the full buoyancy of the ama (when fully underwater) to the main beam ... and multiply by the Beam Lever (shown here), which might be ~4ft in this case. IF the full ama volume is say 800 lbs, then the bending moment on the beam would be 3200 lbs.ft

Once you have fixed the hinge location, you can calculate the bending moment at the hinge, using the same 800 lbs (just assumed for this example) but with a smaller lever. Let’s assume it is 2.5ft in this case, so the Bending Moment will now be 2.5 x 800 or 2000 ft lbs. This would mean that IF your vertical distance between the upper hinge and the lower latch is 5” deep (0.42ft), that the latch will need to take 2000/0.42 or 4762 lbs in tension, for the hinge to be as strong as the beam. This shows the important value of 'beam depth' with a hinge system.

There will also be a download on the upper hinge, due to whatever crew weight you place on the flying windward ama (plus the weight of the ama and outer beam itself). With a large volume ama, this download is typically about 70-80% of the upload, so the hinge is a little less stressed in tension than the lower latch, but with a small ama, it could be the reverse, so you need to do the maths..
In Fig 3. note that I show the amas inclined out at 10-12 degrees. If this is not done, they are more side-loaded when heeled and this adds an unnecessary load to their beam attachment as well as making the ama more resistant to push through the water, so personally, I consider some outward angle is essential.
In addition to their location in the above sectional view, the outer hulls that will work as amas, also need to be positioned in profile view , relative to the central hull.
In the sketch below, they are shown with slight lift of the bow that some designers in the past have incorporated with the assumption of less resistance and 'to ride over the waves'. In the 1970’s many amas were then banana shape d and even back then, Hobie 16 hulls were sometimes used as trimaran floats. Having sailed on one a few times, I found such boats (like Newick’s Tremolino for one) were very jittery in any seaway, were very wet, and also pitched excessively. Even using the straighter and therefore more suitable H18 hulls, their stability role for a trimaran is still compromised if installed as shown here in Fig 6.

Just compare these two sketches in Fig 7 that both show an identical assumed heeled water line (in red) and you can see that IF the bow of the ama is raised that the ama will not give any bow lift UNTIL the whole bow drops, severely increasing the risk of pitch-poling, so unless the bow is very full with a wide vee, its more effective and safer to actually LOWER the buoyancy of the ama bow so that it quickly immerses, to provide more effective lift when heeled.

So what can be done to make the beachcat hull more like this ama? The bow is deep and narrow, not vee’d. Think of the Hazelett mooring buoy that is a vertical tube. While it still offers buoyancy, it moves very little in waves. When a bow is like that, its not easily launchied in the air to only fall again, over and over again. It just stays quiet and cuts horizontally through waves and it certainly increases the waterline length. Early rockered amas, had short waterline lengths and were also vee’d … two things I advise against. After all, we are ’sailing’ on this ama and need it to act like an efficient boat hull. But as it would be complicated to deepen the forefoot of an existing beachcat hull, its easier to lower the bow as shown above and then raise the deck forward of the forward beam.
As a picture is a 1000 words …, check out what I would do. 3 days of 4 hours could see both done if you plan your work.

You might find a collision bulkhead inside that will need cutting across, but it should not be hard to raise that with rigid foam, so that the raised deck can be bonded to it and keep it watertight. The ¾” holes in the sides will stop the end of the cut from splitting and cracking, and will be filled and covered over by the fill piece.
This should give one enough to make the important decisions and calculations, but as can be seen, catamaran hulls are not ideally interchangeable with Trimaran hulls, so their use like this will always be a compromise.
You also have to decide which hull will hold a centerboard or daggerboard. It’s much easier to reach one in the center hull, but this is your choice and dilemma. Either can be made to work but do not use ama boards unless you are operating in deep water, or you may end up IN the water while trying to adjust them from an ama, especially in rough water.
As far as the end result , it depends on so many things that it’s hard to predict. But it could be made to perform quite well in relatively flat water and give you some fun at least … but it will not be a dry boat like the W17, nor as comfortable or have as low leeway, as the round hulls are just not as ideal for slicing waves with minimum disturbance as the W17 hulls are. While rounded hulls are very effective in lowering surface friction, they seldom slice waves as well and certainly do not provide the leeway resistance of the W17 hulls.
It's also frequently forgotten (or just not understood) that often, the greatest resistance from a small boat is wave resistance or wave making … being the most critical in the 4 to12kt range. Optimizing for this range with non-round hulls can more than make up for their added skin drag. See this article for more on this, where there is a chart showing what proportion of residuary (wave) resistance applies at what speed.
Hope this helps to get you going in the right direction, and good luck with your project.
Also note that there was an earlier question of using the reverse ... Trimaran hulls for a Catamaran and as my graph showing the proportion of residuary resistance versus the total is also there, it may be of some interest too.
Mike ... March 2022
"New articles, comments and references will be added periodically as new questions are answered and other info comes in relative to this subject, so you're invited to revisit and participate." —webmaster
"See the Copyright Information & Legal Disclaimer page for copyright info and use of ANY part of this text or article"

A Trusted Source For Boating Information Since 2019
Catamaran hulls- everything you need to know.
- Post Written By: Boater Jer
- Published: July 17, 2022
- Updated: July 19, 2022

Disclaimer: You might notice that we recommend products in some articles. We may earn a commission for referring you if you click the link and buy a product.
We only recommend products we’ve tried/tested/own (that’s why you won’t find thousands of affiliate links on my site). If you have experience with one of the products we’ve mentioned, please share your experiences in the comments at the end.
Advertisement

Catamaran hulls are not like normal boats but provide increased stability. Let’s take a look at these incredible boats and how their hulls create one of the most versatile watercraft available today.
The Tamil Cholas used catamarans to ferry their troops to invade Malaysia, Indonesia, and Burma. The early paravars or fishing communities in the southern part of Tamil Nadu used two-hulled boats to fish. Polynesian seafarers were also early users of the catamaran, utilizing the watercraft to get to hard-to-reach islands. ( source )
Although the catamaran hull concept is a relatively new introduction to modern boat design , the boat has been in use since the 5th century. It was used for fishing, traveling, and transporting people and supplies.
Parts Of A Catamaran
Here are the basic parts of the modern sailing catamaran:
- Hulls are what sets this boat apart from the rest. The catamaran has two hulls, while the monohull, as the name suggests, has only one hull. Most of the advantages of this boat are hinged on these two hulls.
- The bridge deck connects the two catamaran hulls.
- On top of the catamaran hulls and the bridge deck is the deck . It is where owners attach most of the equipment in a boat.
- You can locate the berth, the galley, and other living amenities in the cabin .
- The cockpit is where you find the navigation equipment of the boat . It is where you control the catamaran’s rudder, sails, and engine.
Types Of Catamaran

The modern catamaran is far more different than its crude ancestor. Instead of tree cutouts, catamarans are now carbon fiber or fiberglass. Here are the different types of catamarans:

Based On function
Pontoons are usually present on rivers and lakes and sometimes even on oceans, but they only travel near the shore.
In a catamaran pontoon-type boat, the pontoons serve as storage areas, where you will find the onboard motors. They are useful for water leisure activities such as short water trips, tubing, wakeboarding, and water skiing.
Some pontoons may also serve as houseboats. They provide a broader, more stable platform ideal for a floating house. Plus, the space is bigger, and most of it is above water. It offers a better viewing option than a monohull. ( Source )
Small Waterplane Area Twin Hull is a catamaran-type boat that the United States Navy initially used for military purposes. They provide the water stability that is necessary when transporting heavy military equipment.
One example of a military SWATH catamaran is the Spearhead class EPF. It is as long as a World War II escort destroyer, yet it is twice as fast at 43 knots. It can reach that speed because of its two separate hulls.
Because of their innate speed, SWATH catamarans can become patrol boats in lakes and rivers. They can easily outrun and outmaneuver standard watercraft.
Nowadays, there are SWATH cruise ships and other non-military variations. ( Source )

Based On Design
- Sailing Catamaran
The smaller sailing catamarans do not have auxiliary engines, so the owner can propel the boat by harnessing the wind using the sails. It’s a popular choice for people with very little or no sailing experience because they are light and easy to use.
The larger sailing catamarans are for group charters and long-distance cruising. They have become so popular lately that they now outnumber monohulls in tropical locations all over the world. They have a last, a headsail, and a mainsail. And the twin hulls have one engine each.
- Power Catamaran
Unlike their sailing cousins, the powered catamarans do not have sails. They have massive engines which provide high speed. Their twin hulls are stronger and can carry and protect the large motors.
The smaller “powercats” are used mainly for fishing. The bigger ones are rented out for charters and cruises.
Catamaran Hulls Performance
Thanks to the catamaran hulls, the boat offers many advantages over other boat types.
- Because its dual-hull design provides a broader base, it offers more water stability than monohull boats. It makes the cat (catamaran) a popular choice for fishing expeditions and cruises.
- Riding a catamaran is ideal for people who feel seasick whenever they ride boats. The twin hulls prevent the boat from moving from side to side. The hulls allow the boat to travel smoothly, even on moderately choppy waters.
- The catamaran is the best choice when storing provisions and other household items with less heeling and bobbing.
- The twin hulls’ stability is ideal for many activities such as cooking and partying.
- Cats offer more moving space because of their broader base, thanks to dual hulls.
- With a catamaran, you have two great options on where to hang out. You can do it on the spacious deck or below the galley.
- Compared to a monohull of the same size, the catamaran can accommodate more equipment and people.
- The living area in a catamaran is above the water line. This feature provides more natural light, a greater view of the outside, and better air circulation.
- Since catamarans do not have keels, they can anchor on shallow waters, something that most monohulls will not be able to do. This ability of catamaran boats is impressive, especially if you are going around areas with many reefs and small islands.
- Catamaran hulls allow the boat to cut through the waves easier and faster. It means they require less engine power than their monohull counterparts.
- Because it has two engines and two rudders, the catamaran can easily maneuver in very tight spaces.
- Because they do not carry heavy keels, catamarans can sail faster than monohulls.
- The catamaran’s stability, speed, and weight make it a safer option than the monohull. It can sail in shallow waters, make a 360 degrees maneuver effortlessly, and carry more provisions.
Disadvantages Of A Catamaran
Like any other boat type, the catamaran also has drawbacks and limitations. Here are some of them:
- The catamaran hulls prevent the boat from sailing as fast as the monohull upwind. The two hulls cause drag, and this slows the boat considerably.
- Because of its bigger size, looking for a docking site can be more difficult and costlier than a monohull.
- For hardcore sailing fans, the experience of sailing with a catamaran will never be able to match that of sailing with a monohull. To them, the challenge of true sailing is just not there with a catamaran.
What Are The Hulls Of The Catamaran Called?
According to the Online Etymology Dictionary, the Tamil word கட்டுமரம், which is pronounced as kattumaran, is where the word catamaran takes its name. The word means “pieces of logs tied together”. Through the years, the term has evolved into what is now a catamaran in English.

What Are The Characteristics Of A Catamaran Hull?
- Both hulls of a catamaran complement each other to achieve very minimum water resistance.
- Because of this, it takes less energy to propel a catamaran, whether via an engine or sails.
- The catamaran hulls provide stability to the boat. The twin-hull significantly reduces bobbing.
- The catamaran’s ability to keep steady on the water makes it an ideal vessel for cooking, dining, and storing provisions.
Are Catamarans Good In Rough Water?
Catamarans are amazingly stable in rough water. The catamaran’s design and build, which provides stability, are factors why it is one of the best boats to use when the waters are choppy.
Yes, catamarans are relatively more expensive than monohulls. Nevertheless, since single-hull boats are less expensive, their resale value is also cheap.
If you add all the advantages that a catamaran offers – safety, comfort, and speed- it does not come out expensive.
patekphilippe.io

Share this post with your friends
Subscribe to our newsletter.
Join us in our love for all things water. And Adventure.

Why Are Boat Steering Wheels So Big?
Advertisement You see them on the water in summer or all year round, depending on where you live, boats, and lots of them. Riding on the water on a ship is calming and relaxing unless you are racing, then it can be exhilarating and action-filled! I have been on many boats of different shapes and

Are Catamarans Safe In Rough Seas?
Catamarans are known to be reliable and fun to operate. From the personal watercraft sized cats to the massive superyacht class of catamaran, all are great ships of the seas. But are catamarans safe in rough seas?

Pontoon Boats Vs. Catamaran (Pros and Cons For New Buyers)
Advertisement Pontoon Boats Vs. Catamaran – Pros and Cons For New Buyers – A Boating Guide Buyer’s Guide For 2023. Would you like to know the differences between pontoon boats and catamarans? These two vessels seem similar in the hull design to stay on the water. However, there are several differences, and each ship is

Boat Hull Types – Which Boat Hull Is Best?
In this article, we examine all these hull types with full explanations of how each one works so you can figure out which is best suited for you.

A Guide To Choosing Your First Boat
Advertisement A Guide To Choosing Your First Boat – A Boating Guide Buyer’s Guide Report for 2023. Would you like to buy your first boat? When you buy a boat for the first time, it is easy to make a mistake due to the lack of experience. Therefore, before making any decision, you must evaluate

PowerSeeker Intelligent Fish Finder – A Smart Fishing Gadget
Advertisement PowerSeeker Intelligent Fish Finder Review Do you love fishing? Who doesn’t? Fishing is not an easy task, especially if you’re out on a trip with your friends. It’s because, at such times, it becomes a matter of pride to quickly catch a vast fish. Mostly, people find it hard even to trace a fish.

Boat Information By Type
© 2023 Boating.Guide, A Hyperwave Media Group Ltd. Publication.
Privacy Overview
DIY Styrofoam Catamaran

Introduction: DIY Styrofoam Catamaran

This is a Styrofoam catamaran i built. I had been wanting to build this for a while, then in the last few days of summer i decided to build it. This only took 2 full days to build and one day to test. The catamaran costed me around 200 dollars (sail not included) and this is comparable to a store bought catamaran which would cost 2000 dollars
In this instructable i have included a few schematics (located on the last page) , a materials list, and various pictures and descriptions for all steps.
If you plan to build this project i suggest you check out the video and if you like this project be sure to check out my channel or my website for more projects like this.
Step 1: Materials

The materials i needed for this project were:
2"x4"x8' pieces of wood - 2
2"x3"x8' pieces of wood - 1
2"x2"x8'pieces of wood - 6
1”x2’x8’ Styrofoam sheet - 5
1.5”x14”x4’ Styrofoam sheet - 5
½’’x2’x4’ piece of plywood - 2
½’’x4’x6’ piece of plywood - 1
Sail and mast - 1
Epoxy (dollar store epoxy is cheapest and works well) - 7
Step 2: Assembling a Pontoon

The catamaran will be composed of 2 pontoons. These pontoons will have a frame filled with the white, less durable Styrofoam in the center; then we will later add the pink Styrofoam to the outside.
To start off i lay out two 2x2 pieces of wood with the white Styrofoam pieces in the center. This will be the inside of the pontoon. Next i add a front triangle onto the pontoon. As you can see in the third picture i added 2 struts near either end of the pontoon. Once that is finished i fill the pontoon with white Styrofoam and cut it to fit in the gaps.
Step 3: Finishing the Pontoon

to finish off the pontoons we must first cut 4 pieces of Styrofoam to size (2 for each pontoon). To cut them all at once i clam them together and use a reciprocating saw to cut the height from 2 feet to 17 inches (the height of the pontoon).
After that i use 1 - 1.5 tubes of epoxy as adhesive. I spread the epoxy on the wooden frame and then lay the Styrofoam down onto the wooden frame and add weight to it so the Styrofoam stays tight to the frame as the epoxy hardens. After that i use the saw to taper the bottom edge. I also add Styrofoam to the front triangle and taper that as well. Once complete you should go ahead and do that for both pontoons.
Note: The strut layout in the second pic is different then the layout of the of the struts in the previous page. The layout in the previous page showed the correct positioning of the struts.
Step 4: Completing the Pontoons

Now you can see both pontoons side by side. To complete them i add a wooden triangle positioned at the top, and lined up with each strut, this will be used for mounting the frame. To add some more buoyancy i also cut a full 2' x 8' piece of Styrofoam in half lengthwise (giving us two 1' x 8' pieces). I use epoxy to mount those onto the inside of the pontoons.
Now both pontoons combined give a buoyancy of 460 lbs when fully submerged. This seems like a lot but when you consider you wouldn't want more then 60 percent of the pontoon submerged (then you would be uncomfortably close to the water) and you might also have you weight towards one side of the pontoon then it seems this 460 lbs is just enough for one person to float comfortably. (i fit 2 full size people on but it sits very low). If you wish to be able to make this a 2 person boat you can add more Styrofoam sheets to the outside. Each 1"x 2' x 8' sheet once cut to a height of 17" provides 62 lbs of buoyancy when fully submerged.
These calculations are fairly simple to do on your own. First calculate the volume of the object (length in meters x width in meters x height in meters), this will give you volume in meters cubed. Then multiply the value you get by the density of water (1000 kg/m cubed) this will give you how many KG the object can float when fully submerged.
Step 5: Making the Frame

To make the frame i cut my 2x4 s to 4.75 feet long and attached them to the pontoons using screws. I chose that width because it was just small enough that i would be able to fit the frame (when separated from pontoons) in the back of my van. Next i add the 2x3 piece down the middle of the boat. This is both for structure and to mount other parts off of.
Step 6: Adding the Keel

Now i cut out the keel out of a piece of plywood. Using the plywood, i also glue a slot so that the keel can be slid in and will be able to slide up and down within the slot.
The keel is an essential part of the sailboat and helps to turn the force provided by the wind into thrust in the forward direction. This is also the pivot point when you turn your boat
Step 7: Adding the Rudder

The rudder will need to rotate so i decide to mount it off of a hinge. I add a hinge to the back of the boat and then cut the rudder out of the piece of plywood. The rudder should be fastened in place with 2 bolts and the bolts should have a washer in between the nut and the wood of the rudder. The bottom bolt will have to be taken while the boat is out of the water so that the rudder can pivot upwards when it is on dry land.
To finish off i add a handle made of plywood. The handle is to only have one bolt through it so that it can pivot up and down.
Step 8: Finishing Touches

To finish up i cut a piece of plywood to size and fit it on top of the catamaran to use as a seat.
After that we need to make somewhere to mount the mast of the sail. To do this i obtain a small piece of pvc pipe and heat the bottom of it so i can squeeze it down and make it thin. Once that is done i simply mount a few screws in it to attach it to the frame of the boat.
Step 9: Setting Up the Sail

Now i use a mast and sail that i had laying around and slide it into the pvc pipe. I secure the mast with metal cables that attach to various points on the boat. Once the mast is in place i rig up the main sail and the jib and it is now ready to sail
Step 10: Testing Out the Boat

Now that the boat is complete you can go ahead and take it out on the water and test it out. Be sure to wear a lifejacket and bring a paddle just in case you have a hard time getting it in using the wind.
To see the test you can also check out the video
Step 11: Schematics

Here are a few schematics of the boat, they are not to scale. Beside the schematic picture i also attached a real picture of the boat
In order we have a top view of the boat, a front view, a side view, and a picture of the rudder and keel. All measurements of the schematics are done in meters.
Recommendations

Make it Resilient

Remake It - Autodesk Design & Make - Student Contest

Engineering in the Kitchen - Autodesk Design & Make - Student Contest


Everything electric boats and boating

Turning Nissans and Teslas into a DIY electric catamaran: Part 1
Read how UK marine electric propulsion consultant Jamie Marley designed and built his dreamboat ‘Ohm’s Law’, a DIY electric catamaran, powered by twin outboard electric motors using Nissan EV motors and Tesla batteries.
A mission to promote electric boating
Jamie is a Southampton-based marine electrical propulsion specialist who has consulted and worked on dozens of projects for boatbuilders of all description for two decades.
Along with a passion for the sea and sailing, he also has a passion for protecting our marine environments and decided early in his career that replacing ICE technology with electric propulsion would be an essential part of helping achieve that goal.
In 2014 he joined electric propulsion pioneer Torqeedo as Senior Field Service Engineer and worked with them until 2018, as Project Sales Manager specializing in electrification of new and existing passenger ferries worldwide.

With interest in electric boating starting to take off, Jamie realized he wanted to work hands-on with a wide variety of projects and have the freedom to use the most appropriate suppliers. He left Torqeedo to put up his own shingle and start Marine Electrification Solutions , an impartial and independent electric and hybrid marine propulsion consultancy.
His mission is simple and straightforward: To promote safe, environmentally sound, efficient and sustainable zero emission propulsion systems through cooperation .
There are few people with as broad a knowledge of electric propulsion as Jamie, and he has consulted on many major projects including the first RS Electric Boats model, the Spirit 111 which carried Torqeedo’s 100,000th motor and the electrification of Queen Elizabeth’s ceremonial rowboat ‘Gloriana’.
In December 2020 he started work on a project for someone who could be his most demanding client ever. Himself.
Making the plans: what size boat?
Planning an electric boat refit is much like figuring out how to buy any boat. The first step is figuring out the use case:
- What will you be using the boat for?
- Where will you be going?
- For how long?
- At what speed?
“I was looking for something our family (Jamie is married with two boys, 10 and 14) could go out in on a sunny day off the coast of Southern England” says Jamie. “We have a few favourite places where we have a picnic and a swim, maybe go paddleboarding…and the boys love a quick run on a tube or small boogie board.”
So he didn’t need any sleeping berths, a dayboat would be fine, and none of their activities require extreme speed: top speed for safe tubing is about 15 knots (≈ 20mph / 30 kmh). What Jamie and his family need is a steady, reliable hull for the occasionally choppy waters and enough space to hold the equipment, a cooler and a spread-out towel for lying in the sun.
Ex-workboat, 6 metre planing catamaran
Jamie figured something about 6 – 7 metres (20-25 feet) would do nicely. He started scouting around the local marinas and classified listings.
He spotted a 6 metre (20 ft) catamaran hull made by Hunter, a UK brand known for quality and durability. With a centre console and beam of 2.5m wide (8 ft) there was lots of space for the family and the water toys. It had been used as a workboat before, so the insides had taken a bit of a beating, but the structure was all in good shape.
One of the other things that attracted Jamie was the space beneath the deck. “Because it’s really a commercial catamaran hull, the deck was flush, no seams sticking up or anything…completely sealed, and all the cargo and tools would have been on the deck.” This gave him flexibility below on where to place the batteries and the access hatches.

Now it was time to think about the propulsion. From his long experience electrifying boats he knew a planing catamaran was a great hull to work with. The two pontoons mean less water resistance and drag than a monohull, which translates into smaller power requirements and increased range.
The other advantage is that the power requirement can be split between two motors, one on each side. That was good for two reasons. One is redundancy – if there is any issue with one of the motors, the other can propel the boat. Also, he would be able to experiment and tweak each motor separately when he built them, to find the optimum set-up.
Doing the calculations: use case
Let’s look at the power usage for the boat. To do that, we need to begin with calculating the energy usage. And to do that, we need to look at a use case.
Typical use case: It’s a sunny weekend day so the family wants to get out to one of their favourite spots for a nice lunch, some swimming, sunbathing, paddleboarding and maybe some tubing. The tubing and planing speed are what require the most energy in a boat.
Let’s start our energy need calculations with that.
With 10 minutes at planing speed they would be able to travel about 3.5 miles (5.6 km) from port – plenty for what they need. Once there, the boat would use almost zero energy during swimming and paddleboarding, would need energy for the 10 minutes of tubing and another 10 minutes at planing speed to return home.
That is the upwards end of the energy required. There is every possibility that on a sunny day they would be quite happy to enjoy a leisurely cruise out to and back from their swimming spot. And at cruising speed the spots they could visit would be considerably farther from port.
Planing: 2kW of power per 50 kilograms of boat
A rule of thumb is that it takes about 2kW of power per 50 kilograms of boat to get it planing. It depends on the shape of the hull, and a catamaran is going to be more efficient than a monohull, but this is a rule of thumb. (This equation roughly translates as 2.5HP for 100 pounds of boat). Calculation:
Jamie figured the hull and two outboard motors would weigh somewhere around 1,500kg (≈3,300 lbs). That’s 30 ‘parcels’ of 50 kilograms, so multiplying that by 2kW of power means 60kW for planing speed.
This turns out to be a fairly easy number to work with, because if getting the boat on plane takes 60 kiloWatts of power, in an hour of planing it will require 60 kiloWatthours of energy – which works out to 1 kWh per minute.
So the thirty minutes of planing Jamie might need is going to require 30 kiloWatt hours of energy. He will need batteries with at least that much capacity. To make sure he always has enough energy, let’s double that and say Ohm’s Law is going to want a battery – or batteries – with 60kWh of energy storage.
Next: Battery weight
Part two of the calculation is the weight of those batteries. For that we need to understand energy density – how much energy can be stored in what weight of battery. A good rule of thumb for a lithium ion battery is that it takes 5 kilograms of lithium ion battery to store 1 kilowatt hour of energy. So 60 kWh of energy is going to be stored in (roughly) 300 kilograms of battery.
We’d better circle back here, because our calculations were based on the boat weighing 1,500 kilograms. Now we’re at 1,800 kilograms and we haven’t got Jamie and Vicky and the kids and paddleboards and the lunch on board yet!
Let’s say the people and their paraphernalia add another 300 kilograms. Now we’re at 2,200 kilograms and we need to revisit our planing power.
2200 kgs is 44 ‘parcels’ of 50 kilograms, so we are going to need 88 kilowatts of power…but then we are going to need more battery…you can see how this can be a bit like chasing one’s tale, but it is a calculation that needs to be done.
In the end, when Jamie worked out his use cases and built in some extra capacity for more planing or unexpected emergencies, he decided to go with 120 kilowatt hours of battery storage – 600 kilograms of battery weight – to make a total boat weight of 2,500 kilograms.
Total weight: 2,500 kg / 5,500 lbs
You’ll notice that we haven’t talked about the power of the motors yet. The reason is that we needed to know the total boat weight before we could figure out the power requirement and we couldn’t figure out the boat weight until we figured out the energy requirement.
We now know we’ve got 2,500 kg of total boat weight, which is 50 parcels of 50 kgs. When we multiply that by 2kW we need 100 kw of power for planing speed.
Finding the motors
Even though Jamie was not going to be doing a lot of planing, there are lots of reasons, you don’t want any drive train – electric or fossil fuel, on a car or a boat – working at maximum output all the time. Jamie knew he needed extra power available above 100 kw, and figured that 120kW of power would give him plenty to do any planing and easily handle the cruising speeds.
One of the nice things about a catamaran is that it naturally has two motors – one on each pontoon – so the full weight of the boat doesn’t always have to be borne by one motor. Two 60 kW outboards would fit the bill for Ohm’s Law. And for redundancy, if he did happen to have any problems out on the water with one motor, he could easily get to shore running with just one.
Creating the electric outboards
The power of a Nissan Leaf motor matches up nicely with what Jamie needed. One EV motor for each outboard. Time to start looking in detail at that.
Fossil fuel outboards have a combustion motor – the powerhead – under the cowling at the top of the setup. That motor turns a vertical shaft in the lower leg – or lower unit as it is called in North America – which in turn uses a right angle gear connection to turn a horizontal shaft with the propeller on the other end.
To convert it to an electric motor, the ICE powerhead will be replaced with an electric motor.
Simple concept, but in practice it is more complicated, because it involves precise engineering to link the existing spline on the lower leg’s shaft with the one on the electric motor to match up exactly as the original combustion motor did. It also involves calculations about the RPMs of the original motor and the new electric one. Finally, the torque properties of an electric motor are different from ICE, so that will need to be looked at.

Jamie had the Nissan motors, the hunt now was to find the casing and lower units from a petrol /gas motor. He found what he wanted at a sale of marine equipment at the UK Ministry of Defense, and picked up a pair of used Mariner Optimax outboards.
He wasn’t concerned what shape the powerheads were in, of course, but he knew that since the motors had been used by the Ministry they would have been well maintained with gear lubrication and all of the other things that would assure the lower shafts and gears were in good shape.
Getting ready for Part II – putting it all together
We’ve covered a lot in this article. To recap: Jamie has found his boat, done his energy/power calculations, and sourced a couple of outboard casings. Basically he has taken an assortment of ‘shell’ components for a boat that ran on fossil fuel and is now going to clean it all up with electric propulsion.
We will pick up the next stage of the Ohm’s Law journey in a Part II Plugboats article. It will cover the details of finding the Nissan motors and Tesla batteries, converting the outboards to electric, placing the batteries in the hull, testing, re-testing and getting Ohm’s Law ready for her maiden voyage.
If you found Part 1 of this article through social media, Part II will also be posted there. Keep your eye out.
Or, why not sign up for the Plugboats newsletter below and you’ll get Part II and all the latest electric boat and boating news delivered to your mailbox every couple of weeks.
Enter your email address and click ‘Subscribe to Plugboats’ to be added to our mailing list.
Email address:
- ← Molabo 48V electric inboard makes catamaran debut on ‘Earthling’
- Avator 7.5e now shipping, first of 5 Mercury electric outboard models in 2023 →
Leave a comment Cancel reply

Get all the latest electric boats and boating news delivered to your mailbox!
Sign up here for the plugboats newsletter..
IT’S FREE!
No, thanks.
Terms and Conditions - Privacy Policy
IMAGES
VIDEO
COMMENTS
If you were to build a 40-foot (12.1-meter) catamaran, your cost of materials would range between 20-30% of the total cost. Therefore, for $300,000 total, the boat's materials would range between $60,000 and $90,000. The hull tends to range between 15-35% of the total build.
The first step to building your dream catamaran begins with a strongback - this is a square frame used to position the temporary frames that will be used to form the hull shape. ... Once both hulls are turned the tops of the bulkheads will be used to join the two hulls, and then the bridgedeck component will be installed underneath. STEP 6.
The lightest, most expensive hulls are made from carbon, but a catamaran builder may use carbon in places other than the hull to add strength and stiffness. Carbon boards, rudders, and reinforcing structures can enhance performance without driving the price of the boat beyond reach. Carbon is the fiber of choice for many custom builds, racing ...
Step 1. Kit Design. Work with us to finalise the details of the design you have chosen including any design options or additional modules to be included in the kit. We will determine the laminates, the number of panels required for each laminate, create the cutting files and prepare a quote for the kit if it is not already priced.
Here's a short explainer on catamaran hull design and the theory behind our own hulls. We have a quite distinctive and unusual design for a cruising catamara...
Catamaran hulls are usually made from fiberglass or wood. The most important factor when building catamaran hulls is making sure that the hulls are lightweight and strong. A good way to achieve this is to use a fiberglass layup technique, which involves laminating a number of layers of fiberglass together and reinforcing the hull with a frame. ...
Building a DIY sailing catamaran is very achievable. The cruising catamaran hulls are now complete, it is time to consider the fit-out style for cruising and...
A cruising catamaran's performance depends on three main aspects; its length, the sail area, and the boat's weight. Long boats are generally fast. A light boat with more sail area is also faster than a heavier boat with less sail area. In other words, you can make a multihull faster by making it longer, lighter, or adding more sail.
The first step is to choose the right materials for the hull, such as fiberglass, wood or aluminum. Then, you will need to build the frame of the boat, which includes the crossbeams and the main hull. After that, you will need to install the decking, the rigging, and other components.
Fast forward through 3 year's work - in 3 minutes, the building of a 40ft catamaran.An overview — building a DIY homemade 40ft catamaran. If you have dreamed...
The first step is to decide on the design and the materials you will use. You will need plans for the project, along with lumber and other materials such as fiberglass and epoxy. The next step is to build the catamaran frame, which involves cutting and fitting the wood pieces together to form the hulls and decks.
If you have fine hulls you can use a lower Cp. Most monohulls have a Cp of 0.55- 0.57. And that is about right for displacement speeds. However the key to Catamaran design is you need a higher Cp if you want to sail fast. So a multihull should be at least 0.61 and a heavy displacement multihull a bit higher still.
My new blog: MultihullBlog.com. 3123 Fairview Ave E. Seattle, WA 98102. Order the Latest Design Portfolio today to see over 85 multihull plans in stock. Besides illustrating my stock designs, for which I sell study plans and full construction plans, it also contains my design philosophy of multihulls; an article on the rapid Cylinder Mold (pdf ...
turn the hulls. By the end of August, we had two open hulls sitting in our boat shed. Over the next several months we proceed to join the hulls with the beams I had built in the garage, and then to install the cuddy cabin, cockpit, and decks. By the spring of 1998, it was staring to look like a catamaran. Through the
This CATAMARAN was designed to be built using the FIBERGLASS panel construction & special pre-scaled drawings are supplied for each hull panel making it simple for the builder to build all of the hull and superstructure as one complete unit. This is a POWER-SAILER CATAMARAN .. the bias is about 60% power and 40% sail ...
The DESIGNER'S book TRIMARAN and CATAMARAN CONSTRUCTION is part of the plans (over 21') and covers all phases of construction. Plans are leased to build ONE boat, NO time limit. ... All boats may be built with flared hulls, with the exception of the TRI 25, TRI 26MT, CAT 27PC and the CAT 27. A DESIGN FEE for customer modifications to stock plans.
Start of the catamaran building project. First the hulls are built, turned then the lower bridge deck secured in place. Hope you enjoy.
The main hull is made from a pair of old 16' catamaran hulls cutoff and glassed end-to-end. Junked catamaran hulls are easy to get. If you can't find a free hull, build a hull like the Kenya Canoe but bigger. Use scavenged plywood from crates if you want it free. ... DIY Electric Kayak by BradenSunwold in Boats. 125 12K ...
Place the widest one with most volume in the center. Obviously, if you kept the hull in this level position, your trimaran would be dragging 3 hulls through the water with far more drag than for a catamaran. So you need to lower the central hull, so that it will support your 900 lbs .. requiring 14 cu.ft volume under the waterline.
Hulls are what sets this boat apart from the rest. The catamaran has two hulls, while the monohull, as the name suggests, has only one hull. Most of the advantages of this boat are hinged on these two hulls. The bridge deck connects the two catamaran hulls. On top of the catamaran hulls and the bridge deck is the deck.
Step 2: Assembling a Pontoon. The catamaran will be composed of 2 pontoons. These pontoons will have a frame filled with the white, less durable Styrofoam in the center; then we will later add the pink Styrofoam to the outside. To start off i lay out two 2x2 pieces of wood with the white Styrofoam pieces in the center.
Building a 14ft plywood motor catamaran - An introduction to the project and showcase of the homemade boat. -----...
Calculation: Power required for planing speed. 2kW per 50kg (2.5HP per 100 lbs) Jamie figured the hull and two outboard motors would weigh somewhere around 1,500kg (≈3,300 lbs). That's 30 'parcels' of 50 kilograms, so multiplying that by 2kW of power means 60kW for planing speed. Boat Weight = 1,500kg ÷ 50kg = 30.