
Sailboat Shroud: Everything You Need to Know
by Emma Sullivan | Jul 27, 2023 | Sailboat Maintenance

Short answer sailboat shroud:
A sailboat shroud is a part of the standing rigging system that supports the mast and helps maintain its stability. These load-bearing wires or cables are attached to the sides of the boat and provide crucial support for the mast by counteracting lateral forces.
Understanding the Importance of a Sailboat Shroud: A Comprehensive Guide
The sailboat shroud: an often overlooked yet indispensable component of any sailing vessel. While its name may sound somewhat unfamiliar to the uninitiated, its significance in ensuring a safe and successful sailing experience cannot be overstated. In this comprehensive guide, we will delve into the critical role that sailboat shrouds play, unraveling their importance to both the functionality and safety of your beloved watercraft.
Firstly, let’s demystify what exactly a sailboat shroud entails. The term “shroud” refers to a collection of wires (usually made from stainless steel) or synthetic fibers that are strategically positioned on either side of the mast, providing structural support to maintain its stability during navigation. These rigging components act as tension-bearing elements that transfer various forces between the mast and the hull of the sailboat, ensuring its structural integrity is maintained under varying wind conditions.
One might wonder: why are these shrouds so important? Well, at their core, they serve primarily to counteract lateral forces acting upon the mast while also assisting in maintaining its vertical alignment. When properly tensioned, they prevent excessive sideways movement known as “mast rake,” thereby allowing for improved directional control and optimized sailing performance. In essence, sailboat shrouds directly contribute to maximizing your vessel’s efficiency by minimizing unnecessary energy loss due to excess mast movement.
Beyond optimizing performance, however, shrouds are instrumental in guaranteeing your safety whilst out on the open water. By firmly securing the mast in place through their tensioned presence, they help distribute loads evenly throughout the sailboat’s structure – preventing it from collapsing or compromising stability under heavy gusts or turbulent conditions. This aspect is particularly crucial during rough weather conditions or when encountering strong currents where failing to account for these external factors could potentially lead to catastrophic consequences.
Moreover – and here comes one of their most valuable features – well-maintained sailboat shrouds can actually save you money by keeping the rest of your rigging in good condition. When appropriately tensioned, they actively contribute to reducing stress on other interconnected components such as spreaders, stays, and halyards, thus minimizing wear and tear caused by excessive movement or strain. By employing sailboat shrouds effectively, you’ll be able to avoid unnecessary repair costs and extend the lifespan of your entire rigging system.
Understanding the significance of proper sailboat shroud maintenance is equally essential to fully grasp their overall importance. Regular inspection for signs of wear or corrosion should form part of routine boat maintenance. Any damaged wires or weak points must be promptly replaced to maintain optimal functionality and prevent potential accidents. Additionally, adjusting the shroud tension periodically – in harmony with manufacturer recommendations and prevailing weather conditions – will ensure consistent performance over time.
In conclusion, a sailboat shroud may be just one part of your vessel’s intricate rigging system, but its contribution cannot be understated. From optimizing sailing efficiency through improved handling and control to ensuring safety during challenging conditions, these unassuming yet vital components play an integral role in any sailor’s experience. Acknowledging their worth and prioritizing proper maintenance will undoubtedly lead to smoother journeys on the open seas while extending the longevity of your prized sailboat investment.
How to Properly Install a Sailboat Shroud: Step-by-Step Instructions
Title: Rigging Your Sailboat with Finesse: A Step-by-Step Guide to Installing Shrouds
Introduction: Setting up the shrouds on your sailboat is an essential part of rigging. These vital components provide support for the mast and ensure stability while sailing. While many sailors rely on professionals for this task, understanding how to properly install a sailboat shroud can be incredibly empowering and save you money. In this step-by-step guide, we will walk you through the process with detailed professional instructions, spiced with a touch of wit and cleverness.
Step 1: Gather Your Tools – Preparation is Key Before you get started, arm yourself with the necessary tools: – Wrench or shroud tension gauge – Wire cutters – Cotter pins or stainless steel stoppers – Tape measure
Step 2: Measure Twice, Cut Once – Determining Shroud Lengths Measurements are crucial when it comes to installing shrouds accurately. Starting from each attachment point (chainplate or turnbuckle), stretch a tape measure upward toward your masthead. Make sure the measurements are precise, accounting for any additional hardware like spreader ends or mast tangs that may affect length requirements. Repeat this process for every shroud.
Step 3: Remove Old Shrouds – Out with the Old! If you’re working on an existing rigging setup, start by removing any old shrouds using wire cutters to clip off their bottom parts — near chainplates or turnbuckles.
Step 4: Preparing New Shrouds – Who Says Rework Isn’t Fun? Now that your old shrouds have hit the deck (pun intended!), it’s time to prepare new ones. When choosing replacement wire, opt for high-quality marine-grade stainless steel cables as they offer excellent corrosion resistance and longevity.
Cut your newly acquired cables according to the measurement gathered in Step 2. Remember to leave a little extra length for fine-tuning and adjustments during installation. Once cut, use wire cutters to fray the ends slightly. This process will aid in affixing fittings later on.
Step 5: Attaching the Bottom Ends – Keep Calm and Connect On! Starting with one side of your sailboat, connect the bottom end of each shroud cable to its respective chainplate using cotter pins or stainless steel stoppers. Ensure that you exert tension by pulling the shrouds downward while inserting and securing these fasteners. Double-check for any twisting or misalignment.
Step 6: Securing the Top Ends – Reaching New Heights! Now it’s time to ascend your mast—well, figuratively speaking! Attach each shroud’s top end to their corresponding turnbuckle, ensuring they’re oriented correctly without any twists or kinks. – Pro Tip: Orienting turnbuckles with open slots facing opposite directions makes tuning easier in future adjustments.
Step 7: Balancing Act – Find Your Sailboat’s Equilibrium Begin tightening the turnbuckles evenly on both sides of your mast while keeping an eye on their lengths. Use either a wrench or a shroud tension gauge to ensure consistent tension across all shrouds. Establish good baseline stiffness without excess rigidity, allowing flexibility required for proper sailing dynamics.
Step 8: The Final Touches – Safety First! Once satisfied with your tension setup and balance, secure each turnbuckle to avoid accidental untwisting under pressure. Cotter pins can be used here as well if they serve as an extra peace-of-mind measure against tampering.
Conclusion: By mastering how to properly install sailboat shrouds through our step-by-step guide packed with professional instructions and a sprinkle of wit, you’ve gained valuable knowledge in maintaining your vessel’s rigging setup independently. Rigging becomes an enjoyable journey when accomplished with confidence, and remember: those who sail their own shrouds are the captains of their fate on the open sea!
Common FAQs About Sailboat Shrouds Answered
Title: Unraveling the Mysteries of Sailboat Shrouds: Answering Common FAQs
Introduction: Sailing enthusiasts, both seasoned and beginners alike, often find themselves bombarded with questions about various aspects of their beloved watercraft. One such area that constantly generates curiosity is sailboat shrouds. These integral components play a crucial role in maintaining stability and safety while out on the open waters. Today, we aim to demystify these enigmatic structures by answering some frequently asked questions about sailboat shrouds.
1. What are sailboat shrouds? Sailboat shrouds are a vital part of a sailing vessel’s standing rigging system, consisting of sturdy wires or cables that support the mast from the sides. They provide lateral stability for the mast, ensuring it stays upright even under strong winds or rough seas.
2. How do sailboat shrouds work? When properly tensioned and adjusted, sailboat shrouds counteract the force exerted by the sails on the mast, preventing excessive bending or swaying. By distributing this load evenly across multiple points on either side of the mast, they effectively keep it centered and help maintain optimal performance during sailing.
3. What materials are sailboat shrouds made of? Traditionally, sailboat shrouds were constructed using stainless steel wire ropes due to their exceptional strength, durability, and resistance to corrosion in marine environments. However, modern advancements have also introduced alternatives like Dyneema®, a high-performance synthetic fiber known for its remarkable strength-to-weight ratio.
4. How often should I inspect my sailboat shrouds? Regular inspections of your sailboat’s standing rigging are essential for ensuring safety at sea. We recommend conducting thorough inspections before each sailing season and after any significant weather event or prolonged period of disuse. Typically, closely examine key areas such as fittings, turnbuckles, tangs (attachment points), and wires for signs of wear, cracks, corrosion, or loose connections.
5. Can I replace sailboat shrouds myself? While some experienced sailors may tackle minor maintenance tasks on their own, replacing sailboat shrouds is a job best left to professionals. The process involves carefully adjusting tension levels, ensuring proper alignment, and verifying that all components are compatible and correctly installed. Expert riggers possess the necessary knowledge and specialized tools to carry out these intricate procedures safely and efficiently.
6. Are there different types of sailboat shrouds? Yes, there are various configurations of sailboat shrouds tailored to specific sailing requirements. Common designs include single lower shrouds (found on smaller boats), double lower shrouds (enhanced stability for larger vessels), cap shrouds (supporting the mast from the top), and intermediate or diamond stays (adding lateral support). Consulting with a professional rigger can help determine the suitable setup for your specific sailboat.
7. How do I know if my sailboat shroud needs replacement? Several indicators might suggest it’s time to consider replacing your sailboat shroud. These include visible signs of damage such as broken wires or fatigue-induced cracking, excessive corrosion, reduced tension capacity due to stretched wires, noticeable misalignment when compared to other rigging components, or simply reaching its recommended lifespan as specified by the manufacturer.
Conclusion: Sailboat shrouds may seem like a complex subject at first glance but understanding their purpose and knowing how to properly maintain them ensures safer and more enjoyable sailing experiences. By addressing some common FAQs about these essential rigging elements, we hope to have shed light on their significance in keeping your vessel steady while conquering the magnificent seas ahead. So set your course confidently knowing that your trusty sailboat shrouds have got you covered!
The Role of a Sailboat Shroud in Ensuring Safety at Sea: Explained
Sailing is an exhilarating experience that combines the beauty of nature with the thrill of adventure. It allows us to disconnect from the chaos of our daily lives and immerse ourselves in the vastness of the open sea. However, amidst all this excitement, it is crucial to prioritize safety above all else. One vital component that plays a significant role in ensuring a safe sailing journey is the sailboat shroud.
Now, you might be wondering, what exactly is a sailboat shroud? Well, let’s dive into its importance and how it guarantees our safety while sailing.
At its core, a sailboat shroud refers to a series of tensioned cables or wires that support the mast on a sailing vessel. It acts as an essential connective element between the mast and the deck, providing stability and integrity to the entire structure. In simple terms, without sturdy sailboat shrouds, your mast would be prone to wobbling or even collapsing entirely – definitely not something you want in the middle of your oceanic voyage!
So, why are sailboat shrouds so crucial for safety? Let’s take a closer look at their key functions:
1. Stability: Imagine you’re steering your sleek yacht through choppy waters with strong winds gusting against your sails. Without reliable sailboat shrouds to support your mast, your vessel could easily lose balance and capsize – turning your exciting adventure into a dangerous nightmare. The primary function of these shrouds is to provide lateral stability by counteracting excessive sideways forces acting on the mast.
2. Structural Integrity: A sailboat shroud ensures that all elements comprising your boat’s rigging work together harmoniously. By distributing load evenly across various points on the hull and deck fittings, it prevents concentrated stress on any particular area – reducing the risk of structural failures such as cracked hulls or bent masts.
3. Control and Comfort: Sailing is about harnessing the power of wind to navigate your craft efficiently. Sailboat shrouds play a vital role in achieving this balance by allowing you to trim your sails effectively. By adjusting the tension in these rigging components, sailors can optimize their boat’s performance, maintaining a stable course and comfortable sailing experience even in rough conditions.
4. Prevention of Catastrophic Failures: In the worst-case scenario, where extreme conditions or unforeseen events create immense stress on your mast, sailboat shrouds act as a safety net, preventing catastrophic failures. They absorb excessive forces and provide a buffer zone for potential damage – giving you precious time to react before things take a turn for the worse.
However, bear in mind that sailboat shrouds aren’t invincible superheroes; they require regular inspection and maintenance to ensure their effectiveness. Over time, exposure to saltwater environments and constant tension can cause wear and tear on these critical components. Routine checks for signs of corrosion, fraying wires, or damaged fittings are essential practices that should never be neglected.
In conclusion, sailboat shrouds are not only essential but invaluable when it comes to ensuring safety at sea. From providing stability and structural integrity to enabling control and preventing catastrophic failures, these unassuming wires play an instrumental role in our nautical adventures.
So next time you find yourself aboard an elegant sailboat venturing into the vast blue unknown, remember to thank those trusty sailboat shrouds silently working behind the scenes – safeguarding your journey amidst windswept waves while allowing you revel in nature’s embrace with peace of mind knowing you’re well protected!
Expert Tips for Maintaining and Inspecting Your Sailboat Shrouds
Title: Mastering the Art of Sailboat Shroud Maintenance and Inspection: Expert Tips Unveiled
Introduction: Embarking on a sailing adventure is a thrilling experience, but it’s crucial to ensure that your vessel is maintained in top-notch condition. Among the many critical components of your sailboat, the shrouds play a paramount role in supporting your mast, preserving stability, and guaranteeing safety. In this blog post, we aim to equip you with expert tips that will assist you in maintaining and inspecting your sailboat shrouds effectively. Let’s dive into the world of sailboat care!
1. Brush Up Your Knowledge: Before delving into maintenance techniques, it is essential to understand what sailboat shrouds are and how they function. Shrouds are stainless steel cables or rods that run from various parts of the mast down to the hull. They prevent excessive bending and swaying of the mast when under high wind-pressure conditions or while under sail. Being aware of their purpose will help you comprehend why their proper upkeep is indispensable.
2. Routine Inspections are Vital: Begin by conducting frequent inspections around every two to three months or whenever you return from extended voyages. Look out for signs of rust, elongation, fraying, or corrosion on both ends (connectors) as well as along its length using a magnifying glass if necessary. Any indication of wear or damage should not be taken lightly; instead, take immediate action.
3. Check Tensions Regularly: Maintaining optimum tension on your shrouds promotes overall boat performance and reduces unnecessary strain on other rigging elements such as stays and spreaders – enhancing stability during sailing trips.
4. Replace Worn Parts Promptly: As soon as you identify any deformities, such as frayed strands or localized corrosion spots on your shrouds during an inspection, it is paramount to replace them promptly with new ones that meet the manufacturer’s specifications. Ignoring these signs could lead to catastrophic failures at sea, jeopardizing both your safety and that of your beloved sailboat.
5. Don’t Overlook Turnbuckles: Pay special attention to the turnbuckles that adjust the tension in your shrouds, as they are often vulnerable to corrosion due to their exposed location. Applying a high-quality, marine-grade lubricant regularly will keep them functioning smoothly and preserve their longevity.
6. Tidy Up Your Shroud Rigging: Over time, accumulated dirt, salt residue, or bird droppings can affect the structural integrity of your shrouds. Use mild soapy water and a non-abrasive brush to clean them gently. Avoid harsh chemical cleaners as they might damage the stainless steel surface. Remember, cleanliness goes hand in hand with durability!
7. Consult Professionals for Detailed Inspections: While regular inspections are indispensable, it is still prudent to consult professional riggers or sailing experts for periodic thorough assessments of your sailboat’s rigging system – including sailboat shrouds. Their experience enables them to detect issues not apparent during routine checks and provide expert advice on maintenance practices tailored specifically to your vessel.
Conclusion: Maintaining and inspecting your sailboat shrouds shouldn’t be taken lightly; they form an integral part of keeping you safe during all sailing endeavors. By following these expert tips diligently, conducting routine inspections, addressing issues promptly, and seeking professional assistance when necessary—you’ll ensure optimal performance from the essential components that embellish your prideful sailboat! Set sail confidently knowing that you’ve mastered the art of maintaining and inspecting your sailboat shrouds like a true professional!
Upgrading Your Sailboat Shrouds: Key Considerations for Performance Enhancement
When it comes to upgrading your sailboat shrouds, there are several key considerations that can enhance your vessel’s overall performance. Shrouds play a crucial role in supporting the mast and maintaining its stability, so it’s important to carefully evaluate all aspects before making any changes. In this blog post, we will delve into the intricacies of upgrading sailboat shrouds, discussing various factors to take into account and guiding you towards an informed decision.
Before embarking on this upgrade journey, it is imperative to assess the current condition of your sailboat shrouds. Inspect them thoroughly for signs of wear and tear such as rust, fraying wires, or any obvious structural weaknesses. If you notice any concerning issues, it may be wise to consult with a professional rigging expert or rigger who can provide an objective assessment.
One key consideration when upgrading your shrouds is the material from which they are made. Traditionally, stainless steel has been the go-to choice due to its durability and strength. However, advancements in textile technology have paved the way for alternative materials such as Dyneema or carbon fiber composites which offer substantial weight savings without compromising strength.
Choosing the right size and diameter for your upgraded shrouds is another vital aspect to consider. The load-bearing capacity of the mast and rigging system should be evaluated in order to determine the appropriate size that can effectively withstand anticipated stresses during sailing maneuvers. Consulting with a rigging specialist or naval architect can help ensure accurate calculations based on your specific vessel’s design parameters.
Additionally, assessing the angle at which your sailboat shrouds intersect with the mast is essential for optimizing performance. An improper angle can lead to excessive mast bend or unwanted sagging of sails. Adjusting these angles through advanced tuning techniques like dynamic rigging allows for fine-tuning adjustments that improve windward performance and overall boat handling characteristics.
While analyzing all these technical aspects is crucial, it’s essential not to overlook the aesthetic element. Upgrading your sailboat shrouds presents an opportunity to add a touch of personality and uniqueness to your vessel. With a wide range of colors and finishes available, you can enhance the visual appeal of your rigging while still prioritizing performance.
One last consideration that should not be overlooked when upgrading shrouds is budget allocation. Sailboat shroud replacements can vary widely in cost depending on factors such as material choice, size, and customization options. It is advisable to establish a realistic budget beforehand and prioritize factors accordingly.
In conclusion, upgrading sailboat shrouds requires careful evaluation of various key considerations. From material selection to size determination, angle adjustments, aesthetics, and budget allocation – each aspect plays a vital role in optimizing your vessel’s performance on the water. By approaching this upgrade decision with a professional mindset while also injecting some wit and cleverness into the process, you can elevate both the functionality and allure of your sailboat shrouds. So set sail towards better performance enhancement by exploring these considerations in detail!
Recent Posts

- Sailboat Gear and Equipment
- Sailboat Lifestyle
- Sailboat Maintenance
- Sailboat Racing
- Sailboat Tips and Tricks
- Sailboat Types
- Sailing Adventures
- Sailing Destinations
- Sailing Safety
- Sailing Techniques
How to Tune a Sailboat Mast
Here are some general guidelines for tuning your mast’s standing rigging . please see our blog on how to properly adjust a turnbuckle before you begin. as always we recommend seeking the advice of a professional rigger for more specific tips and tricks regarding tuning your boat’s rigging..
Your boat must be in the water. Begin by just slacking off all of the side shrouds as evenly as possible, so that all stays can be adjusted by hand. Once loose, try and adjust all turnbuckles so that they are pretty much equally open (or closed) from port to starboard respectfully. Also go ahead and line up the cotter pin holes (if present) in the studs so that they are in a pin-able position. Now is also the time to balance out the threads, between the upper and lower studs of the turnbuckle, IF they are not even. Do this by unpinning the turnbuckle from the chainplate – BE CAREFUL HERE – to ensure the mast is secure before unpinning any one stay. Lastly, loosen all halyards or anything that may pull the mast to port, starboard, forward or aft.
1. Check by sighting up the backside of the mast to see how straight your spar is side to side. You can take a masthead halyard from side to side to ensure that the masthead is on center. Do this by placing a wrap of tape 3′ up from the upper chainplate pin hole on each upper shroud. Cleat the halyard and pull it to the tape mark on one side, mark the halyard where it intersects the tape on the shroud. Now do this to the other side, the mark on the halyard should also intersect the tape similarly. Please note: when the mast is equipped with port and starboard sheaves, instead of just one center-line sheave, it will appear slightly off to one side. Just keep this in mind……
2. Using the upper shrouds as controls, center the masthead as much as possible using hand tension only. Some masts are just crooked. If yours is(are) crooked, it will reveal itself when you loosen all of the stays and halyards initially and sight up the mast. Although you should use hand tension only, you can use a wrench to hold the standing portion (the stay portion) of the turnbuckle. If for some reason the shroud is totally slack and you still can’t turn the turnbuckle by hand then the turnbuckle may need to be serviced, inspected, and maybe replaced.
3. Tune the mast from the top shroud on-down, making sure the mast is in column. Remember: as you tension one shroud by adjusting the turnbuckle, to loosen the opposing shroud the same amount.

4. Once the mast is fairly straight from side to side, tighten the shrouds all evenly using tools for tensioning. Typically, for proper tension, the shrouds should be tightened using these guidelines; uppers are the tightest, and then fwd. lowers, then the aft lowers and intermediates should be hand tight plus just a turn or two. ~ With an in-mast furler it is recommended to tension the aft lower a bit more to promote a straighter spar (fore and aft) for better furling.
5. Now you can tension the aft most backstay (s). If the backstay has an adjuster it should be set at a base setting (500-1000 lbs). If the backstay simply has a turnbuckle then it should be tightened well. After this has been done, in either situation (adjustable or static backstay), one should site up the mast from a-beam and notice that the masthead has a ‘slight’ aft bias. If there is no aft bias, too much, or the mast is inverted (leaning forward), then the forward most forestay (s) will most likely need to be adjusted to correct this. If a furler is present then seek the council of a professional rigger or refer to your furler’s manual for instructions on how to access the turnbuckle if there is one present.
6. Finally, sight up the mast one last time and make any necessary adjustments.
7. MAKE SURE ALL TURNBUCKLES AND PINS HAVE COTTER PINS AND ARE TAPED NEATLY TO PREVENT CHAFE!
Read HERE for how to use a LOOS & Co. Tension Gauge!
Here is a little vid from our friend Scott at Selden Masts (click the link then hints and advice for more info) on rig tune…..
[youtube http://www.youtube.com/watch?v=rcCALZ4x6R4&w=420&h=315]
Is your mast fractionally rigged, only has a single set of lowers or is just plain different? Be sure to leave any questions or comments below.
Similar Posts
The self tending jib boom.
Jib boom or no jib boom… that is the question. First we need to figure out why it’s there to begin with. The jib boom really only has its advantages when sailing “off the wind”. It allows the sail to maintain a well projected, fast sail shape as the sheet is eased off of centerline….
Remember: Banque Populaire Breaks Around the World Record
Just taking a look back at the mega multi-hull Banque Populaire. In January it was official, the massive tri-maran had broken the ’round the world speed record; 45 days, 13 hours, 42 minutes and 53 seconds. Get the full scoop here. [youtube http://www.youtube.com/watch?v=aKUwK4NOUs8&w=560&h=315]
A 1903 Lawley Built Yacht
When I started in the marine industry, I was fortunate enough to work aboard a truly unique yacht. The name of this yacht was Witchcraft. The yacht was built in 1903 by the Lawley Ship Yard in Boston, MA and designed by B.B. Crowninshield. Originally, the boat had a very tall gaff rigged mast which…
A Modern Classic
A beautiful yacht with classic lines and modern technology, “PASHA”. Enough said….. [youtube=http://www.youtube.com/watch?v=nSLTxlz0PIU&w=560&h=315]
The World’s Largest Mast….
…was stepped last month at the Perini Navi Yard in Italy. Just look at the size of the masthead! [youtube https://www.youtube.com/watch?v=_pEsuYH-Dt4&w=560&h=315] This incredible carbon fiber wonder measures just over 250′ and weighs in at just over 16 metric tons…pretty light considering. The furling boom provided by Future Fibres could be its own sailing yacht…
Pin and Tape……
…….A term regularly used here at The Rigging Company. Yet this small detail appears to elude most, at least when it comes to doing it correctly. I always say, “details are what make the difference between a professional job and one that is well, not so professional”. If you take notice as to how your…
Leave a Reply Cancel reply
Your email address will not be published. Required fields are marked *
Save my name, email, and website in this browser for the next time I comment.
54 Comments
I have a 1965 Alberg 30. On a starboard tack the boat has more weather helm than on a port tack. I have not been able to achieve a balanced helm on either tack. New full batten main, new 150 roller furl genoa.
Other than the boat being evenly ballasted from port to starboard, e.g. holding tanks, fuel tanks, below deck furnishings, and storage items, I would check the rig from side to side. A crooked mast or poor static tune can result in the boat sailing differently on both tacks. A good way to test this is either sighting up the mast at the dock to ensure that the mast is relatively straight side to side and in column. You can also see that when beating (aka hard on the wind), you have to make adjustment’s to the mainsail sheet tension (NOTE: the traveler will likely need to be adjusted to mirror the same setting as on the previous tack). If notice that with the traveler in the same position on each respective tack that the sail is bubbling or flogging more on one tack than on the other, it is likely necessary to re-tune the mast. This can be done at the dock by following the guidelines in the article once the everything has been appropriately loosened to tension.
Let us know if this helps.
Any Hints, tips for tuning a 1977 Whitby 27 sloop 1/4 ton rig?
Nothing special that I can think of. Just follow the guidelines in the article. From what I can gather there are only a single set of lowers correct? Are the spreaders aft swept at all or just straight out? If it is single lowers and no sweep to the spreaders you’ll need to set the rake using the forestay adjustment to set the rake and the backstay to control the forestay tension. If you are interested in optimizing sail tuning, like in racing situations: higher wind sailing conditions will desire more tension on the shrouds, a bit more tension on the lower than the upper, but only slightly; and in lighter winds loosen them up a bit, a tad looser on the lower than the upper.
Hope that helps, and good luck.
How do I tune /2 in rigging. Neither of the loos gaug s are large enough?
Thanks for the question. Yes, I think the Loos gauges only go up to 3/8″ wire. First let me say that a tension gauge is not a must for proper tuning, more for tension recording and also not exceeding max tension which is typically hard to achieve without additional fulcrums or wrench extensions. Having said that, if you know that you need one simply search google for cable tensioning gauges. There are a few others like this one https://www.checkline.com/product/136-3E , pricing is not easily apparent and may be excessive for your needs.
My recommendation is that if you have a good local rigger have them do a static dock-side tune and perhaps sail-tune in the boat’s ideal conditions. Perhaps they can provide a tutorial on their process for you to be able to make rigging adjustments over time.
Hope that helps.
Hi. Nice article. I have a Mirage 27 (the Bob Perry design). It’s a masthead rig with single spreaders and the shrouds on each side come to the same chainplate. I have been tuning so that tension on the lower and uppers is the same and trying to set them so that (as you say) the leeward shrouds are just slightly slack. But how do I induce mast rake? I have a split backstay with a 6:1 purchase on the adjuster; should the mast have rake even with the adjuster off? or do I just haul on it? or should the tension on the inners and outers be different?
HI Michael,
You will need to lengthen the headstay and shorten the backstay. This can be done a few ways either with turnbuckle adjustment or actually shortening and lengthening cables, sometimes you can add or remove toggles also.
Hope that helps!
- Pingback: Buying a second-hand luxury yacht? Here’s what you need to look for - Phuketimes news
I recently purchased a 1988 Catalina S&S 38 and experienced my first launch this season, including stepping the mast and tuning the rig. As we prepared, we found that the Cap Shroud and Intermediate Shroud were clamped together at the four spreader ends. The folks at the yard had never seen that, and I certainly didn’t know why it was there … possibly to keep the spreader ends and shrouds consistent? Anyway, as I am learning how to tune my rig, it seems to me that these clamps would prevent me from tuning the cap shroud and intermediate separately and correctly Thoughts? Should I remove them and re-tune the rig?
So it is a double spreader rig I take it? The upper shroud wire should run freely through the first spreader, or the closest one to the deck, and be clamped at the top spreader. The intermediate shroud wire should be clamped at the lower spreader.
Before stepping, if this was done correctly, both upper spreader and lower spreader should be clamped equal distance from the mast attachment point, when looking at the mast from port and starboard.
In other words, you should measure the distance from where the upper shroud attaches to the mast to the end of the upper spreader and it should be the same distance on the other side, port to starboard. Then the same goes for the intermediate shroud and the lower spreader. The upper shroud should run freely through the lower spreader although it is covered by the clamp, but not actually clamped at the lower spreader, j ust the top one.
If all 4 spreaders are clamped equally port to starboard. You should be good to tune from there. The spreaders should show a slight up angle, to be specific slightly more up at the upper spreader than at the lower, but all of them should be just ever so slightly pointing up. You even want to think about clamping them slightly higher than that before tensioning, as this will pull them down and into their preferred angle, just slightly up. Specific angles are really only determined on the spar builders drawing and vary for manufacturer to manufacturer. Generally it is pretty clear where they want to sit. With the shrouds loose if you find that angle that appears to be the right one, and push them up slightly from there then clamp. This will allow them to be pulled down slightly once tensioned.
Kind of a tricky thing to explain in writing but hopefully it helps.
Have further questions? Give us a call 443-847-1004, or email us [email protected]
I have a Catalina 275 fractional rig with single swept back spreaders and an adjustable backstay. My questions are: how much rake, tension on cap and lower shrouds and on chain plate should cap shroud be forward and lower aft. I am racing and want the best performance. Thanks for any help. Bill
If the two shrouds are on the same plate, right next to each other, and the pin holes are the same diameter, and the plate is configured in a fore and aft configuration, I would choose the aft hole for the lower shroud and the forward one for the upper shroud.
In terms of specific rake, you will need to look towards the maker of your sails and or the boat manufacturer. I discuss how to measure rake in the preceding comments.
“You can measure rake by hanging a small mushroom anchor from the main halyard, with the boat floating on its lines, if you wish”
For racing I would start off with a good static tune at the dock by following the points in the article. If you know it’s going to be light day, start off with light rig tension. Be sure to use either Velcro wrap style cotter pins or simply lash the upper and lower shroud turnbuckles together to secure them. This will give you access to removing the pins or lashing while sailing and adjusting the stays.
From there you will need to sail tune for that days specific conditions, your shrouds will tell you what needs to be tighter and looser. I have answered how to do this a few times already in the comments below, please take your time to peruse the comments section to see what sail tuning entails. Doing this will always ensure that the cable tensions are set up ideally for the conditions and the boat can be sailed at maximum potential.
“For racing, ideally once the static tune at the dock (the part we just talked about) is done, go out and sail tune. Do this by going hard on the wind and checking to see if the leeward shrouds are just starting to dance, this is ideal. If they are swaying about they are too loose for the current conditions. If the leeward shrouds are tight, they may be a touch to tight. Tension and loosen as needed; count what you did and to what shroud, then tack and do the same to the other side.
ALWAYS secure the turnbuckles when you are finished adjusting them.”
Just hit ‘Ctrl F’ and search the page for “sail tune” and “rake”
I am trying to tune a Hallberg Rassy HR36 masthead rig. The rig has two in-line spreaders. The cap shroud is 3/8 inch and terminates at the lower spreader. From the lower spreader, the cable transitions to a 5/16 inch cable passing over the upper spreader to the masthead. A second 9/32 inch cable runs from the lower spreader to the mast (just below the upper spreader). The Selden rigging suggests that the “upper shroud” be at 15 percent of the breaking strength of the cable. In this situation, is it 15 percent of the 3/8 inch lower portion? If so, how should the upper 5/16 inch and 9/32 inch cables be tensioned?
Thanks for your help.
Hi Bryant, good question. Once proper alignment and centering of the spar has happened (static tune), and you are perhaps a hair tighter than hand tight on all shrouds, you can begin to tension things to a percentage of breaking strength. Do this by using the cables at the deck and use their diameters to determine the tensioning amount.
The V1 (aka cap shroud) in your case is a 3/8″ cable which supports the two cables above ii, hence its large diameter. The 5/16 V2,D3 and the 9/32 D2 total 19/32. So if 15% of the 3/8 cable is achieved you will below that threshold for the cables aloft. Does that make any sense?
With that in mind there is a range of acceptable tension from light air to heavy air. 15% sounds like a good middle of the road tension. Generally you do not want to exceed 30%. Sail tuning in ideal conditions is generally the best way to determine the right tension, but 15% of breaking strength sounds like a good place to start.
Don’t forget your cotter pins and tape, especially aloft.
Hope that helps and thanks for the question.
T.R.C. Thanks you for the clarification regarding the V2,D3 and D2 load distribution. When I set the V1 tension to 15%, the tension on the V2,D3 was at 8 %. I then tensioned the forward shroud to 12 % and the aft shroud to 10 %. Then I tensioned the backstay to 14 %. After doing this, I measured the tension on the V1 to be 10 %. The only information I could find regarding tension on the D2 was that is did not have to be tensioned much. I tensioned it to 5%. The mast sights straight and I used a bossen seat on a halyard to measure to the lower part of the V1, which also indicated that the mast was straight. Did I overtension the fore and aft stays? Is the tension in the D2 too much or too little? Again, I appreciate your advice.
When you tighten the backstay it usually induces a bit of aft bend in the mast which will soften the upper shroud (V1) a bit. You can just take up on it again to get it back to 15% if you like. As I said there is a acceptable range for all of the stays, which you are well within. Everything else sounds like you did a pretty good job. Next up sail tune and see if there is excessive waggling on the leeward side, but in moderate breeze. The shrouds will begin to sway as the breeze builds, this could be a telltale to either reduce sail a bit or you can add some tension to the shrouds all the way around.
Should be all good as they say.
Cheers, ~T.R.C.
T.R.C., your advice has been invaluable. I took her out in 12-15 knots and was very happy with the sail luff and stiffness of the rig. Thanks for you help!😁⚓️
Hi , can you provide any tuning guides for a Swan 38 Tall mast single spreader rig with baby stay, I am keen to set the rig up for new North sails and race her competitively. The mast is an exact Nautor factory replacement in 1998. She shall not have furling sails.
Hi Peter and thanks for the comment.
Unfortunately we do not have a guide for that boat. I would ask the sailmaker however to see what info he or she might have. Alternatively you can always start with a good static tune and then sail tune the boat as I describe in some of the comments below. This is the best way. I may use a Swan 45 Tuning guide as the template and then just fill in my own numbers over time. This is ideal, but infidelity start with asking the sailmaker you are working with, he should have some good info.
This may seem like a silly question, but it has me perplexed. How long should my cotter pins be? Long enough to ‘jam’ against the surrounding body, to prevent rotation? Otherwise, I don’t see how they’ll prevent my stays from loosening.
The length should be the minimum amount to just be able to bend the legs. Too long and they get caught up on things, too short and you can’t adequately bend the legs to keep the pin in place. The head of the pin is a actually providing the security.
Does that help?
Great article to get me started, thanks! I just have a few questions…
I originally owned a Tanzer 7.5. Her mast was rigid and simple to tune with a LOOS and an eyeball. I however now own a Mirage 33 (1982) and things are a bit more complex (but not too much). When I bought her the mast was already stepped and the owners said they replaced the forestay (inside the furler) 1 season ago. I went about the boat tuning the rig as best I could but I started second guessing the rake. I found noticeable rake in the mast with virtually no backstay tension on. So I think my forestay stretched (being “new”) and I need to bring it forward.
How do I measure how much rake (at rest on the tensioner) is enough? With my rig as is I felt worried that if I pulled down on the backstay tensioner I might buckle my mast by bending it too far. It seems to me it’s ALOT of downward pressure on the column when you pull down on her especially if the mast was already raked or maybe in my case leaned too far back to start? She has a babystay too, I wasn’t sure how far to tension that other than to assist adding bend\rake but since I had too much already I just lightly tightened it and hoped for the best!
Thanks for the question. With the backstay tensioner completely off, you should be able to adjust the static/ base tension of the backstay with a turnbuckle (s). Loosen the Baby Stay so that it is completely loose, sloppy, to take it out of the equation. Then mark furling line spool direction and remove the line. Next, open the furler up to gain access to the turnbuckle inside, if present. Remove all cotter pins or locking nuts to free the turnbuckles on the headstay and the backstay. You should then loosen things so that the headstay and the backstay can be adjusted by hand. Close the headstay turnbuckle and open the backstay turnbuckle to reduce rake, and vice versa if wanting to add rake.
You can measure rake by hanging a small mushroom anchor from the main halyard, with the boat floating on its lines, if you wish. Then once you achieve the desired mast rake go ahead and tension the forestay and backstay a few turns equally with tools; not too tight, but a good base light air setting, or as loose as you can imagine the headstay ever needing to be. Lastly, tension the baby stay a bit until it just starts to tug on the mast, helping induce bend. From here the backstay tensioner will do the rest: wind it on and it will tension the headstay and induce mast bend via the baby stay. You may have to take the boat sailing and adjust things as you find out how it performs at various degrees of rake and bend.
I hope that’s not too wordy, but helps explain it all a bit. Feel free to email or call with further questions.
Regards, ~T.R.C.
Can you provide some specific information regarding rig for 1980 C&C 32. Looking to purchase new main and want to get the most from it for Wednesday nights. Boat currently does not have a pony stay, it has been removed. Can replace that track/car. What should initial bend look like, keel step is fixed so assume I need to some chock aft of mast at deck? Have rod rigging but no Loos gauge for same, should I acquire one? Love this site, very helpful RayK
Thanks for the compliment. This may be less technical than you might expect. I would start with the basic guidelines given in the article to ensure a good base, static tune setting. A Loos gauge is good but not needed. If you focus on getting the spar straight, side to side, with a slight aft bias and then the tension is set so that it feels fairly tight. I know that sounds vague, but keep this in mind: if you are anticipating heavier wind make things a bit tighter, and loosen things up if less windy. The order of tension, in regards to the which shroud (upper vs intermediate vs lower) is important; more so than the amount of tension. Make sure nothing is so loose it is just flapping about.
The headstay should have some good slack to it with the backstay adjuster totally off. Adjust the backstay and headstay turnbuckles, with them in the slack position until the masthead is favoring a slight aft lean or rake, but only slight. From there, tension the backstay adjuster very tight and see what the headstay tension feels like, should be very tight.
PLEASE NOTE: if the backstay adjustment is totally bottomed out at this point, the backstay needs to be shortened a bit. Just pay attention to how this affects the rake. …
This part is where the pony stay or the baby stay will play a critical part, for mast bend. You may even find the pony stay to be good for mast pumping in light air and waves. Making this baby stay removable is a good idea, as well as, we’ve found that Dynema rope is the best choice here.
So… a centered mast head, side to side. A straight, in column mast from the top on down. A slight aft rake to start with…and as you begin to wind on the backstay and the baby stay you will add some rake but also a good bit more bend.
Take this set up for a few test sails and see how things act, in different conditions. After that you can make some adjustments here and there as needed: weather helm, shroud tension, mast rake, pre bend, etc…Moving chocks and using a Loos gauge.
ADDT’L TIP: Chocks and mast step position affect bend and rake properties. Want more rake? Chock mast aft in collar and move step forward. Want more bend? Chock mast forward in collar and move mast aft. As all things, there is more to it than that, but that’s the gist of the whole chocks and mast step thing…
“Sail Tuning” is a blog we are in the works of, but the punchline is that if hard on the breeze, and the leeward shrouds are excessively loose, and you are sure you aren’t over canvased…then go ahead and take turns on the leeward side until they just stop waggling, count what you’ve done, tack and mirror the turns on the other side.
Once the boat is set up for that specific condition, and you return to the dock, you should take your loose gauge and record these settings…creating a tension gauge setting for various conditions.
Hi, Thanks for your information. I have a Dehler 34. 1986… How much mast prebend and rake is recommended? The boat is new to me in March. Raced ok but I want to get a new main and want it to fit a well tuned mast. What do you think of a 2 degree rake and 4″ prebend at the speaders? Also, I have a Harken furler, How do you measure the forestay tension? Thanks, Duke
The answer, this boat is pretty sporty so it should show some rake. The spreaders are swept slightly aft so this will produce some natural bend just to tension the headstay.
Head-stays are always tough to measure with any sort of gauge, there are some class specific tricks for using a gauge in funky ways in order to get data, but they aren’t really reliable in my opinion. If you live in a typically windy area, go for bit more shroud tension, headstay tension and mast bend, and see how the boat feels. This will take some trial and error. If the forestay feels too stiff, slot too tight, loosen the uppers a bit, thus reducing bend and slackening the headstay.
Once the boat is sailing well in the ideal conditions, record that bend and those tensions. This is where I would leave things set, record it, and then just adjust shroud tension to affect bend and headstay in order to compliment different wind strengths and sea states. It takes quite a bit of back and forth, and documentation to get it right. One designers have already worked all of this out and then they share it for others…..very helpful. The rest of us will have to be the trailblazers for this type of information for other boat owners with the same (similar) boats to benefit.
Hope that helps, thanks for the kind words, and good luck. Once you figure things out post a link here for others with the same boat…..would be helpful.
Hello, Thanks for all of this great info. I just purchased a 37′ boat with a 3/4 fractional rig and a tapered mast. I was wondering if there were any special considerations when tuning the fractional rig? Currently the stays and shrouds are a little loose and can be wiggled (borderline flopping) by hand although the mast stands and is visually centered. (We are in SW Florida and the boat went through a direct hit by hurricane Irma like this and still stands tall!) Also is it advisable to increase shroud tension in small increments first on one side and then do the same on the opposing side? Thanks so much for any info
Hi Nathan. There are some thoughts, so fractional masts are usually fitted with aft swept shrouds and spreaders. If so, this means that the uppers also tension the headstay and create mast bend. The lowers then also act to reduce mast bend, so the tighter you make them you are actually reducing mast curve, thus powering the mainsail up. So be conscious of these two thoughts when tensioning the shrouds. The rest is fundamentally the same as the guide suggests. Loose or wiggling shrouds (excluding the scenario where we are talking about the leeward shrouds under sail), should be tightened. Doing things in increments is definitely a good idea.
Hope that helps. Thanks for the questions.
Thanks!! Now that you say that about the swept spreaders helping create mast bend it makes perfect sense. I had an ‘oh duh’ moment. I’ll probably err on the side of looser lower shrouds knowing if we need more power we can always tighten them up. Thank you again this helped immensely!
I want to buy a tension gage. Most familiar with Loos. But do I need Pt 1 or 2? (Pretty sure I don’t need 3 or Pro.) I have two rigs to tune: a 1972 Morgan 27 and a Catalina 22, I think 73 or thereabouts. The Morgan 27 is mine, fresh water for life, and 99.9% most likely factory wire. The Catalina 22 is a borrower in the Gulf, but pretty sure the owner has never tuned it. My problem is I can’t find the gage of wire for either standing rigging anywhere! Any help?
I think this one will do… https://sep.yimg.com/ca/I/yhst-70220623433298_2270_120385950 . The Morgan is likely 3/16″ wire and the Catalina is likely 5/32″, that’s an educated guess. Hope that helps.
I just purchased a 1980 C&C 40. I was told that I need to replace the rod rigging as it is “too old”. The mast is down and the rod rigging seems ok but I have not done any penetration testing. Does rod rigging need to be replaced due to age? Thanks Rigging Co.
Not replaced, but re-headed. This can mean that some stays need to be replaced as a whole, but not typically not the whole set. There are instances where you’ve almost replaced all of it anyways, so full replacement just makes sense. Other than those scenarios, full replacement is due after a certain mileage with rod…60,000 NM. Please keep in mind these standards are very general recommendations. It sounds like in your case, you should send in the rod, tangs, and chainplates for service and inspection. once we receive everything we will make a quote for the recommended services and/or replacement.
Hope that helps and give us an email for more info.
I have had a problem with securing the spreaders to the shrouds, resulting in the spreaders dropping. I am using stainless wire to seize them but still having a problem. Any tips on how to do this properly?
Seizing the wire onto spreaders with hinged spreaders is a bit of a trick of the trade that requires some practice. We use the X’s and O’s method. The end result should be something that looks like this… https://theriggingcompany.files.wordpress.com/2011/11/2012-06-07_14-26-09_899.jpg?w=900 . A trick to make the wire bite into the spreader end a bit more is to wedge a small piece of leather between the spreader and the wire before seizing. Also parceling and serving the wire where it intersects the spreader will help create more bite too. Lastly, and I don’t like this method but you can install a bull dog cable clamp beneath the spreader, nuts facing in, to keep it from dropping when slack.
I hope that helps a little. Thanks for commenting.
I am struggling to get enough rake into my mast. 33 foot Charger 33 keel stepped. Have loosened forestay and moved mast foot forward by about 10 mm. Should the chocks in the collar be adjusted? Runners and 2 spreaders, and check spreader. Spreaders do not have much aft angle. Move mast step more forward? Outers are tight with inners looser. Thoughts?
Hey Bernard,
Yeah, it sounds like chocks are the last thing. Maybe remove the chocks with the rigging slack and see if you can get the mast to sit where you like it with just hand tension. Then chock it where it wants to sit. It sounds like you are on the right track everywhere else, perhaps add a toggle into the headstay and shorten the backstay is next. Good luck and I hope that helps somewhat.
Hi, We have a Lagoon Catamaran with fractional rig, upper and lower shrouds, fore stay and upper and lower diamonds. No back stay. The mast has a degree of pre-bend. I do not plan to drop the mast.
I may have to do some work on the port side upper diamond. Is it as easy as just undoing the turnbuckle? Or do I need to loosen the starboard one at the same time. If it needs replacement should I also replace the starboard one even if in good condition?
As a further question, what happens if a diamond breaks, does it result in mast failure?
You would need to loosen the other counterpart to that stay for sure. It is just good practice, will keep the mast straight, and also make your life easier for removal install. Now, do you replace both? I don’t know. How old is the standing rigging? Why are you replacing the one? If it is not all due for replacement and you are just replacing due to damage, just do the one, but loosen both sides to do this.
Hope that helps and thanks for the visit.
Hello! I recently purchased a keel-stepped 1982 Goman Express 30 which came with an Alado Furler. I have been sailing it since May of this year. My question is this: Despite relocating mast wedges at the cabin roof to bias the lower mast aft about 2″, I still have a pronounced backward bend (10 degrees or so) just above the highest spreader. When sailing on jib alone, most wave action causes the mast to pump right at the bend point. I have a split backstay that is as un-tensioned as possible and the forestay only has another inch of adjustment left. There is no baby stay.
How can I get the bend out of the mast? How concerned should I be that the mast might break at that point?
Thanks in advance for your reply!
Eric Hassam – Delta Flyer
Thanks for taking the time to comment on our site. It sounds like you are on the right track. So one other adjustment that you have is the mast step position. This greatly affects mast bend on keel stepped masts. For a stronger bend and less rake, move the mast butt aft. For more rake and less bend (probably what you need to try), move the mast step forward a bit. If neither of these help, you may be off to have your headstay shortened and this means it is too long. This is likely not the case, but it is a possibility.
Keep in mind….A mast should have a slight aft rake bias along with a small amount of mast bend. This is quite normal. You can send us a picture if you’d like a second opinion on if it is over-bent. Having said all of that, even if you remove all of the mast bend, the mast may still pump. This is a design flaw in many spar designs that lots of end users have experienced. This can be remedied by redesigning the stay lay out. Is there a place for a staysail stay and/ or runner backstays? If so add them. Is there a place for a baby stay? If not, that may be a consideration.
Thanks again and I hope that helps.
Hi, I have a 48 foot yawl with a 7/8 fractional rig, is the tuning procedure the same as a masthead rig? I seem to have trouble getting aft rake and proper headstay tension. Also, is there a particular tension number the upper shrouds should have? many thanks in advance
Hi Bill, thanks for taking the time. 7/8 is very close and I would treat it like a masthead rig, especially if the none of the spreaders are aft swept. Tesnsion the headstay using the backstay(s). This should pull the top of the mast aft. If there are any other forward stays, i.e. stay sail stay, forward lowers, or anything else that could be holding the mast forward, go ahead and loosen those completely. You then may need to tighten the Tri-attic (the stay that connects the top of the mizzen and top of the main) if present. OR if the mizzen needs more rake too, then lossen all forward stays and pull it back using the available aft stays for this as well.
Hope this helps and please email us and send some pictures if you need more help.
I have a 1972 Morgan 27, which has both forward and after lower shrouds. I wish to remove the forward lowers so I can trim a 110% jib inside the stays. I see a lot of boats without forward lowers and think this will work OK, but wonder if I should increase the size of the aft lowers and beef up the chain plates. Any suggestions?
THANKS FOR YOUR INPUT. I AM GOING TO REMOVE THEM ANYWAY AND SEE WHAT HAPPENS. “HOLD MY BEER, WATCH THIS….” FAMOUS LAST WORDS.
Lol! Good luck. Call us if you need assistance.
I have rod rigging on my Beneteau 32s5
Any other guidance on tuning them vs wire rigging
Hi and thanks for commenting.
Just follow the guidelines in the write up. The over all goal is that the mast needs to be straight and in-column when looking at it from side to side.
Fore and aft, the mast should show a very slight lean aft. Depending on whether or not the spreaders are in-line or aft swept; you should also see some slight bend if there is any aft sweep to the spreaders just from the tension of the uppers.
A Rod stay tends to run a bit tighter than wire, so keep that in mind.
For racing, ideally once the static tune at the dock (the part we just talked about) is done, go out and sail tune. Do this by going hard on the wind and checking to see if the leeward shrouds are just starting to dance, this is ideal. If they are swaying about they are too loose for the current conditions. If the leeward shrouds are tight, they may be a touch to tight. Tension and loosen as needed; count what you did and to what shroud, then tack and do the same to the other side.
ALWAYS secure the turnbuckles when you are finished adjusting them.
- Pingback: Tuning a Sailboat Mast | ChesapeakeLiving.com
- Pingback: Rig Tuned | middlebaysailing
Wow, I would hate to be charged by her for three trips up the rig and forget the screw driver the rubber plugs that are sacraficial and replaced everytime removed just to clean the stainless 1×19 rigging.
Username or Email Address
Remember Me
Lost your password?
Review Cart
No products in the cart.
- Privacy Overview
- Strictly Necessary Cookies
This website uses cookies so that we can provide you with the best user experience possible. Cookie information is stored in your browser and performs functions such as recognising you when you return to our website and helping our team to understand which sections of the website you find most interesting and useful.
Strictly Necessary Cookie should be enabled at all times so that we can save your preferences for cookie settings.
If you disable this cookie, we will not be able to save your preferences. This means that every time you visit this website you will need to enable or disable cookies again.
Standing Rigging (or ‘Name That Stay’)
Published by rigworks on november 19, 2019.
Question: When your riggers talk about standing rigging, they often use terms I don’t recognize. Can you break it down for me?
From the Rigger: Let’s play ‘Name that Stay’…

Forestay (1 or HS) – The forestay, or headstay, connects the mast to the front (bow) of the boat and keeps your mast from falling aft.
- Your forestay can be full length (masthead to deck) or fractional (1/8 to 1/4 from the top of the mast to the deck).
- Inner forestays, including staysail stays, solent stays and baby stays, connect to the mast below the main forestay and to the deck aft of the main forestay. Inner forestays allow you to hoist small inner headsails and/or provide additional stability to your rig.
Backstay (2 or BS) – The backstay runs from the mast to the back of the boat (transom) and is often adjustable to control forestay tension and the shape of the sails.
- A backstay can be either continuous (direct from mast to transom) or it may split in the lower section (7) with “legs” that ‘V’ out to the edges of the transom.
- Backstays often have hydraulic or manual tensioners built into them to increase forestay tension and bend the mast, which flattens your mainsail.
- Running backstays can be removable, adjustable, and provide additional support and tuning usually on fractional rigs. They run to the outer edges of the transom and are adjusted with each tack. The windward running back is in tension and the leeward is eased so as not to interfere with the boom and sails.
- Checkstays, useful on fractional rigs with bendy masts, are attached well below the backstay and provide aft tension to the mid panels of the mast to reduce mast bend and provide stabilization to reduce the mast from pumping.
Shrouds – Shrouds support the mast from side to side. Shrouds are either continuous or discontinuous .
Continuous rigging, common in production sailboats, means that each shroud (except the lowers) is a continuous piece of material that connects to the mast at some point, passes through the spreaders without terminating, and continues to the deck. There may be a number of continuous shrouds on your boat ( see Figure 1 ).
- Cap shrouds (3) , sometimes called uppers, extend from masthead to the chainplates at the deck.
- Intermediate shrouds (4) extend from mid-mast panel to deck.
- Lower shrouds extend from below the spreader-base to the chainplates. Fore- (5) and Aft-Lowers (6) connect to the deck either forward or aft of the cap shroud.
Discontinuous rigging, common on high performance sailboats, is a series of shorter lengths that terminate in tip cups at each spreader. The diameter of the wire/rod can be reduced in the upper sections where loads are lighter, reducing overall weight. These independent sections are referred to as V# and D# ( see Figure 2 ). For example, V1 is the lowest vertical shroud that extends from the deck to the outer tip of the first spreader. D1 is the lowest diagonal shroud that extends from the deck to the mast at the base of the first spreader. The highest section that extends from the upper spreader to the mast head may be labeled either V# or D#.
A sailboat’s standing rigging is generally built from wire rope, rod, or occasionally a super-strong synthetic fibered rope such as Dyneema ® , carbon fiber, kevlar or PBO.
- 1×19 316 grade stainless steel Wire Rope (1 group of 19 wires, very stiff with low stretch) is standard on most sailboats. Wire rope is sized/priced by its diameter which varies from boat to boat, 3/16” through 1/2″ being the most common range.
- 1×19 Compact Strand or Dyform wire, a more expensive alternative, is used to increase strength, reduce stretch, and minimize diameter on high performance boats such as catamarans. It is also the best alternative when replacing rod with wire.
- Rod rigging offers lower stretch, longer life expectancy, and higher breaking strength than wire. Unlike wire rope, rod is defined by its breaking strength, usually ranging from -10 to -40 (approx. 10k to 40k breaking strength), rather than diameter. So, for example, we refer to 7/16” wire (diameter) vs. -10 Rod (breaking strength).
- Composite Rigging is a popular option for racing boats. It offers comparable breaking strengths to wire and rod with a significant reduction in weight and often lower stretch.
Are your eyes crossing yet? This is probably enough for now, but stay tuned for our next ‘Ask the Rigger’. We will continue this discussion with some of the fittings/connections/hardware associated with your standing rigging.
Related Posts
Ask the Rigger
Do your masthead sheaves need replacing.
Question: My halyard is binding. What’s up? From the Rigger: Most boat owners do not climb their masts regularly, but our riggers spend a lot of time up there. And they often find badly damaged Read more…
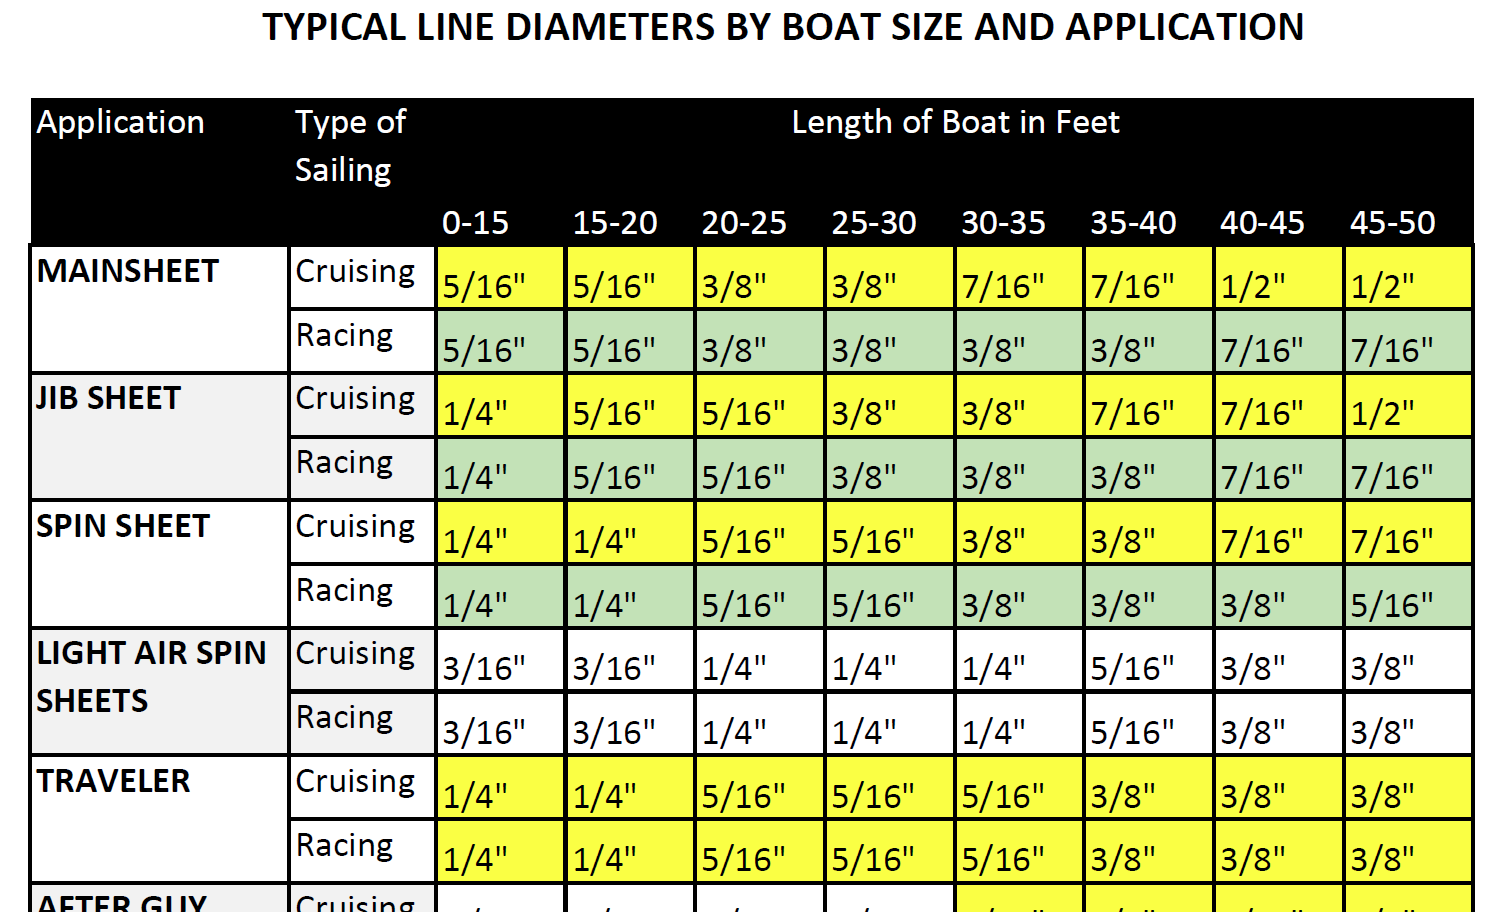
Selecting Rope – Length, Diameter, Type
Question: Do you have guidelines for selecting halyards, sheets, etc. for my sailboat? From the Rigger: First, if your old rope served its purpose but needs replacing, we recommend duplicating it as closely as possible Read more…
Spinlock Deckvest Maintenance
Question: What can I do to ensure that my Spinlock Deckvest is well-maintained and ready for the upcoming season? From the Rigger: We are so glad you asked! Deckvests need to be maintained so that Read more…
- Clutches, Clam & Cam Cleats
- Deck Organizers
- Genoa Leads & Track
- Jib Reefing, Furling, Headfoils
- Lifeline Hardware
- Mainsail Travelers & Accessories
- Rigging Hardware
- Rope & Accessories
- Tillers & Tiller Extensions
- Whisker Poles & Accessories
- Winches, Parts & Accessories
- Emergency Gear
- Harnesses & Tethers
- Man Overboard
- EPIRBs, AIS, PLBs
- Electric Pumps
- Fresh Water
- Manual Pumps
- Seacocks & Valves
- Bags & Luggage
- BBQ Grills & Accessories
- Umbrella & Awning
- Waterproof Cases
- Audio & Video
- Charts & Cruising Guides
- Navigation Tools
- Books & Publications
- Clocks & Barometers
- Propane System
- Stoves & Cooktops
- Teak Accessories
- Ventilation
- DC Electrical
- Generators & Power Equipment
- Shore Power
- Accessories
- Foul Weather Gear
- Sailing Gloves
- Outboard Motor Parts
- Spark Plugs
- Boat & Motor Accessories
- Boat Letters & Numbers
- Highfield Boats
- Boat Maintenance
- Engine Maintenance
- Anchor Rodes & Chain
- Inflatable Boat Maintenance & Repair
- Outboard Motors Servicing
- 303 Products
- Adventure Medical
- Alexander Roberts
- Apex Inflatable Boats
- Aqua Signal
- Bete-Fleming
- Blue Sea Systems
- Boat Bright
- Bristol Finish
- Buck Algonquin
- Captains Choice
- Chesapeake Bay Magazine
- Chesapeake Marine Fasteners
- Cole Hersee
- Consolidated Thread
- CrewWatcher
- Cruise Products
- Ebinger Leather
- Fell Marine
- Gam Electronics
- GMCO Maps & Charts
- Gorilla Glue
- Green Mountain
- GSI Outdoors
- Handi-Man Marine
- HarperCollins
- Helly Hansen
- Henri Lloyd
- Honda Outboard Motors
- Inland Marine
- Johnson Marine
- Johnson Pumps
- Just Marine
- Kotap America
- Lord & Hodge
- Lunar Marine
- Master Lock
- McGraw Hill
- Moby Dick Specialties
- Nautic Sport
- New England Ropes
- Paradise Cay
- Poly-Planar
- PSS Shaft Seal
- Quicksilver
- Redtree Industries
- Rudder Craft
- Sailing Specialties
- SamplexSolar
- Sea-Dog Line
- Seattle Sports
- Sesamee Padlocks
- Shaft Shark
- Shakespeare
- Signal Mate
- Snappy Teak
- Standard Horizon
- Taylor Made
- Teknor Apex
- Teak Wonder
- Tip Top Teak
- Torqeedo Outboard Motors
- Trac Ecological
- Treadmaster
- Ultra Safety Systems
- Viking Life Rafts
- Waterway Guide
- Weems & Plath
- West System
- Western Pacific Trading
- Williams & Heintz Map
- Yale Cordage

BETE-FLEMING BATTENS, INC.
ASH SHROUD ROLLER 1.5X6' FINIS
SKU: BET 612SRFA
- Regular price $199.95
+++MAY REQUIRE ADDITIONAL SHIPPING++++
The Ash shroud rollers are a traditional way to protect sheets and head sails when tacking and close hauled. Unlike plastic substitutes, these classics keep rolling. The interior of the finished Shroud Rollers are sealed and the exterior is finished with 5 coats of Epifanes clear gloss varnish. Sold in pairs – 1 port, 1 starboard; washers placed between the turnbuckle and shroud roller are included.
Customer Reviews
- Choosing a selection results in a full page refresh.
- Press the space key then arrow keys to make a selection.
- Use left/right arrows to navigate the slideshow or swipe left/right if using a mobile device
Net Orders Checkout
Shipping address, shipping methods.
Currency: GBP
- Worldwide Delivery
Mooring Warps and Mooring Lines
- LIROS 3 Strand Polyester Mooring Warps
- LIROS Braided Dockline Mooring Warps
- LIROS Classic Mooring Warps
- LIROS Green Wave 3 Strand Mooring Warps
- LIROS Handy Elastic Mooring Warps
- LIROS Moorex12 Mooring Warps
- LIROS Octoplait Polyester Mooring Warps
- LIROS Polypropylene Floating Mooring Warps
- LIROS Super Yacht Mooring Polyester Docklines
- Marlow Blue Ocean Dockline
Mooring Accessories
- Mooring Cleats and Fairleads
- Mooring Compensators
- Mooring Shackles
- Mooring Swivels
Mooring Strops
- LIROS 3 Strand Nylon Mooring Strops
- LIROS Anchorplait Nylon Mooring Strops
- Small Boat and RIB Mooring Strops
Mooring Bridles
- V shape Mooring Bridles
- Y shape Mooring Bridles
Mooring Strops with chain centre section
- 3 Strand / Chain / 3 Strand
- Anchorplait / Chain / Anchorplait
Bonomi Mooring Cleats
- Majoni Fenders
- Polyform Norway Fenders
- Dock Fenders
- Fender Ropes and Accessories
- Ocean Inflatable Fenders
Mooring Buoys
Max power bow thrusters.
- Coastline Bow Thruster Accessories
50 metre / 100 metre Rates - Mooring
Mooring information.
- Mooring Warps Size Guide
- Mooring Lines - LIROS Recommended Diameters
- Mooring Rope Selection Guide
- Mooring Warp Length and Configuration Guide
- How to estimate the length of a single line Mooring Strop
- Mooring Ropes - Break Load Chart
- Mooring Compensator Advisory
- Rope Cockling Information
- Fender Size Guide
- Majoni Fender Guide
- Polyform Norway Fender Inflation Guide
Custom Build Instructions
- More Article and Guides >
Anchor Warps Spliced to Chain
- LIROS 3 Strand Nylon Spliced to Chain
- LIROS 3 Strand Polyester Spliced to Chain
- LIROS Anchorplait Nylon Spliced to Chain
- LIROS Octoplait Polyester Spliced to Chain
Anchor Warps
- Leaded Anchor Warp
- LIROS 3 Strand Nylon Anchor Warps
- LIROS 3 Strand Polyester Anchor Warps
- LIROS Anchorplait Nylon Anchor Warps
- LIROS Octoplait Polyester Anchor Warps
- Aluminium Anchors
- Galvanised Anchors
- Stainless Steel Anchors
Calibrated Anchor Chain
- Cromox G6 Stainless Steel Chain
- G4 Calibrated Stainless Steel Anchor Chain
- Lofrans Grade 40
- MF DAMS Grade 70
- MF Grade 40
- Titan Grade 43
Clearance Chain
Anchoring accessories.
- Anchor Connectors
- Anchor Trip Hooks and Rings
- Anchoring Shackles
- Bow Rollers and Fittings
- Chain and Anchor Stoppers
- Chain Links and Markers
50 / 100 metre Rates - Anchoring
Chain snubbers.
- Chain Hooks, Grabs and Grippers
- Chain Snubbing Bridles
- Chain Snubbing Strops
Drogue Warps and Bridles
- Lewmar Windlasses
- Lofrans Windlasses
- Maxwell Windlasses
- Quick Windlasses
Windlass Accessories
- Coastline Windlass Accessories
- Lewmar Windlass Accessories
- Lofrans Windlass Accessories
- Lofrans Windlass Replacement Parts
- Maxwell Windlass Accessories
- Quick Windlass Accessories
Anchoring Information
- How To Choose A Main Anchor
- Anchoring System Assessment
- Anchor Chain and Rope Size Guide
- The Jimmy Green Guide to the Best Anchor Ropes
- What Size Anchor Do I Need?
- Anchor Size Guides
- Anchor Rope Break Load and Chain Compatibility Chart
- How to Choose Your Anchor Chain
- How to Establish the Correct Anchor Chain Calibration?
- Calibrated Anchor Chain - General Information
- Calibrated Anchor Chain Quality Control
- Calibrated Chain - Break Load and Weight Guide
- Galvanising - Managing Performance and Endurance expectation
- Can Galvanised Steel be used with Stainless Steel?
- Windlass Selection Guide
- More Articles and Guides
Stainless Steel Wire Rigging and Wire Rope
- 1x19 Wire Rigging
- 7x19 Flexible Wire Rigging
- Compacted Strand Wire Rigging
- Insulated 1x19 Wire Backstays
Wire Rigging Fittings
- Swaged Terminals
- Swageless Terminals
- Turnbuckles / Rigging screws
- Turnbuckle Components
- Backstay Insulators
- Wire Terminals
Rigging Accessories
- Babystay and Backstay Adjustment
- Backstay Blocks
- Pins, Rings and Nuts
- Rigging Chafe Protection
- Terminal Backing Plates and Coquilles
Fibre Rigging
- DynIce Dux Fibre Rigging
- LIROS D-Pro Static Rigging
- LIROS D-Pro-XTR Fibre Rigging
- Marlow Excel D12 MAX 78 Rigging
- Marlow M-Rig Max Rigging
Fibre Rigging Fittings
- Blue Wave Rope Terminals
- Colligo Marine Terminals
Dinghy Rigging
- Dinghy Rigging Fittings
- Fibre Dinghy Rigging
- Stainless Steel Dinghy Rigging
Wind Indicators
Guard wires, guardrails and guardrail webbing.
- Guard Rail Fittings
- Guard Rails in Fibre and Webbing
- Guard Wire Accessories
- Guard Wires
Furling Systems
- Anti-torsion Stays
- Headsail Reefing Furlers
- Straight Luff Furlers
- Top Down Furlers
Furling Accessories
- Continuous Furling Line Accessories
- Furling Line Accessories
50 / 100 metre Rates - Wire and Fibre
Standing rigging assistance.
- More Articles and Guides >
- Cruising Halyards
- Performance Halyards
- Dinghy Halyards
Rigging Shackles
- Bronze Snap Shackles
- Captive and Key Pin Shackles
- hamma™ Snap Shackles
- Selden Snap Shackles
- Soft Shackles
- Standard Snap Shackles
- Tylaska End Fittings
- Wichard Snap Shackles
Lashing, Lacing and Lanyards
- LIROS 3 Strand Lashing, Lacing and Lanyards
- LIROS Braided Lashing, Lacing and Lanyards
- Cruising Sheets
- Performance Sheets
- Dinghy Sheets
- Continuous Sheets
- Tapered Sheets
Sail Handling
- Barton Sail Handling
- Boom Brakes and Preventers
- Lazy Jack Sail Handling
- Rodkickers, Boomstruts
- Sail Handling Accessories
- Slab Reefing
Running Rigging Accessories
- Anti-Chafe Rope Protection
Shock Cord and Fittings
Control lines.
- Cruising Control Lines
- Performance Control Lines
- Dinghy Control Lines
- Continuous Control Lines
Classic Ropes
- 50 / 100 metres - Classic
- Classic Control Lines
- Classic Docklines
- Classic Halyards
- Classic Sheets
- LIROS Classic 3 Strand Polyester
50 / 100 metre Rates - Running Rigging
- 50 / 100 metres - Cruising Ropes
- 50 / 100 metres - Dinghy Ropes
- 50 / 100 metres - Lashing and Lanyards
- 50 / 100 metres - Performance Ropes
- LIROS Ropes
- Marlow Ropes
Running Rigging Resources
- Running Rigging Rope Fibres and Construction Explained
- How to Select a Suitable Halyard Rope
- How to select Sheets and Guys
- Dyneema Rope - Cruising and Racing Comparison
- Dinghy Rope Selection Guide
- Rope Measurement Information
- Running Rigging - LIROS Recommended Line Diameters
- Running Rigging Break Load Comparison Chart
- Colour Coding for Running Rigging
- Selecting the right type of block, plain, roller or ball bearing
- Replacing your Furling Line
- Recycling Rope
- Running Rigging Glossary
Custom Build Instructions for Sheets, Halyards, Control Lines
Low friction rings, plain bearing blocks.
- Barton Blocks
- Harken Element Blocks
- Seasure 25mm Blocks
- Selden Yacht Blocks
Wooden Blocks
Ball bearing blocks.
- Barton Ball Bearing Blocks
- Harken Ball Bearing Blocks
- Holt Dynamic Blocks
- Selden Ball Bearing Blocks
Ratchet Blocks
- Harken Ratchet Blocks
- Selden Ratchet Blocks
Roller Bearing Blocks
- Harken Black Magic Blocks
- Selden Roller Bearing Blocks
Clutches and Organisers
- Barton Clutches and Organisers
- Lewmar Clutches
- Spinlock Clutches and Organisers
Genoa Car Systems
- Barton Genoa Sheeting
- Harken Genoa Systems
- Lewmar HTX Genoa Systems
Traveller Systems
- Barton Traveller Systems
- Harken Traveller Systems
Deck Fittings
- Bungs and Hatches
- Bushes and Fairleads
- Deck Eyes, Straps and Hooks
- Pad Eyes, U Bolts and Eye Bolts
Rudder and Transom Fittings
- Pintles and Gudgeons
- Tiller Extensions and Joints
Stanchion Blocks and Fairleads
Snatch blocks.
- Barton K Cam Cleats
- Harken Ball Bearing Cam Cleats
- Holt Cam Cleats
- Selden Cam Cleats
- Spinlock PXR Cleats
Block and Tackle Purchase Systems
- Barton Winches, Snubbers and Winchers
- Coastline Electric Winch Accessories
- Harken Winches, Handles and Accessories
- Karver Winches
- Lewmar Winches, Handles and Accessories
- Winch Servicing and Accessories
Deck Hardware Support
- Blocks and Pulleys Selection Guide
- Barton High Load Eyes
- Dyneema Low Friction Rings Comparison
- Seldén Block Selection Guide
- Barton Track Selection Guide
- Barton Traveller Systems Selection Guide
- Harken Winch Selection Guide
- Karver Winch Comparison Chart
- Lewmar Winch Selection Guide - PDF
- Winch Servicing Guide
Sailing Flags
- Courtesy Flags
- Red Ensigns
- Blue Ensigns
- Flag Accessories
- Flag Staffs and Sockets
- Flag Making and Repair
- Signal Code Flags
- Galvanised Shackles
- Stainless Steel Shackles
- Titanium Shackles
- Webbing only
- Webbing Restraint Straps
- Webbing Sail Ties
- Webbing Soft Shackles
Hatches and Portlights
Sail care and repair.
- Sail Sewing
Maintenance
- Antifouling
- Fillers, Sealants, Adhesives
- Primers and Thinners
- PROtect Tape
Fixings and Fastenings
- Monel Rivets
- Screws, Bolts, Nuts and Washers
- U Bolts, Eye Bolts and Pad Eyes
Splicing Accessories
- Fids and Tools
- Knives and Scissors
General Chandlery
- Barrier Ropes
- Canvas Bags and Accessories
- Carabiners and Hooks
- Netting and Accessories
- Rope Ladders
Seago Boats and Tenders
Chandlery information, flag articles.
- Flag Size Guide
- Bending and Hoisting Methods for Sailing Flags
- Courtesy Flags Identification, Labelling and Stowage
- Courtesy Flag Map
- Flag Etiquette and Information
- Glossary of Flag Terms and Parts of a Flag
- Making and Repairing Flags
- Signal Code Message Definitions
Other Chandlery Articles
- Anchorplait Splicing Instructions
- Antifoul Coverage Information
- Hawk Wind Indicator Selection Guide
- Petersen Stainless - Upset Forging Information
- Speedy Stitcher Sewing Instructions
- Thimble Dimensions and Compatible Shackles
Jackstays and Jacklines
- Webbing Jackstays
- Stainless Steel Wire Jackstay Lifelines
- Fibre Jackstay Lifelines
- Jackstay and Lifeline Accessories
Safety Lines
Lifejackets.
- Children's Life Jackets
- Crewsaver Lifejackets
- Seago Lifejackets
- Spinlock Lifejackets
Buoyancy Aids
Life jackets accessories.
- Lifejacket Lights
- Lifejacket Rearming Kits
- Lifejacket Spray Hoods
Overboard Recovery
- Lifebuoy Accessories
- Purchase Systems
- Slings and Throwlines
Floating Rope
- LIROS Multifilament White Polypropylene
- LIROS Yellow Floating Safety Rope
- Danbuoy Accessories
- Jimmy Green Danbuoys
- Jonbuoy Danbuoys
- Seago Danbuoys
- Liferaft Accessories
- Seago Liferafts
Safety Accessories
- Fire Safety
- Grab Bag Contents
- Grab Bags and Polybottles
- Sea Anchors and Drogues
Safety Resources
- Guard Wires - Inspection and Replacement Guidance
- Guard Wire Stud Terminal Dimensions
- Webbing Jackstays Guidance
- Webbing Jackstays - Custom Build Instructions
- Danbuoy Selection Guide
- Danbuoy Instructions - 3 piece Telescopic - Offshore
- Liferaft Selection Guide
- Liferaft Servicing
- Man Overboard Equipment - World Sailing Compliance
- Marine Safety Information Links
- Safety Marine Equipment List for UK Pleasure Vessels
Sailing Clothing
- Sailing Jackets
- Sailing Trousers
- Thermal Layers
Leisure Wear
- Accessories
- Rain Jackets
- Sweatshirts
Sailing Footwear
- Dinghy Boots and Shoes
- Sailing Wellies
Leisure Footwear
- Walking Shoes
Sailing Accessories
- Sailing Bags and Holdalls
- Sailing Gloves
- Sailing Kneepads
Clothing Clearance
Clothing guide.
- What to wear Sailing
- Helly Hansen Mens Jacket and Pant Size Guide
- Helly Hansen Womens Sailing Jacket and Pant Size Guide
- Lazy Jacks Mens and Womens Size Charts
- Musto Men's and Women's Size Charts
- Old Guys Rule Size Guide
- Sailing Gloves Size Guides
- Weird Fish Clothing Size Charts
The Jimmy Green Clothing Store
Lower Fore St, Beer, East Devon, EX12 3EG
- Adria Bandiere
- Anchor Marine
- Anchor Right
- August Race
- Barton Marine
- Blue Performance
- Brierley Lifting
- Brook International
- Brookes & Adams
- Captain Currey
- Chaineries Limousines
- Coastline Technology
- Colligo Marine
- Cyclops Marine
- Douglas Marine
- Ecoworks Marine
- Exposure OLAS
- Fire Safety Stick
- Fortress Marine Anchors
- Hawk Marine Products
- Helly Hansen
- International
- Jimmy Green Marine
- Maillon Rapide
- Mantus Marine
- Marling Leek
- Meridian Zero
- MF Catenificio
- Ocean Fenders
- Ocean Safety
- Old Guys Rule
- Petersen Stainless
- Polyform Norway
- PSP Marine Tape
- Sidermarine
- Stewart Manufacturing Inc
- Team McLube
- Technical Marine Supplies
- Titan Marine (CMP)
- Ultramarine
- Waterline Design
- William Hackett
Clearance August Race Boat Cleaning Kit £26.00
Clearance LIROS Racer Dyneema £55.08
Clearance Folding Stock Anchor £123.25
Clearance LIROS Herkules £0.00
Clearance Barton Size 0 Ball Bearing Blocks - 5mm £10.13
Clearance Marlow Blue Ocean® Doublebraid £18.48
Mooring Clearance
Anchoring clearance, standing rigging clearance, running rigging clearance, deck hardware clearance, chandlery clearance, safety clearance.

Shroud Rollers
Reference: TMS-ALSR115-2PACK

Shroud rollers provide protection for your sails and lines as they run past stays and shrouds
1.5 metres long - Each length consists of two half circle sections that snap together
Sold in packs of 2, 4, 6 and 8 lengths
N.B. Restricted courier options apply
PayPal Credit is a credit line for your PayPal account that acts like a credit card for online shopping. You can get approved for a limit, use it at stores that accept PayPal, and make repayments directly through your PayPal balance.
They offer 0% interest for 4 months on purchases of £99 and over and allow you to pay in instalments with businesses like Jimmy Green Marine.
Apply online if you're a UK resident over 18 with a good credit history.
More Information
Shroud rollers are easy to fit because they consist of 2 semi circle sections that snap together around existing stays and shrouds.
Each section is 1.5 metres long but very easy to cut down to a specific length
N.B. There is a delivery surcharge applied at checkout because the parcel will be over 1.5 metres long
You may also like
Psp rig-wrap millionaires tape, proboat shroud cover, holt rondo sail wheels, meridian zero sailguard, clearance plastimo spreader boots - 12mm wire.
£30.00 -£12.00
Clearance Wire Protection Sheath
Proboat leather spreader boot covers, self amalgamating tape, rutgerson rondo sail guard 4-6mm, plastimo spreader boots, insulation tape, plastimo rigging screw boot, ocean universal cross-tree cover.
× You are using an outdated browser. Please upgrade your browser to improve your experience.
We Ship Worldwide! | FREE SHIPPING! for US Continental orders over $99. Click for details.

Shopping Cart
Your cart is currently empty..
FREE SHIPPING! for US Continental orders over $99 click for details
Rigging Shroud Cleats

Barton Marine
Shroud cleat.

Shroud Cleat w/Eye
At MAURIPRO Sailing we carry a wide variety of rigging products, including shroud cleats all from great brands such as Barton Marine.
MAURIPRO Sailing, your direct access to Rigging Shroud Cleats and all your other sailing and boating needs.
Copyright © 2024 MAURIPRO Sailing LLC.
What is a Shroud on a Sailboat? A Detailed Exploration
In the fascinating world of sailing, there’s a crucial piece of hardware known as a shroud on a sailboat. This integral part has quite a role to play, ensuring the stability and proper functioning of your seafaring vessel.
Like a trusted companion, it bears the strain of winds and waves, maintaining the mast’s vertical position. But what exactly is it? How does it work? Let’s dive into the details.

What is a Shroud on a Sailboat?
Picture yourself on a sailboat, your eyes following the sturdy mast upwards as it pierces the clear blue sky. It stands tall and unyielding, bearing the sails that capture the wind and drive you forward. But how does it maintain its vertical position in the face of gushing winds and raging storms? That’s where the shroud comes in.
Shrouds on a sailboat are essentially the standing rigging wires that run from the masthead to the sides of the boat. They offer lateral support, keeping the mast stable and upright. In simple words, shrouds are the strong arms that support the mast when the wind blows from the side.
Now, let’s peel back a layer and take a closer look at the different types of shrouds that help your sailboat function seamlessly.
Different Types of Shrouds
When it comes to the rigging of a sailboat, understanding the different types of shrouds goes a long way in ensuring the safety and performance of your vessel. Each type of shroud serves a unique purpose, working in harmony to uphold the mast’s stability. Let’s delve into the intricate world of cap shrouds, uppers, and lower shrouds, and unravel their unique roles.
Cap Shrouds
Imagine the mast of your sailboat as a towering fortress. It braves the wind, waves, and weather, standing tall and strong. But even a fortress needs its guards, and in the case of your mast, these are the cap shrouds.
Cap shrouds extend from the very top of the mast to the sides of the boat, anchoring it firmly against the lateral forces induced by the wind and the sea. They act as the primary support system, preventing your mast from swaying excessively side-to-side. But their role isn’t limited to just fortifying the mast. They also contribute to the overall stability and balance of the sailboat, allowing you to navigate the waters with confidence.
For a detailed exploration of various sailboat types and to understand where cap shrouds play a pivotal role, check out our extensive guide on Different Types of Sailboats Explained .
While the cap shrouds guard the topmost part of the mast, the section just below the masthead, known as the uppers, has its line of defense too. Uppers, or upper shrouds, provide crucial support to this part of the mast.
They work hand-in-glove with the cap shrouds, forming a second line of defense against the lateral forces. Uppers ensure the part of the mast they hold remains steadfast and upright, contributing to the overall rigidity of your sailboat’s structure.
Lower Shrouds
And then we come to the base. The lower part of the mast, which takes on a significant amount of strain and stress. This is where the lower shrouds step into the picture.
Lower shrouds secure the lower third of the mast, reducing the side-to-side motion that could result in undue strain on your boat’s structure. By minimizing this movement, they prevent potential mast damage and ensure your sailboat maintains its balance.
The type and number of shrouds used on a sailboat can vary. Factors such as the sailboat’s design, its size, and the conditions it will sail in, all influence the shroud setup. Some sailboats may even feature intermediate shrouds, adding another layer of support.
Now that you’re familiar with the various types of shrouds and their roles, it’s time to explore the materials they are crafted from. Because just like the sails that catch the wind (learn more in our Comprehensive Guide on Types of Sails on Sailboats ), the material of your shrouds significantly influences your sailing experience.
Now that you know the roles of different types of shrouds, let’s talk about what they’re made of.
Materials Used for Shrouds
Shrouds are typically made of stainless steel wire, which offers durability and strength. However, the advent of modern materials has seen a shift towards synthetic fibers such as Dyneema and Vectran . These materials offer the same level of strength but at a fraction of the weight, making them an excellent choice for racing yachts. You can learn more about such yachts in our article Racing Sailing Yachts – Black Sails .
Just as you would pay attention to the quality of sails for your boat (check out our comprehensive guide on Types of Sails on Sailboats ), selecting the right material for shrouds is equally crucial.
Now, having understood the different types of shrouds and the materials used, let’s turn our focus to one of the most crucial aspects of shroud setup – the proper tension.
Importance of Proper Shroud Tension
Just like a finely tuned instrument, your sailboat requires a perfect balance. A big part of that balance lies in achieving the right shroud tension. Too loose, and the mast could sway more than necessary, affecting your boat’s performance and potentially causing damage. Too tight, and you could put excessive pressure on the hull, leading to unwanted strain and even structural damage. The right tension ensures optimal sail shape and the best performance of your vessel.
Finally, let’s discuss the critical aspect of maintaining and replacing shrouds, which ensures your sailboat continues to ride the waves effortlessly.
Maintaining and Replacing Shrouds
Maintaining your shrouds isn’t a one-off task; it’s an ongoing commitment. Regular inspections for wear and tear, corrosion, and proper tension can keep potential issues at bay. Small problems can be spotted and fixed before they snowball into expensive repairs or dangerous situations at sea.
Replacing shrouds can be a tricky business, depending on the size and complexity of your rigging. While minor repairs can be done by a knowledgeable sailor, it’s recommended to hire a professional when it comes to complete replacement.
Costs for shroud replacement can vary, depending on the material used, the size of the boat, and the complexity of the rigging. However, investing in quality shrouds and proper maintenance can save you from potential damage and costly repairs down the line.
In the fascinating world of sailing, understanding the nitty-gritty of each component makes the journey even more rewarding. We hope this article has shed light on the importance and functionality of shrouds on a sailboat. Next time you’re out sailing, remember to appreciate these silent warriors that help navigate the high seas.
For more exciting content about the world of sailing, be sure to check out our list of Best Sailing Movies and learn more about Sailboat Racing Flags and Signals .

Table of Terms about Shrouds on Sailboats
Faqs about shrouds on sailboats, what is a shroud on a sailboat.
A shroud is a standing rigging wire that provides lateral support to the mast of a sailboat.
Why are shrouds important on a sailboat?
Shrouds maintain the stability and vertical position of the mast, enabling optimal sail performance and boat balance.
What are the different types of shrouds?
The three main types of shrouds are cap shrouds, upper shrouds, and lower shrouds, each supporting different sections of the mast.
What materials are commonly used for shrouds?
Shrouds are typically made from stainless steel, but modern variants can also use synthetic materials like Dyneema and Vectran.
How often should shrouds be replaced?
The frequency of replacement depends on the condition of the shrouds. Regular inspection helps detect wear and tear, dictating when a replacement is needed.
About the author
I worked as an officer in the deck department on various types of vessels, including oil and chemical tankers, LPG carriers, and even reefer and TSHD in the early years. Currently employed as Marine Surveyor carrying cargo, draft, bunker, and warranty survey.
Leave a Reply Cancel reply
Your email address will not be published. Required fields are marked *
Save my name, email, and website in this browser for the next time I comment.
Latest posts

Expectations for the 2024 Maritime Transport Market
What does the 2024 maritime transport market look like? International events have disrupted supply chains and changing regulations keep industry leaders on their toes.

Lifeboats: Regulations and Requirements
In an emergency, portable vessels called lifeboats will get a ship’s occupants to relative safety. So how do lifeboats work?

What Are the Most Common Shipbuilding Woods?
While shipbuilders have switched to other practices, wood still has a place in the maritime industry. The numerous types available mean manufacturers have myriad options, so here’s a guide on shipbuilding woods.
- Burgee Staffs
- Fender Boards
- Shroud Rollers
- Home & Business Kits
- Canvas Storage Sleeves
- Halyard Clips & Covers
- Sockets & Mounts
Our Ash shroud rollers are a traditional way to protect sheets and headsails when tacking and close hauled. Unlike plastic substitutes, these classics keep rolling. The interior of the finished Shroud Rollers are sealed and the exterior is finished with 3 coats of Epifanes clear gloss varnish.
Sold in pairs – 1 port, 1 starboard with nylon washers to place between the turnbuckle and shroud roller are included.
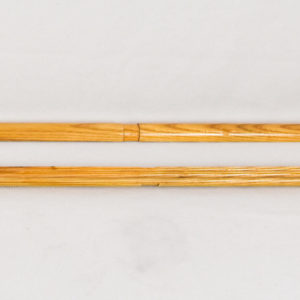
Ash Shroud Rollers
Selecting the right size shroud roller.
When selecting the appropriate size of shroud roller for your boat there are a couple of considerations: boat length; shroud size; and sheet lead/head sail cut/mast height.
- Boat length (general recommendation); up to 32′ – 5′ 1¼””; over 32′ – 6′.
- Shroud size: 4′ and 5′ shroud rollers fit up to 5/16″” wire; 6′ fits up to 7/16″” wire.
- Sheet lead/head sail cut: for boats with shrouds 5/16″” and less, and shorter masts, fuller cut jibs with lower jib clews, the 4′ shroud roller may be appropriate.
There is also the element of personal preference.
HOW TO CHOOSE YOUR FLAG POLE
These mahogany, teak and ash flagstaffs offer beauty, quality and durability. An ash staff with a mahogany truck (top) result in a striking flagstaff. In keeping with the traditional look our flagstaffs have a “saucer” style truck and a “beefy belly” shape. The poles are finished with four coats of varnish.
Request a Quote
- Forums New posts Unanswered threads Register Top Posts Email
- What's new New posts New Posts (legacy) Latest activity New media
- Media New media New comments
- Boat Info Downloads Weekly Quiz Topic FAQ 10000boatnames.com
- Classifieds Sell Your Boat Used Gear for Sale
- Parts General Marine Parts Hunter Beneteau Catalina MacGregor Oday
- Help Terms of Use Monday Mail Subscribe Monday Mail Unsubscribe

shroud rollers
- Thread starter anchorman
- Start date Apr 29, 2008
- Catalina Owner Forums
- Ask A Catalina Owner
My C-34 has roller shroud covers. They badly worn and I am trying to find someone that sell these in the US. I found a supplier in the UK. this is the link to the proboat website. If anyone knows where I can get these it would be great. http://www.proboat.co.uk/item.asp?dep=1&prod_id=194&cat_id=23
West Marine. nm

Rollers Don't waste your money. When I bought my Catalina 30 eight years ago, I made rollers for the front shrouds if you don't mind disconnecting the front shrouds. Go to a hardware store and by a 8 foot sections of outside PVC pipe(UV resistant) and 4 end caps for the pipe and 2 stainless washers that are about the same outside diameter as the end caps and with a hole large enough to pass the shroud. Cut the pipe in half, now you have 2 - 4 foot sections. Drill a hole in the center of each of the end caps, large enough to pass the shroud through. Disconnect one shroud, remove the turnbuckle. Slip the end cap over the shroud. Now slip the pipe over the shroud and then the other end cap. Use the washer as a bearing on top of the turnbuckle. With the shroud through all the pieces, press the caps in place on the pipe. Do this last because if you put the end caps on first it will be difficult to thread the shroud through 4 feet of pipe and get out the hole on the cap and the other end. Thread the turnbuckle back on the stay. Do the same on the other side. Tension all your shrouds to the specs you like. Cost very little and is very strong. See http://www.sailthehudson.com/images/Julia2.jpg for a bad pic of the 8 year old shroud roller.
- This site uses cookies to help personalise content, tailor your experience and to keep you logged in if you register. By continuing to use this site, you are consenting to our use of cookies. Accept Learn more…
Please verify you are a human
Access to this page has been denied because we believe you are using automation tools to browse the website.
This may happen as a result of the following:
- Javascript is disabled or blocked by an extension (ad blockers for example)
- Your browser does not support cookies
Please make sure that Javascript and cookies are enabled on your browser and that you are not blocking them from loading.
Reference ID: aef7d390-032b-11ef-9455-d642452ecab5
Powered by PerimeterX , Inc.
- Crossword Tips
Clue: City 200 miles south of Moscow
Referring crossword puzzle answers, likely related crossword puzzle clues.
- Russian city
- Pitcher Hershiser
- City on the Oka
- Sportscaster Hershiser
- Hurler Hershiser
- City south of Moscow
- Turgenev's birthplace
- Baseball's Hershiser
- Soviet city
Recent usage in crossword puzzles:
- New York Times - Sept. 29, 1981
- New York Times - March 23, 1971
Gorky Park (Moscow)
Start writing your article here!
Attractions

Flying Machine

External links
Gorky Park in Wikipedia
IMAGES
VIDEO
COMMENTS
Shroud size: 4′ and 5′ shroud rollers fit up to 5/16″" wire; 6′ fits up to 7/16″" wire. Sheet lead/head sail cut: for boats with shrouds 5/16″" and less, and shorter masts, fuller cut jibs with lower jib clews, the 4′ shroud roller may be appropriate. There is also the element of personal preference.
Dynamic Dollies. Dynamic/Seitech Dollies Compatible Parts. Type 1: Boats up to 250 lbs Dollies. Type 2: Laser, Byte & Invitation Dollies. Type 3: Curled Gunwale Boats Dollies. Type 4.1: Small/Med Bowsprit Boats Dollies. Type 4.2: Heavier Sprit Boats Dollies.
Here's what our local C22 fleet captain recommends for our club: "Shroud Rollers. A good idea to improve tacking is to install shroud rollers on the upper and forward shrouds. This can be done easily by installing a 1" diameter schedule 200 PVC pipe over the shrouds. 36" roller tube on the forward lowers and a 12-24" roller tube on the uppers."
Let us help. 206-632-4462. Email. Equip yourself with sailboat rigging hardware from Fisheries Supply. Shop products from top brands like Hayn, Johnson, Alexander Roberts, Ronstan, and more.
Short answer sailboat shroud: A sailboat shroud is a part of the standing rigging system that supports the mast and helps maintain its stability. These load-bearing wires or cables are attached to the sides of the boat and provide crucial support for the mast by counteracting lateral forces. Understanding the Importance of a Sailboat Shroud:
1. Check by sighting up the backside of the mast to see how straight your spar is side to side. You can take a masthead halyard from side to side to ensure that the masthead is on center. Do this by placing a wrap of tape 3′ up from the upper chainplate pin hole on each upper shroud. Cleat the halyard and pull it to the tape mark on one side ...
A sailboat's standing rigging is generally built from wire rope, rod, or occasionally a super-strong synthetic fibered rope such as Dyneema ®, carbon fiber, kevlar or PBO. 1×19 316 grade stainless steel Wire Rope (1 group of 19 wires, very stiff with low stretch) is standard on most sailboats. Wire rope is sized/priced by its diameter which ...
The Ash shroud rollers are a traditional way to protect sheets and head sails when tacking and close hauled. Unlike plastic substitutes, these classics keep rolling. The interior of the finished Shroud Rollers are sealed and the exterior is finished with 5 coats of Epifanes clear gloss varnish. Sold in pairs - 1 port, 1 starboard; washers ...
For the forward lower shrouds, you have two choices. Tack 'n Roll. If you keep your sailboat in a slip most of the time, you can cut the forward lower shroud boots long enough to work as shroud rollers (also called rigging rollers). Shroud rollers reduce the chafing caused by your foresail rubbing across the shrouds when tacking.
Shroud rollers provide protection for your sails and lines as they run past stays and shrouds. 1.5 metres long - Each length consists of two half circle sections that snap together. Sold in packs of 2, 4, 6 and 8 lengths. N.B. Restricted courier options apply. Wire Diameter. 3-5mm. 6-8mm.
At MAURIPRO Sailing we carry a wide variety of rigging products, including shroud cleats all from great brands such as Barton Marine. MAURIPRO Sailing, your direct access to Rigging Shroud Cleats and all your other sailing and boating needs. Shop a full range of Rigging Shroud Cleats at MAURIPRO Sailing Store. Includes technical support, low ...
Shrouds on a sailboat are essentially the standing rigging wires that run from the masthead to the sides of the boat. They offer lateral support, keeping the mast stable and upright. In simple words, shrouds are the strong arms that support the mast when the wind blows from the side. Now, let's peel back a layer and take a closer look at the ...
Shroud size: 4′ and 5′ shroud rollers fit up to 5/16″" wire; 6′ fits up to 7/16″" wire. Sheet lead/head sail cut: for boats with shrouds 5/16″" and less, and shorter masts, fuller cut jibs with lower jib clews, the 4′ shroud roller may be appropriate. There is also the element of personal preference.
Slip the end cap over the shroud. Now slip the pipe over the shroud and then the other end cap. Use the washer as a bearing on top of the turnbuckle. With the shroud through all the pieces, press the caps in place on the pipe. Do this last because if you put the end caps on first it will be difficult to thread the shroud through 4 feet of pipe ...
Shroud (sailing) Shrouds as they might have looked on a late 17th-century tall ship. On a sailing boat, the shrouds are pieces of standing rigging which hold the mast up from side to side. There is frequently more than one shroud on each side of the boat. Usually a shroud will connect at the top of the mast, and additional shrouds might connect ...
Shop the best selection of Shroud Covers from West Marine. Visit for products, prices, deals and more! ... GET MORE. BOAT MORE. Save on gear through April 29 Shop Sale. Let the Pros do the hard stuff! Learn More. home ... Jib Rollers Navy Turnbuckle Cover, 520mm Navy Turnbuckle Cover, 360mm Gray Turnbuckle Cover, 360mm ...
Shroud Adjuster 420/FJ/V15 (Zim) Zim Sailing. $26.00. Shroud adjusters connect your shrouds to the deck of your sailboat, offering an easy means of both attachment and adjustment. Connections are typically made with stainless steel clevis pins and rings.
Walking tour around Moscow-City.Thanks for watching!MY GEAR THAT I USEMinimalist Handheld SetupiPhone 11 128GB https://amzn.to/3zfqbboMic for Street https://...
Recent usage in crossword puzzles: New York Times - Sept. 29, 1981; New York Times - March 23, 1971
JetPhotos.com is the biggest database of aviation photographs with over 6 million screened photos online!
Roller Coaster Pax Company: Steel Sit Down Extreme 1992 2004 - 2007 Relocated to Spreepark Silber Mine S.D.C. Steel Sit Down 1995 2011 Unknown Super-8-Bahn Schwarzkopf: Steel Sit Down Thrill Unknown 1969 or earlier Unknown Twister Coaster Zamperla: Steel Sit Down Thrill 2007 or earlier 2011 Unknown Wacky Worm