Sail area calculations
Mainsail Area = P x E / 2 Headsail Area = (Luff x LP) / 2 (LP = shortest distance between clew and Luff) Genoa Area 150% = ( 1.5 x J x I ) / 2 Genoa Area 135% = ( 1.35 x J x I ) / 2 Fore-triangle 100% = ( I x J ) / 2 Spinnaker Area = 1.8 x J x I
Copyright � 2008 Sailboat Rig Dimensions All Rights Reserved.
- Types of Sailboats
- Parts of a Sailboat
- Cruising Boats
- Small Sailboats
- Design Basics
- Sailboats under 30'
- Sailboats 30'-35
- Sailboats 35'-40'
- Sailboats 40'-45'
- Sailboats 45'-50'
- Sailboats 50'-55'
- Sailboats over 55'
- Masts & Spars
- Knots, Bends & Hitches
- The 12v Energy Equation
- Electronics & Instrumentation
- Build Your Own Boat
- Buying a Used Boat
- Choosing Accessories
- Living on a Boat
- Cruising Offshore
- Sailing in the Caribbean
- Anchoring Skills
- Sailing Authors & Their Writings
- Mary's Journal
- Nautical Terms
- Cruising Sailboats for Sale
- List your Boat for Sale Here!
- Used Sailing Equipment for Sale
- Sell Your Unwanted Gear
- Sailing eBooks: Download them here!
- Your Sailboats
- Your Sailing Stories
- Your Fishing Stories
- Advertising
- What's New?
- Chartering a Sailboat
- Sail Dimensions

What Sail Dimensions are Required to Calculate Sail Areas?
The required sail dimensions for calculating the area of any triangular sails are usually its height and the length of its foot. But that only works for mainsails and mizzens with no roach, and jibs with a 90 degree angle at the clew - and what about high-cut headsails, spinakers and cruising chutes? Read on...
Foresail and mainsail dimensions are universally referenced with the letters 'J', 'I', 'E' and 'P' approximating to the length of the foredeck, height of the mast, length of the boom and the height of the main sail - but more accurately defined further down this page.
Yacht designers need these sail dimensions to calculate thought provoking stuff such as the sail-area/displacement ratios of their creations, and sailmakers need them before they put scissors to sailcloth.
If our sailboat's sails were perfectly triangular then, as every schoolboy knows, their area would be 'half the height, times the base' - but with the possible exception of a mainsail with a straight luff, generally they're not. Here's how it works...
Main and Mizzen Sail Dimensions
These are almost right-angled triangles except for the curvature of the leach (the 'roach') which increases the sail area.

It's usually calculated as:~
Area = (luff x foot)/1.8, or
Area = ( P x E )/1.8, where:~
- 'P' is the distance along the aft face of the mast from the top of the boom to the highest point that the mainsail can be hoisted, and
- 'E' is the distance along the boom from the aft face of the mast to the outermost point on the boom to which the main can be pulled.
For the mizzen sails on ketches and yawls , 'P' and 'E' relate to the mizzen mast and boom.
For more heavily roached sails, the increased area can be accounted for by reducing the denominator in the formula to 1.6.
Clearly calculating sail areas isn't going to be an exact science...
Jibs, Genoas and Staysail Dimensions

For a working jib that fills the fore triangle - but no more - and with a foot that's parallel to the deck, then you've got a 'proper' right-angled triangular sail, whose area is:~
Area = (luff x foot)/2, or
Area = ( I x J )/2, where:~
- 'I' is the distance down the front of mast from the genoa halyard to the level of the main deck, and
- 'J' is the distance along the deck from the headstay pin to the front of the mast.
Genoas, by definition, have a clew which extends past the mast and are described by the amount by which they do so. For instance a 135% genoa has a foot 35% longer than 'J' and a 155% genoa 55% longer. Areas are calculated as follows:~
Area (135% genoa) = (1.44 x I x J )/2, and
Area (155% genoa) = (1.65 x I x J )/2
High-cut Headsails

But these formulae don't work for a high-cut jib with a raised clew - unless you imagine the sail turned on its side such that the luff is the base and the luff perpendicular is the height.
It's still a simple calculation though, once you know the length of the luff perpendicular ( LP ), the sail area is:~
Area = (luff x luff perpendicular)/2, or
Area = ( L x LP )/2, where:~
- 'L' is the distance along the forestay from the headstay pin to the front of the mast, and
- 'LP' is the shortest distance between the clew and the luff of the genoa.
Spinnaker Sail Dimensions
Much like calculating foresail areas, but with different multipliers for conventional spinnakers and asymmetric spinnakers...
Conventional Spinnakers
Area = (0.9 x luff x foot), or
Area = (0.9 x I x J ), where:~
- 'I' is the distance from the highest spinnaker halyard to the deck, and
- 'J' is the length of the spinnaker pole.
Asymmetric Spinnakers
Area = (0.8 x luff x foot), or
Area = (0.8 x I x J ), where:~
- 'I' is the distance from the highest spinnaker halyard to the deck, and
- 'J' is the distance from the front face of the mast to the attachment block for the tackline.
More about Sails...

Are Molded and Laminate Sails One Step Too Far for Cruising Sailors?
Although woven sails are the popular choice of most cruising sailors, laminate sails and molded sails are the way to go for top performance. But how long can you expect them to last?

Is Carrying Storm Sails on Your Cruising Boat Really Necessary?
It's good insurance to have storm sails available in your sail locker if you are going offshore, and these are recommended fabric weights and dimensions for the storm jib and trysail

Using Spinnaker Sails for Cruising without the Drama!
When the wind moves aft and the lightweight genoa collapses, you need one of the spinnaker sails. But which one; conventional or asymmetric? Star cut, radial head or tri-radial?
The Mainsail on a Sailboat Is a Powerful Beast and Must Be Controlled
Learn how to hoist the mainsail, jibe it, tack it, trim it, reef it and control it with the main halyard, the outhaul, the mainsheet and the kicker.
Is Dacron Sail Cloth Good Enough for Your Standard Cruising Sails?
Whilst Dacron sail cloth is the least expensive woven fabric for standard cruising sails, do the superior qualities of the more hi-tech fabrics represent better value for money?
Recent Articles
Wauquiez Gladiateur 33 for Sale
Apr 10, 24 05:40 AM
'Cabo Frio', a Catalina Morgan 43 for sale
Apr 01, 24 08:35 AM
Live Aboard Boats For Sale
Mar 30, 24 07:02 PM
Here's where to:
- Find Used Sailboats for Sale...
- Find Used Sailing Gear for Sale...
- List your Sailboat for Sale...
- List your Used Sailing Gear...
Our eBooks...

A few of our Most Popular Pages...

Copyright © 2024 Dick McClary Sailboat-Cruising.com
The Worldwide Leader in Sailmaking
- Sail Care & Repair
- Sailing Gear
- Sail Finder
- Custom Sails
- One Design Sails
- Flying Sails
- New Sail Quote
- 3Di Technology
- Helix Technology
- Sail Design
- NPL RENEW Sustainable Sailcloth
- Sailcloth & Material Guide
- Polo Shirts
- Sweaters & Cardigans
- Sweatshirts & Hoodies
- Accessories
- Mid Season Sale
- Mid & Baselayers
- Deckwear & Footwear
- Luggage & Accessories
- Spring Summer '24
- Sailor Jackets
- Maserati X North Sails
- NS x Slowear
- Sailor Jacket
- Sustainability
- North Sails Blog
- Sail Like A Girl
- Icon Sailor Jacket
- Our Locations
- North SUP Boards
- North Foils
- North Kiteboarding
- North Windsurfing
SAIL FINDER
SAILING GEAR
COLLECTIONS & COLLAB
COLLECTIONS
WE ARE NORTH SAILS
ACTION SPORTS
Popular Search Terms
Collections
Sorry, no results for ""
SAIL PLAN DIMENSIONS
Figure out your rig dimensions when it comes to your sails.

The basic rig dimension for a yacht are generally understood. However, there are some differences in how some sailors describe these dimensions. Here is how we define them at North Sails.
I – Height of Foretriangle Elevation of Forestay, measured down to elevation of main shrouds at sheer line.
J – Base of Foretriangle Horizontal distance measured from front face of mast at deck to position of headstay at sheer line.
P – Mainsail Hoist Elevation of upper mast band or maximum main halyard position, measured down to lower mast band or top of boom.
E- Mainsail Foot Horizontal distance measured from aft face of mast at top of boom to boom band or maximum outhaul position.
Is – Height of Inner Foretriangle Elevation of Forestay, measured down to elevation of main shrouds at sheer line.
Js – Base of Inner Foretriangle Horizontal distance measured from front face of mast at deck to position of inner headstay at sheer line.
Py – Mizzen Mainsail Hoist Elevation of upper mast band or maximum main halyard position, measured down to lower mast band or top of boom.
Ey – Mizzen Mainsail Foot Horizontal distance measured from aft face of mizzen mast at top of boom to boom band or maximum outhaul position.
ISP – Elevation of Spinnaker Halyard Measured down to elevation of main shrouds at sheer line.
SPL – Spinnaker Pole Length
STL – Spinnaker Tack Length Horizontal distance measured from front face of mast at deck, forward and horizontally to position of spinnaker tack attachment point.

FEATURED STORIES
How to care for your foul weather gear, npl renew faq, flying sails 101.
- Refresh page
- Navigating the High Seas: A Comprehensive Guide to Sailboat Masts
Sailboat masts are the unsung heroes of the sailing world, silently supporting the sails and ensuring a smooth journey across the open waters. Whether you're a seasoned sailor or a novice, understanding the intricacies of sailboat masts is essential for a safe and enjoyable voyage. In this comprehensive guide, we will delve into the world of sailboat masts, discussing their types, maintenance, and everything in between.
Types of Sailboat Masts
Sailboat masts come in various configurations, each with its advantages and drawbacks. The two primary types are keel-stepped and deck-stepped masts.
Keel-Stepped Masts
Keel-stepped masts are the most common type, extending through the deck and resting on the boat's keel. They provide excellent stability and are suitable for larger sailboats. However, they require careful maintenance to prevent water intrusion into the boat's cabin.
Deck-Stepped Masts
Deck-stepped masts rest on the deck of the boat, making them easier to install and remove. They are commonly found on smaller sailboats and are more forgiving in terms of maintenance. However, they may offer slightly less stability than keel-stepped masts.
Components of a Sailboat Mast
To understand mast maintenance better, it's essential to know the various components of a sailboat mast. The key parts include the masthead, spreaders, shrouds, and halyard sheaves.
The masthead is the topmost section of the mast, where the halyards are attached to raise and lower the sails. It also often houses instruments such as wind indicators and lights.
Spreaders and Shrouds
Spreaders are horizontal supports attached to the mast to help maintain the proper angle of the shrouds (cables or rods that provide lateral support to the mast). Properly adjusted spreaders and shrouds are crucial for mast stability and sail performance.
Mast Materials: Choosing the Right One
Sailboat masts are typically constructed from three primary materials: aluminum, wood, and carbon fiber. Each material has its unique characteristics and is suited to different sailing preferences.
Aluminum Masts
Aluminum masts are lightweight, durable, and relatively easy to maintain. They are commonly used in modern sailboats due to their cost-effectiveness and longevity.
Wooden Masts
Wooden masts, while classic and beautiful, require more maintenance than other materials. They are best suited for traditional or vintage sailboats, where aesthetics outweigh convenience.
Carbon Fiber Masts
Carbon fiber masts are the pinnacle of mast technology. They are incredibly lightweight and strong, enhancing a sailboat's performance. However, they come at a premium price.
Mast Maintenance
Proper mast maintenance is essential for safety and longevity. Regular cleaning, inspection, and addressing minor issues promptly can prevent costly repairs down the line.
Cleaning and Inspection
Regularly clean your mast to remove salt, dirt, and grime. Inspect it for signs of corrosion, wear, or damage, paying close attention to the masthead, spreaders, and shrouds.
Common Repairs and Their Costs
Common mast repairs include fixing corroded areas, replacing damaged spreaders, or repairing shrouds. The cost of repairs can vary widely, depending on the extent of the damage and the materials used.
Extending the Lifespan of Your Mast
Taking steps to prevent damage is essential. Avoid over-tightening halyards, protect your mast from UV radiation, and keep an eye on corrosion-prone areas.
Read our top notch articles on topics such as sailing, sailing tips and destinations in our Magazine .
Check out our latest sailing content:
Where to shelter from the Bora in Croatia?
What skipper's licence do I need?
From Lefkada or Corfu to Paxos and Antipaxos
Discover the paradise of Paxos and Antipaxoss
Discover Corfu: sailing adventure in the Ionian
Sextant and navigation: survival without GPS
5 best sailing routes in the Bahamas
Yachting guide to the Bahamas
The ultimate yacht cleaning kit
Traditional sailor tattoos: Meaning of the swallow
The most popular catamarans of 2023
Fishing and sailing: where to sail for the best catches?
Lighthouses you won't forget
New Year's resolution: let's sail more eco
British Virgin Islands: sailing paradise
How to get kids to enjoy sailing?
How to sail a yacht on a tailwind
How to sail a yacht in crosswinds
Götheborg: the greatest sailing ship
How to have a nautical Christmas
What to pack for a tropical sailing
How to sail a yacht against the wind
Sailing the Maldives: paradise
Interview: is ocean pollution irreversible?
How to gear up for the 2024 sailing season
Medicanes in Greece
Top 10 reasons boaters contact their insurers
New boats for rent in 2024
Currents and sailing: the Atlantic Ocean
Trade routes that shaped the world
Stepping and Unstepping a Mast
Stepping and unstepping a mast is a crucial skill for any sailboat owner. This process involves removing or installing the mast on your boat. Here's a step-by-step guide for safe mast handling.
Step-by-Step Guide for Safe Mast Handling
- Gather the necessary tools and equipment.
- Disconnect all electrical and rigging connections.
- Use a crane or mast-stepping system to safely lower or raise the mast.
- Secure the mast in its proper place.
- Reconnect all electrical and rigging connections.
When and Why to Unstep a Mast
You may need to unstep your mast for various reasons, such as transporting your sailboat or performing extensive maintenance. It's crucial to follow the manufacturer's recommendations and ensure a safe unstepping process.
Sailboat Mast Boot: Protecting Your Mast
A mast boot is a simple yet effective way to protect your mast from water intrusion and damage caused by the elements. Here's what you need to know.
The Purpose of a Mast Boot
A mast boot is a flexible material that wraps around the mast at the deck level. It prevents water from entering the cabin through the mast opening, keeping your boat dry and comfortable.
Installing and Maintaining a Mast Boot
Installing a mast boot is a straightforward DIY task. Regularly inspect and replace it if you notice any signs of wear or damage.
Replacing a Sailboat Mast
Despite your best efforts in maintenance, there may come a time when you need to replace your sailboat mast. Here's what you should consider.
Signs That Your Mast Needs Replacement
Common signs include severe corrosion, structural damage, or fatigue cracks. If your mast is beyond repair, it's essential to invest in a replacement promptly.
The Cost of Mast Replacement
The cost of mast replacement can vary significantly depending on the type of mast, materials, and additional rigging needed. It's advisable to obtain multiple quotes from reputable marine professionals.
Yacht Masts: Sailing in Style
For those looking to take their sailing experience to the next level, upgrading to a yacht mast can be a game-changer.
Differences Between Sailboat and Yacht Masts
Yacht masts are typically taller and offer enhanced sail performance. They are often equipped with advanced rigging systems and technology for a more luxurious sailing experience.
Upgrading to a Yacht Mast
Consult with a marine professional to determine if upgrading to a yacht mast is feasible for your sailboat. It can be a significant investment but can transform your sailing adventures.
Sailboat Mast Steps: Climbing to the Top
Mast steps are handy additions to your mast, allowing easier access to perform maintenance or enjoy panoramic views. Here's how to use them safely.
Using Mast Steps Safely
Always use proper safety equipment when climbing mast steps. Make sure they are securely attached to the mast and regularly inspect them for wear or damage.
The Advantages of Mast Steps
Mast steps provide convenience and accessibility, making sailboat maintenance tasks more manageable. They also offer an elevated vantage point for breathtaking views while at anchor.
Mast Maintenance Tips for Beginners
If you're new to sailboat ownership, these mast maintenance tips will help you get started on the right foot.
Essential Care for First-Time Sailboat Owners
- Establish a regular maintenance schedule.
- Seek advice from experienced sailors.
- Invest in quality cleaning and maintenance products.
Preventing Common Mistakes
Avoid common pitfalls, such as neglecting inspections or using harsh cleaning agents that can damage your mast's finish.
Sailing with a Mast in Top Condition
A well-maintained mast contributes to a safer and more enjoyable sailing experience. It enhances your boat's performance and ensures you can rely on it in various weather conditions.
How a Well-Maintained Mast Improves Performance
A properly maintained mast helps maintain sail shape, reducing drag and improving speed. It also ensures that your rigging remains strong and secure.
Safety Considerations
Never compromise on safety. Regularly inspect your mast, rigging, and all associated components to prevent accidents while at sea.
Sailboat masts are the backbone of any sailing adventure, and understanding their intricacies is crucial for a successful voyage. From choosing the right mast material to proper maintenance and upgrading options, this guide has covered it all. By following these guidelines, you can sail the high seas with confidence, knowing that your mast is in top condition.
So what are you waiting for? Take a look at our range of charter boats and head to some of our favourite sailing destinations.
I am ready to help you with booking a boat for your dream vacation. Contact me.

Denisa Nguyenová

The Ultimate Guide: How to Accurately Measure Your Sail for Optimal Performance
Alex Morgan

When it comes to sailing, having a properly fitted sail is essential for optimal performance on the water. Measuring a sail accurately is a crucial step in ensuring a perfect fit and maximizing its potential. This article will guide you through the process of measuring a sail, explain why it is important, and provide tips and best practices for obtaining accurate measurements.
Measuring a sail is important for two main reasons. It ensures a proper fit. A sail that is too loose or too tight can affect its performance and efficiency. By obtaining accurate measurements, you can ensure that your sail fits snugly and functions optimally. Measuring a sail helps in optimizing its performance. By determining the correct dimensions, you can modify the sail’s shape and features to achieve the desired sailing characteristics.
To measure a sail accurately, you will need specific tools and equipment. These include a tape measure , sail shapers for maintaining the proper shape of the sail during measurement, and a sailmaker’s ruler for precise and consistent measurements.
The process of measuring a sail involves several steps. You need to prepare the sail by removing any wrinkles or folds to ensure accurate measurements. Then, you will measure the luff length , leech length , foot length , roach , and headboard height . Each measurement plays a crucial role in determining the dimensions of the sail.
To ensure accurate measurements, it is important to double-check your measurements and eliminate any potential errors. measuring a sail in appropriate weather conditions, such as a calm day without strong winds, can help minimize any measurement discrepancies. If you are uncertain or lack experience in measuring a sail, seeking professional assistance can ensure accurate results and help optimize your sail’s performance.
By following these guidelines and best practices for measuring a sail, you can ensure a properly fitted and high-performing sail, ultimately enhancing your sailing experience on the water.
Key takeaway:
- Proper fit is crucial when measuring a sail: Measuring a sail accurately ensures it fits properly, improving its performance and longevity.
- Optimize sail performance with accurate measurements: Properly measured sails maximize performance by allowing for optimal sailing angles and better control.
- Essential tools for measuring sails: Tape measures, sail shapers, sailmakers’ ruler, and other specialized tools are necessary for accurate sail measurement.
- Step-by-step sail measurement guide: Follow a systematic process, including measuring luff length, leech length, foot length, roach, and headboard height, to ensure accurate measurements.
- Important tips for measuring sails: Double-check measurements for accuracy, measure in suitable conditions, and seek professional assistance if needed for precise sail measurement.
Why is Measuring a Sail Important?
Measuring a sail is more than just a technical necessity. It plays a crucial role in ensuring a perfect fit and optimizing the performance of your sail. As we dive into this section, we’ll explore why measuring a sail is so important. From achieving a proper fit to enhancing performance, we’ll uncover the key aspects of sail measurement that every sailor needs to know. Get ready to set sail with confidence and precision!
Ensuring Proper Fit
Ensuring a proper fit is crucial when measuring a sail. The accuracy of the measurements for the sail’s luff length , leech length , foot length , roach , and headboard height is essential in determining the sail’s dimensions and shape. These measurements ensure that the sail fits properly on the mast, boom, and rigging.
Maintaining the right amount of tension in the sail is vital for a proper fit. It should be taut but not overly tight , allowing it to catch wind efficiently without distorting or tearing.
A well-fitting sail will have a smooth shape and be properly aligned with the rigging. This ensures optimal airflow and reduces drag, maximizing the sail’s performance.
Properly trimming the sail based on wind conditions is also important. Adjusting its positions and angles helps optimize efficiency and propels the boat forward effectively.
A seasoned sailor once learned the hard way about the importance of ensuring a proper fit. During a long-distance race, his loose sail caused excessive drag and significantly reduced his boat’s speed. Frustrated with his lackluster performance, he realized the need for accurate measurements and tension. From that moment on, he made it a priority to meticulously measure and adjust his sail, resulting in remarkable improvements in his racing performance.
Optimizing Performance
To optimize sail performance, follow these steps:
Trim the Shape: Adjust the sail shape by tightening or loosening control lines. This maximizes airflow and improves performance in different wind conditions.
Check the Twist: Proper twist is crucial for optimal performance. Use telltales and observations to ensure balanced twist across the entire sail.
Adjust the Camber: Experiment with different settings to find the optimal camber for maximum lift and power.
Fine-tune the Outhaul and Cunningham: Play with these controls to optimize performance based on wind strength and point of sail.
Consider Sail Tuning Guides: Manufacturers often provide specific tuning guides for their sails. These guides offer recommended settings for different wind conditions.
Keep in mind that sail tuning can vary based on factors like boat design, sail type, and personal preference. It may take some trial and error to find the perfect setup, so don’t be afraid to experiment and make adjustments accordingly.
Remember, small adjustments can make a big difference. Regularly evaluate and fine-tune your sail to get the best results on the water.
Tools and Equipment for Measuring a Sail
If you’re looking to measure a sail accurately, it’s crucial to have the right tools and equipment at your disposal. In this section, we’ll explore the essential tools that will aid you in measuring a sail effectively. From the trusty tape measure to specialized equipment like sail shapers and sailmakers’ rulers, we’ve got you covered. We’ll also walk you through the step-by-step process of measuring various aspects of the sail, including luff length , leech length , foot length , roach , and headboard height . Get ready to set sail with precision and confidence!
Tape Measure
To accurately measure a sail, having a tape measure is essential . The tape measure allows for precise measurements , ensuring that the sail fits properly and performs optimally .
There are several important features and uses of a tape measure:
– Durability and Flexibility : The tape measure should be sturdy and flexible enough to easily measure different parts of the sail.
– Metric and Imperial Units : It should have both metric and imperial units to accommodate different preferences.
– Locking Mechanism : A locking mechanism is crucial to secure the tape measure at the desired length and prevent it from retracting prematurely.
– Clear Markings : The tape measure should have clear and easy-to-read markings for accurate measurements.
With the tape measure, you can follow a step-by-step guide to measure various aspects of the sail, such as luff length , leech length , foot length , roach , and headboard height . It is important to double-check your measurements and measure under appropriate conditions to ensure accuracy.
If you are unsure or need assistance, it is recommended to seek professional help for precise measurements. A tape measure provides the necessary tool to gather precise data for any adjustments or repairs that may be needed.
Sail Shapers
Sail shapers enhance sail shape and performance. They optimize sail aerodynamics, improving speed and maneuverability. Sail shapers are made of lightweight, flexible materials like carbon fiber or plastic. They are inserted into sail pockets or batten sleeves to provide support and structure. Sail shapers can be adjusted or removed for different wind conditions or sailing styles. Using sail shapers reduces wrinkles and folds in the sail, improving airflow and efficiency. Sail shapers are commonly used in racing and performance sailing, where small improvements in sail shape make a significant difference.
True story: In a sailing regatta, I noticed my boat consistently falling behind the competition. I found that my sail shape wasn’t optimized for the wind conditions. With the advice of an experienced sailor, I tried sail shapers . These small, lightweight tools were easy to insert, and the difference was immediate. The sail became taut and smooth, allowing my boat to glide effortlessly. I not only caught up but also finished in second place, surpassing the competition. Sail shapers truly transform sail performance and elevate the sailing experience to new heights.
Sailmakers’ Ruler
The Sailmakers’ Ruler is a necessary tool for sail measurement . It is designed specifically for sailmakers and sail repair professionals , guaranteeing precise measurements and a proper fit.
The Sailmakers’ Ruler provides:
– Length measurements in inches and centimeters
– Straight edges for measuring luff , leech , and foot lengths
– Curved edges for measuring roach and headboard height
– Sturdy construction for durability and accuracy
Using the Sailmakers’ Ruler simplifies the sail measuring process, ensuring precise and consistent measurements. This tool eliminates guesswork or estimates, providing reliable measurements that are crucial for sail customization and repairs.
Pro-tip : Position the Sailmakers’ Ruler accurately along the edges of the sail for the most precise measurements. This will ensure a proper fit and optimal sail performance.
Step 2: Measuring Luff Length
To measure the luff length of a sail, follow these steps:
Step 1: Prepare the sail by laying it flat on a clean surface.
Step 2: Align the tape measure along the front edge of the sail, starting at the bottom of the mast.
Step 3: Measure from the tack (lower front corner) to the head (top corner) of the sail, following the curve of the luff.
Step 4: Record the measurement in either inches or centimeters.
Measuring the luff length is important for ensuring the proper fit of a sail. It determines the size and shape of the sail to maximize performance. Accurate measurement helps sailors achieve the desired shape and power by ensuring proper tension on the sails.
Accurate measurement is crucial as even small variations can affect the sail’s performance in different wind conditions. It also helps determine the appropriate sail size for specific sailing purposes and conditions.
Remember to double-check your measurements for accuracy. It is recommended to measure the luff length when the sail is dry and properly tensioned. If you are unsure or need assistance, seek professional help to ensure accurate measurements and optimal sail performance.
Step 3: Measuring Leech Length
- Position yourself at the aft end of the sail.
- Attach and stretch the sail properly.
- Hold one end of the tape measure at the head of the sail.
- Extend the tape measure along the leech, which is the back edge of the sail.
- Measure all the way down to the bottom, or foot, of the sail.
- Record the measurement in inches or centimeters.
- Avoid measurement errors that can impact sail performance.
- Ensure measurement consistency by repeating the process multiple times.
- Verify measurement accuracy before proceeding to the next step.
Step 4: Measuring Foot Length
- To measure the foot length of a sail, follow these steps:
- Lay the sail flat on a level surface, ensuring it is fully extended and free of twists or wrinkles.
- Using a tape measure, start at the lowest corner of the sail (the tack) and measure along the bottom edge to the corner where the foot and leech meet (the clew).
- Make sure to measure along the curve of the foot, following its natural shape.
- Record the measurement in feet , meters , or centimeters , depending on your preferred unit of measurement.
- Double-check the measurement for accuracy.
Measuring the foot length of a sail is Step 4 . It is essential for determining its dimensions, ensuring proper fit on the mast and boom, and optimizing performance through proper trim and handling.
Step 5: Measuring Roach
1. Find the highest point of the sail, called the head , where the halyard attaches.
2. Use a sailmaker’s ruler or tape measure to measure the distance from the head of the sail to the outermost point of the sail’s leech .
3. Make sure the tape measure or ruler follows the contour of the sail , accounting for any curves or angles.
4. Record the measurement in centimeters or inches , depending on your preference and the units used for other measurements.
5. The measurement obtained represents the length of the roach , which is the part of the sail that extends beyond a straight line from the head to the clew .
6. The roach measurement is essential for determining the sail area and its performance characteristics, such as stability and power .
7. Double-check your measurement to ensure accuracy, as it plays a crucial role in achieving optimal sail performance.
Measuring the roach of a sail is important for sailors and sailmakers to determine the proper sail area and design for optimal performance on the water.
Step 6: Measuring Headboard Height
To measure the headboard height of a sail, follow these steps:
- Lay the sail flat on a clean surface.
- Locate the headboard , the stiff piece of material at the top of the sail.
- Use a tape measure to measure from the bottom edge of the headboard to its highest point.
- Next, move on to step 6: Measuring Headboard Height.
- Adjust the measurement if necessary to account for additional elements like battens or hardware attached to the headboard.
Measuring the headboard height is crucial for accurately determining the dimensions of a sail. It ensures proper fit and optimal performance on the water. This step-by-step guide will help you confidently measure the headboard height of your sail and make any necessary adjustments for a better sailing experience. Remember to measure in suitable conditions and seek professional assistance if needed.
Tips and Best Practices for Measuring a Sail
Mastering the art of measuring a sail is crucial for every seafarer. In this essential guide, we’ll uncover valuable tips and best practices to ensure accurate measurements. Discover the importance of double-checking your measurements and learn how to account for the appropriate weather conditions when taking measurements. And if you ever find yourself in need of expert guidance, we’ll discuss when it’s advisable to seek professional assistance. Get ready to navigate the seas with confidence as we unlock the secrets to precise sail measurement.
Double-Check Your Measurements
Double-checking your measurements is crucial for accurate sail measurement. Here is a step-by-step guide:
- Measure each component of the sail, then measure again to confirm accuracy.
- Compare the second measurements with the first round. They should match or be very close for precision.
- If any second measurements differ significantly, re-measure that specific component to identify errors.
- Note any inconsistencies or discrepancies between measurements. This could indicate mistakes made in the first round.
- If you cannot resolve discrepancies, seek assistance from a professional sailmaker who can troubleshoot and correct any issues.
Pro tip: Involve a second person to double-check the measurements independently for added accuracy assurance.
Measure in the Appropriate Conditions
When measuring a sail, ensure accurate results by following these steps:
- Choose a calm and windless day. Strong winds can affect the sail’s shape and make measurements difficult.
- Ensure the sail is dry and free from debris or dirt. Brush off any dirt or dust before measuring.
- Find a suitable area with enough space to spread out the entire sail, such as a flat floor or clean deck.
- Ensure good lighting conditions. Natural daylight is ideal for accurate measurements. Avoid dimly lit areas or nighttime measurements.
- Position the sail properly on the flat surface without folds or wrinkles. Smooth out creases for precise measurements.
- Use appropriate measuring tools, such as a tape measure or sailmaker’s ruler, to measure the dimensions of the sail.
- Take multiple measurements of each dimension for accuracy. Repeat measurements if necessary to ensure consistency.
- Immediately record the measurements to avoid forgetting or mixing up the numbers.
- Double-check all measurements before finalizing. Accurate measurements are crucial for sail adjustments or ordering a new sail.
Seek Professional Assistance, if Required
Seeking professional assistance is crucial when measuring a sail. Here are some reasons why it can be beneficial:
Expertise: Professionals have the necessary knowledge and experience to ensure accurate measurements. They understand the technical aspects of sail measurement and can provide valuable insights.
Specialized Equipment: Professionals have access to tools like laser measuring devices that individuals may not have. These tools guarantee precise measurements and eliminate potential errors.
Customization: Professionals can tailor measurements to meet specific requirements and unique sail characteristics. They can offer advice on adjustments and modifications to enhance performance and fit.
Efficiency: Professionals are skilled at quickly and efficiently measuring sails. They can identify potential issues or areas for improvement, saving time and effort.
Quality Assurance: Seeking professional assistance provides confidence in the accuracy of sail measurements. This is particularly important when investing in a new sail or making modifications.
Some Facts About How To Measure A Sail:
- ✅ Sails without boat class can still fit if all three edge dimensions are appropriate. (Source: Bacon Sails)
- ✅ The controlling dimensions for headsails are I and J, with the working jib luff usually measuring 80-90% of I. (Source: Bacon Sails)
- ✅ Spinnaker luff length should not exceed 95% of the square root of (I^2 + J^2) according to the I.O.R. rule. (Source: Bacon Sails)
- ✅ The “TRY ON” method involves hoisting a “pretend sail” outlined by three ropes with dimensions matching the sail’s edges. (Source: Bacon Sails)
- ✅ There is a maximum dimension determined by the boat and a minimum dimension that can be based on available sails or price. (Source: Bacon Sails)
Frequently Asked Questions
How do i measure a sail using the “try on” method.
The “TRY ON” method involves tying three ropes together to match the exact dimensions of the sail’s edges. Hoist the “pretend sail” created by the ropes and check if the ropes representing the leech and foot can be pulled taut at the same time from the jib lead block. If they can, the actual sail should fit.
What are the key dimensions I should measure when determining the size of my sail?
When measuring a sail, it is important to determine the maximum luff, foot, and leech dimensions. These measurements help ensure the sail is the right size for your boat and rig. Maximum luff refers to the length from the head of the sail to the tack, while the foot dimension is the distance from one corner to the other along the bottom edge. The leech dimension is the measurement from the head to the clew corner.
Can I use manufacturer specifications to measure my sail?
While manufacturer specifications can provide a starting point, it is recommended to physically measure the boat and rig instead of relying solely on these specifications. Rig sizes can vary even among the same make and size of sailboat, so taking accurate measurements yourself is crucial for the best fit.
What should I do if I don’t have an old sail to measure?
If you don’t have an old sail to measure, you can still determine the dimensions of your new sail. Measure the luff by hoisting a tape measure attached to the main halyard and measuring to the band on the mast. For the leech, swing the tape measure to the aft end of the boom and measure in a straight line to the desired location of the clew ring. To measure the foot, attach the tape measure to the out haul line and pull it taunt to the maximum point of draw. These measurements will help in designing the perfect fit for your new sail.
What information should I provide when ordering a custom sail?
When ordering a custom sail, it is important to provide detailed information such as the position of both ends of the sheeting track on deck, the diameter of the luff tape, the color and placement of the UV cover, and any specific preferences like a high clew sail for better visibility. This information helps the sailmaker design the best sail for your needs.
Can I rely on pictures of the boat’s sail plan or designer’s specifications for accurate measurements?
While pictures of the sail plan or designer’s specifications can provide some guidance, it is always recommended to physically measure the boat and rig for the most accurate measurements. Pictures may not accurately represent the current state of the rig, and physical measurements ensure the perfect fit for your new sail.
About the author

Leave a Reply Cancel reply
Your email address will not be published. Required fields are marked *
Save my name, email, and website in this browser for the next time I comment.
Latest posts

The history of sailing – from ancient times to modern adventures
History of Sailing Sailing is a time-honored tradition that has evolved over millennia, from its humble beginnings as a means of transportation to a beloved modern-day recreational activity. The history of sailing is a fascinating journey that spans cultures and centuries, rich in innovation and adventure. In this article, we’ll explore the remarkable evolution of…

Sailing Solo: Adventures and Challenges of Single-Handed Sailing
Solo Sailing Sailing has always been a pursuit of freedom, adventure, and self-discovery. While sailing with a crew is a fantastic experience, there’s a unique allure to sailing solo – just you, the wind, and the open sea. Single-handed sailing, as it’s often called, is a journey of self-reliance, resilience, and the ultimate test of…

Sustainable Sailing: Eco-Friendly Practices on the boat
Eco Friendly Sailing Sailing is an exhilarating and timeless way to explore the beauty of the open water, but it’s important to remember that our oceans and environment need our protection. Sustainable sailing, which involves eco-friendly practices and mindful decision-making, allows sailors to enjoy their adventures while minimizing their impact on the environment. In this…
Sailboat Mast: Everything You Need To Know
Anyone who loves sails and boating needs to know their sailing boat from the inside out. If you are new to the sport, then you are probably wondering about things like a sailboat mast and everything around it.
In this article, we have everything you need to know about a sailboat mast, like what it is, its different types, as well as the material it is made of.
All you have to do is keep reading below to find it all out!
What Is A Sailboat Mast?
A sailboat mast is a tall pole that is attached to the deck. It helps secure the sail’s length to the boat and upholds the sail’s structure.
A sailboat mast is the most defining characteristic of a sailboat, helping keep the sail in place. What’s amazing about it is that it can even be taller than the vessel’s length!
Although conventional sailboats use wood, the majority of the newer sailboat masts are constructed of aluminum. The kind of sailboat mast a vessel has depends on the kind of sail plan supported.
What Are The Parts Of A Sailboat Mast?
The sailing mast is essentially a pole that cannot operate effectively without certain critical components.
Moving from the deck to the rest of the sailboat, we can first see the mast boot, which prevents the water from draining down the mast and flooding the cabin.
The stays are the long cords hooked up on each side of the mast, and they hold the mast up off the ground under massive force.
A gooseneck pipe fitting joins the boom to the mast. The sail is raised and lowered using halyard lines that go to the mast’s highest point.
Types Of Sailboat Masts
Rigs with one mast.
Many people that are not aware of the modern sailboat design envision single-mast sailboats.
The reason why this type of sailboat is so widely known is that these masts are low-cost to construct and fairly simple to operate alone.
Sloops, cutters, and catboats are among the most popular rigs with only one mast.
Sloop Masts
Nowadays, sloop rig vessels are the most popular type of sailing boat. Sloops typically have only one mast positioned somewhere on the front third or the middle of the deck, even though some boat models might vary a bit.
A sloop mast is equipped with a big mainsail and a jib sail (see also ‘ Why Are Sails Made In A Triangular Shape? ‘). A Bermuda-rigged sloop has only one towering mast and a triangle-shaped sail. Other not-so-popular gaff-rigged sloops have a significantly smaller mast and bigger 4-point mainsails.
Catboat Masts
Catboats are distinctive New England boats that have a forward-mounted standard mast and a long boom. A catboat, unlike a sloop-rigged boat, is only equipped with one sail.
It is also typically mounted (more or less) right in front of the boat, and it is commonly short and relatively thick.
Catboats are frequently gaff-rigged. In a single-mast design, gaff-rigged sail designs (see also ‘ The Definition And History Of The Lateen (Triangular) Sail ‘) succeed in making the most out of short masts and are relatively simple to maneuver.
The mast of gaff-rigged catboats is shorter than that of a Bermuda-rigged boat of comparable size, but it is typically taller than that of comparable gaff-rigged crafts.
Cutter Mast
A cutter-rigged sailboat has only one towering mast and several headsails, which is why it can be mistaken for sloops when seen from afar.
However, because cutters use numerous headsails rather than one standard jib (see also ‘ Everything You Need To Know About Sailboat Jibs ‘), their masts are typically taller than those of comparable-sized sloops.
In several places, a gaff-rigged cutter is far more usual than a gaff-rigged sloop. Even at times when its sails are folded, a cutter can be distinguished from a sloop.
This is due to the fact that cutters frequently have a protracted bowsprit and two front stays; the forestay and the jib stay.
Rigs With Multiple Masts
Multi-mast sailboats (see also ‘ Small Sailboats: What Are They Called? ‘) are not as popular as single-mast sailboats. That is why the design and structure of a multi-mast boat usually make it classier and more navigable.
A multi-mast boat provides more than simply great looks. It also provides speed and efficient control for skilled seamen.
Most of these boats have two masts, which seem to be frequently smaller than the masts on comparable-sized single-mast crafts. Yawl, ketch, as well as schooner rigs, are among the most popular types.
Yawls are sturdy multi-mast boats whose length ranges from 20 to more than 50 ft. A yawl has a lengthy forward main mast and a small mizzen mast at the back of the vessel. This type is also frequently gaff-rigged and was previously used as a utility boat.
A yawl-rigged boat can also self-steer by using the mizzen mast and sail. The yawl can be distinguished from many other double-mast vessels by its short mizzen mast, which is frequently half the size of the main mast.
Furthermore, the mizzen mast is located toward the back of the rudder post.
Ketch Masts
Ketch masts can be mistaken for yawls with a quick look. However, ketch masts are equipped with two masts of comparable size and a significantly bigger mizzen mast. A ketch boat’s mizzen mast is located at the front of the rudder post.
Ketch-rigged vessels are frequently gaff-rigged, with topsails on each one of their masts. Triangle-shaped sailplanes on some ketch-rigged vessels prevent the necessity for a topsail.
Ketch masts, much like the yawl ones, have a headsail, a mainsail, and a mizzen sail that are similar in size to the mainsail. Finally, a ketch-rigged vessel can sail while handling more than one rear sail.
Schooner Masts
Schooners are some of the most beautiful multi-mast sailboats. They are clearly more similar to ketches than yawls. However, if you closely look at a schooner, you will see that it will feature a smaller foremast and a longer (or nearly equal-sized) mast behind it.
Schooner masts are large and heavy, but they are generally shorter than single-mast vessels of comparable size.
This is due to the fact that double-masted vessels share the sail plan over 2 masts and do not require the additional length to compensate for the reduced sail space.
Finally, they are typically gaff-rigged, with topsails and topmasts that expand the mast’s length.
Masts Of Tall Ships
Tall ships are those traditional large cruising ships that ruled the seas well before age of steam. Renowned ships with this massive and intricate rig setup include the U.S.S Constitution as well as the H.M.S. Victory.
Tall ships have 3 or more massive masts that are frequently constructed using big tree trunks. Tall ships with 5 or more masts are quite common too.
Tall ships typically are as long as 100 feet or more, since the size and sophistication of these square-rigged vessels render them only useful at scale.
Tall ships have main masts, foremasts, mizzen masts, and gaff-rigged jigger masts at the back of their mizzen masts.

Mast Materials For Sailboats
The masts of sailboats (see also ‘ Two-Mast Sailboat Types ‘) are typically constructed of aluminum or other specific types of wood. Until the 1950s, almost all sailboat masts were constructed of wood.
That began changing around the time that fiberglass vessels rose to fame, with aluminum being now the most used mast material.
Aluminum Masts For Sailboats
Aluminum has become the most popular modern mast material. Aluminum masts are lighter in weight, hollow, and simple to produce. Such reasonably priced masts efficiently withstand seawater. These masts are also heavy for their size.
If there is one drawback to this type of mast that would be galvanic corrosion, which happens extremely quickly once seawater is in contact with aluminum and another metal, like steel and copper.
So, in types like the Bermuda-rigged sloop which are frequently made with aluminum, that is an issue.
Wooden Masts For Sailboats
The typical material for sailboat masts is wood, which is still employed for many specially designed boats nowadays.
Wood masts are big and bulky, yet very sturdy, and proper maintenance can guarantee their lengthy (over 100 years!) lifespan. They are also prevalent on gaff-rigged vessels because wood is best suited for short masts.
The Fir family provides the most popular mast wood. Although Douglas Fir is widely used, regional models (such as British, Columbian, and Yellow Fir) are also ideal.
Several sailboats, especially the tall ships, have masts made of pine and sometimes redwood. Other cedar species like the Port Orford or the Oregon cedar, can also be used for masts and spars.
Carbon Fiber Masts For Sailboats
Carbon fiber masts are a relatively new addition to the boatbuilding industry, and they have a few perks over the wood and aluminum ones.
First of all, carbon fiber is both strong and light, making it perfect for sailboats designed for races and which typically have tall masts. The best top-quality carbon fiber masts in the business are used by ships competing in America’s Cup races.
Maintenance Of Masts
It is critical to maintaining the sailboat masts and all of their associated hardware. Masts’ stays, lines, and halyards must be regularly checked, modified, and replaced on a regular basis. Masts made of wood must be lacquered and inspected for rot.
Masts made of aluminum do not typically require regular checks and maintenance, but any indications of a corrosive environment should be acted upon right away.
Build a clear maintenance schedule with your regional boat repairman or boating specialist. Keep in mind that preventative maintenance is always less expensive and simpler than repair work.
Choosing The Right Mast
For those who own a production boat, the options will be determined by the model and manufacturer.
The important factors to keep in mind for one-off boats without a designer sail plan are:
- the masts step’s features
- the length and displacement of the boat
- the addition of backstays and running backstays
- the quantity and placement of chainplates
If the mast is on a step on deck rather than on the structural beam, an image of the step may be useful to the mast maker.
For those who frequently take part in races, a carbon mast will save them from the extra weight and enhance their performance.
The Bottom Line
We hope that this article was helpful in learning more about a sailboat mast, the different types of mast you can see on vessels, as well as the materials they are made of, and their maintenance requirements.
Masts play a vital role in holding the boats in place, allowing people to keep on sailing to their dream destination, and they are also an eye-catching element of sailboats thanks to their vertical form and their length that often surpasses that of the sailboat itself.
Depending on the use of the boat, you will get a different type of mast, and the material it will be made of, its size, height, and weight, will guarantee the best sailing experience!
Related Posts:

Sailboat Rigging Specifications: Everything You Need to Know
by Emma Sullivan | Aug 1, 2023 | Sailboat Maintenance

Short answer: Sailboat rigging specifications
Sailboat rigging specifications refer to the measurements and details of the various components that make up a sailboat’s rig. This includes the type and size of the standing rigging (such as shrouds and stays), running rigging (such as halyards and sheets), mast height, boom length, and sail dimensions. These specifications are essential for proper performance, safety, and handling of a sailboat.
1) Understanding Sailboat Rigging Specifications: A Comprehensive Guide
Understanding Sailboat Rigging Specifications: A Comprehensive Guide
Sailing enthusiasts often find themselves entranced by the beauty and grace of a sailboat slicing through the water, powered solely by the wind . But behind every successful sailboat is a well-designed rigging system that plays a crucial role in its performance and safety. In this comprehensive guide, we will delve into the world of sailboat rigging specifications, unraveling the intricacies and shedding light on the key aspects every sailor should understand.
To embark on this journey of unraveling sailboat rigging specifications, one must first comprehend their fundamental purpose. Rigging refers to the various components that support and control the sails, enhancing their efficiency in harnessing wind power. It comprises intricate networks of wires, ropes, blocks, pulleys, and fittings meticulously designed to distribute loads evenly across the hull while enabling precise control over sail adjustments.
The importance of understanding these specifications cannot be overstated. Rigging functions as an interconnected system where even slight adjustments can have a profound impact on sailing performance . Familiarity with rigging specifications empowers sailors to optimize their boat’s performance while ensuring safe navigation under diverse weather conditions.
Let’s dive deeper into some essential elements that make up a sailboat ‘s rigging specification:
1) Standing Rigging: The standing rigging forms the backbone of any sailboat ‘s rigging system. It consists predominantly of stainless steel wire cables known as ‘stays’ or ‘shrouds,’ which hold up the mast and distribute its loads across multiple points on the hull. Understanding how factors like wire diameter (gauge), construction (1×19 or 7×7), material grade (316 or 304 stainless steel), and tension affect overall stability plays a vital role in maintaining a balanced vessel capable of handling varying wind conditions.
2) Running Rigging: Unlike standing rigging that remains static during normal sailing operations, running rigging controls various sail adjustments in response to wind conditions. It includes halyards, sheets, and control lines that enable raising and lowering sails, trimming them for maximum efficiency, and altering boom positions. Knowing the properties of different ropes (known as lines) like rope material (nylon, polyester, or Dyneema), diameter, and construction allows sailors to optimize their boat’s performance while ensuring ease of handling.
3) Sail Controls: Sail controls encompass a variety of mechanisms essential for regulating the shape and tension of the sails. Devices such as sail tracks, winches, blocks, travelers, and cleats collaborate harmoniously with rigging components to achieve precise control over sail shape, twist, camber, draft position – all crucial factors influencing both speed and safety. Familiarity with these specifications enables sailors to adeptly adjust their sails’ performance based on wind strength and direction.
4) Safety Considerations: Rigging specifications hold a critical role in ensuring safety during sailing ventures. Inspecting the rigging thoroughly before setting sail is imperative. Checking for corrosion or wear on wire cables, fraying on ropes or lines can help prevent disastrous failures mid-journey. Additionally, understanding load limits associated with each component guarantees sailors neither underload nor overload any part of their rigging system.
By now it should be evident that understanding sailboat rigging specifications is indispensable for every sailor aiming to unlock their vessel’s true potential while prioritizing safety. With constant advancements in materials technology providing an array of options for upgrading rigging systems tailored to specific sailing needs – from club racing to bluewater cruising – keeping abreast of new developments becomes even more crucial.
Maintaining a well-maintained rigging system is not merely about technicalities; it represents an art form that requires skillful orchestration by blending engineering prowess with a deep appreciation for the timeless elegance embodied by these majestic vessels. So next time you set out on your sailboat, take a moment to marvel at the intricate rigging system that steers you toward adventure and understanding .
2) How to Determine the Right Sailboat Rigging Specifications for Your Vessel
In the exciting world of sailing, the rigging of your sailboat plays a crucial role in ensuring a successful, safe, and enjoyable voyage. Just like a well-tailored suit, finding the right specifications for your vessel’s rigging is essential to maximize performance on the water. Whether you’re an experienced sailor or a novice embarking on your first adventure, understanding how to determine the ideal sailboat rigging specifications can make all the difference.
But fear not! We’ve got you covered with some expert tips to help you navigate through this process. Let’s dive in and unravel the mysteries behind finding the perfect rigging setup for your vessel.
1) Understand Your Boat
Before delving into determining proper sailboat rigging specifications, it’s important to comprehend your boat inside out. Consider its design, size, weight distribution, and intended use. No two boats are exactly alike, and thus each requires specific considerations when it comes to rigging .
For example, if you own a racing yacht designed for speed and agility, your rigging will likely be tuned for optimal aerodynamics while maintaining stability. On the other hand, if you have a leisurely cruising boat built for comfort and relaxation, your rigging may focus more on ease of handling without compromising safety.
2) Seek Professional Advice
While it’s tempting to rely solely on your own instincts and knowledge when determining sailboat rigging specifications, consulting a professional is highly recommended. An experienced rigger or naval architect can provide valuable insights based on their expertise and extensive background in handling various vessels.
These professionals can assess factors such as mast height/length ratio (aspect ratio), headstay tension requirements, shroud angles/tensions (depending on single or multiple spreaders), boom height relative to deck level – just to name a few critical parameters that contribute to successful sailboat performance.
3) Analyze Sail Plan
Your boat’s unique characteristics should be accounted for when analyzing the sail plan. Consider the number and types of sails you have or plan to use—main, jib, genoa, or spinnaker—and their respective sizes and geometries. The size and positioning of your sail ‘s luff length, foot length, and clew height will influence rigging decisions.
By understanding the relationship between your vessel’s sail plan and rigging, you can optimize control and response while sailing in various wind conditions. For instance, a high-performance racing yacht may require a more powerful rig with adjustable backstays or hydraulic tensioners to handle large headsails effectively.
4) Safety First
While we all love chasing speed on the water, it’s crucial not to neglect safety considerations when determining rigging specifications. Overloading the rigging beyond its limits can lead to disastrous consequences. Carefully analyze the breaking load ratings of wires/ropes and fittings used in your sailboat’s rig system.
Additionally, regular inspections and maintenance are paramount to detect any potential weaknesses before they become serious issues during your sailing adventures . Never compromise safety for performance gains; instead, strike a balance between both aspects for an enjoyable and secure experience on board.
5) Experiment & Fine-Tune
When it comes to sailboat rigging specifications, finding the perfect setup might require some trial-and-error experimentation combined with meticulous fine-tuning. Keep track of changes made and their effect on different sailing conditions.
Don’t be afraid to reach out to other sailors within your community who might have similar vessels or experiences as they can offer valuable suggestions based on their firsthand encounters. Joining online forums or attending boat shows/seminars can also provide opportunities for networking with like-minded enthusiasts eager to share insights into optimizing sailboat rigging setups.
In conclusion, determining the right sailboat rigging specifications is an art that combines science, experience, and personal preferences. By thoroughly understanding your boat ‘s characteristics, seeking professional advice, analyzing your sail plan, prioritizing safety, and embracing experimentation, you can find the perfect balance that suits your vessel’s needs. So, hoist the sails high and set off on unforgettable sailing adventures with confidence and finesse!
3) Step-by-Step Process: Setting Sailboat Rigging Specifications like a Pro
Title: Mastering the Art of Setting Sailboat Rigging Specifications: A Professional’s Step-by-Step Process
Introduction: Setting sail on a mesmerizing adventure calls for meticulous attention to detail when it comes to sailboat rigging. Even the slightest miscalculation or oversight can have a significant impact on safety, performance, and overall sailing experience. In this article, we unveil a comprehensive step-by-step process that will empower you to set sailboat rigging specifications like a true professional – ensuring smooth navigation and maximizing your boat’s potential. So, fasten your seatbelts (or should we say lifelines), as we embark on this exciting journey!
1) Understanding the Basics: Before diving into the specifics, let’s brush up our understanding of sailboat rigging. Sailboat rigging refers to the collection of intricate systems that support and control the sails aboard a boat . It includes elements such as mast, shrouds, stays, halyards, sheets, and various fittings responsible for tensioning and maneuvering sails .
2) Inspection is Key: To begin our step-by-step process, inspect your entire sailboat meticulously. Look out for signs of wear and tear in the hardware components including shackles, turnbuckles, blocks, cleats – anything that plays a crucial role in securing your rigging. Ensure all fixings are tight and secure; any loose connections can be disastrous while hoisting sails in rough waters .
3) Evaluate the Lines: Next up is evaluating your lines – halyards and sheets. Check for degradation caused by exposure to UV radiation or harsh weather conditions . Replace worn-out lines promptly as frail ropes pose great risks during maneuvers when under high loads.
4) Determine Your Sailing Style: Now it’s time to assess your unique sailing style! Are you an adrenaline-seeking racer or more inclined towards leisurely cruising? This assessment helps understand the necessary adjustments required in rigging setup. Racers typically prefer minimal weight and maximum control, while cruisers prioritize ease of handling and comfort. Knowing your preference will allow you to fine-tune your rigging specifications accordingly.
5) Measurements That Matter: Precise measurements play a vital role in achieving the desired rigging tension and performance. Carefully measure the heights of your mast, boom, and other essential spars to ensure proper alignment during installation . Always refer to manufacturer guidelines for recommended measurements as they vary across different sailboats.
6) Understanding Tension: To create optimal sail shape and performance, understanding tension is crucial. Referred to as tuning the rig, setting proper tension in shrouds and stays allows for controlled sail draft and minimizes distortion under varying wind conditions. Consult professional tuning guides or seek assistance from sailing experts if needed; mastering this skill could significantly impact your boat’s overall stability and speed.
7) Partnering with Professionals: Suppose you find yourself overwhelmed by the complex world of sailboat rigging specifications. In that case, partnering with professionals can be an excellent way to gain valuable insights and guidance specific to your boat’s make and model. Rigging specialists possess extensive knowledge regarding different components, methodologies, and cutting-edge advancements in the industry – guiding you towards optimal rigging configurations tailored to suit your needs.
8) Going Beyond Theory: Putting theoretical knowledge into practice through experimentation is essential when it comes to refining sailboat rigging specifications like a pro. Head out on shorter cruises initially where you can gradually fine-tune adjustments based on real-world sailing experiences . This hands-on approach ensures you become intimately familiar with your boat ‘s behavior under various wind conditions – turning you into a confident skipper who knows their vessel inside out.
Conclusion: Rigging a sailboat may seem daunting but breaking it down into manageable steps demystifies this intricate process. By understanding the basics, inspecting meticulously, evaluating lines, accounting for sailing style, measuring accurately, tensioning skillfully, seeking professional guidance when needed, and continuously experimenting, you’ll be well on your way to becoming a pro at setting sailboat rigging specifications. So go ahead – seize the wind and waves with confidence as you embark on unforgettable journeys aboard your perfectly rigged vessel !
4) FAQs about Sailboat Rigging Specifications Answered
When it comes to sailboat rigging, there are lots of questions that may arise. Understanding the specifications and requirements can be a bit confusing for beginners and even experienced sailors. Fear not! We have compiled some frequently asked questions about sailboat rigging specifications to provide you with comprehensive answers.
1. What are sailboat rigging specifications? Sailboat rigging specifications refer to the guidelines and requirements set for the rigging components on a boat. It includes details such as the type and size of wire used, fittings, tensions, and other important measurements needed to ensure the stability and safety of your sailboat’s mast and sails.
2. Which factors determine the sailboat’s rigging specifications? Several factors come into play when determining sailboat rigging specifications: boat size, displacement, type of sailing (cruising or racing), mast height, length overall, beam width, keel design, mast construction material (aluminum or carbon fiber), among other considerations. Different boats will have different specific requirements based on these factors.
3. Why is it important to adhere to proper sailboat rigging specifications? Adhering to proper sailboat rigging specifications is crucial for maintaining safety while at sea. Rigging components are responsible for supporting the mast and sails in changing weather conditions and intense pressures caused by wind. Without adhering to appropriate specifications, the integrity of your rig could compromise stability or even lead to catastrophic failures like broken masts or torn sails .
4. How often should I inspect my sailboat’s rigging ? Regular inspections of your sailboat’s rigging are essential for identifying any signs of wear or damage which could lead to failure. The frequency of inspections depends on various factors such as how often you use your boat, sailing conditions (rough or calm waters), saltwater exposure (corrosion risks), and age of components. Most experts recommend at least an annual rig inspection, but it’s always a good idea to consult your boat manufacturer or a professional rigger for specific guidance.
5. Can I upgrade my sailboat’s rigging specifications? Yes, upgrading a sailboat’s rigging is possible and sometimes even necessary. Upgrading can improve performance, reduce weight aloft, increase durability, and enhance safety. However, determining the appropriate upgrades requires careful evaluation of your boat ‘s characteristics and intended use. Consulting with experienced sailors or professional riggers will help you make informed decisions about potential upgrades.
6. What are some common signs of worn-out or damaged rigging components? There are several signs that indicate worn-out or damaged rigging components: loose wires or strands, broken strands, rust or corrosion on fittings and wire surfaces, elongation/stretching of wire cables beyond their original length, fraying or chafing of cables near attachment points. Recognizing these symptoms early allows for prompt replacement before they compromise the structural integrity of your sailboat.
In conclusion, understanding sailboat rigging specifications is crucial for the safety and longevity of your vessel. Adhering to proper specifications not only ensures stability but also minimizes the risk of failures while sailing. Regular inspections and timely replacements are key to maintaining reliable rigging. Remember to seek advice from professionals when making changes or upgrades to ensure you choose the right specifications for your boat . Keep sailing safe and enjoy the adventure!
5) The Importance of Sailboat Rigging Specifications: Ensuring Safety and Performance
When it comes to sailboats, safety and performance are paramount. One crucial aspect that often gets overlooked is the rigging specifications. Rigging refers to the system of ropes, wires, and hardware that support and control the sails, ensuring smooth navigation on the water . While it may seem like a mundane technicality, proper sailboat rigging specifications play a pivotal role in both the safety of the crew and the boat’s overall performance.
First and foremost, sailboat rigging specifications are essential for ensuring the safety of everyone onboard. A well-maintained and correctly installed rigging system reduces the risk of accidents, such as mast failure or rig collapse. Sailboats can encounter powerful winds and turbulent waters that put immense strain on their rigging. With precise specifications, sailors can have peace of mind knowing that their boat’s rigging is up to par and capable of withstanding challenging conditions.
Additionally, sailboat rigging specifications are crucial for optimizing performance on the water. An improperly rigged boat can experience inefficiencies in sail trim, resulting in decreased speed and maneuverability. Precision is key when it comes to adjusting tensions in various parts of a sailing vessel’s rigging system – from shrouds and stays to halyards and sheets – as these adjustments directly impact how efficiently a boat harnesses wind power for propulsion.
Not only do accurate sailboat rigging specifications enhance a boat’s speed potential but they also contribute to improved handling characteristics. When every element of the rigging is properly tensioned according to manufacturer recommendations or customized preferences, sailors have better control over their vessel’s stability both while cruising or racing competitively.
Furthermore, maintaining appropriate sailboat rigging specifications aids in prolonging the lifespan of an entire sailing craft. Regular inspections will help identify any signs of wear or damage on hardware components such as clevis pins, turnbuckles, or swage fittings; thus allowing timely replacements before they lead to catastrophic failures. Moreover, old or worn-out rigging can gradually cause stress points to develop on the mast, deck, and hull – compromising structural integrity over time. With meticulous attention to detail and adherence to specifications, sailboat owners can prevent costly repairs or potentially life-threatening situations .
Aside from safety and performance benefits, adhering to sailboat rigging specifications also demonstrates a high level of professionalism. Whether you are an experienced sailor or a novice boat owner, consulting and complying with manufacturer guidelines or hiring expert riggers showcases a deep understanding and respect for the intricate mechanics of sailing vessels. It exemplifies a commitment towards mastering the art of sailing and upholding industry standards.
In conclusion, sailboat rigging specifications might appear insignificant at first glance; however, their importance cannot be underestimated when it comes to safety, performance optimization, vessel longevity, and professional responsibility. By ensuring that every aspect of a sailboat’s rigging complies with established guidelines or customized preferences within safe parameters provided by manufacturers and experts alike — sailors can enjoy not only smooth-sailing experiences but also preserve the overall value of their prized watercraft. So before setting off on your next nautical adventure, take the time to pay attention to your sailboat’s rigging specifications – it could make all the difference in creating a memorable voyage while safeguarding everyone onboard.
6) Top Factors to Consider when Choosing Sailboat Rigging Specifications
When it comes to sailboat rigging specifications, there are several factors that every sailor should consider before making a decision. The rigging plays a crucial role in the performance and safety of your sailboat, so choosing the right specifications is paramount. In this article, we will outline the top factors to consider when selecting sailboat riggin…
1) Type of Sailboat : The first factor to consider is the type of sailboat you own or plan to purchase. Different types of sailboats have different rigging requirements. For example, a racing yacht would require a more sophisticated and adjustable rigging system compared to a small pleasure cruiser. Understanding your sailboat’s design and intended use will help you narrow down your options.
2) Material: The material used for the rigging greatly impacts its durability and performance. Stainless steel is widely regarded as the best choice due to its resistance to corrosion and high tensile strength. However, there are different grades of stainless steel, such as 316 marine-grade or 304 structural-grade, each offering varying levels of durability and cost-effectiveness.
3) Size and Diameter: Choosing the appropriate size and diameter for your sailboat’s rigging is crucial. It is important to find a balance between strength and weight. Thicker rigging provides more strength but adds unnecessary weight that may impact sailing performance . On the other hand, skimping on thickness compromises safety during heavy winds or rough seas.
4) Rig Configuration: Consider how you want your sailboat rigged – whether it’s a single mast with one main sail or multiple masts with various sails. The type of rig configuration affects not only your boat ‘s maneuverability but also its overall complexity and maintenance requirements.
5) Cost: While it’s tempting to opt for cheaper options, remember that quality always comes at a price. Investing in high-quality rigging may save you money in the long run by minimizing maintenance costs or potential failures. However, this doesn’t mean you have to break the bank – finding a balance between quality and cost-effectiveness is key.
6) Expert Advice: Finally, consulting with industry professionals or experienced sailors can provide valuable insights before finalizing your rigging specifications. They can offer advice based on their expertise and personal experiences, helping you navigate the vast array of choices in the market.
In conclusion, sailboat rigging specifications should not be taken lightly. Considering factors such as sailboat type , material, size and diameter, rig configuration, cost, and seeking expert advice will ensure that your sailboat’s rigging meets your specific needs. By carefully assessing these factors, you can set sail with confidence knowing that your rigging is both reliable and efficient.
Recent Posts

- Sailboat Gear and Equipment
- Sailboat Lifestyle
- Sailboat Maintenance
- Sailboat Racing
- Sailboat Tips and Tricks
- Sailboat Types
- Sailing Adventures
- Sailing Destinations
- Sailing Safety
- Sailing Techniques
By Product Categories
Small Boat Blocks
Big Boat Blocks
Complementary Hardware
Travelers & Genoa Leads
Mainsail Handling
Headsail Handling
Mooring Solutions
Spare Parts
Accessories
Harken Canvas
Fly Soft-Attach Blocks
Carbo Air Blocks
Small Boat Classic
Flip-Flop Small Boat
GP Catamaran Ceramic Mainsheet Systems
Protexit™ Exit Blocks
Through-Deck
Wire High-Strength
Dinghy Vang
Small Boat Deck Organizers
Midrange Classic
Midrange Deck Organizers
Zircon Blocks
Element Blocks
Black Magic Air Blocks
Cruising ESP Blocks
Megayacht Blocks
Stainless Steel Blocks
Black Magic Air Runners
FlatWinder Powered Blocks
Mastbase Blocks
Over-the-Top
Crossover Blocks
Big Boat Deck Organizers
Cam Cleats & Kits
Cam Cleat Accessories
Cam Cleat Bases
Stand-Up Bases
Deck Organizers
Spinnaker Pole Cars
Soft Attachments
Fixed Padeyes
Removable Padeyes
Bolt-Down Fairleads
Grand Prix Jib Leads
Halyard Tensioners
Tiller Extensions
Peter's Desk Drawer
Dinghy Jib Leads
Crossbow Pivoting Self-Tacking Jib Traveler
13 mm Micro
22 mm Small Boat
27 mm Midrange
32 mm Big Boat
Windward Sheeting
42 mm Mini-Maxi
T-Track Genoa Lead
Access Rail System
13 mm AA Battcar System
22 mm A Battcar System
27 mm B Battcar System
32 mm C Battcar System
18 mm Switch Battcar System
26 mm Switch Battcar System
26 mm Trysail Switch
32 mm Switch Battcar System
32 mm Trysail Switch
40 mm Switch Battcar System
40 mm Trysail Switch System
Furling Mainsail Outhaul Systems
Single Line Reefing
Harken Vang-Master
Carbo Racing Foil
Small Boat Furling
Small Boat Underdeck
Reflex Furling
MKIV Jib Reefing & Furling
MKIV Underdeck Jib Reefing & Furling
Furling Accessories
Powered Furling
MKIV Ocean Furling
SnubbAir (Not a Winch)
Grand Prix Winches
Air Winches
Circuit Breakers
Analog Switches
Digital System Switch
Aluminum, Chrome & Bronze Winch Handles
Carbo OneTouch Locking Winch Handle
Service Kits
CLR Mooring Winches
Electric Captive Reel Winches
Hydraulic Captive Reel Winches
UniPower Radial
Single-Acting Integral Backstay Adjuster
Single-Acting Cylinders
Locking Cylinders
Double-Pull Cylinders
Grand Prix Cylinders
Hydraulic Cylinder Rod End Blocks
Hydraulic Cylinder End Fittings
Control Valves
Control Manifolds
Control Panels
Compact Control Panel
Rotary Pumps
Hydraulic Pump Handles
Power Systems
Repair Kits
Ball Bearings
Block Spare Parts
Traveler Cars
Furling Spare Parts
Winch Spare Parts
Winch Service Kits
Blockheads Gear
Promo & Gifts
Marine Grip
Jeep/Truck tops
Garage storage
One-design Covers
Boat accessories
Canvas bags
By Type of Sailing
Dinghy / One-Design
Offshore Racing
Coastal / Day Cruising
Bluewater Cruising
Megayachts / Custom
Service Guide
Tech/Service
deck layouts
Data Sheets (SDS)
How to choose
System diagrams
Calculators
Reeving diagrams
Traveler Purchase Selection Guide
How to Choose
Testimonials
Hoister Videos
Request a Quote
Request Samples
Fabric details
Cover Styles
Canvas Videos
Contract Services
Materials and Components
Our Equipment
Contract Cut-and-Sew Project Spotlight
- Harken at the front
- Safety & Rescue
Support / Tech/Service Articles
Rig Dimensions
The following abbreviations are often used to describe various measurements on a sailboat. Precise technical definitions exist for each abbreviation, but the following is a list of simple descriptions.
If you would like to link to or reprint this article please contact [email protected] .

Product Categories
- United States
- New Zealand
- United Kingdom
My Cruiser Life Magazine
Working with Sail Dimensions
Why measure sails? Sailmaking is a complex discipline that blends elements of science and art. Perhaps you want to get a new set of sails made for your older boat, or perhaps you have a new to your boat with no sails to work from. However you attack the problem, you’ll have to start out with some measurements.
Table of Contents
Sail measurements and definitions, main sail dimensions, headsail dimensions — jib, genoa, or staysail, sails and sailing measurements made easy, sail dimensions faqs.

One thing to understand before diving in—sails are three-dimensional objects. You can lay them out flat on the ground, but a perfectly flat sail does not harness the wind. Instead, sails must have a curve built into them, and that makes measuring them much more complex.
The three sides of a triangular sail each have a particular name.
- Leech — The rear edge of a sail that is not attached to anything
- Luff — The forward edge of a sail, attached to the mast on a mainsail or to the stay on a headsail
- Foot — The lower edge of a sail, it runs along the boom on a mainsail
Likewise, each corner of a triangular sail has a name.
- Head — The top of a sail, where the halyard gets attached
- Tack — The forward corner, on a mainsail it gets attached to the gooseneck
- Clew — The aft corner, where the outhaul attaches on a main or the sheets attach to a jib
Sailboat Sail Dimensions
With those basic terms out of the way, it’s time to look at a few things that sailmakers consider when designing a set of sails. The most significant limits placed on the sailmaker come from the boat itself.
Many makes and models of boats have their sail specifications online. It’s essential to break out the tape measure and measure your boat–if only to confirm that the numbers you found are genuine. Remember, at this point, many of our sailboats have had long and storied lives well before we owned them. Your boat may have been custom rigged, and you don’t even know it.
Rig measurements also can change from year to year on one make and model as the manufacturer’s supplier changes. So you can’t be sure which numbers you find on the internet are correct and which apply to a different boat.
The limiting dimensions for mainsails are the height of the hoist along the mast and the length of the boom.
- P — distance along the aft face of the mast from the top of the boom (gooseneck) to the point of highest hoist at the maximum main halyard position
- E — distance along the boom from the mast to the maximum outhaul position
Mizzen Mainsail Hoist Elevation and Boom Length
Mizzen mast sails on ketches or yawls will have similar shapes and measurements as a mainsail. Therefore, their P and E measurements are usually denoted Py and Ey to show it is the mizzen sail.

Main and Mizzen Sail Area Calculation
When given P and E, the unknown factor is the length of the sail’s leech. The leech can be longer and curve out, giving the sail more shape and lift by adding roach.
If the sail were perfectly flat, calculating its area would be straightforward. The area of a right triangle is equal to one-half of its two legs multiplied together.
Since the main or mizzen is not a flat object, though, we do not divide it by two (or halve it). Instead, we use a multiplier to estimate its area. For a regular mainsail, divide by 1.8. If the sail has a larger roach, divide by 1.6.
Mainsail Area = (P * E) /1.8
Mainsail Area (heavily roached sails) = (P * E) /1.6
The key measurements for a headsail are the distance up the mast that you can hoist the sail and the distance from the base of the headstay to the mast.
- I — The height along the front face of the mast from a point level with the headstay pin to the point of maximum hoist
- J — Foretriangle horizontal distance measured from he distance along the main deck, from the tack attachment to the mast
Headsail Area Sail Measurements
Assuming that the headsail is roughly a right triangle, the area equals those two sides multiplied together and divided by two.
Working Jib Area = (I * J) /2
However, it’s important to note that many genoas are designed to overlap the mast. Therefore, using the J measurement does not account for the extra sail area that projects aft of the mast.
135% Genoa Area = (1.44 * I * J) /2
155% Genoa Area = (1.65 * I * J) /2

Luff Perpendicular
In the case of a high-cut jib or genoa that does not form a right triangle, the luff perpendicular measurement is used.
- L — (Luff) The distance of hoist from the attachment of the sail’s tack to the point of the maximum hoist, as measured on the forestay (i.e. the length of the sail’s luff)
- LP — (Luff Perpendicular) The shortest distance from the sail’s clew to the luff
The same area measurement formula applies.
High-cut Jib Area = (L * LP) /2
While it’s fun to work out all the specifications that set one boat apart from another, it’s of little use to the cruising sailor. Measuring sails is a simple task as long as you know what to look for and the limits that your boat places on your sails. Keep in mind that as long as a sail fits, it will probably work. Most sail lofts and second-hand sail dealers work on the “try and see” plan. So hoist the sail and give it a shot—you might be surprised.
How do you measure a sail?
Sails are measured based on the limitations presented on the boat. For example, a mainsail cannot be hoisted taller than the mast. So a critical measurement for a mainsail is the luff length, denoted by the measurement “P” in sail dimensions. Similarly, you cannot mount a mainsail on a boom that is too short. So the foot of a mainsail is denoted as “E.”
What is sail size?
Sails are sized based on the fixed dimensions from the boat they are made for. In other words, nearly every sail is custom-tailored to the rig on the boat. You can take specific measurements from the rig that will dictate the size of the final sails. Within those boundaries, sailmakers can tinker with a few other ways to add sail area, like adding roach to mainsails or creating overlapping headsails.
How are sail luffs measured?
The luff of a sail determines its draft, or how much curve the sail has. As such, there is no straight-line measurement for the luff of a sail. Instead, sailmakers used the fixed measurements from the leech and foot of the sail to determine its overall size. The luff, in the end, may be curved outward to add roach and more draft.
Too much luff is not a good thing, however. If the luff is too long on a mainsail, the boom may sit too low to clear the bimini, hardtop, or boom gallows.
What is the formula of sail?
The area of a sail is calculated by multiplying the luff or vertical by the foot and dividing by 1.8 for mainsails or 2 for headsails. Mainsail or Mizzensail Area = (P * E) /1.8 Jib, Genoa, or Staysail Area = (I * J) /2

Matt has been boating around Florida for over 25 years in everything from small powerboats to large cruising catamarans. He currently lives aboard a 38-foot Cabo Rico sailboat with his wife Lucy and adventure dog Chelsea. Together, they cruise between winters in The Bahamas and summers in the Chesapeake Bay.

- Measurements
On this page
Rig measurements are following the WS Equipment Rules of Sailing (ERS) with only a couple of modifications specific for offshore boats:
- Mast datum point is at the top point of the section at the foreside of the mast
- Rigging point is attachment of the forestay to the mast, or the intersection of the extended forestay with the mast structure.
Mast datum point and Foretriangle base

BAS and J with SFJ measurements are defining vertical and longitudinal position of the mast and sail plan relative to the hull. BAS is the height from the mast datum point to the boom or lower black band on the mast. It is used also as a reference point for the halyards hoist measurements on the mast. J is probably the best-known measurement on boat, since it is used to define the size of headsails. It is defined as the horizontal distance between the front side of the mast and the intersection of the forestay with the deck. SFJ then determines the distance of the forward point of J to the actual foremost point on the hull.

P is distance between the black bands and the mast that are limiting the position of the mainsail luff - while racing the mainsail luff must be between these bands. In the absence of the upper black band, P is measured to the upper part of the main halyard sheave. IG is defined as the height of the foretriangle and is the vertical distance from the mast datum point (at the sheerline at the mast) to the forestay attachment to the mast. Similar to IG , ISP is the spinnaker halyard height and is the maximum height that the head of the spinnaker or headsail set flying can be hoisted.

Mast profiles are measured for maximum dimensions above 0.5 * P transversely (MDT1) and longitudinally (MDL1) as well as for the minimum dimensions transversely (MDT2) and longitudinally (MDTL2) . Taper length TL is the vertical distance from the upper black band to the point where maximum mast profile dimensions occurs. Thus, TL is 0 if mast is not tapered.
If there is a structure element of forestay attachment to the mast, then its distance from the aft side of the mast is measured as GO . Mast width MW at that height provides elements for the calculation of the actual intersection of the forestay with the front side of the mast.

Mast weight (MWT) and mast centre of gravity (MCG) are important factor determining a boat's stability. It can be measured by weighing the mast at a single point and finding the actual centre of gravity, or by two separate weight measurements at the same points from which total weight and centre of gravity position are calculated.

The mast is weighed with: forestay, backstay, spreaders, jumpers, shrouds, chain plates, runners, lights, antennae, wiring and other permanently fitted components all slack stretched down and secured with light material at the bottom of the mast. Excluded are: checkstays, halyards, boom vang and reefing lines.
If the mast is not weighed, then lightweight defaults for aluminium or carbon mast are used. Actual mast weight measurements will therefore always give a more favorable rating.
E is the measured distance from the aft side of the mast to the black band on the boom that limits the position to which mainsail foot may be extended. In the absence of the black band, it shall be measured to the point on the boom as aft as the mainsail clew can reach.
Boom diameter BD is measured as a vertical cross section.

Spinnaker pole and bowsprit
Spinnaker pole length ( SPL ) the horizontal distance from the forward face of the mast spar, ignoring any fittings and tracks, measured on or near the centerline of the boat, to the extremity of the spinnaker pole. . The tack point of spinnaker ( TPS ) when it is tacked on the boat's centerline is the distance from the foreside of the mast to the foremost point on which the asymmetric spinnaker or any headsail set flying can be tacked. If the bowsprit is retractable TPS shall be measured with it in its fully-extended position.

Other rig details
In addition to the measurements set above, the following rig details are also recorded:
- Inner stay , which may be adjustable or fixed
- Foresetay tension , which may be controlled by Forestay, Backstay, Both or be Fixed.
- Number of spreaders
- Number of runners
- Carbon mast and fiber rigging
- Mainsail furler
- Headsail furler
- Use of non-manual power for adjusting running rigging or spars
Offshore Racing Congress Partners
Log in to ORC Sailor services using email and password
ORC Sailor Services allows you access to ORC Database of all ORC certificates issued worldwide such as accessing speed guides, target speeds and do test runs on any certificate.
ORC Sailor Services - Password reminder
Please enter the e-mail address registered for the ORC Sailor Services to receive your password
ORC Sailor Services
With an ORC Certificate you are getting more than just a rating. ORC Sailor Services allows you access to the ORC Database of all ORC certificates issued worldwide.
Free Shipping Over $99* - 366 Day Returns - Dedicated Customer Support
- Call Us +1-503-285-5536
- Sign in & Register
- Recently Viewed
Guide to Laser Sail and Rig Sizes

Over 200,000 Laser sailboats have been built over the last 40 years, more than most other small dinghy sailboats. In this article we are going to answer one of the most common questions we get: What size rig do I have? This will help answer what size sail and/or rig you already have and what size sail and/or rig you need to purchase to update your Laser.
What size rig / sail do I have? Standard vs. Radial vs 4.7 Explained
The Laser sailboat has had a number of different rig sizes, with the intention of making the boat sailable by a wide range of sailors (and different sailor weights) by simply swapping out the lower mast section and sail while keeping all other components the same. There are currently three different rig sizes and they are commonly referred to as 'Standard', 'Radial' and '4.7'. Below you will find an image that shows the three rigs side by side, and in the following section we'll explain each one.

Laser Standard / MK2 / ILCA 7
This is the most common Laser rig size, and the original rig on the boat when it was designed. It features a 7.06 square meter sail (about 76 square feet). In 2018, the Laser Class approved a new 'Standard' sail, which is referred to as the 'MKII' or 'Mark 2' to distinguish it from the first version. The difference, among other things, is in the panels. The original 'Standard' sail featured horizontal cut panels. The new MkII sail has radial cut panels. There is no difference in size between these two versions, and as of 2020 all new Laser Standard sails are available in this updated cut.

How to tell if you have a 'Standard' sail: The first and most obvious way to tell if you have a 'Standard' sail is to look at the panels. If they are horizontal, it is most likely a standard sail. Next, you can measure the luff (the front edge of the sail along the mast sleeve). This measurement should be about 5130 mm or 200 inches from the top of the sail to the bottom.
How to tell if you have a 'Standard' lower mast section: The 'Standard' lower mast section should measure about 2865 mm or 113 inches . It is a fairly stout mast section compared to the two smaller mast sections.
Laser Radial / ILCA 6
Originally called the 'M' rig when first designed, the Laser 'Radial' sail is smaller than the 'Standard' sail at 5.76 square meters (62 square feet). At the time, it was the only Laser sail to feature the radial cut panels, which allowed the sail to be de-powered more easily in bigh winds. Per the notes about the 'Standard' rig above, both the Standard and Radial sail feature the radial cut design. Another typical indicator of a Radial size sail are the blue panels at the tack and clew of the sail.

How to tell if you have a 'Radial' sail: The first and most obvious way to tell if you have a 'Standard' sail is to look at the panels. If they are radial, as in emanating out from the center, it is most likely a radial sail. Next, you can measure the luff (the front edge of the sail along the mast sleeve). This measurement should be about 4560 mm or 180 inches from the top of the sail to the bottom.
How to tell if you have a 'Radial' lower mast section: The 'Radial' lower mast section should measure about 2262 mm or 89 inches . It is also a bit smaller in diameter than the standard section.
Laser 4.7 / ILCA 5
The Laser 4.7 (or ILCA 5) is the smallest of the three Laser sails and was designed for young sailors just getting into Laser sailing. The 4.7 lower mast section is also different from the others in that is has a pre-bend near the boom fitting, allowing the sail to depower much easier. This is the least common Laser sail size, and if you have an old one around, chances are it is not a 4.7 sail.

How to tell if you have a '4.7' sail: The 4.7 is similar to the old 'Standard' sail as it has cross cut panels. Many 4.7 sails also have an obvious 4.7 logo somewhere on the cloth. Next, you can measure the luff (the front edge of the sail along the mast sleeve). This measurement should be about 4080 mm or 160 inches from the top of the sail to the bottom.
How to tell if you have a '4.7' lower mast section: The '4.7 lower mast section has a pre-bend in it and should measure about 1810 mm or 71 inches . The bend is the easiest way to tell it apart from the others.
Subscribe To Our Newsletter
Sign up for our newsletter to receive exclusive discounts, new product announcements, and upcoming sales.

New Headsail Measurements: What Dimensions A Sailmaker Needs
- December 7, 2022
What do you need to measure to order a new headsail ? Are the sails that your boat currently has suitable only for a specific type of sailing? How do you know which headsails should be included in the sailboat’s inventory? Knowing the key measurements for a headsail will help you make sure a new headsail will fit your sailboat properly.
New Headsail Dimensions Needed To Get A Quote
General dimensions of a headsail include Luff Length, Foot Length, and Leech Length.
- Luff length is the distance between the head point and the tack point.
- Leech length is the distance between the head point and the clew point.
- Foot length is the distance between the clew point and the tack point.
These measurements, which you can take from an existing sail, will be sufficient to order a new one. However, you also need to be able to calculate the size of your headsail if you want to deeply understand and optimize your sailing.
Dimensions Needed to Calculate the Size of a Headsail
Two dimensions are needed to calculate the size of a headsail that is suitable for your boat:
- The “J” dimension . This is the distance from the mast to the bottom of the forestay at the stem fitting when measured along a line perpendicular to the mast.
- “Luff Perpendicular” or “LP” . This is the distance of the headsail clew from its luff when measured upon a line perpendicular to the luff. You can simply measure the shortest path between the clew and the luff.
The size of your headsail expressed as a percentage is LP divided by J.
Knowing the sail size is important when ordering a new one. If you are happy with the size that you previously had and the headsail’s performance, you can order the same one. You can also adjust the size to a bigger or smaller percentage depending on the sailing experience with your previous sail and prevailing weather conditions in your area.
The headsail size varies from 50 to 75% for storm and heavy weather sails to the common size of around 110% which is suitable for a wide range of wind and sea conditions, to the 135% size used by sailors who sail primarily in moderate conditions and, finally, the 150% genoa used for very light winds.
A new sailboat usually comes with a minimalist inventory of headsails. What you might add to this collection will depend very strongly on your type of sailing and on whether you sail shorthanded: an experienced and strong crew is ideal if you want to use a bigger sail. A day cruiser can get away with just two sails: a genoa and a working jib. An offshore cruiser, however, will need a wider range to sail safely. Those of us that race should also ideally have more than two headsails in their inventory.

Working jibs, that are designed for 15 – 18 knots of wind and above, are heavy-duty sails used more often than one anticipates. A working jib usually has an LP of 85-100%. Keeping an extra small jib will extend the life of the genoa and will be your insurance against complete sail failure when you are far away from home. The 130-135% is, generally, the most versatile size for cruising boats.
If You’re into Racing: Other Headsail Dimensions
The following additional measurements maybe required if you take part in races:
- Top width (HHB)
- ¼ width (HQW)
- ½ width (HHW)
- ¾ width (HTW)
- 7/8 width (HUV)
These are found by folding the sail to find equal distances between clew and head or between two adjacent measurement points.

The Sailor’s Marketplace for Sailboats and Sails.
Sell Your Sailboat
Sailboats for sale.
- New Sailboats
- Used Sailboats
- Cruising Sailboats
- Racing Sailboats
Sell Your Sails
Sails for sail, sail manufacturers.
- North Sails
- Quantum Sails
- Doyle Sails
- UK Sailmakers
Sailing Reviews
- Sailing Line
- Safety Equipment
- Sailing Accesories
As an Amazon Associate SailTrader earns from qualifying purchases.
This website uses cookies to ensure you get the best experience possible.
Home > Resources > How to Measure for a New Mainsail
How to Measure for a New Mainsail
13 April 2017
Ask Precision Sails , Design , Hardware , Mainsail , Measurements , Sails , Technical Tags: How To Measure a Mainsail , Mainsail Measurements , measurement services

Purchasing a new Mainsail for your sailboat is one of those investments that every sailor will be faced with eventually. Sails don’t last for ever, even if you treat them like gold. Once you have decided to invest in new sails you may get that feeling of being over whelmed by the choices and the details involved. When deciding on a loft to work with make sure you choose a loft that will offer a good consultation on the cloth and sail feature choices as well as a design consultation if you want one. Don’t be scared into paying extra for a sail just because your local loft tells you it’s hard to measure. You do not need the added expense of having someone come to your boat and measure for your new sail. If you can read a tape measure you can measure your boat for a new Mainsail.
Measurements Required for a New Mainsail:
- Rig Specs : The first thing that you are going to want to find are the General Rig Specs I,P,J,E for your boat. You can get these from your boat manufacturer, online or in your boat manual. These will be used to ensure that the loft you are working with has quoted you the correct size of sail and to ensure that when you take your measurements they are accurate.
- Existing Mainsail: Measure your existing mainsails general dimensions. Luff (leading edge of your sail), Leech (trailing edge of your sail) and the Foot of your sail. These measurements will be used to compare the measurements that you take from your rig to ensure that everything is working out well. It will also give your designer an idea of what the current sail size is.
- Rig Measurements: Now we are going to get onto the boat and start to take the measurements of the rig as it sits today. This will ensure that your sail designer is designing a sail for your boat and not the boat that it started as. The two measurements that are required are the P measurement and the E Measurement. The P is the maximum luff length that the sail can have. This is taken by hauling a tape measure up your mainsail halyard until it reaches the top and measuring straight down to the top of your boom. The E measurement is done the same way but from the aft of the mast to the longest out haul setting. While you are doing the E measurement also measure to your back stay. This will help your designer determine the size of roach that the sail can have without hitting your back stay.
Max Luff Measurement – How To Video
Max Foot Measurement – How To Video
Back Stay Measurement- How To Video
Now we need to take some more detailed measurements to ensure that your sail fits perfectly when it arrives. The areas that need to be looked at are the Out haul, the tack and the luff attachments.
Out Haul Attachments
There are two types of out haul attachments. Shackle Style and Car Style
Tack Connections
Your designer will want to know where to put the tack ring on the sail so that it lines up with your rig.
To measure the location of the tack attachment point simply measure back from the mast to bearing point of your tack fitting and measure up from the boom to your tack bearing point.
Reef Hook Location
Just like the tack set up and set back you will want to make sure the designer can align you reef rings to your reef hooks. Measure these in the same manner.
How to Measure Reef Hook Video
Luff Attachment – Sliders
Attaching your sail to your mast is simple when you choose the right slider. There are several types of sliders to use depending on the type of track you have on your mast. Measuring them is a straightforward and simple process, look inside your measurement form for more details, but the simple explanation is we need the width and waist of your selected slider.
How To Measure Luff Sliders Video
Clew Attachment – Slug
Now you will need to do the same process for your clew attachment (only if you have a shackle attachment)
How To Measure Clew Slug Video
The last things that a sail designer is going to wan to know is the mast rake and bend. If you choose the proper designer they will be able to pull this information off a picture that you supply or you can measure the rake by using a plumb bob to determine the bend.
That’s it! The details are important to get a sail that fits perfectly the first time, however they are easy to do if your sail loft provides a good measurement form to fill out.
To watch all of Precision Sails’ How To Measure a Mainsail Videos please click here.
If you are interested in receiving a quote from Precision Sails for your sail boat click here
precisionsails
Related Posts

Full Battens vs Partial Battens vs 2 Full plus 2 Partial Battens
Full Battens VS Partial Battens At
Precision Sails we are asked every day during our customer quote consultation “Should I choose Full Battens or Partial Battens for my new mainsail?” Whether you are cruising or racing you will need to examine the pros and cons of adding full battens to your main sail.Positive Aspects of Full […]

Memories of Sail Repairs, Replacement Sails and FINALLY New Sails
I have had a Tanzer 26 for over 20 years now. The vessel, without much imagination I call The Boat, has served me well and without complaint through yearly cruises on Lake Ontario with my three kids and day sailing with the wife. Did I mention that my wife is a good sport but a definitive lover of a good.

My Need for Cruising Speed Demands a Great Suit of Sails
My Need for Cruising Speed Demands a Great Suit of SailsI like to sail fast mostly in the heavy winds that Lake Ontario throws.
" * " indicates required fields
Thanks for telling us a bit about yourself and your boat. Our team will send you a preliminary quote based on information we have gathered from sailors similar to you.
We will give you a call in order to narrow down the options on your quote and improve the accuracy. If you want us to call you at a specific time, feel free to schedule a time on our calendar!
Thanks for telling us a bit about yourself and your boat. Our team will reach out to offer some suggestions and get started on finding you the perfect sail!
What Do Boat Measurements Mean? 11 Terms Explained!
Boat measurements are more than just numbers; they are the essence of maritime safety, efficiency, and compatibility.
Navigating the intricate world of boat measurements is crucial for anyone in the boating industry, from manufacturers to enthusiasts.
Understanding these measurements ensures proper vessel selection, compliance with marina requirements, and safe navigation in various water conditions.
Below we delve into the key aspects of how boats are measured and the main terms used, providing you with the essential knowledge to engage with the maritime world confidently.
11 Main Boat Measurement Terms
These are 11 main boat measurement terms with expanded descriptions and examples for better understanding:
- Length Overall (LOA) : This is the total length of the boat from the tip of the bow to the end of the stern. It’s the most common way to describe the size of a boat. LOA is important for determining mooring space, marina fees, and navigating in confined waters. For example, a boat with an LOA of 30 feet will need a berth slightly longer than 30 feet. For stability calculations, you should refer to LBP or length between perpendiculars .
- Length on Deck (LOD) : This measures the horizontal length of the boat’s hull excluding any extensions like bow sprits or swim platforms. LOD is used to provide a more accurate measurement of the usable space on the boat. A boat might have an LOA of 35 feet but an LOD of 30 feet if there’s a 5-foot bow sprit.
- Beam : The beam is the width of the boat at its widest point. It’s crucial for stability; wider beams generally provide greater stability. The beam also affects a boat’s capacity and maneuverability. For instance, a boat with a beam of 10 feet might be more stable but less maneuverable than a boat with an 8-foot beam. More about boat beam read here .
- Draft : Draft measures the minimum depth of water a boat requires to float. It’s key for determining where a boat can safely navigate. A sailboat with a draft of 6 feet can’t enter waters less than one fathom or 6 feet deep without risking running aground.
- Displacement : This is the weight of the water displaced by the boat’s hull. It roughly equates to the boat’s weight when fully loaded. Displacement impacts how a boat handles and its fuel efficiency. A boat displacing 5 tons will handle differently than one displacing 2 tons.
- Freeboard : The distance from the waterline to the upper deck level, indicates how much of the boat is above water. A higher freeboard can mean a drier and potentially safer ride in rough conditions. For example, a boat with 4 feet of freeboard will handle choppy water better than one with 2 feet of freeboard.
- Deadrise : This is the angle of the boat’s hull relative to a flat surface. A higher deadrise (sharp angle) helps cut through waves, providing a smoother ride in choppy conditions. A boat with a 20-degree deadrise will generally perform better in rough water than one with a 10-degree deadrise. Learn more about boat deadrise in a detailed article.
- Air Draft : This is the height of the boat from the waterline to its highest fixed point. It’s important to determine if a boat can fit under fixed bridges or other overhead obstructions. A sailboat with a mast height (air draft) of 50 feet needs to consider bridge clearances on its route.
- Gross Tonnage : This volume measurement is used for large vessels and is calculated based on the total internal space of the ship. Ship tonnage is important for regulatory, safety, and commercial purposes. A cargo ship with a gross tonnage of 50,000 indicates its large size and capacity.
- Ballast : This is the weight (often lead or water) added low in the boat to improve stability. Ballast is particularly important in sailboats to counterbalance the force of the wind. A sailboat with 2,000 pounds of ballast will heel (lean) less and be more stable than one with 1,000 pounds.
- Waterline Length (LWL) : The length of the boat at the waterline, can be shorter than the LOA due to overhangs. LWL affects speed and stability; longer waterline lengths generally allow for higher speeds. For instance, a boat with an LWL of 25 feet may be faster than one with an LWL of 20 feet.
Each of these measurements plays a critical role in the design, functionality, and performance of a boat. They are essential for builders, designers, and users to understand the capabilities and limitations of a vessel in various conditions.
How Do You Measure A Boat Hull?
Measuring a boat hull involves determining several key dimensions that are critical for understanding the boat’s design, performance, and suitability for certain conditions. Here are the main measurements taken for a boat hull:
- Length Overall (LOA) : Measure from the furthest point forward ( bow ) to the furthest point aft ( stern ), including any overhangs.
- Length on Deck (LOD) : Measure the length of the deck, excluding overhangs.
- Waterline Length (LWL) : Measure the length of the boat at the waterline, which may be different from the LOA due to the hull shape and overhangs.
- Beam : Measure the widest part of the boat hull, which is usually found at or near the midpoint of the boat’s length. The beam measurement is crucial as it affects stability and interior space.
- Draft : Measure the vertical distance from the waterline to the lowest part of the hull (usually the bottom of the keel ). This tells you how deep the water needs to be for the boat to float without hitting the bottom.
- Freeboard : Measure the distance from the waterline to the upper edge of the hull. This measurement gives an idea of how high the boat sits in the water and can affect how dry the boat stays in rough conditions.
- Deadrise : This is the angle between the hull bottom and a horizontal plane at the boat’s beam. It’s measured in degrees and indicates how the hull will handle different sea conditions. A higher deadrise usually means better performance in rough water.
- Hull Depth : Measure the distance from the deepest point of the hull to the top of the deck. This gives an idea of the overall volume of the hull.
These measurements are typically made using measuring tapes, laser measuring tools, or, in the design phase, through CAD (Computer-Aided Design) software. Accurate hull measurements are essential for boat builders, designers, and owners, as they influence the boat’s capacity, stability , speed, and seaworthiness.
How Does the Coast Guard Measure Boat Length?
The U.S. Coast Guard measures boat length primarily based on the Length Overall (LOA) method. This approach involves measuring the boat from the tip of the bow in its most forward position to the end of the stern in its most aft position.
This includes all structural and integral parts of the boat but does not include removable attachments and fittings such as outboard motors, bow pulpits, rudders , and similar extensions.
It’s important to note that the Coast Guard’s measurement for boat length can differ from how length is defined for registration or documentation purposes, or how it might be described by manufacturers or in boating literature.
For instance, Length on Deck (LOD) or Waterline Length (LWL) might be used in different contexts but are not the standard measurements the Coast Guard uses for defining a boat’s length.
The Coast Guard’s method of measuring boat length is significant for regulatory and safety reasons. For example, certain boating laws, safety requirements, and regulations apply differently to boats depending on their length class. Therefore, accurate measurement is crucial for compliance with federal and state boating laws .
About the author
I worked as an officer in the deck department on various types of vessels, including oil and chemical tankers, LPG carriers, and even reefer and TSHD in the early years. Currently employed as Marine Surveyor carrying cargo, draft, bunker, and warranty survey.
Leave a Reply Cancel reply
Your email address will not be published. Required fields are marked *
Save my name, email, and website in this browser for the next time I comment.
Latest posts

Lifeboats: Regulations and Requirements
In an emergency, portable vessels called lifeboats will get a ship’s occupants to relative safety. So how do lifeboats work?

What Are the Most Common Shipbuilding Woods?
While shipbuilders have switched to other practices, wood still has a place in the maritime industry. The numerous types available mean manufacturers have myriad options, so here’s a guide on shipbuilding woods.

Fiberglass vs. Steel: Which Is More Reliable?
Shipping professionals should get the most from their investment, so which is more reliable: steel vs. fiberglass? Here’s how to determine the better option.
Performance Handicap Racing Fleet of Southern California

Boat Measurements & Definitions
Tools Required It is recommended that the measurer have a good quality 100-foot tape measure with a loop fitting that can be connected to a halyard shackle. The tape should be either metal or fiberglass backed so that it does not stretch. A plumb bob and a level are also useful. All measurements are in decimal fractions of a foot, and should be made to the nearest 0.1 foot.
Rig Measurements The purpose of rig measurement is to help identify the boat model and, for production boats, to determine whether the rig has been modified. If you haven’t modified your boat at all, then your boat is called a stock boat , and there are a few other options to get your rig measurements:
- check the make and model documentation from your boat manufacturer
- search for your boat make and model on sailboatdata.com
- search our database for boats that are exactly the same make and model as yours

I: In theory, I is the vertical distance between the local sheer line and either the point where the forestay intersects the face of the mast or to the top of edge of the highest headsail halyard sheave, whichever is greater. In practice, it is sufficient to hoist a tape measure with the Genoa halyard and measure the distance to the side deck just inside of the shroud chain plate.
ISP: The theoretical definition of ISP is the distance from the local sheer to the top edge of the highest spinnaker halyard sheave. For our purposes it is sufficient to hoist a tape measure with the highest spinnaker halyard and measure the distance to the side deck just inside of the shroud chain plate.
P: This is the distance from the top of the boom to the bottom of the black band at the top of the mast. Without going up the mast, it is very difficult to see the black band. One method is to hoist the tape measure with the main halyard to the designed P measurement, then use binoculars to see if how close the end of the tape measure is to the bottom of the band. If there is no black band on the mast, hoist the tape as far as it will go and measure the distance to the top of the boom.
E: This is the distance from the back surface of the mast to the inside edge of the black band at the end of the boom. If there is no black band, measure to the outside edge of the outhaul sheave. If there is an external track fitted on the mast, the measurement is taken to the surface of the track.
J: This is the horizontal distance from the point where the forestay intersects with sheer line to the face of the mast. For boats that tack a headsail forward of the forestay, J will be the horizontal distance from the headsail tack point to the face of the mast.
SPL: Set the pole on the mast fitting in a horizontal position and athwart ships. Measure the distance from the center line of the mast to the extreme outboard end of the pole.
TPS: Measure the horizontal distance from the face of the mast to the point of attachment at deck level for deck tacked spinnakers or the extreme forward end of any bowsprit when fully extended for sprit tacked spinnakers.
Sail Measurements Measure your largest sails, and use units in fractions of feet to the nearest 0.1 foot. When measuring sails, sufficient tension should be applied to remove wrinkles but not to stretch the cloth. If you’re getting new sails, the sail measurements are typically provided by your sailmaker.
Symmetrical Spinnaker: The Spinnaker Luff (SL) is measured along the edges of the sail from the head to the foot. The Spinnaker Maximum Width (SMW) equidistant from the head. The Spinnaker Foot (SF) is the shortest path on the surface of the sail connecting the tack and clew. For most spinnakers the maximum width will be near the center of the sail, but it may also be across the foot.
Asymmetrical Spinnaker: Both the Spinnaker Luff and Leech (ALU and ALE) are measured from head to foot. The Asymmetric Mid Width (AMG) is measured by determining the mid points of the luff and leech and the width is the shortest path connecting those two points. The Spinnaker Foot (SF or ASF) is measured in the same fashion – that is, the shortest path connecting the tack and clew.

Headsail: The luff perpendicular (LP) is measured from the clew to outside edge of the sail including any luff tape. The perpendicular line can be found by holding the end of the tape at the clew, then determining the minimum distance to the luff by swinging the tape in a small arch. The headsail half width (HHW) is only required for a Large Roach Headsail.
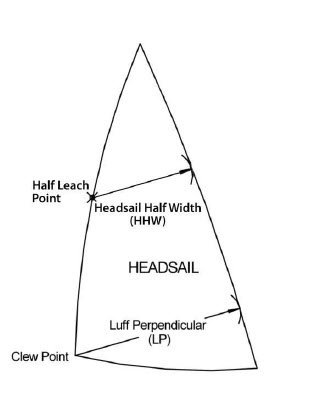
Standard Pinhead Regular Mainsail: PHRF Socal is not asking members to submit the measurements described below at this time. However if you do want to measure your pinhead main, here’s how to do it. Fold the head to the clew (using the corner where the leach intersects the headboard) to locate the half leech point, then fold the head to the half leech point to locate both the one-quarter and three-quarter leech points. Mark these points on the leech. Then fold the head back to the one-quarter leech point to locate he seven-eight leech point. Measure the widths by measuring from the leech point to the nearest point on the luff of the sail including the bolt rope.
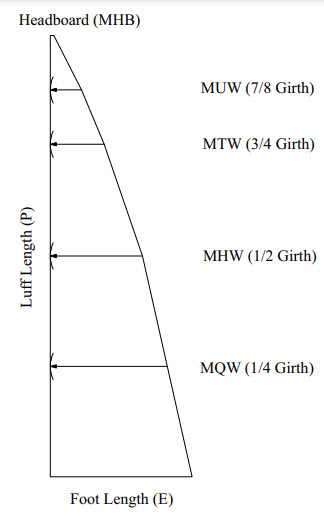
Square-Top, FlatHead Mainsail: The measurements of a square-top mainsail are often contained in sail certificates provided by the sail manufacturer. Your best bet to obtain accurate measurements is directly from your sailmaker. The mainsail parameters that we require are shown below.
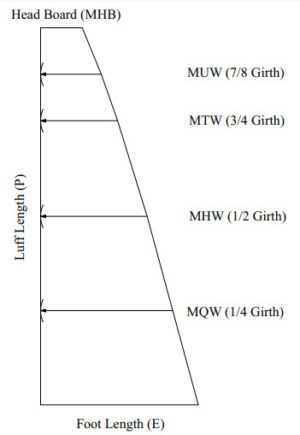
Diagrams and definitions courtesy of Lake Michigan PHRF (except for the mainsail diagrams).
IMAGES
VIDEO
COMMENTS
Jigger-mast - the fourth mast; The rigging mast of a sailboat is a tall vertical pole which supports the sails. Bigger ships could have several masts. This will vary depending on the size and configuration of the ship. The sailboat's masts are named from bow to stern or front to back. Sailboat Rigging Types
Primary dimensions for calculating areas of triangular sails. It's usually calculated as:~. Area = (luff x foot)/1.8, or. Area = ( P x E )/1.8, where:~. 'P' is the distance along the aft face of the mast from the top of the boom to the highest point that the mainsail can be hoisted, and. 'E' is the distance along the boom from the aft face of ...
A sailboat mast is a vertical pole or spar that supports the sails of a sailboat. It provides structural stability and allows for adjustment of the sail position to effectively harness wind power. Typically made of aluminum or carbon fiber, mast design varies based on boat size, sailing conditions, and intended use.
However, there are some differences in how some sailors describe these dimensions. Here is how we define them at North Sails. I - Height of Foretriangle. Elevation of Forestay, measured down to elevation of main shrouds at sheer line. J - Base of Foretriangle. Horizontal distance measured from front face of mast at deck to position of ...
The following rig dimensions designated by " I ", " J ", " P ", and " E " are needed to produce a price quote. They are convenient names to use because they are short and are understood throughout sailmaking…. " P " is the luff length of the main-sail, measured along the aft face of the mast from the top of the boom to the ...
Sailboat masts are the unsung heroes of the sailing world, silently supporting the sails and ensuring a smooth journey across the open waters. Whether you're a seasoned sailor or a novice, understanding the intricacies of sailboat masts is essential for a safe and enjoyable voyage. In this comprehensive guide, we will delve into the world of ...
Step 2: Align the tape measure along the front edge of the sail, starting at the bottom of the mast. Step 3: Measure from the tack (lower front corner) to the head (top corner) of the sail, following the curve of the luff. Step 4: Record the measurement in either inches or centimeters.
Short answer sailboat masts: Sailboat masts are vertical structures that support the sails on a sailboat. Typically made of aluminum, wood, or carbon fiber, masts vary in length and design depending on the type and size of the boat. ... Now that you have all the measurements required; carefully inspect your new mast for any defects or damages ...
Short answer: Sailing Mast A sailing mast is a tall vertical spar, typically made of wood or metal, which supports the sails on a sailing vessel. It helps harness wind power to propel the vessel forward by providing a framework for hoisting and controlling sails. Masts vary in size and design depending on the type
A sailboat mast is a tall pole that is attached to the deck. It helps secure the sail's length to the boat and upholds the sail's structure. A sailboat mast is the most defining characteristic of a sailboat, helping keep the sail in place. What's amazing about it is that it can even be taller than the vessel's length!
Sailboat rigging specifications refer to the measurements and details of the various components that make up a sailboat's rig. This includes the type and size of the standing rigging (such as shrouds and stays), running rigging (such as halyards and sheets), mast height, boom length, and sail dimensions. These specifications are essential for ...
The following abbreviations are often used to describe various measurements on a sailboat. Precise technical definitions exist for each abbreviation, but the following is a list of simple descriptions. LOA Length Overall - overall tip-to-tip length of the boat LWL Length Waterline - length of waterline of the boat DWL Design Waterline -theoretical waterline length of boat as opposed to LWL ...
The key measurements for a headsail are the distance up the mast that you can hoist the sail and the distance from the base of the headstay to the mast. I — The height along the front face of the mast from a point level with the headstay pin to the point of maximum hoist. J — Foretriangle horizontal distance measured from he distance along ...
BAS and J with SFJ measurements are defining vertical and longitudinal position of the mast and sail plan relative to the hull.BAS is the height from the mast datum point to the boom or lower black band on the mast. It is used also as a reference point for the halyards hoist measurements on the mast. J is probably the best-known measurement on boat, since it is used to define the size of ...
Mast 7.2.1 The mast may be stepped on the deck or into the hull. With the mast spar perpendicular to the base line, the after side at deck level shall not be less than 3048mm and not more than 3202mm forward of Station 11. The mast spar may be fixed or rotating. No dimension
This measurement should be about 5130 mm or 200 inches from the top of the sail to the bottom. How to tell if you have a 'Standard' lower mast section: The 'Standard' lower mast section should measure about 2865 mm or 113 inches. It is a fairly stout mast section compared to the two smaller mast sections. Laser Radial / ILCA 6.
Mast Rake and Mast Bend Measurements. The final measurements that the sailmaker will need to know are the mast rake and mast bend measurements. A professional sail designer will know how to get this information from a picture taken of the side of the vessel and rig. They can also measure the mast rake by using a plumb bob.
With these measurements we're going to get a really good idea of where the backstay will be and maximize the sail area you can have. Mast Sliders. This is the number one thing people measure incorrectly. Unfortunately when a sail comes it can fit the boat perfectly. But if the sliders don't fit then the sail will slide out or never get up ...
Dimensions Needed to Calculate the Size of a Headsail. Two dimensions are needed to calculate the size of a headsail that is suitable for your boat: The "J" dimension. This is the distance from the mast to the bottom of the forestay at the stem fitting when measured along a line perpendicular to the mast. "Luff Perpendicular" or "LP ...
The two measurements that are required are the P measurement and the E Measurement. The P is the maximum luff length that the sail can have. This is taken by hauling a tape measure up your mainsail halyard until it reaches the top and measuring straight down to the top of your boom. The E measurement is done the same way but from the aft of the ...
These are 11 main boat measurement terms with expanded descriptions and examples for better understanding: Length Overall (LOA): This is the total length of the boat from the tip of the bow to the end of the stern. It's the most common way to describe the size of a boat. LOA is important for determining mooring space, marina fees, and ...
Boat Measurements & Definitions. It is recommended that the measurer have a good quality 100-foot tape measure with a loop fitting that can be connected to a halyard shackle. The tape should be either metal or fiberglass backed so that it does not stretch. A plumb bob and a level are also useful. All measurements are in decimal fractions of a ...
Mast Height from DWL: 33.00 ft / 10.06 m: Sailboat Links. Builders: ... A sail area/displacement ratio below 16 would be considered under powered; ... (100% Fore + Main Triangles) which is the area as defined by the rig measurements.) S.A. (reported) can differ depending on the size of the head sail used to calculate the S.A. Sailboat Rigging ...