- BOAT OF THE YEAR
- Newsletters
- Sailboat Reviews
- Boating Safety
- Sailing Totem
- Charter Resources
- Destinations
- Galley Recipes
- Living Aboard
- Sails and Rigging
- Maintenance

Adding Solar Power to a Sailboat
- By Emily Fagan
- Updated: October 18, 2019

During our nearly four-year cruise of Mexico, my husband, Mark, and I lived almost exclusively on 555 watts of solar power charging a 640-amp-hour house battery bank. We anchored out virtually every night aboard our 2008 Hunter 44DS, Groovy , and relied on the sun for power. During one 10-week stretch, while we waited for a replacement engine alternator to arrive, our boat’s solar panels were our sole source of power. We had no backup charging system to turn to, and yet we lived and sailed comfortably the entire time. Mounting solar panels on a sailboat was not difficult, but a few key decisions made a huge difference in how effective our panels were.
A solar-power installation on a sailboat is made up of two independent systems: one system to charge the batteries, and another system to provide 120-volt AC power for household appliances. In the charging system, the solar panels convert sunlight into electrical current and deliver it to the batteries via a solar charge controller. Similar to a voltage regulator, the charge controller acts as a gatekeeper to protect the batteries from receiving more current than they need as they are being charged. In the AC power system, an inverter or inverter/charger converts the 12-volt DC power in the battery into 120 volts AC whenever it is turned on.
Panel Positioning and Wiring Considerations
One of the biggest challenges for sailors installing solar power on a sailboat is finding a place on the boat where the panels will be shaded as little as possible. Just a few square inches of shade on one panel can render that panel all but inoperable. Unfortunately, between the mast, radome, spreaders and boom, shadows cross the deck all day long, especially as the boat swings back and forth at anchor.
What’s worse, if the panels are wired in series rather than in parallel, this little bit of shade can shut down the entire solar-panel array. When we installed solar power on Groovy , we had already lived exclusively on solar power in an RV for over two years. Our RV solar panels had been wired in series, and we had witnessed the array shutting down current production when just half of one panel was shaded.
Choosing whether to wire the panels in series or parallel on a boat affects the wire gauge required, which is why many solar-power installers lean toward wiring the panels in series. Panels wired in series can be wired all the way to the solar charge controller with a thinner-gauge wire than those wired in parallel. This is because the voltage of panels wired in series is additive, while the current remains constant, so the current flowing is just that of a single panel. In contrast, the current flowing from panels that are wired in parallel is additive, while the voltage across them is not. This means that in a parallel installation, the current going to the charge controller is several times higher and requires much thicker cable to avoid any voltage loss over the length of the wire.
Not only is thinner-gauge wire less expensive, but it is also more supple and easier to work with, making the job of snaking it in and around various crevices in the boat and connecting it to the solar charge controller much less of a struggle. Thus the choice between series and parallel wiring boils down to a trade-off between system performance, expense and ease of solar system installation.
Luckily, the size of the wire can be reduced if higher-voltage solar panels are chosen. Since watts are determined by multiplying volts by amps, a higher-voltage panel that generates the same watts as a lower-voltage panel will produce less current. Therefore, selecting nominal 24-volt panels instead of 12-volt panels allows for the use of thinner wire sizes no matter how they are wired.

Our Marine Solar Panel Design Choices
In our installation, we decided to mount three 185-watt, 24-volt (nominal) Kyocera solar panels high above the cockpit, well aft of the boom, as far away as possible from potential shade. Our Hunter came with a big, solid stainless-steel arch, and we turned to Alejandro Ulloa, a brilliant metal fabricator at Baja Naval Boatyard in Ensenada, Mexico, to build a polished stainless-steel solar-panel arch extension onto the existing structure. He designed the arch extension with integrated telescoping davits to hoist our dinghy as well as support the solar panels. These davits were strong enough — and the lines and blocks had enough purchase — that either of us could lift our light Porta-Bote dinghy with its 6-horsepower outboard without a winch.
We spaced the panels about a half-inch apart and wired them in parallel. Using two twin-lead wires, we snaked the three positive leads and one common ground down through the inside of the arch tubes so they wouldn’t be visible, and placed wire loom over the exposed wires under the panels.
The junction points for the three parallel panels were on positive and negative bus bars inside a combiner box, all mounted in a cockpit lazarette. Inside the combiner box, we installed three breakers, one for each panel. This gave us the ability to shut off any or all of the panels if we needed to (we never did).
We mounted a Xantrex solar charge controller (model XW MPPT 60-150) in a hanging locker, as close to the batteries as possible, in a spot where it was easy to monitor and program. We ran twin-lead wire from the combiner box to the charge controller and from there to the batteries.
Our boat came with three new 12-volt Mastervolt 4D AGM house batteries, all wired in parallel, for a total of 480 amp-hours of capacity. We wanted a bigger house battery bank, and because it is best for the age, type and size of the batteries to be matched, we added a fourth new Mastervolt 4D AGM house battery, which brought our total to 640 amp-hours. Our batteries were installed at the lowest point in the hull, below the floorboards, and they ran the length of the saloon, from just forward of the companionway stairs to just aft of the V-berth stateroom door.
The best way to charge a bank of batteries that are wired in parallel is to span the entire battery bank with the leads coming from the charge controller. We did this by connecting the positive lead from the charge controller to the positive terminal of the first battery in the bank, and the negative lead from the charge controller to the negative terminal of the last battery. By spanning the entire bank, the batteries were charged equally rather than having the charging current focused on just the first battery in the bank.
We feel that AGM batteries are superior to wet cell (flooded) batteries because they can be installed in any orientation, don’t require maintenance, can’t spill (even in a capsize), and charge more quickly. Our Mastervolt batteries, like almost all AGM batteries on the market, are dual-purpose, combining the very different characteristics of both deep-cycle and start batteries. Our batteries work well, but if we were doing an installation from scratch today, we would consider the new Trojan Reliant AGM batteries. These batteries are engineered strictly for deep-cycle use and have been optimized to provide consistent current and maximize battery life.
Our boat came with a Xantrex Freedom 2,500-watt inverter/charger wired into the boat’s AC wiring system with a transfer switch. The inverter/charger performed two functions. While the boat was disconnected from shore power, it converted the batteries’ 12-volt DC power into 120-volt AC power, allowing us to operate 120-volt appliances, like our microwave. When the boat was connected to shore power, it charged the batteries.
Because this inverter/charger was a modified-sine-wave inverter, mimicking AC current with a stair-stepped square wave, we also had a 600-watt pure-sine-wave inverter to power our potentially more sensitive electronic devices. We chose Exeltech because its inverters produce an electrical signal that is clean enough to power medical equipment, and they are NASA’s choice for both the Russian and American sides of the International Space Station. For simplicity, rather than wiring the inverter into the cabin’s AC wiring, we plugged ordinary household power strips into the AC outlets on the inverter and plugged our appliances into the power strips. Like the charge controller, the inverter must be located as close to the batteries as possible. Ours was under a settee.

Shade’s Impact on Sailboat Solar Panels
Once our solar installation was completed on our sailboat, we closely observed the effects of shade on our solar-panel array. We were often anchored in an orientation that put the panels in full sun. Just as often, however, we were angled in such a way that shade from the mast and boom covered portions of our panels. It was fascinating to monitor the solar charge controller’s LCD display whenever the sun was forward of the beam — the current from the panels to the batteries fluctuated up and down as we swung at anchor.
Taking notes one morning, we noticed that the charging current was repeatedly creeping up and down between 9.5 and 24.5 amps as the boat moved to and fro. When the entire solar-panel array was in full sun, it generated 24.5 amps of current. When we moved so the mast shaded a portion of one panel, the array generated 15 amps. When it shaded portions of two panels and only one was in full sun, the array produced just 9.5 amps. Of course, it would have been preferable to see a steady 24.5 amps all morning, but this sure beat watching the current drop to zero whenever a shadow crossed a panel.
We discovered that shade makes a huge impact while sailing, too. Surprisingly, it is far worse to have the panels shaded by the sails than to have the panels in full sun but tilted away from its direct rays. One afternoon, we noticed that while we were on a tack that tilted the panels away from the sun, they generated 24.5 amps of current, whereas on a tack where the panels were tilted toward the sun but two of the three were partially shaded by the sails, the current dropped to a mere 10 amps.
Reflections On Our Solar Panel Installation
A wonderful and surprising side benefit of our large solar panels and arch system was that the setup created fabulous shade over the jumpseats at the stern end of the cockpit. Our metal fabricator, Alejandro, placed a support strut at hand-holding height, and sitting in those seats feels secure and comfortable while sailing, no matter the conditions.
After living on solar power for eight years of cruising and land-yacht travel, we’ve learned that you can never have too much solar power. Groovy’s 555 watts was enough to run all our household appliances as needed, including our nearly 4-cubic-foot DC refrigerator, two laptops, a TV/DVD player, and lights at night. However, it was not quite enough power to run all that plus our stand-alone 2.5-cubic-foot DC freezer during the short days and low sun angles of the winter months without supplemental charging from the engine alternator every few days. For the 10 weeks that we did not have a functioning alternator, our solution was to turn off the freezer, which enabled our batteries to reach full charge every afternoon.
Solar power made a world of difference in our cruise. Not only did it allow us to live comfortably and with ample electricity for weeks on end when our engine alternator went on the blink, but as a “set-it-and-forget-it” system, it also gave us the freedom to anchor out for as long as we wished without worrying about the batteries. In our eyes, the solar-panel arch enhanced the beauty and lines of our boat, giving her a sleek and clean appearance. It was true icing on the cake to discover that the panels and arch system also provided much-needed shade over the cockpit and helm from the hot tropical sunshine. If you are preparing for a cruise, consider turning to the sun for electricity and outfitting your sailboat with solar power.
The Installation:

Emily and Mark Fagan offer cruising tips and share their stories and photos on their website, roadslesstraveled.us . They are currently enjoying a land cruise across America aboard an RV.
- More: DIY Sailboat Projects , green sailing , How To , installations , Refits , Sail Green , solar , solar panel , Upgrades
- More How To

Adding Onboard Electronics? Here’s How To Get Started

7 Boating Safety Tips for Summer Cruising

How to Prep for a Diesel You Can Depend On

Anchoring in Paradise

Now For Sale: Leopard 45

The Long Way Around

Sailing to the Land of Shrimp

Swallow Tattoos and Sailors
- Digital Edition
- Customer Service
- Privacy Policy
- Email Newsletters
- Cruising World
- Sailing World
- Salt Water Sportsman
- Sport Fishing
- Wakeboarding
Yachting Monthly
- Digital edition

Sailing with solar power: A practical guide
- Duncan Kent
- November 13, 2020
The latest solar technology makes self-sufficient cruising much more achievable. Duncan Kent gives the lowdown on everything you need to get your boat sorted

SOLAR POWER ON BOARD
Solar power is fast becoming the most popular and economic method of keeping the batteries charged on a boat.
Particularly now that the efficiency of photovoltaic (PV) panels, charge controllers and batteries is improving every day.
Furthermore, the latest technology in regulators and charge controllers has brought about a noticeable increase in useable power output, so the problems of shading and non-alignment can be compensated for more easily.
Not only has PV equipment become more efficient and cost-effective, but many of the modern devices we want to use on a boat have become less power hungry.
This means it is now far easier to provide your entire yacht’s electrical needs, both 220Vac and 12/24Vdc, from natural energy resources – particularly solar power, even if you are planning on a fully electric boat .

Thinking carefully about how much power you need and how much your boat can accommodate is key to planning a solar array. Credit: Graham Snook
WHAT DO YOU NEED?
For instance, a boat with two new, good quality, deep-cycle house batteries of 100Ah each would supply 100Ah of energy to consume between charges, if you only use the recommended 50% of available charge between each charge cycle to protect the batteries.
From this you could run:
- a modern 12Vdc fridge (approx. 1.5Ah, or 36Ah over 24hrs),
- all LED lighting (say 20Ah per day),
- various small device chargers (20Ah)
- and a number of other items such as water pumps, TVs and stereos (25Ah/day)
- Totalling around 100Ah.
- For this you’d need 400W of solar capacity.
Of course, if you like to run a lot of AC devices off-grid such as hair dryers, microwaves, toasters and the like, then you’re going to need a DC/ AC inverter, which will take you to another level in power consumption terms.
But even then, with careful planning, solar could provide a large portion of the power you need before resorting to engine charging or a generator.
THE AVAILABLE SPACE
In practical terms, a modern 40ft monohull would have the space for around 1,200W of PV panels (cockpit arch, sprayhood top, deck), maybe 1,500W with the addition of a few portable panels for use at anchor.
The 1,200W of fixed position solar array could produce around 360Ah on a sunny summer’s day (zero shading) or more likely 250Ah on the average UK summer’s day.
So that’s enough for your 100Ah general DC consumption plus another 150Ah of AC consumption via the inverter.
Of course, to do this you’ll most likely need to increase your battery capacity to around 400-500Ah for maximum flexibility (you’ll need to store as much as possible during daylight hours), a typical figure for a 40-50ft offshore cruising yacht these days.

Get your solar charging right and you may never need to hook up to shore power
Typical daily inverter loads for a cruising yacht off grid might be:
- induction cooking plate (20min) 60Ah
- microwave (15min) 30Ah
- coffee maker (20mins) 25Ah
- hair dryer (5min) 15Ah
- laptop charger (2h) 10Ah
- or around 140Ah in total.
The trick is to monitor the batteries’ state of charge (SOC) at all times and vary your use of the inverter to suit.
For example, you might want to cook supper mid-afternoon, when solar is in abundance, and then reheat it in the evening when you want to eat it.
In some cases, when you’re cruising in warm climates such as the Med, you might end up with excess charge from your solar panels .
In this situation, many long-term cruisers devise a method of ‘dumping’ the extra energy by heating water for showers.
Do bear in mind if you’re planning to live aboard full time , then it’ll be a whole different story on cloudy days and during the winter, when inverter use might need to be knocked on the head entirely.
Continues below…

Eco friendly sailing: Best practice for green yachting
How easy is it to go eco friendly sailing? We look at the steps cruisers can take to minimise their…

How and where to go wild cruising in the UK
Planning to spend the night away from crowded waters can be truly rewarding but preparation is essential before you go…

Solar-powered boat crosses Atlantic
Then heads to UN climate conference
POWER DISCREPANCIES
There’s often confusion as to how much power you can harvest from a solar installation.
A PV panel is nearly always advertised stating its theoretical peak output power (Pw).
But in reality, on a yacht where there are limited areas in which to mount them, they will more likely produce a maximum of 60% of their peak output if mounted horizontally, increasing to 80% if tilted towards the sun and regularly adjusted.
The latter is rarely achievable on a boat, however, as even at anchor it can swing through an arc of 180° in wind or tidal shifts .

Flexible panels can be mounted on sprayhoods or awnings to add power when it’s needed at anchor or in harbour
INSTALLATION
Having trawled through hundreds of ‘deals’ to get the best price on the most efficient panels you can afford you now need to know how to install them to best fulfill your energy generation needs.
The output, even from the highest quality photo-voltaic array, will only be as good as the installation itself.
So following our guidelines should ensure you extract every last drop of energy from your investment.
PANEL MOUNTING
Sailing boats are not the ideal structure on which to mount wide, flat PV panels.
So before you go ahead and purchase what looks like the biggest and best, take a few minutes to decide on exactly where you can mount them, as this will affect what size and type of panels you should buy.
In many cases the first choice would be on an arch, davits or gantry aft, especially if you already have, or plan to fit one.

Dinghy davits, particularly on multihulls, can support a huge solar capacity
These allow a solid metal framework to be constructed that will be strong enough to take the heavier, more productive rigid PV panels.
You can also build in some form of adjuster to the framework that will allow the panels to be orientated towards the sun for the best performance.
With luck (or careful planning) a gantry will also keep them aft of the boom, thereby eliminating loss of output caused by boom shading.
The next most popular position for mounting the panels is on a cockpit sprayhood or bimini, although this will often mean using the flexible or semi-flexible panels, which are generally less efficient than the rigid ones for the same area.
ELEVATED MOUNTING
Alternatively, there are kits available for mounting panels onto lifelines, which can allow their elevation to be manually adjusted to a certain degree.

Pole-mounted panels can be used for maximum adjustability
Finally, panels can be fitted directly onto the deck by either gluing them down using mastic or attaching them onto a rigid support frame.
Once again you will probably need to use semi-flexible panels – especially if the deck surface is curved.
Rigid, glass-coated panels will obviously not be suitable for deck mounting in an area that is frequently walked over.
Don’t be tempted to drill through the panels, even along the edges, as this will invalidate the warranty and possibly damage the panel.

With solid panels, the ability to adjust the angle can add significantly to output
It might seem obvious, but the key to an efficient system is to avoid shading wherever possible.
It’s no good fitting expensive, high-efficiency PVs right under the boom as they’ll perform little better than the cheaper types.
Saying that, in good quality panels each cell will be isolated from the next by a series of diodes (one-way electrical valves), so that if one cell is shaded at least it won’t drag down the other cells within the same panel.
Older panels often didn’t have these, so the slightest partial shading caused the output of the entire panel to cease.
OVERHEATING
Another important factor that is often ignored when installing the panels is that of overheating.
If a PV panel gets too hot, which is quite likely if mounted directly onto a flat surface without an air gap behind, its output will drop quite noticeably.
To allow for some air circulation behind the panels it’s best to apply mastic adhesive in numerous large dabs.
This is best achieved by placing wooden spacer strips between the dabs until the mastic has completely cured, after which the spacers can be removed.
You might need some form of trim around one or more of the outside edges, though, if they are positioned where sheets and other lines might get caught under them.
Raising the panels up will also help water to drain off and thereby helping to avoid possible delamination from sitting in water for too long.
CHARGE CONTROL
A PV module cannot supply an electrical device directly due to the changeability of the sunlight, which in turns varies the current it can produce.
Therefore, it has to be connected to a battery, which stores and smooths its output.
Whatever the size of your solar array you will need to fit a regulator, or charge controller as they are now more commonly known, to the system in order to control the output and to help extract as much power from the panels as possible.
There are two types of PV charge controller.
The older designs, called Pulse Width Modulation (PWM) types, were fairly basic voltage regulators and simply output volts at just above battery level.
The latest controllers use Multi Power Point Tracking (MPPT) technology and can accept much higher input voltages (up to 240Vdc).
MPPT controllers can be up to 30% more efficient as they use the peak output of the panels to charge the batteries, even compensating for partial shading.
BEWARE FAKE GEAR
If you buy online do be careful to ensure you’re getting what you pay for.
There are a huge number of fake MPPTs out there, which are simply the much cheaper PWM dressed up with fake labels.
It’s hard to tell which is which, but the old adage of ‘if it looks too good to be true, it usually is’ makes good sense.
MPPT controllers are usually bigger and heavier than PWMs, but if in doubt call or email the supplier to discuss the pros and cons of their kit before buying.
If they’re not happy to chat and advise you then I would steer clear of their gear.
Some good MPPTs are made in China, but unless they have a UK supplier, I wouldn’t bother with them as you’ll have no follow-up advice.
To calculate what size controller you need simply divide the panel’s peak power in Watts (Wp) by the battery voltage, which will give you the maximum current (Amps) they could theoretically supply.
For example 240W/12V = 20A. Although it’s unlikely you’ll ever get near the peak output from any PV panel, it’s best to go for the maximum possible.

Induction cooking is now a reality on board, even without shore power
PV panels come with a short length of cable, usually around 1m long.
Some are supplied with MC4 connectors already attached but most only provide bare wires.
The latter can be easily extended using proper waterproof connections but thought must be given as to the current rating and voltage drop (usually max 3%) for the size of cable you intend to use.
If in doubt, bigger is better!
Panels can sometimes be ordered with the wiring on the back so that the cable can go straight below deck through a hole under the panel.

You may need to fit extra battery capacity if you want to run an inverter from solar charging
SERIES OR PARALLEL?
A commonly asked question is ‘should I wire my PV panels in series or in parallel?’
The simple answer is, if there’s any danger of frequent shading to one or more of the panels then install them in parallel.
If wired in series the shading of a single panel will drag down the output from all of the others in the same series.
PARALLEL IS PREFERRED
Most commonly, multiple panels are wired together in parallel to a single charge controller, with diodes protecting each panel from discharging the others should one become partially shaded.
With the advent of MPPT controllers, however, there can sometimes be a benefit to wiring two or more identical panels into a series bank, thereby presenting a higher voltage to the controller.
It’s worth noting that, like batteries, wiring PV panels in series increases the voltage only – the current capacity of the array remains the same as for a single panel.
‘Where’s the benefit of wiring them in series then?’ you might ask.
Well, the higher the voltage fed into the MPPT, the more consistent it will be with its output, which could, in some cases, prove more efficient than a parallel installation with PWM controllers.
It’s also likely to be necessary if you have a 24V domestic system.
SERIES WIRING
Series wiring is usually only done when the cable runs are long, as it helps negate the voltage drop caused by the resistance of the cable.
While a decent controller will have no problem handling the output from four or even five panels wired in series, it is often inappropriate for sailing yachts as shading just one of the panels will reduce the output of the entire series array.
If you need to do so in order to reduce cable runs then it’s best to split the panels between each side of the boat – a series bank on each side.
If you do this, then you would ideally fit a separate controller to each series PV bank and then connect their outputs together in parallel to the battery bank.
Note, however, that panels wired in series must all be the same types with an equal number of cells per panel.
Furthermore, the charge controller needs to be sized for the total of all panel voltages added together and the current rating of one individual panel.
Differently rated panels can be connected together in parallel but only if each panel has its own controller.
The outputs of the individual controllers can then be joined together to go to the battery bank.
BATTERY BANK QUESTION
Another frequently asked question is ‘Can I connect another charging source to the battery bank while the solar array is charging?’
The answer is yes.
Any decent PV controller will be protected against feedback from other charging sources.

Think carefully about where shade from mast, boom and rigging will fall. Credit: Graham Snook Photography
CABLE SIZE AND CONNECTORS
A frequent cause of reduced output from PV arrays is wiring that is too small.
The resistance of a wire conductor increases in direct proportion to its cross-sectional area, so go as big as is practicable for the least cable loss.
Each panel should be supplied with the correctly sized cables for its own maximum output.
But if you’re combining panels, either in parallel or in series, you will clearly need to rate the single feed cable to suit the maximum current available at theoretical peak solar output and to minimise voltage drop.
Likewise, the cable from the controller to the batteries should be sized to suit the controller’s maximum output current and protected with a fuse.
For outside it’s important to use exterior grade cable, which is double- insulated and UV-proof.
WEATHERPROOF CONNECTORS
And wherever possible use compatible weatherproof connectors (usually MC4) to those found on the panels rather than cutting off the plugs and hard-wiring them.
Field- assembly MC4 plugs are available, so you don’t have to drill large holes in the decks or bulkheads when feeding the cables through.
When joining more than one panel together try to use the approved multiway connectors; not only do they keep the wiring neat and tidy, but they also offer a greater contact area than budget terminal blocks.
If you have to use screw-type connectors make sure to fit proper ferrules to the wire first to avoid any stray wires in the multistrand shorting across the terminals.
When feeding a cable from above to below deck, try to go through an upright bulkhead where possible to minimise ‘pooling’ of water around the access hole.
Also, use a proper watertight deck seal that matches the cable you’re using.
If drilling through a cored deck you need to drill a larger hole first, fill it with epoxy resin and then drill the required size hole through the epoxy to ensure no water gets into the deck core.
Ideally, the charge controller should be mounted no further than 2m from the battery bank.
If you need to go further, you’ll require larger cabling to reduce the voltage drop.

A generous solar array will keep you self- sufficient indefinitely. Credit: Graham Snook Photography
CONTROLLER LOAD TERMINALS
There is often confusion over the ‘load’ output of a charge controller (often depicted by a light bulb) and what can safely be connected to these terminals.
Rarely explained in the manual, the load terminals should be pretty much ignored in a marine installation as the output on these terminals is usually very limited (10A max).
Some attach an LED light to them to indicate the controller is operating, but all your usual electrical loads should remain connected to the batteries with the battery terminals on the controller connected directly to that battery bank via a fuse.
It is possible, though, to control a high-current switching relay in certain conditions.

Parallel installation is more resilient to shading, but a series installation will increase peak charging outputs. A combination of the two offers some of the benefit of both
CIRCUIT MONITORING
Unlike most cheap PWMs, the majority of good quality MPPT charge controllers come with an alphanumeric LCD screen to let you know what is going on.
This can either be a remote display or simply one on the front of the box.
It’s obviously a lot better to have a proper numerical display than to rely on a few flashing LEDs to tell you when something’s not right.
So if your chosen controller doesn’t have one be sure to fit a battery monitor (the shunt type) into your solar circuit between the controller and the batteries.
It doesn’t have to be a very ‘smart’ monitor, just one that can display the voltage and current being supplied by the panels.
For smartphone addicts there are several wifi apps that will do the job remotely on your phone or tablet.
DEVICE PROTECTION
All good quality PV panels feature built-in diode protection between each cell to prevent a shaded cell from dragging down the productive ones.
In addition, there will be internal blocking diodes on the final output to protect the panel from polarity reversal and to ensure that the batteries can’t discharge back into the panel during the night.
The latter can be added externally, the former can’t, so check before you buy.
A fuse, rated just above the maximum current available, should be fitted between each panel and the charge controller.
Another fuse should then be installed between the charge controller’s output and the batteries.
In the case of multiple arrays, this second fuse will be rated higher than the individual panel fuses and should match the maximum current rating of the cable.
With this protection installed other charging devices can be connected in parallel at the battery, meaning the solar can be left connected even when you are hooked up to shore power and the battery charger is operating.
In some circumstances, however, this arrangement can affect the sensing of the battery by the charger, causing it to fall back into float mode.
If this becomes apparent it can be overcome by installing a manual/auto switch to disconnect the solar array when on shore power.

Check the flex of the solar panel is sufficient for your deck
EXCESS POWER DUMPING
A solar charge controller works by disconnecting the supply from the PV panels when the batteries are fully charged.
But for some full-time liveaboards in sunny climates that can be considered a waste, when the excess power could be put to good use – heating water, say.
This is commonly done using an inverter to supply AC power to the heating element.
Alternatively, you can now buy a 12Vdc element for your calorifier (hot water tank) and supply this directly from your battery bank.
Both of these methods would require a voltage sensitive relay (VSR) to disconnect the element should the battery voltage drop below a pre-set level.
Don’t expect boiling hot water, as there will probably only be enough spare power to take the chill off it before your battery bank reaches its lower threshold voltage.
A 600W/12V element will draw some 50A, from the batteries, whereas a 1kW AC element run through an inverter will need close to 100A.

A small, semi-flexible panel will be sufficient for keeping batteries trickle charged, but not for heavy use
RIGID, FLEXIBLE, OR SEMI FLEXIBLE?
Despite massive recent improvements in semi-flexible panels in recent years, the solid glass panels still offer a higher power density.
That said, they are heavier, more awkward to mount and can’t be walked on, so unless you have a dedicated gantry aft, you’re better off choosing the more rugged semi-flexibles.
Modules incorporating monocrystalline cells also have a better output than those with polycrystalline cells (that’s cells made from a single slice of silicon as opposed to layers of smaller pieces).
Output voltage also depends on the number of cells on the panel.
In the past this has commonly been 32, but now some 36 and even 40 cell panels are available.
That said, they’re larger, of course, so an array of interconnected smaller panels might be a better solution.
Module efficiency is now more often around the 20% mark, as opposed to 12-15% for older models and semi- flexible (up to 20° bend) are usually better than flexible (up to 180° bend).

A rigid panel is more efficient, but less robust
There are a huge number of panels on the market, but many use the same cells.
Sunpower Maxeon cells are exceptionally good, as are the Panasonic HIT range and LG, but they are pricey.
If the maker is offering a 25-year guarantee instead of a 3-5 year one, you can be pretty confident they’re good.
When it comes to charge controllers it’s definitely worth paying a little more for a decent MPPT.
A cheap PWM might be okay just to keep a small starter battery charged with a 30W panel, but the MPPT will give you much more when it comes to heavy service.
Victron are probably top of the range, while cheaper brands like MakeSkyBlue and EPever are also good value – but treat imports of unclear origin with care.
ABOUT THE AUTHOR

Duncan Kent has been evaluating and reviewing yachts and marine equipment for the past 30 years
Enjoyed reading this?
A subscription to Yachting Monthly magazine costs around 40% less than the cover price .
Print and digital editions are available through Magazines Direct – where you can also find the latest deals .
YM is packed with information to help you get the most from your time on the water.
- Take your seamanship to the next level with tips, advice and skills from our experts
- Impartial in-depth reviews of the latest yachts and equipment
- Cruising guides to help you reach those dream destinations
Follow us on Facebook , Twitter and Instagram.
Service Locator
- Angler Endorsement
- Boat Towing Coverage
- Mechanical Breakdown
- Insurance Requirements in Mexico
- Agreed Hull Value
- Actual Cash Value
- Liability Only
- Insurance Payment Options
- Claims Information
- Towing Service Agreement
- Membership Plans
- Boat Show Tickets
- BoatUS Boats For Sale
- Membership Payment Options
- Consumer Affairs
- Boat Documentation Requirements
- Installation Instructions
- Shipping & Handling Information
- Contact Boat Lettering
- End User Agreement
- Frequently Asked Questions
- Vessel Documentation
- BoatUS Foundation
- Government Affairs
- Powercruisers
- Buying & Selling Advice
- Maintenance
- Tow Vehicles
- Make & Create
- Makeovers & Refitting
- Accessories
- Electronics
- Skills, Tips, Tools
- Spring Preparation
- Winterization
- Boaters’ Rights
- Environment & Clean Water
- Boat Safety
- Navigational Hazards
- Personal Safety
- Batteries & Onboard Power
- Motors, Engines, Propulsion
- Best Day on the Water
- Books & Movies
- Communication & Etiquette
- Contests & Sweepstakes
- Colleges & Tech Schools
- Food, Drink, Entertainment
- New To Boating
- Travel & Destinations
- Watersports
- Anchors & Anchoring
- Boat Handling
- ← Technology
What You Need To Know About Boat Solar Panels
Advertisement
Sunshine and boats are a natural together, so why not use all that free energy? Here’s the lowdown on solar panel selection and installation

I first embraced the idea of solar power while up a pole (literally) in the Atlantic Intracoastal Waterway replacing dead batteries. It was the early 1980s, and I was maintaining buoys, beacons, and other such Aids To Navigation (ATON) for the U.S. Coast Guard, replacing massive, nonrechargeable batteries with rechargeable solar-powered ones. The higher-ups said the solar rechargeables would last six years – twice as long as the one-shot batteries. As the deck-ape in charge of lugging all those batteries up and down the ladders, my back and I immediately appreciated the whole “free power from the sun” thing, a concept I continue to embrace.
The strategy behind s olar energy onboard is simple: A solar panel converts sunlight into electricity, after which wiring conducts it to your batteries for storage until needed. Solar panels are used to keep batteries or banks charged rather than to power equipment directly. This arrangement allows the panels to store generated power whenever produced, while providing a steady source of power to a piece of equipment even when the panel is producing no power.
While they do require an initial outlay, solar panels can easily pay for themselves in money saved and independence gained over their service life. They’re noiseless, have no moving parts, and they provide free electricity for years with minimal maintenance. Solar panels also have the benefit of being modular, letting you start small and add more as your power requirements increase.
The benefits of solar
Almost any boat can benefit from solar power. Whether at a slip, mooring, or on a trailer, boats can keep their batteries topped off without the need for external power. You can also use solar power to supplement or even replace other onboard charging sources, reducing or eliminating the need to run engines or generators to keep batteries topped off (a wasteful practice that burns fuel while wearing down the costliest pieces of equipment onboard).
While underway, it’s a plus to be able to recharge a dead battery in an emergency – say, to operate a VHF radio or navigation gear. While dockside, solar panels keep batteries charged and vital systems (such as bilge pumps) up and running without the need for shore power.

Just about any boat can benefit from solar power, whether it’s to keep batteries topped off or supplement other onboard charging sources.

Mount solar panels where they are exposed to maximum sunlight but do not interfere with operation of the vessel.

Bottom: Something as simple as the shadow of a line or shroud can reduce or halt output.
Types of panels
Solar panels contain photovoltaic cells – small silicon semiconductor devices that convert sunlight into electricity. Each cell generates between 0.45 and 0.5 volts, depending on exposure to direct sunlight. Cell size determines amperage, with a 3-inch cell producing roughly 2 amps, a 4-inch cell a little over 3 amps, and a 5-inch cell around 5 amps.
Construction-wise, the three main types of solar panels are monocrystalline, polycrystalline, and amorphous (or thin-film) technology.
Monocrystalline panels have been around the longest and remain the most popular. The panels are constructed of thin slices of crystal silicon (each cell is cut from a single crystal) housed in a rigid, aluminum frame and covered with tempered shatterproof glass. The panels have a uniform black, blue, or gray appearance and are generally quite rugged, although they can be cracked or broken if subjected to extreme abuse.
Monocrystalline panels have the longest service life of the three types. With a conversion efficiency of around 17%, they’re also the most efficient and have the highest electrical output per area, but they are also the most expensive.
Polycrystalline cells are sliced from a cast silicon block and have a shattered glass appearance. Built in much the same way as monocrystalline panels, they’re rectangular, giving the panel itself a tiled look. Their life span is similar to monocrystalline panels, and while their conversion efficiency is lower (by 14%), they’re also a bit less expensive.
Amorphous panels are made by placing a thin film of active silicon on a solid or flexible backing (such as stainless or aluminum sheeting) depending on whether the panel is to be rigid-framed and glass-fronted or flexible. Flexible amorphous panels, in which cells are sandwiched between rubber and polymer covers, are light and tough enough that you can walk on them and, in some cases, even roll them up for storage.
This type of solar panel is also better if shade is an issue. With crystalline panels, even the thin shadow of a rope or shroud across one cell can reduce or halt output of an entire module. Amorphous panels have “bypass” diodes that essentially turn off shaded cells and provide a current path around them. Some monocrystalline panels also have bypass diodes, but this feature comes at an increase in cost.
Amorphous panels are the least expensive of the three types, but their efficiency is also lower – around 8%, or roughly half that of a monocrystalline type. This lower output is somewhat mitigated in newer panels, however, which use three-layer construction. Each layer absorbs different colors of the solar spectrum, so the panel will deliver more power longer each day and during lower light conditions than the other two types.

The charge controller should be mounted below decks and as close to the battery as possible.

Follow manufacturer instructions for wire connections.
Planning the system
While factors such as cost, mounting options, and output are important, a successful installation depends on knowing what you want the system to accomplish. Is the goal to float-charge a single battery or supplement an overall vessel energy plan? Answering these questions up front will help determine the type, size, and number of panels required.
To understand the process better, let’s walk through the basic steps to determine power requirements and installation considerations for a single solar panel installation. While the example itself is simple, the steps are the same used to plan more complicated installations.
For our example, the goal is to install a solar panel to provide charging for a single 12-volt, 100-amp-hour wet-cell battery used to power an automatic anchor light on a moored vessel.
The first step is compiling a daily power consumption estimate to determine how much solar power is needed.
The daily self-discharge rate for a wet-cell battery is roughly 1%, meaning our 100-amp-hour battery requires one amp every 24 hours just to maintain the status quo. The anchor light draws 50 milliamps per hour of operation, and we’ll assume it operates 10 hours each night. Multiplying current draw (50 milliamps) by hours of daily operation (10) generates a daily energy expense of 500 milliamps or .5 amps.
This means our solar panel must meet a minimum daily energy tab of 1.5 amps – one amp of battery self-discharge rate plus .5 amps of power draw for the anchor light.
Next up is figuring out panel size and the best mounting location. For our example, let’s assume the panel will be a horizontal, fixed-mount installation. A 10-watt horizontally mounted panel should generate between 3- and 5-amp hours per day.
We’ll need at least 13 volts to fully charge our 12-volt battery. As most solar cells generate at least 0.45 volts, you’ll want a panel with a minimum of 33 cells, which should provide around 14.85 volts.
Keep in mind that’s the minimum needed, which may not be enough once you factor in a few cloudy days. Most panels are designed to generate between 15 and 20 volts to overcome problems like cloudy days or inherent electrical resistance within the panel or installation components. While this higher voltage lets you make up for less electrically productive days, it also means you’ll want to install a solar charge controller (voltage regulator) to avoid battery damage due to overcharging.
Attempts to plan a system that tries to use the output of the panel and capacity of the battery to prevent overcharging (and avoid the installation of a charge controller) is false economy and should not be done. The system will never meet its full output potential and, worst case, can damage the battery due to overcharging.
A word on ‘charge controller confliction’
If your vessel has multiple charging sources, such as solar panels and a wind turbine, a crucial but often overlooked consideration is “charge controller confliction.” In short, this is an issue where the charge controller for your solar panel and the charge controller for your wind turbine are internally adjusted to the same maximum charge voltage set point. This means they are constantly fighting each other to be the dominant power source, which results in diminished overall charging output and performance. An in-depth article on this issue can be found at missioncriticalenergy.com (in the website footer, click “Superwind Turbine Manuals & Technical Bulletins.” Under the header “Charge Controllers,” select the document “Resolving Charge Controller Confliction”).
While this article addresses charge controller confliction at remote, off-grid sites, the information provided is also applicable to vessel installations. — F.L.
Location and mounting
Solar panels should be mounted in a location where they are exposed to the maximum amount of sunlight but do not interfere with operation of the vessel or the movement of passengers and crew. Solar panels will typically be either fixed or mounted on some type of movable bracket that allows you to actively point the panel toward the sun for maximum output. Both methods have their pros and cons. Fixed panels (which are normally mounted horizontally) don’t produce as much power as a panel that can be adjusted to face the sun. The downside is that adjustable panels must be aimed throughout the day to maximize their output.

Use good quality, marine-grade heat shrink connectors (top) and liquid electrical tape (right) to create airtight, waterproof seals and reduce corrosion.

Installation
After choosing and mounting your panel, it’s time to connect it. The first thing you need to determine is the size (gauge) of the wiring to be used. Multiply your panel’s rated amp output by 1.25 (which adds a 25% safety factor). Then measure the length of the entire wiring run, panel to battery, and multiply by 2. Once you have these two numbers, refer to the American Boat and Yacht Council’s (ABYC) 3% voltage-drop table for wire size. Ancor Products offers a handy wire calculator on its website ( ancorproducts.com/resources ).
Always use good quality marine grade connectors and tinned, multi-stranded copper wire with vinyl sheathing. The wire will run from the solar panel to the charge controller first, then to the battery. Try to keep the wire run as short as possible, and if it transits an external deck or cabin house (it likely will), be sure to use an appropriate weatherproof deck fitting.
The charge controller should be mounted below decks and as close to the battery as possible. You’ll always want to follow the manufacturer’s instructions for connections, but in a typical installation you’ll connect the solar panel’s positive (red wire) lead to the charge controller’s positive input wire or terminal and the negative (black wire) lead to the charge controller’s negative input wire or terminal.
Next, connect the charge controller’s negative output to the battery negative terminal and the controller’s positive output to the battery’s positive terminal via an appropriately sized in-line fuse (or circuit breaker). ABYC recommends these be installed within 7 inches of connection to the battery or other point in the DC system. To reiterate, the installation of the charge controller can vary among models, so follow the manufacturer’s installation instructions.
Finally, ensure all connections are waterproof and secure any loose wire runs with wire ties and cable clamps for a neat installation. Then get ready to lean back and soak up some free sun.
Related Articles
The truth about ceramic coatings for boats.
Our editor investigates the marketing claims of consumer-grade ceramic coatings.
Fine-Tune Your Side Scan Fishfinder
Take your side-scanning fishfinder off auto mode, and you’ll be spotting your prey from afar in no time
DIY Boat Foam Decking
Closed-cell foam flooring helps make boating more comfortable. Here’s how to install it on your vessel
Click to explore related articles
Frank Lanier
Contributing Editor, BoatUS Magazine
Capt. Frank Lanier is a SAMS Accredited Marine Surveyor with more than 40 years of experience in the marine and diving industries. He’s also an author, public speaker, and multiple award-winning journalist whose articles on boat maintenance, repair, and seamanship appear regularly in numerous marine publications worldwide. He can be reached via his YouTube channel “Everything Boats with Capt. Frank Lanier” and website captfklanier.com.
BoatUS Magazine Is A Benefit Of BoatUS Membership
Membership Benefits Include:
Subscription to the print version of BoatUS Magazine
4% back on purchases from West Marine stores or online at WestMarine.com
Discounts on fuel, transient slips, repairs and more at over 1,200 businesses
Deals on cruises, charters, car rentals, hotel stays and more…
All for only $25/year!
We use cookies to enhance your visit to our website and to improve your experience. By continuing to use our website, you’re agreeing to our cookie policy.
- Weekly Newsletter
California's Boating & Fishing News

Image courtesy of Sun Powered Yachts
Navigating the Seas of DIY: A Sailor’s Guide to Solar Panel Installation
In the world of sailing, mastering the art of boat maintenance is as essential as hoisting the sails themselves. For seasoned sailors and newcomers alike, embarking on a DIY project to enhance their vessel can be both rewarding and practical. From routine checks to transformative upgrades, here’s a comprehensive look at a DIY project that sailors can undertake to ensure their boat is shipshape and seaworthy.
Project Title: Installing a Solar Panel System
With a growing emphasis on sustainability and energy efficiency, installing a solar panel system on a boat has become an increasingly popular DIY project among sailors. Not only does it offer the convenience of generating electricity on board, but it also reduces reliance on traditional power sources and minimizes environmental impact.
Marine solar panels are crafted to endure harsh marine conditions, using corrosion-resistant materials like aluminum frames and tempered glass. They’re compact and lightweight, fitting well on boats with limited space and can even flex to fit curved surfaces. Products such as the 140 Watt Flexible Marine Solar Panel from Sun Powered Yachts offer 140 Watt Semi-flexible Marine Solar Panels that are ideal for mounting on a bimini top or a curved deck surface. These panels offer diverse mounting options, with specialized hardware for secure attachment. Marine Solar panels feature enhanced waterproofing, often meeting IP67 or IP68 standards and include safety features like overcharge protection. Across the board, marine solar panels ensure reliable and efficient power generation for boats and yachts, contributing to sustainability and energy independence.
Materials Needed:
- Solar panels
- Charge controller
- Battery bank
- Mounting hardware
- Wiring and connectors
- Tools (drill, screwdriver, wire cutters, etc.)
Step-by-Step Guide:
- Assessment and planning: Begin by assessing your boat’s layout and determining the optimal location for mounting the solar panels. Consider factors such as sun exposure, available space and accessibility. Plan the layout of the system, including the placement of panels, controller and battery bank.
- Selecting solar panels: Choose high-quality marine-grade solar panels designed to withstand the rigors of marine environments. Consider factors such as wattage, size and efficiency to meet your energy needs.
- Mounting solar panels: Install mounting brackets or racks on the boat’s deck or cabin roof using appropriate hardware. Ensure that the panels are securely attached and positioned at an angle to maximize sun exposure.
- Wiring and connection: Connect the solar panels to the charge controller using suitable wiring and connectors. Follow manufacturer instructions and adhere to proper safety practices. Route wiring neatly and securely, avoiding potential hazards or obstructions.
- Installing charge controller: Mount the charge controller in a well-ventilated and easily accessible location. Connect the controller to the battery bank, ensuring correct polarity and wiring configuration. Set up any additional features or settings according to manufacturer guidelines.
- Connecting battery bank: Install the battery bank in a designated compartment or storage area, securely fastening it to prevent movement. Connect the battery bank to the charge controller, fuse box and onboard electrical system.
- Testing and commissioning: Once the installation is complete, conduct thorough testing to ensure the system functions properly. Verify that solar panels are generating electricity and charging the battery bank efficiently. Test all electrical connections and components for any signs of malfunction or irregularity.
- Maintenance and monitoring: Regularly inspect and maintain the solar panel system to ensure optimal performance and longevity. Clean panels periodically to remove dirt, debris, or salt buildup. Monitor battery voltage, charge levels and system operation to address any issues promptly.
Embarking on a DIY solar panel installation project can empower sailors to harness the power of the sun and reduce their environmental footprint while enhancing onboard comfort and convenience. With careful planning, proper installation and ongoing maintenance, sailors can navigate the seas with confidence and sustainability, one solar panel at a time.
Additional Resources:
- Online tutorials and guides
- Marine electronics retailers
- Boatbuilding and maintenance forums
- Professional marine electricians or technicians for consultation
Editor’s Note:
While the DIY tips and projects outlined in this article offer valuable insights and guidance for boat maintenance, it’s important to emphasize that they are intended as suggestions and recommendations. Every boat is unique, and the scope of maintenance and repair tasks may vary depending on factors such as vessel size, age and configuration.
Boaters should exercise caution and discretion when undertaking DIY projects, especially those involving electrical systems, structural modifications or other complex tasks. Prioritize safety at all times and consult professional marine technicians or experts when in doubt.
Additionally, The Log recommends that readers conduct thorough research, seek multiple sources of information and consider their own skill level and experience before attempting any DIY projects. While these projects can be rewarding and cost-effective, they should never compromise the safety or integrity of the vessel.
Ultimately, the goal of DIY boat maintenance is to empower boaters to take an active role in caring for their vessels and enjoying the maritime lifestyle to the fullest. Whether tackling minor repairs, upgrades or routine maintenance tasks, boaters should approach DIY projects with diligence, patience and a commitment to quality craftsmanship.
Share This:
- ← Stocking Up for Safety: How to Prepare Your Boat with Adequate Provisions for Bad Weather
- Preparing for Hurricane Safety in or out of Mexican Waters →
Comments Cancel reply
Your email address will not be published. Required fields are marked *
Your Thoughts are Appreciated
Save my name, email, and website in this browser for the next time I comment.
Top 3 Best Solar Panels For Sailboats

Last Updated by
Daniel Wade
June 15, 2022
Choosing whether or not to install solar panels on your sailboat is a big decision. They are not exactly cheap, though they can start to pay themselves off pretty quickly.
This article is going to cover not only why you might want to use solar panels but all the benefits they provide. You will also find a helpful guide on which solar panels would be best for you and your budget. Hopefully, by the end, you will feel confident in your decision to install solar panels on your sailboat and even have an idea of which ones you might like.
Table of contents
Are solar panels on sailboats necessary?
Whether or not you should be installing solar panels on your boat is a matter of choice, not out of necessity. Sailboats get their power from the wind, by harnassing it in their sail. So if you plan to be sailing for the afternoon you probably don’t need solar panels.
You could charge a battery pack from the marina and that will probably see you through several trips. The problems only really start to arise if you are planning to be on your sailboat for longer periods, or even permanently. If you plan to live on your sailboat year-round, even if you spend 80% of it in a marina, you would be better off with some solar panels. Even if it is just as a backup source of power.
Are solar panels on boats safe?
Solar panels are generally pretty safe. They have no moving parts and typically have a very strong protective cover over them so you never come in contact with the electrics themself. So, as a source of power, they are generally pretty safe. The only time they may become unsafe is if they are badly damaged.
Solar panels are often covered by glass plating that keeps them safe. It also helps them absorb sunlight and warmth. This is great, except when the glass breaks. If the glass protective cover on your solar panels should crack and splinter you are at risk of serious injury from sharp shards of glass. Not only is the glass itself dangerous at this point, so are the electronic components inside. They have powerful currents running through them, and if you come in contact with them you may be in for a shock.
Furthermore, if these electronics get wet they can become deadly. Electricity and water do not mix well at all. Being as you are on a sailboat, at sea, the chances of them getting wet is very high. Luckily, the chances of them breaking in the first place are slim to none. The only real way they would break, besides vandalism, is by debris hitting them during a bad storm. There is not often debris at sea, so this shouldn’t be too much of a problem.
What are the benefits of having solar panels on a sailboat?
There are so many great benefits of having solar panels on a sailboat. They can be a lifesaver if you find yourself at sea for a long time. There benefits range from trivial comforts to being the difference between life and death. Here are some of the benefits you might not have considered about having solar panels installed on your sailboat.
Money-saving
Solar panels are not cheap, it is far cheaper to just run a generator or charge your batteries from the marina the whole time. At least, it is in the short term. Over time, it can start to become very expensive. With solar panels, you are looking at a big initial cost (the solar panels themself) and then it’s smooth sailing. You don’t need to pay for power again. Solar panels last for about 40 years before they start to become too inefficient at producing power. The cost of a few solar panels upfront compared to 40 years of marina fees and gasoline for a generator is the financially savvy move.
Emergency power
If you find yourself at sea, the wind dies down (or becomes too strong), and you find yourself stuck bobbing around waiting for more favorable conditions you may run into trouble. Depending on how long you are out there, you may find yourself with dead electronics. Be it a satellite phone, radio, or secondary engine (depending on the boat). Having a set of solar panels and a power bank can be a genuine lifesaver in these situations.
Comfort amenities
Whether you are day sailing or making a week-long voyage, having access to the comforts in life can make the whole journey so much more enjoyable. The amenities may not be available to you without having a constant source of power at sea. Having access to a kettle, tv, videogame system, radio or microwave oven may be the only thing keeping you going at rougher times. As exciting as sailing can be, when you aren’t sailing and are just bobbing around it can be quite dull. The sea is beautiful, but there is only so much time you can spend looking at the water before you miss the comforts of land. With solar panels, you can bring those comforts with you.
Eco-friendly
There are only two alternatives to solar panels. A gasoline generator, and taking power from the grid. Neither of these is good for the environment. Luckily, solar panels are a great third option. Solar panels are completely eco-friendly and are great for the environment. This is not just great for the earth, and your conscience, but for the journey itself. If you are running a gasoline generator at sea you are going to be listening to it thrumming away and smell the burning gasoline. Wouldnt you prefer silence and nothing but the smell of the sea breeze?
How much do solar panels cost?
How much solar panels cost is almost entirely tied into both their voltage/wattage and whether or not they are portable panels. Portable solar panels are great for people who don’t spend a lot of time on their boat or are happy enough living off the marina’s power grid. Permanent solar panels, the kind that may need to professionally installed, can end up costing far more. They are also likely to be far superior and you can pretty much forget about them once they are installed.
Portable solar panels will cost just a few hundred dollars each. You will need a few to be sustainable, but that’s not going to be much of a problem. These portable solar panels can just be rolled out on the deck of your boat, weighed down, and then hooked up to a battery pack. The battery itself here is going to be the most expensive part of the whole set up. A decent-sized battery could set you back a $1000. But, when charged fully it will last days. Even with constant use.
Permanently installed solar panels can cost one or two thousand dollars in some cases. The advantage here though is once they are installed that’s it, you can forget about them. You don’t have to put them up, take them down, and find somewhere to stow them every time they need using. They too will need to be hooked up to a battery, the battery is still only going to cost you $1000. If you are installing permanent solar panels because you plan to be making long voyages, it is ideal to have two or perhaps even three large batteries hooked up to your boat. One to run off, one or two for emergencies.
How do I maintain my solar panels?
Solar panels, unlike gasoline generators, are generally pretty easy to maintain. They have no moving parts and are thus pretty self-sufficient. They don’t need taking apart and they last as long as 40 years. That being said, if they do break they need repairing as soon as possible. The exposed electrics can be deadly when water is thrown into the mix. Which, on a boat, is almost always. The glass cover will need replacing and the electronics inside may need repairing, though not always. Don’t ever attempt to do this yourself unless you are experienced at making these repairs. The cost of hiring someone to do it for you is preferable to being dead. Solar panels have very powerful electric currents, that when in contact with water and yourself can be fatal. As mentioned above, these panels rarely break so you will likely not ever run into this problem. If you do, hire a contractor.
Do my solar panels need cleaning?
Solar panels work by converting the light and heat of the sun into useable power. The process itself is rather complicated but the results are simple to understand. That being said, there are some reasons that your solar panels will stop working as effectively. They all revolve around a lack of sunlight. It could be because it is night time. It could be because it is very cloudy. Or, it could be because they are dirty. If solar panels become too dusty, dirty, and become too covered in grime they stop operating at maximum efficiency. This is not as much of a problem at sea, the sea spray stops dust settling. The biggest thing you will need to clean off your solar panels is salt build-up and slime. This is easy enough to do with some warm soapy water. Freshwater, not seawater. You want to be removing as much salt as possible. Salt is corrosive to electronics, so removing it is important. Never clean your solar panels using pressure washers as they can crack the glass.
Which are the best solar panels for sailing?
There are so many options on the market at various price points. Here are three very different options that will all make good choices, depending on your needs. It is important to consider not just price but power output. Spending a lot of money on solar panels now might not feel ideal, but it is the most cost-effective decision.
1. Renogy Starter Kit
This starter kit is going to be perfect for installing on almost any sized boat. There are four solar panels, each can be fitted permanently to the boat. They can be mounted (and unmounted) easily, for your convenience. They do require a flat surface, but they are small enough that that likely won’t be too much of a problem. This starter kit is very middle of the pack price-wise but should provide enough power for a small to medium-sized vessel easily. It is also possible to buy extra panels individually should you need them.
Wattage: 400/4 (100 per panel)
2. Nature Power Rigid
The nature power rigid is a large, powerful, single solar panel. If you are looking for the right panels to power your entire boat comfortably, these are the ones for you. They are very large so they will need a large flat surface area. alternatively, they can be hung vertically from rails. This is an inefficient way of using them, so you would need to buy more this way. Nature power makes various solar panels so you could find some smaller ones of the same brand to supplement it. This one is not so easy to install, you might need to hire someone to install it for you.
Wattage: 165
3. Nature Power Monocrystalline
Nature power makes a portable solar panel that fits inside a special briefcase. It is perfect for stowing away easily and only taking it out when it is needed. It is decently powerful considering its portable, but there is the inconvenience factor of having to set it up each time. If you planned to buy the nature power rigid, buying one of these portable panels might be ideal for supplementing your power supply when it is especially sunny. Though, it may be cheaper for you to just fit more of the Nature Power Rigids.
Wattage: 120
Hopefully, you now have a good idea about whether solar panels would be right for you and your sailboat. Sailing is great, but the lack of power at sea can be dreadfully boring. Luckily, there are so many great options available on the market. Not just the ones mentioned above. Buying a solar panel is an investment, the initial cost is minor compared to the steady return from all the savings you will make.
Related Articles
I've personally had thousands of questions about sailing and sailboats over the years. As I learn and experience sailing, and the community, I share the answers that work and make sense to me, here on Life of Sailing.
by this author
Sailboat Upgrades
Most Recent

What Does "Sailing By The Lee" Mean?
October 3, 2023

The Best Sailing Schools And Programs: Reviews & Ratings
September 26, 2023
Important Legal Info
Lifeofsailing.com is a participant in the Amazon Services LLC Associates Program, an affiliate advertising program designed to provide a means for sites to earn advertising fees by advertising and linking to Amazon. This site also participates in other affiliate programs and is compensated for referring traffic and business to these companies.
Similar Posts

How To Choose The Right Sailing Instructor
August 16, 2023

Cost To Sail Around The World
May 16, 2023

Small Sailboat Sizes: A Complete Guide
October 30, 2022
Popular Posts

Best Liveaboard Catamaran Sailboats
December 28, 2023

Can a Novice Sail Around the World?
Elizabeth O'Malley

4 Best Electric Outboard Motors

How Long Did It Take The Vikings To Sail To England?

10 Best Sailboat Brands (And Why)
December 20, 2023

7 Best Places To Liveaboard A Sailboat
Get the best sailing content.
Top Rated Posts
Lifeofsailing.com is a participant in the Amazon Services LLC Associates Program, an affiliate advertising program designed to provide a means for sites to earn advertising fees by advertising and linking to Amazon. This site also participates in other affiliate programs and is compensated for referring traffic and business to these companies. (866) 342-SAIL
© 2024 Life of Sailing Email: [email protected] Address: 11816 Inwood Rd #3024 Dallas, TX 75244 Disclaimer Privacy Policy
Updated 3 months ago
Everything you need to know about installing solar panels on boats
Written by Ana Almerini
Find out what solar panels cost in your area
Solar panels built specifically for use on boats are a great option as a source of backup power when you’re out on the water. Solar panels act as a way to recharge the boat's batteries and keep your appliances running, all without needing to buy gas for a noisy gas-powered generator.
Marine solar panels are a relatively niche market, but there are plenty of options to choose from since typically, you can install any DIY off-grid solar panel on your boat.
Our favorite solar panels for boats are:
Topsolar flexible solar panel
Renogy 100W 12V solar panel
SunPower 170W solar panel
Below, we get into the best solar panels to buy for your boat depending on your needs, how to determine which size you will need, and why utilizing solar power for your boat is a smart idea.
Key takeaways
Solar panels on your boat maintain your battery’s charge to ensure that your appliances always have power, without a loud and expensive gas generator.
An average 30-foot boat will need about 350 watts of solar power to maintain electricity.
To determine how many panels your boat needs, you need to figure out how much power it uses, which you can easily do with a battery monitor. It also depends on how big your boat’s battery is.
You can install solar panels in unique locations on your boat but it is important that they can track the sun’s movement throughout the day.
What is the best use for boat solar panels?
Boats use a lot of energy for things like maintaining autopilot, keeping navigation lights on, and powering radio systems. Solar panels can provide the energy to carry out these tasks and maintain your boat's battery if it happens to be sitting idle. In either circumstance, your battery will never run out of energy.
Not to mention, compared to gas-powered generators, solar panels have the added benefit of being quiet. They also don’t produce excess heat that makes sitting in your boat with a gas generator unpleasant on hot days.
You can use solar panels for any size boat. For smaller sailboats, the main job of your solar panels would be to keep the battery fully charged for your boat’s electricity. For larger boats, they help reduce or eliminate the need to use the engine to provide excess power.
The average 30-foot boat would require about 300-350 watts of power . Depending on your energy use and boat size, you need more or less solar power to provide you with electricity.
How to choose the right solar panels for your boat
The first step to determining what size solar panel will work for your boat is figuring out how much power your boat is using . You can do this by checking the labels on your appliances for the typical amp hours and volts used.
Or, you can use a battery monitor to measure the amount of energy your fridge, lights, or the other appliances on your boat consume while in use. After finding the amp hours your boat uses per day, you can determine the wattage of power your solar panels need to produce.
This example is extremely limited, you will need to determine how much energy your entire boat is using to make sure your panels provide enough power to keep your battery charged. But, technically if you had one 300-watt solar panel, or (3) 100W solar panels, they would generate 2,800W over those 8 hours. That energy would be more than enough to keep the above appliances running.
The size of your boat’s battery will also factor into which size solar panel you need . For instance, many DIY solar panels are meant to act as a battery charger to a 12-volt lithium battery, which is the typical size within a boat. But if you have a larger boat with a larger battery, you might need more than 350 watts of power.
Additional things to consider are whether you will need a charge controller and if you have enough unshaded space for your solar panels to absorb the maximum amount of sunlight.
Do you need a charge controller?
A charge controller acts as a regulator for the amount of energy that is transferred from your solar panel into your boat’s battery. This helps to make sure that your battery is not overloaded and overcharged, which can ruin the battery over time.
While it is not necessary, it is a good idea to install a charge controller with your solar panel system to help manage the energy load that your battery receives. This will prolong the life of your battery while ensuring your boat uses the exact amount of energy it needs.
Do you have enough space for boat solar panels?
Having a dedicated spot on your boat that has access to the full sun is key. Any shading, such as from a sail on your boat, will reduce the amount of energy your panels produce. While simply bringing portable solar panels aboard is an option, permanently mounting the panels to your boat makes it easier to always have your panels ready to go.
Because boats typically only have room for a small solar system, getting the most out of your limited space is key. With limited space, it’s best to look for high efficiency panels because you will need less of them to produce the energy you need.
Learn more : What are the most efficient solar panels in 2022?
Or something as simple as the setup below can power your boat's battery and be angled towards direct sunlight throughout the day while not taking up valuable space on the boat.
What are the best solar panels for boats to buy?
Any type of panel can be used on a boat such as monocrystalline, polycrystalline or thin-film. However, it is important to note that some companies exclude salt water and marine environments from their warranties.
We've listed some options below, you can choose based on where you have space to put the panels. For instance, thin-film panels are less efficient but they are flexible. So if you wanted to place a few panels on your boat’s roof versus one panel taking up valuable space, thin-film panels would be a good choice.
On the other hand, monocrystalline and polycrystalline panels have higher efficiency ratings and will ensure you get the most energy from your limited space or during low-light conditions. So if you have a location that can support racking, monocrystalline or polycrystalline solar panels are a better option.
Below are some of our top picks for solar panels for boats:
Most practical
Topsolar flexible solar panel
Cost : $149.99 Buy Now
The Topsolar 100W flexible solar panel is a practical, semi-flexible, cheap option. It does not come with a charge controller or an inverter but you can buy a few of these to create a simple solar panel system on your boat.
This flexible panel also allows you to utilize more space since this can be molded to fit untraditional angels on your boat.
Best quality, small cost
Renogy 100W 12V solar panel
Cost : $103.44 Buy Now
The Renogy 100W 12V solar panel is a great option. At 21%, it is a high efficiency monocrystalline panel manufactured by a reputable solar panel company.
There are pre-drilled holes for easy drilling to a mount on your boat. If you have space to secure solar panels to a mount, the Renogy panels will help you maximize energy output.
Best overall
Cost : $399.00 Buy Now
The SunPower 170W panel is a great flexible solar panel for off-grid use. Choose this option if you are interested in the versatility that a flexible solar panel offers and also want a reputable brand name with a high efficiency rating.
While these panels do not come with a solar charge controller, they must be used with one, so add one to your cart like the Victron Energy SmartSolar MPPT charge controller .
Why solar panels are a good choice for backup power on boats
Having a source of backup power on a boat is very important, you do not want to be caught far from land with a dead battery. Solar energy is the perfect choice because on a typical boating day, there is ample sunlight available as renewable energy. Because boats rely on a battery for electricity, a solar panel can ensure that this battery always has power.
There are many solar panel options available for your boat and can easily be installed DIY. They will help with your sense of security while saving money because you can skip out on the traditional gas generator and rely on a self-sufficient solar power system.
Ana is the Marketing & Communications Manager at SolarReviews, working within the solar industry since 2020. With a Master's in Climate and Society and professional experience in marketing, she helps communicate the value of solar to homeowners and build awareness of the SolarReviews brand. On weekends you can find her at the Jersey shore, reading a book from the ever-increasing stack on her side table, or eating food someone else cooked....
Related articles
Practical Boat Owner
- Digital edition

Boat solar panels: Everything you need to know to get started
- David Berry
- October 13, 2021
Want to add some boat solar panels, or wonder how to make the most of those you already have? David Berry has some advice...

While it seems like a good idea to mount a panel on the coachroof the chances of it becoming shaded are increased. Here the mast or rigging can easily throw a shadow over at least part of the panel, seriously reducing its output. Photo: Catchlight Visual Services/Alamy
Keeping batteries topped up without resorting to running the engine is an ongoing problem for yachtsmen. Boat solar panels are an obvious option, not just in the Med but also around the coasts of the UK as the price of panels has fallen over the years.
But choosing them can seem a bit of a black art: after all, how can you possibly predict how much sun you’re going to get during the season, or how much power your panel will produce if it’s not exactly aligned with the sun? But provided you accept a statistical approach using established databases, then prediction is easier than you think.
Ultimately the only thing we need to know is the conversion efficiency, or, how much sun turns into electrical power. NASA do a trick: they use multi-layer panels where each layer responds to a different wavelength so the usual 20% or so is doubled.
Article continues below…

Battery maintenance for boat owners: How to look after your boat batteries
For all but the smallest and simplest of craft a reliable supply of battery power is essential to keep both…

What is insolation? How much power is reaching my boat’s solar panels?
The sun is 93 million miles away, give or take. Packets of energy called photons leave it and travel at…
And there is a new material called Perovskite which is also used to provide an overlay on the standard silicone panel and the tandem panel is claimed to convert up to 28% of the sun’s energy into electricity.
Don’t rush though, when I looked on Amazon for one I discovered even the books describing it cost around £100! The panels themselves seem to be still in development.
How much energy does my boat need?
The first step is to work out your boat’s energy requirements. All you have to do is add up all the energy in watt-hours used by each device on your boat, such as the fridge, lights, computers and so on.
Energy is power accrued over time, so if power is measured in watts, energy is watt-hours. This can be tricky, for example how long is your fridge running for? And how about overnight? How much energy do the instruments take? Or your computer?
You can measure the power by measuring the Amps and Volts and multiplying them together to get Watts, but somehow you need to come up with a table similar to the one below. Once you have your energy requirements worked out, I suggest you add a goodly margin for expansion and errors – at least 10%.
Energy requirement for Aderyn Glas over the course of a day. ‘Current’ is Amps. ‘Duty’ is the portion of the day the (12V) appliance is powered up. eg Fridge 4A x 12V x 12hr = 576Wh
Next, you need to decide how much of this requirement should be met by the boat solar panels. We sail our Moody 33 Aderyn Glas throughout the summer season from our base in Preveza, Greece, so our requirements are essentially those of liveaboard sailors.
We want the panels to be able to supply most of our power needs and allow us not to have to ruin the peace of a quiet anchorage by running the engine simply for charging.
Weekend sailors might be content with a small panel to recharge – over the course of a week – the energy used during a weekend’s sailing. Getting the balance right is important, especially if you want to install enough boat solar panels to more or less cover your power requirements.

David Berry’s Moody Eclipse Aderyn Glas has boat solar panels mounted on a stern gantry where shadows are greatly reduced
But will you get the quoted wattage from your panel? If the panel is a 100W panel, will you get 100W? Panels are rated as the electrical power produced under certain strict test conditions, and these are solar irradiation (called insolation) of 1,000W/m2 at 25°C and an atmosphere of a particular clarity. Do we ever get these conditions in practice? Well, yes, we do, but life is never that simple – in this article I explain about how to assess the real insolation over the course of a day in your chosen location.
Types of boat solar panel
Leaving aside the exotic new Perovskite panels, there are three types that you might consider – a choice that hasn’t changed in years.
There are amorphous panels (good in shady conditions but large for any given wattage), printed panels (manufactured with an inkjet printer but really low conversion efficiency) and crystalline panels either poly- or mono-crystalline.

The smaller amorphous panel is 15W and the larger crystalline panel is 100W. So the larger panel is approximately twice the area, but seven times the power
What type of boat solar panels should I fit?
This question is a bit of a red herring – in reality, the question should be ‘How much space do I have?’
The academic drive is to make panels that are more environmentally friendly, both to make and dispose of, and to reduce the cost per watt.
But ironically this has resulted in a much poorer conversion efficiency generation by generation, which is not helpful to sailors with a small area available to mount the panels.

These panels are printed on a continuous inkjet printer with the idea that they can effectively be an endless strip. The problem with that, though, is the current can build up and eventually burn out the connecting cables. Furthermore, they are no good for yachts because the conversion efficiency is so low so you’d need a battleship in order to have enough space!
So, back to the first generation: crystalline panels come in mono- or polycrystalline species, but they only differ slightly in cost per watt and efficiency.
Added to the mix is the flexibility aspect: flexible panels require a bit of clever manufacture, and this is passed on in higher prices.
Many sailors think flexible panels are a solution because they can be mounted on the deck or coachroof or even the bimini but I’ve not considered them because all those places seem to suffer from shading, more of which later.

A hypothetical energy balance. The red line is the clear-sky power that the panel could provide during daylight. The blue line is the power your boat requires. Light blue is surplus energy, where the panel is outputting more than the load, and dark blue is where the load is greater than the panel can deliver. When night falls, the boat’s energy needs have to be met by the battery. In daylight, the battery becomes a load for the panels as it is charged. The green line is a notional illustration of the state of the battery; it winds downwards when there’s a shortfall and upwards when there’s a surplus available for charging. In winter, the load profile will be different and the captured power will be lower.
So does this mean the default starting point for any installation is a rigid, crystalline panel? In short: yes!
Where should I install my boat solar panels?
If you’re just fitting a small panel to top-up batteries on a mooring, buy a cheap rigid panel and find places on your boat where you can tilt it to catch the sun’s rays for the majority of the day.
We do this during the winter in Greece, where we strap on 20W or so of car battery top-up panels, and it works well for us. Choose a spot that isn’t shaded for the majority of the day and this technique should serve you well.
Do the sums. I have heard of people whose batteries have been damaged by a constant high power being applied to an already charged battery, even through a regulator. My rule of thumb for trickle-charging is a panel wattage about 10% of the battery’s stated amp-hours, but that’s a guess.

Aderyn Glas is fitted with two monocrystalline panels which are rated at 100W apiece – they take the same space previously occupied by amorphous panels which could only muster 75W between them
If you spend more time on board and need to get the best from your panels, mono- or polycrystalline panels will give more power from the same space. We replaced our 75W bank of amorphous panels with 200W of monocrystalline panels in the same area.
But with the higher efficiency comes higher sensitivity to poor mounting conditions, so if you want the best from your panels you need to do your utmost to ensure they’re not shaded, and also that they are tilted as close to a right-angle to the sun as possible. This is why liveaboards often mount theirs on adjustable gantries at the stern or on the pushpit.
Intrinsic losses
Let me just revisit this: the relationship between the nominal power of a boat solar panel and what you really get. When the manufacturer quotes, for example, 100W for a panel, that is the expected output under test conditions.

Choose your site carefully – this coachroof panel will be shaded by the boom, reducing its output by a considerable margin
The test conditions are an insolation of 1,000W/m2 at 25°C. So a typical panel of half a square metre will receive 500W of insolation, then we multiply by the efficiency of 22% or 0.22 and you get roughly 100W. So if you get a sunny day that insolates your 100W panel at 1kW/m2 then you have the potential to get 100W output for a short time around solar noon.
But the energy over 24 hours will be below this owing to the declination of the sun over the course of the day. This can be partly remedied with a tracking panel, but as the sun declines the light has to pass at a more oblique angle through the atmosphere, hence losing power.
The insolation will also be affected by your latitude, and by any form of shading or scattering from atmospheric dust, haze or cloud. Another important intrinsic loss is that heat reduces a panel’s output by about 5% for every 10°C rise in temperature greater than 25°C. For this reason, it’s quite possible to get a higher output from a boat solar panel in cooler northern latitudes than on the Equator!

This is the comparison between an MPPT controller and a PWM type over a 30 minute periodSo you see what I mean when I say the question is all about how much space you have: the default option should be a crystalline panel because it has the best watt per unit area coupled with price per watt, and we only need to deviate from this simple first-generation solution if other factors are important.
Cost and efficiency
Since we’re only talking about crystalline panels the efficiency is always going to be around 20% and the cost less than £1/Watt.
There are a large number of suppliers out there now but I should stick to the well known names such as Kodak, Polaroid, LG, Panasonic and Victron.
For suppliers I would look at Amazon (of course) or, in the UK, Midsummer Energy which stocks not just panels but all the cables and bits you will need to fit them.

Victron MPPT controller
Other boat solar panel system losses
Losses in cables are proportional to the square of the current. The equation is P=(i x 2) x R where ‘i’ is the current in amps, R is the resistance in ohms and P is the power lost in watts. The voltage gradient from the high voltage at the panels to the lower one at the regulator is fixed by the cable resistance and current (Ohm’s law), which is in turn set by how sunny it is and the power required.
But the resistance is a matter of design. To minimise cable losses and prevent potential cable overheating, large-core cables are needed. Resistance is also proportional to the length of the cable, so long cables need to be even fatter than short ones. I tend to use car speaker cable which is fat and can insulate the 12V we need.
Of all the possible ways to lose power from a panel, this is the most significant. On a crystalline panel, even the stripe of a rope’s shadow can wipe out a huge amount of the potential output power. Why is this? The individual cells in a crystalline panel are wired in such a way that a cell which is in shadow and not producing will act as a sink for the power produced by the other cells it’s wired to, with the result that virtually no power escapes from the panels as a whole.
You must have a regulator. The job of the regulator is to throw power away. It does this to ensure the power passing on to the batteries or services is not too great for them to handle. Normally it does this by controlling the amount of power passing through it and hold the output voltage at some predetermined value such as the float charge voltage of 13.4V.
The value of the power it passes depends on the current required by the load: the sum of batteries, lights, fridge and so on that are sucking the current from the panels. If the fridge is on, for example, more power will flow through the regulator and it will throw less power away as heat.
Most common, older regulators use a pulse width modulation (PWM) system which is more efficient than simply controlling the output voltage. Maximum power point tracking (MPPT) devices provide more usable power by seeking the panel’s optimum power voltage although they are expensive.
Chief among the suppliers is Victron (avoid the so-called MPPT types from ebay, they are almost certainly not MPPT controllers). And if you have the room it might be better to spend the money on a larger boat solar panel than on an MPPT controller. This is what we’ve done on our canal boat, settling for a PWM type.
To the boat solar panel, the regulator is part of the load – a consumer of power – which is why the entry to the regulator is an appropriate place to measure the voltage and current if you want to see exactly how much is being generated by the panels.
What power do I really get from boat solar panels?
If you do the sums, the unavoidable losses on a new panel operating at 65°C (measured in full summer sunlight in Greece) are going to be in excess of 20% from the temperature increase alone. Our example 100W panel is therefore only putting out 80W, and that’s only for a few hours.
If you really need every scrap of power then you need to find a way to keep the panel cool, and you need to invest in an MPPT regulator. As the panel gets older its performance will drop off even more. All a bit depressing, isn’t it?
I have to say, though, that in our particular installation on Aderyn Glas we regularly get more than 10A from our 200W panels, and our highest recorded value was 170W, which suggests that these loss figures are conservative.
In reality, with a well set-up installation you can expect to get a maximum of 75% of the power you would expect from a continuously insolated panel operating at its rated power.
Why not subscribe today?
This feature appeared in the May 2021 edition of Practical Boat Owner . For more articles like this, including DIY, money-saving advice, great boat projects, expert tips and ways to improve your boat’s performance, take out a magazine subscription to Britain’s best-selling boating magazine.
Subscribe, or make a gift for someone else, and you’ll always save at least 30% compared to newsstand prices.
See the latest PBO subscription deals on magazinesdirect.com
Captain Curran's sailing blog
~ a collection of sailing adventures from Alaska to Cabo
October 6, 2014
Solar panels for boats: an easy installation guide., marine solar panel installation.
- I am writing the following instructions for boat people or RV campers.
- I describe a basic set up that provides a charge onto your 12 Volt DC battery bank.
- If you want to use this system to power your home, then you'll also need an inverter to switch the 12 Volt DC electricity to 110 Volt AC.
Ok, here's my simple DIY instructions for solar installation on a boat or an RV camper.
How to install solar panels for boats, step by step guide for installing a solar panel boat system, faq: what size panel should i get, faq: which brand of solar panel is best, faq: do i need a controller, faq: how did you mount your panel on your stern rail, faq: how do you wire up the panels/controller/battery, faq: how much will this whole solar panel project cost, solar power for boats price breakdown, okay - good luck with your marine solar panel installation , capt. curran, 60 comments:.
Heany - Don't hesitate, the beauty of this system is that there are no moving parts, which means maintenance is minimal.. turning photons to electrons
Good question - visit your local machine shop They should have barrels of aluminum flat panels You want 12-16 inch long, need to measure panel That's it Then drill holes and strap in on the rail Have fun!
Thanks Douglass - all the best..
Great information, thank you! Where did you purchase the white plastic rail mounts?
Hello Philip Magistro, I bought them at a boating store in Seattle - called Fisheries Supply - they may ship. But I would also check your local west marine - they are standard stern rail mounts - they fit lots of other stuff as well as solar panels. Good luck !
Excellent, glad it was helpful. I'm about to post a couple new photos of the system. Everything is still working great.
Two questions 1. Is a 30w panel large enough to trick charge two 12v batteries? 2. How large an in-line on the positive lead to the battery?
Hello - Yes, a 30watt panel is large enough to trickle charge 2 12 V batteries. That is the set up I have on my boat - it works great - even in mixed sun/cloud conditions. When you ask 'how large' an in-line on the pos. lead - I am assuming you're asking the guage. I can't give the exact guage that is suited for your set-up. But, I know that the reasonable range is between 10-14 awg. Hope that helps.. Cheers
Kevin Thanks. Great info! I was actually trying to ask type and size of fuse on the positive lead to the battery. Fingers! Cheers Bill Pierson
Thanks for a great post! I'll go with the Renogy 200 Watt kit. I know it's not as adventurous, but easier and faster. And time is money :)
Lucas, I hear ya. Time is money - best of luck with that kit. I think you've made a wise decision.... Kevin
Thanks a lot Kavin for your guidance on installing a solar panel on boat. As solar panels are the most effective and the best way of generating electricity these days so everybody wants to install a solar panel of their own. But installing a solar panel in the boat is little challenging. Thanks for sharing the step by step guidelines, it is definitely going to help the readers.
Great article. A few questions: The article explains how to hook it up to one battery. But I have a system with two house banks of two bateries each, as well as a starter battery. How do I ensure that the trickle charge gets to all give batteries? Or do you just hook it up to the starter battery? How does this system interact with my charger?
Mary, I have a similar battery bank - but the two are connected. I connect the leads of the solar panel to my house batteries. However, if they are not connected - then I would connect the leads of your solar panel to the starter battery.
Mary, I would get a MorningStar SunSaver Duo controller which can charge 2 batteries (or banks thereof) and set the 2 house banks in parallel on the controller's Batt1 and the Starter Battery on Batt2. This controller has the option to charge 90/10 or 50/50, 90/10 is best for this setup because the starting battery doesn't need much, just enough to top-it-off.
Hi Kevin, I purchased the Renogy 100w panel with controler. I like your plastic rail mounts. Where can I find those. I plan to mount this on the stern of my 73, 27' Catalina stern rail. Thanks, Chris
Chris, I got mine at a boat store in Seattle called Fishery Supplies. I just looked it up on their website. Here's the page for those rail clamps. https://www.fisheriessupply.com/sea-dog-line-removable-rail-mount-clamps-327199-1 Made by a company called Sea Dog. Good luck - Kevin
I have a 20 volt panel, single marine battery, with a controler working without problem for about 4 years. While motoring out of the marina the controler caught fire. I did not have a fuse installed as you described in your installation guide. Any idea what might have caused this? Barry
Barry Curran, That is an odd and unfortunate situation. I am not an expert on safeguarding circuits, however I can weigh in with my opinion. I do think that the installation of a circuit fuse would help prevent over-charge or over-heating happening within the circuit. I think - assuming the over-charge was happening throughout the circuit - that the fuse would have blown, thereby salvaging your controller. However, there is a chance that a diode or some other internal circuit on the controller was the weak link. In that case, I don't believe a downstream fuse would have helped save your controller. I would install a fuse and get yourself a new controller. Best of luck! Kevin Curran
Just an helpful clarification on the purpose and location of the fuse. The fuse is to protect the wire, and should be placed as close to the origination of the power source as possible which, in this case, is the positive lead near the solar panel. We're all use to hearing about locating the main fuse on a boat as close to the battery as possible; that's because that's where the power comes from. Also, the fuse should be sized based upon the length and gauge of the wire.
Thanks for that additional insight on the location of the fuse! Sorry I didn't see this comment earlier.
Thanks for sharing the helpful guide to install solar panels .
Thanks for sharing article solar installation on boats it is really informative.A Solar panel is typically a panel that absorbs solar energy and uses it as a source of energy to generate electricity. They are basically made up of solar cells or the photovoltaic cells that are arranged as a photovoltaic array making up the photovoltaic system.I know a place one of the best solar installation company provides best solar services and products that are not just economical, but also efficient with customized solutions to offer you the best from our vast range of affordable models...
Greetings, How lucky am I to have happened upon your easily understood blog. Stupid question: can I mount the solar panel flat on the deck of my Nonsuch sailboat? (I know: don’t step on it!). Will it be worthwhile? (It can’t go on the stern rail).
Yes, that can be done. If you have a bimini or any cover in your cockpit, that is probably a better location. But flat on the deck can work, you can create a border around it to prevent falling on it...
Thank you so much for your excellent blog. I am considering a solar system for my 28' Catalina sailboat. Battery question: Any problem using solar systems with AGM batteries? I have two, house and starter battery.
Hmmm, that's a good question. I have never heard of any issue with AGMs on a solar system. Any other readers here have comments?
Selecting the correct charger depends primarily on the design of your deep cycle battery, so the first thing you need to do is determine the construction type of your battery. TrollingBatteryAdvisor.com This is likely to prolong the life of each battery and save you money in the long run.
Great blog! Can I leave my solar panel attached to the battery while I'm drawing from the battery to run my trolling motor?
Anonymous, Yes, you certainly can. There is no issue with drawing from a battery that is being fed energy from a solar panel. Enjoy Captain Curran
Thanks for sharing this article here about the solar panels for boats . Your article is very informative and I will share it with my other friends as the information is really very useful. Keep sharing your excellent work.
Great to hear! Glad the post was helpful..
Thanks a lot, Captain Curran and co-Captain Jessica for a nice and informative article about "Marine solar panel installation". This article will surely help the sailor in the Sea. And using a solar panel in the mid-sea is a very nice idea as an alternative source of power. Best wishes from SolarPandit
Thank you very much, Captain Curran and co-Captain Jessica, for a very interesting and insightful post on "Marine solar panel installation." This article will undoubtedly assist the sailor at sea. Using a solar panel and in the middle of the sea as an alternate source of electricity is also a great idea.
Hello all, Great to see the article has been helpful for those putting panels on their boat. Don't hesitate to reach out with any questions. I changed the notification, so I should be pinged when someone asks a question. Fair winds!
The Renogy 30 Watt Solar Panel is an excellent choice for light energy users, while the 100 Watt Solar Panel is preferred for moderate energy users. And remember to use a suitable quality controller like the Morningstar SunSaver-10 to control the panel's charge and prevent over-charging the battery.
Their step-by-step guide for installing solar panels on boats is incredibly helpful, and I appreciate the personal touch of sharing their own experiences and the success they've had with their solar panel system. The detailed explanations, recommended products, and estimated costs make it easy for someone like me to envision completing this project over a weekend. I'm definitely inspired to take on this DIY installation and enjoy the freedom of generating my own energy while sailing.
I can’t really help but admire your article your topic is so adorable and nice.
Forbidden love in a mesmerizing supernatural universe. Anime like Devils Line
Captain Curran's guide to installing solar panels on boats is a real lifesaver! After following his easy-to-understand steps, I completed my own installation over a weekend, and now my boat's batteries are always topped off during my fishing trips in the Chesapeake Bay. No more worries about a dead battery spoiling the fun!
Hello Captain, Great article, thank you. Our vessel has (6) 6 volt golf cart batteries, a 2000 Watt inverter, plus a generator. I want to limit the generator recharge time by installing a 100 or 200 watt kit that you recommend. My question is can I just connect the pos. and neg. marine grade wires from the controller directly to my battery bank pos. and neg. Thanks, John
This article on installing solar panels for boats brought back memories of my own sailing adventures along the coast of California. I remember the frustration of being stranded due to a dead battery and the relief that came with finding a solution. Capt. Curran's step-by-step guide is not only practical but also reflects his passion for sustainable energy solutions, making it a valuable resource for fellow sailors.
Post a Comment
9 Best Solar Panels for Sailboats
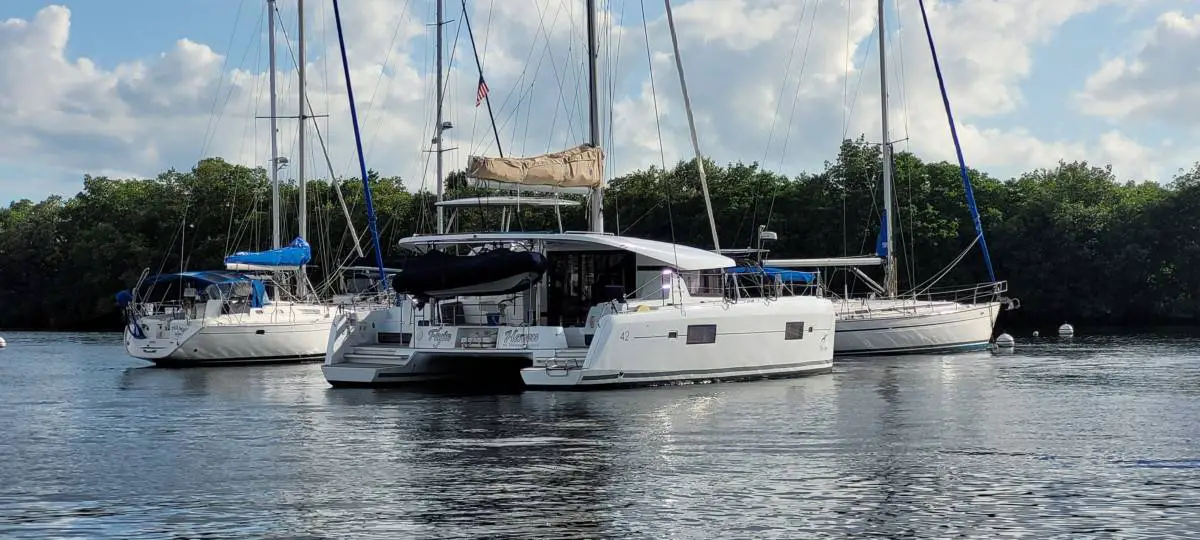
As an Amazon Associate, we earn from qualifying purchases. We may also earn commissions if you purchase products from other retailers after clicking on a link from our site.
Solar panels have become game changers when it comes to supplying power while off the grid. Marine solar panels can charge anything from batteries to computers to bigger electronic appliances. What are the best solar panels for sailboats?
The 9 best solar panels for sailboats are:
- Renogy Flexible Solar Panel
- Newpowa Solar Panel
- SunPower Flexible Sol ar Panel
- Eco-Worthy Off-Grid Solar Panel
- Rich Solar Polycrystalline
- Topsolar Flexible Solar Panel
- HQST Monocrystalline Solar Panel
- WindyNation Solar Panel Complete Off-Grid
- DOKIO Solar Panel Kit
This article will explore everything you need to know about the best marine solar panels.
Table of Contents
Solar Panels on Sailboats: An Overview
Before exploring the best solar panels, it is helpful to consider how solar panels on sailboats work and how many you need. Solar panels sit on different parts of a sailboat’s surface and absorb the sun’s rays, converting them into energy. This energy is used to power chargers, fridges, cooking stoves, and other electronics you need for self-sufficient sailing.
Worth noting is that today we will only discuss solar panels and not the batteries, which of course is an essential part of a complete system; we will also not discuss charges or charge controllers.
The products in this post will get you started in the right direction, but if you’re looking for a high-output system, then I suggest you contact someone that can help you calculate your energy requirements.
How Many Solar Panels Do I Need for My Sailboat?
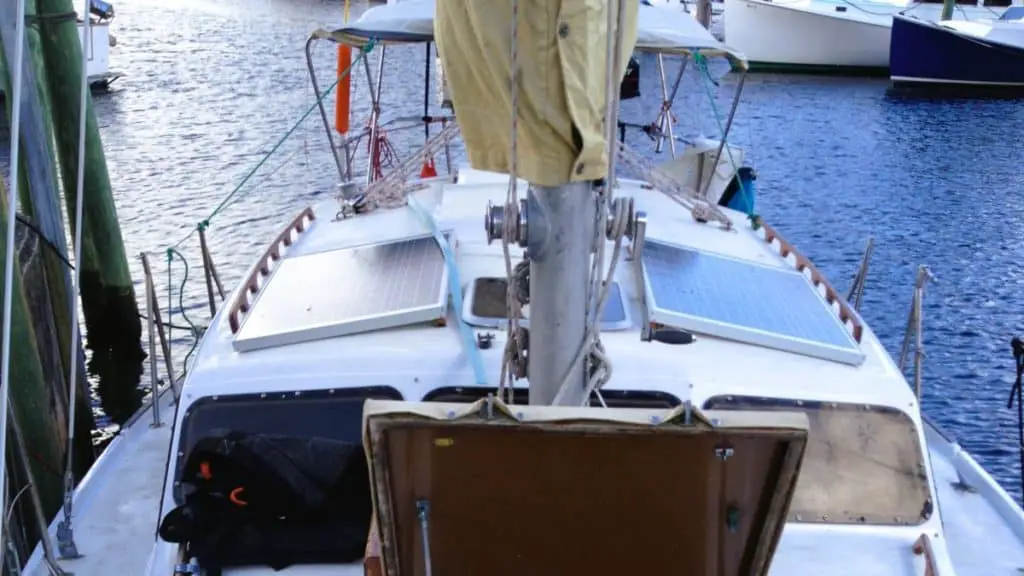
You will need between 2-8 solar panels for your sailboat. The exact amount depends on your sailboat’s space and how many electronics you need to power. Most solar panels can absorb between 100-300 watts per hour. On average, you will need approximately 1500 watts of power each day.
If your solar panels absorb 1500 watts daily, here’s what they can power on your sailboat:
- A laptop charger
- A microwave
- A coffee maker
- An induction cooker
If you want to power more heavy-duty electronics like a washing machine or a television, look for solar panels that absorb 400 watts. For heavy-duty electronics, try installing 5-8 solar panels.
Flexible vs. Rigid Solar Panels
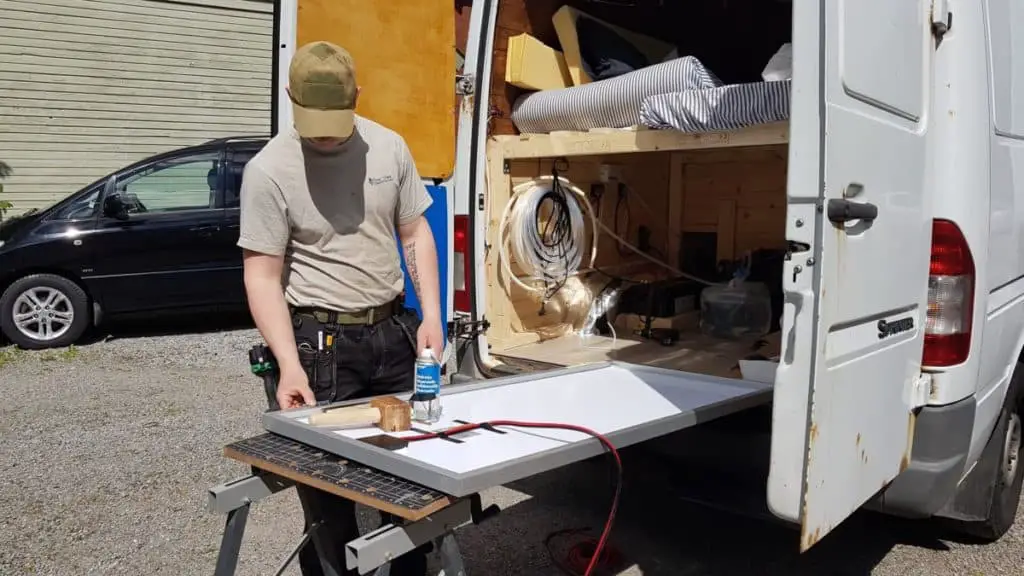
The three main types of solar panels are rigid panels, flexible panels, and semi-flexible panels.
Rigid panels are surrounded by aluminum and made with sturdy tempered glass. They are resilient against various weather conditions but require flat space to install.
Semi-flexible panels can be slightly bent to fit the shape of the installation surface. However, they can’t absorb a lot of power.
One very common type of solar panel used on boats is the flexible panel . Flexible panels are thin and lightweight, and, as their name suggests, they can be added to a wide variety of surfaces.
Here are the pros of flexible panels:
- They are thin and light. Flexible panels are approximately one-eighth the weight and size of rigid and semi-flexible panels. This allows you to add them to various sailboat sizes and surfaces. It also reduces the load on your sailboat.
- They are easy to install. Flexible panels are easy to work with and can be self-installed by following the instructions that come with the panels. Meanwhile, rigid and semi-flexible panels may require expert installations.
- They’re sturdy. Despite being light, flexible panels can bear a lot of pressure – you can easily walk over them.
However, there are also some drawbacks to using flexible solar panels:
- May fly away . As flexible panels are fragile, they can easily be dislodged and fly away, especially in strong winds.
- Vulnerable to scratches . While flexible panels can bear much weight, they may get scratched more easily. Over time this may affect their functionality.
- Not easy to reposition. Flexible panels are generally adhered to the surface of a sailboat using a specially prepared adhesive. Because of this, it is challenging to reposition the solar panels when there is a change of season.
- Less efficient. Flexible solar panels don’t convert energy to electricity or rigid panels. It may be harder to power heavy-duty appliances from a flexible solar panel.
How Many Panels Can I Fit on a Sailboat (Catamaran and Monohull)?
The amount of panels you can fit on your sailboat depends on the size of the panels and the surface space you have available.
You can fit at least two 400W panels on a Monohull and at least four on a Catamaran around 35ft in length. You will be able to fit 4-8 more solar panels if you add a solar panel bracket at the stern.
Renogy Flexible Solar Panel 100W
Renogy is a popular solar panel producer that designs high-quality solar panels. The Renogy Flexible Solar Panel is specially designed for marine vehicles, including sailboats.
Here are the best features of this solar panel:
- Flexibility . These solar panels are fragile, making them flexible and easy to mount on served surfaces.
- Easy to install. These are made with high-quality Monocrystalline, allowing them to be easily bent and easy to install.
- Lightweight. One solar panel weighs only 4 pounds, ensuring that no extra pressure or weight is displaced on your boat.
- Durability . User reviews have noted that these panels are highly durable and can last you a few years.
- Users have noted that these panels do not have the best outputs. They also can’t be stacked, which impacts their accessibility. To ensure that these panels can be connected, you may purchase extra extension cords.
Newpowa Rigid 160W Solar Panel
The Newpowa Right Solar Panel is a new design with a maximum power of 160W. It is weather-resistant and can be used on various surfaces and vehicles.
Here are the pros of the Newpowa Solar Panel:
- Weatherproof . The design features of this solar panel ensure that it survives under a range of different weather conditions. It has a heavy-duty frame preventing it from strong wind and waves. Its mainframe has a further layer of protection for the Junction box.
- Long warranty . Newpowa offers a 25-year transferrable output power warranty.
- Easy to install . These solar panels are made with mono cells and bypass diodes. Consequently, the solar panels can be immediately unpacked and are ready to install.
- High wattage. As these solar panels have 160 Watts of power, you need less of them to power all the devices on your boat.
- If you are planning on buying the Newpowa Solar Panel, you should note that they only make rigid panels. As a result, you may find it to be difficult to install them on curved spaces.
SunPower 110W Flexible Solar Panel
SunPower’s Flexible Solar Panels are made with high-quality materials ensuring durability. They are especially ideal for sailboats as their warranty also covers saltwater damage.
Here are the standout features of the SunPower 110W Flexible Solar Panel:
- Flexibility . This solar panel can be bent up to 30 degrees, making it easy to install on various surfaces.
- Easily portable. These solar panels are incredibly lightweight (4.4 pounds or 2 kilograms) and can be easily uninstalled and transported.
- Extended warranty . SunPower offers a five-year warranty on power and a two-year warranty on the product. The warranty includes damage caused by saltwater which many other solar panel warranties do not.
- Some users have noted that the output quality of these solar panels deteriorates over time. However, you can use the extended warranty to address any quality deterioration.
ECO-WORTHY Rigid 25W Off-Grid Solar Panel
This is a rigid, 25-watt solar panel that is waterproof, making it ideal for your boat. It is highly durable and has inbuilt indicators that highlight the battery’s status. Its low output makes it only suitable for charging phones or smaller electronics.
Here are some notable features of the Eco-Worthy Solar Panel:
- Ease of use. This solar panel is easy to install and requires no maintenance.
- Warranty. Eco-Worthy offers one year of warranty on all of its products and free maintenance if needed.
- USB control. This solar panel is attached to a USB control panel, preventing it from overcharging and getting damaged.
- Waterproof. All solar panel parts are entirely waterproof and can handle exposure to both saltwater and freshwater.
Some of the drawbacks to this solar panel include:
- Low watt absorption. Unlike many of the other solar panels on this list, this one can only absorb up to 25 watts of power at a time. So, it can only power smaller devices like batteries.
- Instruction manual. Some users have noted that the instructions to set up the Eco-worth solar panel are confusing for beginners. If you have never installed solar panels before, it’s best to call in an expert to help.
RICH SOLAR 100W Rigid 12V Polycrystalline
This 100W rigid solar panel is designed to absorb energy even in low light conditions. It is easy to install and ideal for marine environments.
Here’s why you should consider buying Rich Solar Panels:
- Works well in low light. This solar panel has been tested in various low light conditions, including cloudiness and during sunrise and sunset. It is certified to be able to harvest energy in low light conditions.
- Extended warranty. Rich Solar Panels offers a 25-year warranty on limited power output and a five-year warranty on quality.
- Water and weatherproof . The Rich Solar panels have used selective design elements to ensure they are water-resistant. They have high transparency and are made with tempered glass to withstand high winds and water pressure.
- Cost-effective . These are significantly cost-effective, making it easy to equip your sailboat fully.
- While solar panels can easily resist strong winds and water, they can be vulnerable to hail. Hail storms can cause dents on the solar panels, which can eventually cause damage.
Topsolar Flexible 100W Solar Panel
Topsolar provides premium flexible solar panels that are easy to move and install. They are ideal for installing on water vessels like sailboats with waterproof materials.
Here are some of the pros of choosing the Topsolar Flexible Solar Panel:
- Flexibility . The arc radius of this solar panel is 16 inches (40 centimeters) and can be bent to fit several curved surfaces allowing your solar panel to harvest the most sun.
- Efficiency . These solar panels are made with ETFE (ethylene tetrafluoroethylene) materials. They are extremely energy efficient and can rapidly convert energy.
- Some users have noted that these solar panels don’t have as long a life as other panels. In addition, some panels may only be able to absorb up to 75 watts of power at a time.
HQST Rigid 100w Monocrystalline Solar Panel
This is a 100-watt solar panel that has been specially designed to perform well in low light. It is made with high-quality materials and is ideal for sailing boats as it is durable even in unfavorable weather conditions.
Here are the pros of installing the HQST Solar Panel:
- Durability . These solar panels are designed to withstand strong winds and snowfall. They’re made with tempered glass and aluminum and are resistant to corrosion, ensuring longevity.
- Testing and warranty. Each solar panel is quality tested before it is distributed. It also comes with a three-year warranty.
- Easy to install . While these are rigid solar panels, they have pre-drilled holes, making them easier to install.
WindyNation 100W Solar Panel Complete Off-Grid
As its name suggests, this solar panel is designed for off-the-grid living and is helpful if you need to access power when you’re in the middle of the sea.
Here is why you should consider the WindyNation Solar Panel:
- Includes a charge controller. This controller lets you quickly see the amount of power the solar panel has absorbed.
- High power. Several positive user reviews have indicated that this solar panel is highly efficient in absorbing and converting power.
- This solar panel is more expensive than many others on the market.
DOKIO 300W 18V Portable Solar Panel Kit
If you are looking for a heavy-duty solar panel, the Dokio Solar Panel Kit is excellent. It can absorb a lot of energy and power a wide range of appliances on your sailboat.
Here’s why you should consider this solar panel:
- Versatile and flexible. While this is a rigid solar panel, it can be folded, making it easy to transport and install.
- High efficiency. This solar panel is highly efficient at converting energy into power. As it absorbs up to 300 watts, you can install just two of these panels to get significant energy.
- Some users have noted that this solar panel does not work well in low-light conditions. You may want to have a backup solar panel for days when it’s rainy and windy.
Here are Some of My Favorite Catamaran Cruising Resources
Thank you for reading this article. I hope you found it helpful as you hopefully start your sailing adventures. Here are some resources that I use as a sailor that I hope you’ll also find helpful. These are affiliate links, so if you do decide to use any of them, I’ll earn a commission. But in all honesty, these are the exact things that I use and recommend to everyone, even my own family. Sailboats: If you’re looking for the best boat to suit your needs, I would recommend a catamaran. If you’re interested, I can show you the differences between catamarans and other types of sailboats .
Books: For getting started, I really like Cruising catamarans made easy . It is actually a textbook from the American sailing association; it is used to get a cruising catamaran certification. There are some other great books, and I have compiled a list of books about cruising catamarans that you will find useful.
Communication: Being out on adventures, whether it be sailing or climbing mountains, good communications are essential to being safe. I recommend two things Google fi (incredibly simple cellular data all over the world) and Garmin inreach mini (for text and voice in remote areas without cell coverage)
Sailing courses: Online sailing courses are great for beginners starting out their sailing career; it’s an efficient way of learning the basics of navigation, throttle controls, and maritime safety. I suggest starting with two free courses from NauticEd .
To see all my most up-to-date recommendations, check out this resource that I made for you!
Owner of CatamaranFreedom.com. A minimalist that has lived in a caravan in Sweden, 35ft Monohull in the Bahamas, and right now in his self-built Van. He just started the next adventure, to circumnavigate the world on a Catamaran!
Leave a Reply Cancel reply
Your email address will not be published. Required fields are marked *
Save my name and email in this browser for the next time I comment.
Recent Posts
Must-Have Boat Gear for Catamaran Sailors!
Sailing is probably the most gear-intensive activity I've ever done; there are so many decisions to be made about what gear to buy now, for tomorrow, and what to definitely never buy. The gear on...
6 Best Trailerable Trimarans For Bluewater and Coastal Sailing
Having a boat costs a lot of money, even when you are not using it, marina fees, etc. And once it is in the water most sailors never go very far from their "home marina" and sailing will be somewhat...


INSTALLING SOLAR PANELS ON A BOAT

Solar panel technology has improved tremendously in the past few years. The panels are highly efficient, flexible, walkable and comes with very low weight. They can be attached to the deck or canvas with fasteners such as Tenax/Loxx, using velcro or glue. Some panels are suitable for boom/mast assembly as well. The latest technology allows also putting panels onto sails .
Oceanvolt uses solar panels from Sunbeam . The panels have proven to be reliable and efficient with good value for money.
The panels can charge either 12/24 VDC house battery or the 48 VDC propulsion battery bank. Charging the house battery bank is no different than in normal installation: a charge controller must be added compatible with the panel power. Charging a 48VDC lithium ion propulsion battery bank is however a little more challenging.
Lithium Ion batteries require careful balancing to remain fully operational. The balancing is a slow process and thus can be completed only with shore power charger or with solar power: a generator or regeneration under sails can never reach the 100% level as the process is designed to cut off the charge at 80-90%. In applications where shore power is not available some solar power is a requirement – Oceanvolt recommends minimum 200 W of solar panels in this case.
Using solar panels with Oceanvolt propulsion system requires either Victron MPPT series charge controller or Genasun Li-Ion Boost controller. The former is used where the amount of panel voltage is 60-150 VDC/70 amps, the latter if the panel voltage is less than 60 VDC (max 8 amp). The advantage of the Victron MPPT is that it does not require an external balancing relay (the Genasun requires this) & it is fully compatible with the Victron GX which allows remote monitoring of the solar yield.
Panels on the same side of the sun should be connected into the same group if connected in series. Otherwise shading will have significant effect on the power. However, two panels on the opposite sides of the boat can be connected in parallel: one is likely to be on the sun when the other is not.
There is no upper limit for the amount of panels. The number of MPPTs depend on the amount of panels. Oceanvolt has done boats with up to 5 kW (50x 100 W) panels.
SOLAR MOTORING
It is possible to do solar motoring with the Oceanvolt system. The system shows the current yield from the panels and the motor speed can easily be adjusted to match the solar power to get independency. Typically 1 kW of solar gets about 3 knots for a boat suitable for Oceanvolt motors.

Written by admin
View all posts by: admin
Comments are closed.
- Sponsorships
- Hydrogenerator

The best of EcoWatch right in your inbox. Sign up for our email newsletter!
- About EcoWatch
- Contact EcoWatch
- Terms of Use
- Privacy Policy
- Learn About Solar Energy

Top 5 Best Solar Panels for Boats (2024 Marine Buyer’s Guide)
In this guide, you’ll learn:
- Why photovoltaic (PV) equipment is great to have on your boat
- Which panels are best suited for use on the water
- What qualities make for a great boat solar panel
Each product and or company featured here has been independently selected by the writer. You can learn more about our review methodology here. If you make a purchase using the links included, we may earn commission.
Why Should You Install Solar Panels On Your Boat?
Before we dive into the best panels to bring your boat into the world of clean energy, it’s worth discussing why you’d want a solar panel system on your boat in the first place.
There are a few use cases that are important to consider. These not only dictate whether or not you need panels on your boat, but they can also help you decide which system is the best and most cost-effective for you. We’ll discuss the different reasons to go solar on your boat below.

Blue Raven Solar
Regional Service
EcoWatch rating
Average cost
- Industry-leading in-house financing
- Competitive pricing
- Excellent reputation
- Doesn't offer solar batteries (coming 2022)
Charging Emergency Equipment
For anyone who has run into issues out at sea, the need for reliable emergency equipment is well understood. Whether you run out of gas, your boat breaks down or you have some other issue that precludes you from getting back to shore, having a way to reach out for help will keep your mind at ease.
Depending on the type of boat you have and how well it’s equipped, you may have a radio system, a satellite phone, a regular phone or some other communication device for emergencies. All of these require power, and having a solar system on your boat ensures that you’ll always have access to these devices.
Charging Recreational Equipment
Even if you’re not running into problems at sea, you might want the ability to charge recreational equipment. It’s always nice to have the ability to charge smartphones, e-readers, speakers and other devices you might use for entertainment.
This is especially important if you plan on spending a few days at sea and don’t want to rely on your boat’s batteries. Keeping those well charged for lighting, navigation tools and starting your boat’s engine is more important than getting your phone up to a full charge.
Quality of Life at Sea
For a lot of people, there’s a lot of joy in upgrading life at sea and making things just a little more comfortable. One of the perks of installing a solar system on your vessel is that you don’t have to worry about using your boat’s batteries for non-necessities.
For example, many recreational boaters connect their solar array to an electric cooler. Others use their solar modules to power electric water heaters for hot showers and constant hot water.
The possibilities for improving your at-sea experience with solar are really up to you, which is part of what makes bringing renewable energy to your boat so exciting.
What Are the Top 5 Best Solar Panels for Boats?
If you’re convinced you want to install solar on your boat, but you don’t know much about the available options, you might be overwhelmed by the choices. You’ll have access to seemingly countless brands and models.
To help you narrow down your options and choose panels that will meet your needs, we’ve done extensive research and chosen just a few product lines that we recommend. We’ll provide a quick breakdown of the different options below, and we’ll dive deeper into the specifications in later sections.
SunPower 170W Solar Panel
SunPower is a leader in the residential solar industry, so it’s no surprise that we found that the company also makes the best solar panels for use on boats.
This panel is pricey, but it’s significantly more powerful than most other options. At 170 watts, you can use these panels to charge your boat’s main battery, provide backup power for emergencies, or live large on the water by powering coolers, hot water heaters and much more.
This panel doesn’t come with a solar charge controller like many other options do, so not only is it expensive, but you’ll have to lay out more money for a controller, inverter and battery. However, we believe the efficiency and power output are well worth the investment.
These panels are also rated with a waterproof rating of IP67, which means they can withstand immersion in water up to about three feet for around half an hour. If you need more protection than that, you have bigger problems on your hands than losing a panel.
- High-efficiency panel for maximum power
- High-quality, durable materials
- Trusted and reliable brand
- Waterproof up to a meter for 30 minutes
- Doesn’t include any equipment other than the panel
Renogy 100W Flexible Marine Solar Panel
The Renogy Flexible solar panel designed specifically for use on the water is our pick for the best bang for your buck. It’s about half the price of the SunPower panel, although it does have a little more than just half the power capacity.
At 100 watts, this panel is great for middle-of-the-road power. It can serve as a reliable backup source of energy, or you can use it to recharge phones, GPS devices, e-readers, laptops and other electronics. It’s possible to use it for the quality-of-life items mentioned above as well.
This panel also has an IP67 waterproof rating, which is ideal for maintaining peace of mind on the water. Although it’s less expensive than our top pick, it includes a controller and wiring to connect your panels. You’ll just need an inverter and a battery to complete your setup.
- Excellent power output
- IP67 waterproof rating
- Includes controller and wiring
- Reliable brand name
- More expensive than many other options
- Doesn’t include a battery or inverter
EcoWorthy 25W Solar Panel Kit
The EcoWorthy solar panel kit is one of the easiest photovoltaic (PV) systems to install, so it’s our top pick for those looking to get started with clean energy. You can purchase this kit with a 10 amp-hour (AH), 12-volt battery, and the MC4 connectors are plug-and-play for a quick and painless installation.
This panel has a much smaller output than our top two picks, so it’s best reserved for backup power or for charging cell phones and other small electronics.
This kit has a waterproof rating of IP65, which means it can withstand being submerged in around five feet of water for up to a half hour, and it will also be protected from sprays of water. This is a great option for maintaining peace of mind when you’re on the water, especially if conditions are rough.
Lastly, the kit includes a panel, a controller and wiring, so you’ll just need to add a battery and an inverter to complete your kit.
- IP65 waterproof rating
- Includes a controller and wiring
- Very affordable
- Significantly less power than our top picks – Only ideal for light-duty use
NewPowa 30W Solar Panel Kit
This 30 watt solar panel kit from NewPowa includes a panel, a controller and wiring. If you add a backup battery and an inverter, you can create a complete off-grid solar kit for less than $150 without leaving your home (thanks to Amazon).
With an output of 30 watts, this is the best marine solar panel for light-duty use, although you could use it for non-essential electronics like an electric cooler or a small solar water heater. Those more demanding devices should be low-use, though.
The panels and controller are IP67-rated, so they’re suitable for use on just about any boat.
Best of all, the partial solar kit is just $60, so this makes our list as our top budget pick for going solar without breaking the bank.
The kit has pre-drilled mounting holes and is compatible with a wide variety of mounting brackets. As such, your installation process should be relatively straightforward.
- Includes a controller and plug-and-play wiring
- Relatively low wattage
TopSolar Monocrystalline Solar Panel Kit
The off-grid solar kit from TopSolar is a great affordable option, and it’s what we’d recommend as a starter kit for backup energy for beginners. It only puts out 20 watts, so this is not the best option if you’re looking for something to charge your recreational devices or quality-of-life equipment. However, it’s an affordable and easy-to-install kit for emergency power.
Unfortunately, this kit doesn’t include a specific ingress protection (IP) rating, but the manufacturer does note that the product is waterproof. Based on customer reviews, it appears that this product is safe for use on the water.

The kit includes a small PV panel, a controller and wiring, so you’ll need to buy an inverter and battery separately if you want AC power or backup power.
Best of all, the kit is super easy to install. It has pre-drilled holes and is compatible with most mounting brackets and clips.
- Great option for backup power
- Easy to install
- No official IP rating
- Low wattage
What Should Boat Owners Look for When Buying Solar Panels?
Solar panels can be a great option for marine use, but not all panels and solar kits are suitable for use around water. Additionally, the panel you choose needs to be selected based on how you want to use your solar power system.
In the sections below, we’ll include a few key things you’ll want to consider when choosing a solar module for your boat.
Energy Needs
One of the first things we recommend thinking about is how much energy you need your panels to generate. This will help guide you to what size panel and how much energy output you need.
If you’re just looking for reliable backup power for your boat’s internal 12-volt battery, or you want your panels to provide power for emergencies only, you’ll probably only need a panel of around 20 watts.
If you use your boat frequently for entertaining guests, or you spend days at a time on your boat, you might want something above 100 watts to provide backup power plus electricity for electric coolers, water heaters and more. Consider everything you’ll use your solar array for and size your system accordingly.
The chart below provides a quick breakdown of what size solar panels you need for different purposes on a boat.
If you plan on using your panels to replace an on-board generator, you can calculate how much electricity your boat uses and then size your system accordingly. It’s always advisable to go a little bigger than you think you need, as cloud coverage and the angle of the sunlight hitting your panels can cause fluctuations in solar power production.
If you have high energy needs, we also recommend considering a Maximum Power Point Tracker (MPPT) controller, which is more efficient than a Pulse Width Modulation (PWM) controller, which is more common.
Space Available for Installation
Just like residential solar systems are limited by available roof square footage, marine solar systems are limited by the available space for installation. This is an important consideration to make to ensure you don’t buy a panel that you won’t be able to mount or use in your vessel.
Before you buy any equipment, we recommend checking the measurements of the panel and deciding where on your boat you can install it. Some portable, foldable panels come with kickstands for temporary setups, but the smaller of our top picks can be set up just about anywhere without mounting brackets as well.
Type of Solar Panel
You’ll have a few choices for the type of panel you purchase for your boat as well.
First, you’ll need to decide between thin-film solar panels, polycrystalline solar panels and monocrystalline solar panels.
- Monocrystalline panels are the most efficient, so they’re the best suited for use on boats. The higher efficiency ratings will let you produce more energy per square foot, which is essential on a boat where space is limited. All of our recommendations above are monocrystalline.
- Polycrystalline solar panels can also work, but they won’t provide as much solar power.
- Thin-film panels are the most affordable, but they generate even less electricity and aren’t ideal for use where available space is minimal.
Second, you should think about whether you want a rigid solar panel with an aluminum frame or a semi-flexible one. Flexible panels contain special solar cells that can be a bit pricier, but they’re easier to install and are a bit more versatile. They can be mounted on curved surfaces, giving you more placement options.
Waterproof Rating
Since you’ll be using your panels on the water, it’s essential that you choose one with a good waterproof rating. Some of the best options are IP67 and IP65. These will ensure your panels and charge controllers or regulators remain safe and at low risk of fire even when exposed to moisture and direct water contact.
Accessories
Finally, you should consider what your kit comes with. Some come with only panels, so you’ll need to buy a controller, an inverter and a battery to complete your setup. Some come with a combination of these parts, although batteries and inverters aren’t commonly included. Some panels also include mounting brackets, although this is also uncommon.
Thinking about the additional equipment you’ll need to purchase after buying your panels will help you budget more effectively for your entire system.
How Do Solar Panels Work With Boats?
PV panels for boats work just like panels for residential use — they collect sunlight and route the energy either to a storage or use system.
Since boat solar systems are entirely off-grid, most require the following:
- Solar panels
- A charge controller
- An inverter
- Mounting brackets or other mounting hardware
- A backup battery for energy storage
We’ll explain what each of these components does in the section below, and then we’ll get into how to set up and maintain your system.
Equipment for a Marine Solar System

The main components you’ll absolutely need for your boat solar system are PV panels and a controller. If you plan to store energy or use it to charge common electronics, you’ll also need a battery and an inverter.
The panels are the pieces of the system that collect energy from the sun. The electricity generated is then passed to your controller, which limits the amount of power that flows through the wires to your battery or device.
The charge controller helps prevent overcharging batteries or electronics when production is high, and it also prevents battery drainage when production is low. Some panels are equipped with bypass diodes to provide the same safety features.
The solar energy that’s collected is direct current (DC), while most electronics, including standard light fixtures, use alternating current (AC) power. An inverter is used to convert DC current to AC so that you can use your solar power to power devices directly. If you don’t have DC lights in your boat, for example, an inverter might be necessary to provide lighting.
A battery storage system is exactly what it sounds like: it’s a battery bank that stores solar energy for later use.
Solar batteries are useful for two main reasons on boats.
- First, if you ever experience cloudy days, your solar production might very well drop below what you need to provide power to your devices. In that case, having a battery to pull stored energy from can be helpful in maintaining charging capability or electricity.
- Additionally, a battery on board can be useful for maintaining backup power for emergencies. If your boat’s built-in battery ever fails or you need to charge emergency communication or navigation devices, a battery will come in handy.
Installation
Since you want your solar panels to be exposed to as much sun as possible, it’s best to install them at or near the highest point on your boat — often the bimini. This will prevent them from getting shade from other parts of your boat during the day, regardless of which direction your vessel is moving.
It’s also typically best to install your panels as close to parallel with the surface of the earth as possible. Since your boat will be moving around a lot, it’s not realistic to install them facing the path of the sun in the sky as you would on a home. Laying them flat gives you the best chance of always collecting at least some sunlight.
You, of course, need to consider available space as well, so remember to take measurements of your installation site and compare them to your panels before beginning the process.
Finally, you should consider where your batteries will be — if applicable — and where your wiring will run once your installation is complete. Keeping these things in mind will help ensure that the installation process goes as smoothly as possible.
Below, we’ll include a brief step-by-step guide on how to install a solar system on your boat.
- First, take measurements of where your panels will be installed, the path the wiring will take to all components and where your battery, inverter and controller will be placed. Making sure you have enough room for all of your components will help avoid headaches once you get started.
- We recommend mounting your batteries, inverter and controller first. These are generally the easier components to mount, so they’re the easiest to move once installed.
- Next, mount your panels. The process for this will depend on the panels you choose and where you plan to install them. You should follow the installation instructions for the mounting brackets or hardware you purchase.
- Finally, you can wire your system, beginning with the connection between the panels and the controller and then the connections to the inverter and battery.
- You can test your system by using a voltmeter or by checking to see if your powered devices function as intended. Some controllers will also show you if your panels are providing energy and how much they’re producing.
For more guidance and information on how to set up your boat solar system, you can check out the video below:
Maintenance
Thankfully, solar systems are relatively maintenance-free once installed, although you should carry out routine system checks and cleaning to ensure you continue to enjoy maximum safety and energy production.
You should spray down your panels with water about once every six months to get any accumulation of dirt or salt off of them. This will help maximize energy generation. Around the same time, you should also check the wires and connectors for corrosion, which is more likely to occur if you use your boat in saltwater.
After major storms, it’s a good idea to ensure that none of the connections between components were lost. A simple disconnect could lead to your battery charging issues, which could be an issue if you ever need backup power.
Lastly, it’s worth mentioning that solar systems on boats are generally considered safe. There is a small risk of fire but provided you carry out the proper maintenance, you should avoid any serious issues.
Are Marine Solar Panels Worth It?
The answer to this question really depends on who you ask. For some boat owners, PV panels are essential. Not only can they provide backup power for emergencies, but they can also improve your quality of life at sea and the enjoyment of your boat.
For many people, these things are indispensable, so solar systems are well worth the investment. For certain types of boats — like small fishing boats and sailboats — solar panels will be the only source of electricity.
Other boat owners feel comfortable relying on generators if they have them, and some use their boats only for short durations, which makes having an on-board solar array less valuable.
For most people, though, having at least a small solar system to provide backup power for emergencies is worthwhile. From there, opting to up the size of your system to improve your time at sea isn’t hard to get behind.
FAQ: Marine Solar Panels
Below, we’ll answer a few of the most common questions we get about solar panel systems made for boats.
What are the best marine solar panels?
In our opinion, the best solar panels for boat use are the SunPower 170W solar panels. These are flexible panels that allow for easy and versatile installation.
They are some of the most efficient panels suitable for boat use, and they provide an incredible 170 watts each. This is enough power for just about anything you need electricity for on your boat and for emergency equipment in low-light conditions.
These panels are a bit expensive, and they don’t come with any additional equipment. However, the junction boxes have a waterproof rating of IP67, come with a five-year warranty for equipment and high efficiency and are made from high-quality, durable materials for years of use.
Will solar panels keep my boat battery charged?
Yes, solar panels can be hooked up to keep your boat’s 12 volt battery charged. However, you need to make sure you install a system that is sized appropriately for your boat’s needs.
You can check how much power your boat draws from its battery system by looking at the loads (in amps or watts) of each device. You can also use your battery monitor if you have one to check the energy demand of each individual component pulling power. Then, choose solar panels that produce a bit more energy than your system needs.
If you live in an area that experiences a lot of cloudy weather, you might want to size up your system even more to ensure your system generates enough electricity.
How much does it cost to put solar panels on a boat?
The cost to install a solar array on your boat can range from around $150 up to well over $1,000. Where in this range your total falls depends primarily on how much energy you need to produce.
If you’re looking for portable solar panels to take on and off a small boat with you for emergency use only — which is typical for sailboats and smaller boats that don’t normally have electricity — you’ll likely be looking at the $150 end of the spectrum.
If you have a much larger boat and want to be able to maintain power for your essential equipment and some non-essentials, then you’ll likely push your all-in cost closer to the higher end of the range.
What are the benefits of solar panels on boats?
Installing solar panels on your boat can provide quite a few key benefits, although the perks you’ll actually experience depend on your situation and your specific boat.
Perhaps most importantly, solar panels can charge your boat’s battery and maintain electricity for emergencies. Most systems — even small ones — can serve to charge your phone, GPS or other emergency devices in case you run into problems out on the water.
Larger systems can also provide power for recreational use, like charging phones, powering speaker systems, keeping beer cold and more.

Related articles

Calculate Your Solar Panel Payback Period (How Long To Recoup Costs?)

Solar Panel Cost In 2024 (Homeowner’s Installation Savings Guide)

Solar Calculator

Top 6 Best Solar Companies Review

Solar Roof Shingles 2024 Cost and Buying Guide
Related Solar Panel Guides
- Buyer’s Guide: Best Solar Panels for Camping (2022)
- 7 Best Solar Panels for Mobile Homes (2022 Guide)
- What Are the Best Solar Panels for Farming Solar for Agriculture Guide (2022)
- The Best Solar Panels for Portable Solar Generators
- 5 Best Flexible Solar Panels (2022 Reviews and Buyer’s Guide)
Comparing authorized solar partners
Having trouble deciding? Click below and use our process to receive multiple quotes instead:

- Center Consoles
- Dual Consoles
- Motoryachts
- Sport Cruisers
- Tenders & Ribs
- U.S. Atlantic
- Engine Buyers Guide
- Electronics
How to Install a Solar Panel on Your Boat

Install a Solar Panel on Your Boat
Sunbathers delight here’s how to install a solar panel on your boat., types of solar panels, planning the system.

Recommended

The Tsunami Threat

Higher For Longer. The Pain That Rising Rates Is Causing.

Don't miss it

A Comprehensive Review Of The Iliad 53 Flybridge

Is Your Boating Safety Equipment Expired? Advice To Ensure Safety

Another Winning Streak In The Market…

Explore Tarpon Springs: A Must-Visit Cruising Destination You’ll Love

Azimut Grande Trideck: This Is Redefining The Luxury Yachting Experience

Exploring Specialized Outboard Engines: Simplified Tech Solutions For You
- Privacy Policy

1591 E. Atlantic Blvd, 2nd Floor Pompano Beach, FL 33060 Office: +1 (954) 522-5515 Fax: +1 (954) 522-2260 Contact us: [email protected]
© 2024 Southern Boating Media

Installing Solar Panels on a Boat
Installing solar panels on a boat can be a cost-effective and environmentally friendly way to power your boats appliances whilst on the water. With the right equipment and knowledge, it is possible to install solar panels on your boat yourself, without the need for professional help.
In this blog post, we will provide a step-by-step guide for installing solar panels on your boat, including information on what equipment you will need, how to prepare your boat, and how to test and maintain your solar panel system.

Choosing the Right Solar Panels and Equipment for Your Boat
Before you begin installing solar panels on your boat, you will need to choose the right equipment .
Power Required
The first step is to determine how much power you will need to generate. This will depend on the size of your boat and the type of and number of appliances you will be running. You will also need to consider the amount of sunlight you will be exposed to and the amount of space you have available on your boat.
Once you have determined your power needs, you can choose the right solar panels and equipment.
Solar Panels
When it comes to solar panels, you will have a choice between polycrystalline and monocrystalline panels.
Polycrystalline panels are generally less expensive, but they are also less efficient.
Monocrystalline panels are more expensive, but they are more efficient and will generate more power per square foot.
You will also need to consider whether you want to install a solar panel that is Rigid to allow circulation behind the panels, or Flexible or Semi-Flexible panels to follow the contours of your boat.
Charge Controller, Inverter and Battery
In addition to solar panels, you will need to purchase an Inverter, charge controller , wiring, and a Lithium-ion battery bank . The charge controller will help regulate the power flowing into the batteries, while the wiring will connect the solar panels to the charge controller and the battery bank. The battery bank will store the power generated by the solar panels.
Preparing Your Boat for Solar Panel Installation
Preparing your boat for solar panel installation is an important step in the process, as it will ensure that the installation is done correctly and that the solar panels will be able to function efficiently.
There are several things to consider when preparing your boat for solar panel installation, including the location of the panels, the amount of sunlight the boat will receive and the amount of space available on the boat.
Determining the location for the solar panels is one of the first steps in preparing your boat for installation. The solar panels should be mounted on a surface that receives the most sunlight, such as the roof of the boat.
It’s also important to consider the location of other equipment and structures on your boat, such as antennas or vents, to ensure that the panels will not be in the way or obstructed.
The location of the panel should be such that the panel is not in the way of any other equipment or structures on your boat.
The amount of sunlight that the boat will receive is also an important consideration when preparing your boat for solar panel installation. The solar panels will generate more power when they receive more sunlight.
Therefore, it’s important to install the panels in a location that will receive maximum sunlight exposure. This will allow the solar panels to generate more power and reduce the need for external power sources.
The amount of space available on the boat is also an important consideration when preparing your boat for solar panel installation. The solar panels need to be installed in an area that is free from debris and that is large enough to accommodate the panels.
Additionally, the area should be free from potential shading, such as from overhead lines or nearby buildings when moored. This will ensure that the solar panels receive maximum sunlight exposure and that they are able to function efficiently.
By following these guidelines for preparing your boat for solar panel installation, you will be able to ensure that the installation is done correctly and that the solar panels will be able to function efficiently. This will allow you to enjoy the benefits of solar power on your boat for a long time to come.
Step-by-Step Guide for Mounting Solar Panels on Your Boat
Mounting the solar panels on your boat is an important step in the installation process. The panels need to be securely mounted and angled in the direction that receives the most sunlight in order to be effective. Here is a step-by-step guide for mounting solar panels on your boat:
Step 1: Determine the location for the solar panels.
The first step is to determine where on your boat the solar panels will be installed. Ideally, the panels should be mounted on the roof or on a surface that receives the most sunlight. You should also consider the location of other equipment and structures on your boat, such as antennas or vents, to ensure that the panels will not be in the way or obstructed.
Step 2: Measure and mark the mounting points.
Once you have determined the location for the solar panels, measure and mark the mounting points. This will ensure that the panels are installed in the correct position and at the correct angle.
Step 3: Install the brackets.
The next step is to install the brackets that will hold the solar panels in place. The brackets can be mounted using screws, bolts, or adhesive. It is important to ensure that the brackets are securely attached to the boat and that they are level.
Step 4: Install the solar panels.
With the brackets in place, you can now install the solar panels. The panels will typically come with pre-drilled holes that align with the brackets. Use the screws or bolts provided to attach the panels to the brackets.
Step 5: Adjust the angle of the panels.
Finally, adjust the angle of the panels to ensure that they are pointing in the direction that receives the most sunlight. This can typically be done by adjusting the angle of the brackets or by using an adjustable mount.
It is important to note that the solar panels should be installed in a way that allows for easy maintenance and cleaning. Additionally, it’s important to make sure that the panels are not in the way of any other equipment or structures on your boat. By following this step-by-step guide, you will be able to mount the solar panels on your boat securely, and at the right angle to ensure maximum efficiency.
Wiring and Connecting the Solar Panels to Your Boat’s Power System
Wiring and connecting the solar panels to your boat’s power system is an important step in the installation process.
This involves running the wiring from the panels to the charge controller and then from the charge controller to the battery bank. This will ensure that the power generated by the solar panels is properly regulated and stored.
Here are some important things to keep in mind when wiring and connecting your solar panels to your boat’s power system:
It is important to use marine-grade wiring, as it is designed to withstand the harsh conditions of a marine environment. This includes exposure to saltwater and UV rays. The wiring should be properly rated for the current and voltage of your system.
When running the wiring from the solar panels to the charge controller, it is important to use appropriate conduit or protective covering to protect the wiring from the elements. This can include PVC conduit, flexible conduit, or wire loom.
When connecting the solar panels to the charge controller, it is important to follow the manufacturer’s instructions and to make sure that the polarity is correct. The charge controller will regulate the power flowing into the batteries, so it is important to ensure that it is properly connected.
When running the wiring from the charge controller to the battery bank, it is important to use the correct size and type of wire . The wire should be properly rated for the current and voltage of your system. It is also important to use appropriate conduit or protective covering to protect the wiring from the elements.
Finally, it is important to properly ground the system to prevent electrical shock and damage to the equipment. This can typically be done by connecting the negative terminal of the battery bank to the boat’s ground.
By following these guidelines, you will be able to wire and connect your solar panels to your boat’s power system safely and effectively, ensuring that the power generated by the solar panels is properly regulated and stored.
Testing and Maintaining Your Solar Panel System
Testing and maintaining your solar array is an important step in ensuring that it continues to function at optimal levels. Proper testing and maintenance will ensure that the system is working properly, and that any issues are identified and resolved quickly.
Here are some important things to keep in mind when testing and maintaining your solar panel system:
Testing the system includes checking the voltage and current flowing through the system, as well as checking the battery charge level. These readings can be taken using a multimeter or other test equipment. If the readings are not within the expected range, it may indicate a problem with the system and further troubleshooting may be needed.
Regular cleaning of the solar panels is important to ensure that they are able to generate power efficiently. The panels should be cleaned of dirt, dust and bird droppings, which can reduce their effectiveness. A mild detergent and water can be used to clean the panels, and they should be wiped dry to prevent water spots.
Checking the wiring and connections is important to ensure that they are secure and not corroded. Loose connections or corroded terminals can cause the system to malfunction, and should be addressed immediately.
Checking the battery charge level is important to ensure that the battery bank is properly charged and that the batteries are not overcharged or undercharged. This can help prevent damage to the batteries and prolong their lifespan.
By following these guidelines for testing and maintaining your solar panel system, you can ensure that it is working properly, and that any issues are identified and resolved quickly. This will allow you to enjoy the benefits of solar power on your boat for a long time to come.
Troubleshooting Common Issues with DIY Solar Panel Installations on Boats
Troubleshooting common issues with DIY solar panel installations on boats is an important step in ensuring that the system is working correctly.
Despite your best efforts, you may encounter issues with your solar panel system that need to be addressed. Here are some common issues and troubleshooting tips:
- Low voltage or current: This can be caused by loose connections or damaged wiring. Check the wiring and connections to ensure that they are secure and not corroded. Additionally, check the charge controller to ensure that it is functioning correctly.
- Low battery charge level: This can be caused by a malfunctioning charge controller or a problem with the battery bank. Check the charge controller to ensure that it is functioning correctly and check the battery bank to ensure that the batteries are properly charged.
- Shading on the solar panels: This can occur if nearby buildings or other structures cast shadows on the panels, reducing their effectiveness. To resolve this issue, you may need to adjust the angle of the panels or move them to a different location on the boat.
- Faulty equipment: If the issue persists after checking the connections, wiring and charge controller, it may be necessary to replace faulty equipment.
It is important to note that these are common issues and there could be other issues specific to your solar panel system. It is always a good idea to consult the manufacturer’s manual, or an expert in the field, if you are unsure of how to troubleshoot the issue.
In conclusion, a DIY installation on a boat can be a cost-effective and environmentally friendly way to power your vessel while on the water. By choosing the right equipment and following a step-by-step guide, you can install solar panels on your boat yourself, without the need for professional help.
One of the main benefits of a DIY solar panel installation is cost savings. Installing solar panels on your boat can be a significant investment, but by doing it yourself, you can save money on labor costs. Additionally, a DIY installation can help you to better understand and maintain your solar panel system, which can save you money on future repairs and maintenance.
Another benefit of a DIY solar panel installation is independence from external power sources. By generating your own power, you will no longer have to rely on shore power or generators to power your boat. This can be especially beneficial for boaters who spend a lot of time on the water and want to be self-sufficient.
Finally, a DIY solar panel installation can have a reduced environmental impact. Solar energy is a clean, renewable energy source that does not produce any greenhouse gases or pollutants. By generating your own power, you can reduce your carbon footprint and do your part to help the environment.
Similar Posts

7 Best Solar Charge Controllers 2024
Solar powered systems need protection to avoid irreparable battery damage, there are a plethora of solar charge controller choices on the market, from the cheap and cheerful to the unduly expensive. The following condensed review of some of the top MPPT and PWM solar charge controllers on the market will help you in your decision…

How To Live Off the Grid?
To live off the grid means a life of freedom, independent from the system, to become self-sufficient, living sustainably off the land and connected to nature and its seasons. However, off-grid living isn’t a lifestyle choice for the faint-hearted. It requires carefulplanning and preparation, and the right understanding of how to create systems that willprovide…

Renewable Energy: The Green Options
Renewable energy is defined as an energy that is generated from natural energy sources that are continually replenished. It includes renewable sources such as solar, wind, geothermal, hydropower, and biomass. Renewable energy is important because it provides a clean energy source of power that does not contribute to climate change or global warming. Additionally, it…

MPPT vs PWM Solar Charge Controllers: Understanding the Differences
As solar technology continues to improve, creating new ways to convert photovoltaic energy into electricity, the importance of understanding the differences between MPPT (Maximum Power Point Tracking) and PWM (Pulse Width Modulation) solar charge controllers becomes increasingly critical. There are many similarities but also some fundamental distinctions between these two very important components when it…

11 Best MPPT Solar Charge Controllers 2023
MPPT Solar Charge Controllers – the unsung heroes of the solar power world. These devices might not be the first thing that comes to mind when you think about harnessing the power of the sun, but trust me, they are important. In short, a MPPT solar charge controller regulates the amount of energy that flows…

10 Best Solar Powered Security Cameras 2024
Solar powered security cameras are becoming increasingly popular due to the many benefits they offer. They are environmentally friendly, cost-effective, and easy to install. Solar powered security cameras are the perfect way to keep an eye on your home or business while helping to protect the environment. Used in conjunction with sets of solar security…
One Comment
- Pingback: 7 Best Solar Panels for Boats 2023 - Mark Green World
Comments are closed.
- Patio, Lawn & Garden
- Generators & Portable Power
- Solar & Wind Power
- Solar Panels
Add to your order

- No Additional Cost: You pay nothing for repairs – parts, labor, and shipping included.
- Coverage: Plan starts on the date of purchase. Drops, spills and cracked screens due to normal use covered for portable products and power surges covered from day one. Malfunctions covered after the manufacturer's warranty.
- Easy Claims Process: File a claim anytime online or by phone. Most claims approved within minutes. We will send you an e-gift card for the purchase price of your covered product. In some instances, we will replace or repair it.
- Product Eligibility: Plan must be purchased with a product or within 30 days of the product purchase. Pre-existing conditions are not covered.
- Terms & Details: More information about this protection plan is available within the “Product guides and documents” section. Simply click “User Guide” for more info. Terms & Conditions will be available in Your Orders on Amazon. Asurion will also email your plan confirmation with Terms & Conditions to the address associated with your Amazon account within 24 hours of purchase.
- Buy a lot of stuff on Amazon? Tons of items eligible for coverage, from the latest tech like laptops, game consoles, and TVs, to major appliances, sporting goods, tools, toys, mattresses, personal care, furniture, and more.
- Accidents happen. That’s why for your portable products we cover accidental damage from handling such as drops, spills and cracked screens. We also cover electrical and mechanical malfunctions, power surges, and wear and tear.
- Past and future purchases covered. 30 days after you are enrolled, all eligible past purchases (up to 1 year prior to enrollment) and future eligible purchases made on Amazon will be covered by your plan as long as you are enrolled.
- Fast, easy claims. Frustration-free claims, with most filed in minutes. We will fix it, replace it, or reimburse you with an Amazon e-gift card for the purchase price of your product (excluding tax). File at Asurion.com/amazon.
- No hidden fees. For just $16.99 a month + tax you’re covered for up to $5,000 in claims per 12-month period. *THIS PROGRAM IS MONTH-TO-MONTH AND WILL CONTINUE UNTIL CANCELED* Coverage for all products ends 30 days after the plan is canceled. Cancel any time.
Enjoy fast, free delivery, exclusive deals, and award-winning movies & TV shows with Prime Try Prime and start saving today with fast, free delivery
Amazon Prime includes:
Fast, FREE Delivery is available to Prime members. To join, select "Try Amazon Prime and start saving today with Fast, FREE Delivery" below the Add to Cart button.
- Cardmembers earn 5% Back at Amazon.com with a Prime Credit Card.
- Unlimited Free Two-Day Delivery
- Streaming of thousands of movies and TV shows with limited ads on Prime Video.
- A Kindle book to borrow for free each month - with no due dates
- Listen to over 2 million songs and hundreds of playlists
- Unlimited photo storage with anywhere access
Important: Your credit card will NOT be charged when you start your free trial or if you cancel during the trial period. If you're happy with Amazon Prime, do nothing. At the end of the free trial, your membership will automatically upgrade to a monthly membership.
Buy new: #buybox .a-accordion .a-accordion-active .a-price[data-a-size=l].reinventPriceAccordionT2 .a-price-whole { font-size: 28px !important; } #buybox .a-accordion .a-accordion-active .a-price[data-a-size=l].reinventPriceAccordionT2 .a-price-fraction, #buybox .a-accordion .a-accordion-active .a-price[data-a-size=l].reinventPriceAccordionT2 .a-price-symbol { top: -0.75em; font-size: 13px; } $139.00 $ 139 . 00 FREE delivery Wednesday, May 29 Ships from: Amazon Sold by: BougeRV
Return this item for free.
Free returns are available for the shipping address you chose. You can return the item for any reason in new and unused condition: no shipping charges
- Go to your orders and start the return
- Select the return method
3 Year Home Improvement Protection Plan
4 year home improvement protection plan, asurion complete protect: one plan covers all eligible past and future purchases on amazon, save with used - like new #buybox .a-accordion .a-accordion-active .a-price[data-a-size=l].reinventpriceaccordiont2 .a-price-whole { font-size: 28px important; } #buybox .a-accordion .a-accordion-active .a-price[data-a-size=l].reinventpriceaccordiont2 .a-price-fraction, #buybox .a-accordion .a-accordion-active .a-price[data-a-size=l].reinventpriceaccordiont2 .a-price-symbol { top: -0.75em; font-size: 13px; } $126.92 $ 126 . 92 free delivery wednesday, may 29 ships from: amazon sold by: amazon warehouse, image unavailable.

- To view this video download Flash Player

BougeRV 200 Watts 9BB Mono Solar Panel for Outdoor Off-Grid Life(2Pcs 100W 9BB)
Purchase options and add-ons, about this item.
- Totally 200 Watt Solar System. The package includes TWO 100-watt solar panels, you can connect them in series or parallel(Parallel connection needs to buy a Y connect).
- 1-on-1 Solar Solution by BougeRV Tech Support & Warm Warranty.BougeRV promises an 18-month product warranty and 25-years power warranty and lifetime warm-hearted service for you. Please contact us whenever you have any problem with BougeRV solar panel. We will provide you a professional guide to building a solar system.
- High-level 9BB Cell Design has a 21.9% Highest Conversion Rate. Makes the solar panel have a longer service life. Increase the cell receiving surface, thinner ribbon reduces the covered area by 22%.can charge 12V battery or charge 24/48V battery by wiring several solar panels in series.
- Half-cut Cells Technology. BougeRV 100W solar panel use half-cut cells technology increases performance efficiency. Compared with the Standard module, the current is reduced by half, the resistance loss is reduced, so the heat is reduced. Besides the conversation performance is more stable and the service life is longer. Less shadow occlusion, more working area.
- Suitable for multiple scenarios. Compatible with on-grid and off-grid inverters, the BougeRV 100W solar panel is suitable for powering the house or for outdoor use. Corrosion-resistant aluminum material can withstand the changing outdoor environment and prolong its service life. It is easy to use and mount (pre-drilled holes on the back of the panel), sophisticated to use with your RVs, boats, and other outdoor equipment.
- Durable & User Friendly. The sturdy panel can withstand high wind (2400 Pa) and snow loads (5400 Pa) and have excellent performance in low-light environments. IP67 Rated Waterproof Junction Box can isolate environmental particles and low-pressure water jets. Diodes are pre-installed in the junction box, with a pair of pre-attached 3ft Cable. Pre-drilled holes on the back of the panel allow you to quickly install solar panels without using heavy tools.
Frequently bought together

Similar items in new arrivals

Videos for this product

Click to play video

Super EFFECIENT 200W Solar Panel - BougeRV TOPCON
Frugal Repair
BougerRV 200w 16bb Panel - Any Good?
Whizbang Reviews

Eco-Worthy 12V Battery with the BougeRV 200W Solar Panel Kit
CheapRVliving
BougeRV Solar Panel Monocrystalline How to Measure Voltage

BougeRV Solar Panel Kit Unboxing
Product description.

Solar System
Battery,Controller,Inverter,Accessories

Output Power Per Day

Battery&Inverter

Solar Panel Crab Mounting Kit
Easily attach a solar panel to your car cross bars

Can withstand high wind (2400 Pa) and snow loads (5400 Pa). Good performance in any condition.

Pre-drilled holes on the back of the panel allow you to easyly install them without any heavy tools.

We help RV and off-grid enthusiasts to enjoy a more professional outdoor living experience.
Specific Parameters--Single 100W Solar Panel

What does 1-on-1 solar solution mean? What can I get as a customer?
Every project is unique, and BougeRV provides each customer with a 1-on-1 solar solution and customized technical services. We will help you to select the appropriate solar kit to build the solar system.
What is the advantage of 9 bus bars VS 5 bus bars?
a. 9BB solar cells have less internal resistance loss than 5BB solar cells.
b. 9BB can reduce the impact of solar panel Micro-cracks.
c. The busbar of the 9BB solar panel is thinner, the light-receiving area is larger, and 9BB can get more power.
Why BougeRV choose the Class A+ cell? What's the difference between Class A+ cell and Class B & Class C cell?
Class A+ cell: No visible defects pass the strict EL test without any microcracks.
Class B & C cell: it has visible defects, and will have micro cracks. Also, it will have corner breakage, a busbar missing, a watermark, and color deviation.
What causes the low output or no output during the use of solar panels? How can I solve it?
Mainly affected by light intensity, angle, and shadow occlusion during the use of solar panels. Therefore, during daily use, the angle of illumination must be adjusted to prevent shadows and must clean bird droppings, dust, and garbage on the surface
Related Solar Products
From the brand.

BougeRV is known as a sustainable energy brand whose long-term vision is to create a sustainable future for human beings by offering one-stop solar product solutions -----Solar panels, solar accessories, and power stations.
The off-grid is tailored for outdoor enthusiasts who are committing to carbon footprint reduction while enjoying the cozy life that clean energy brings.

New Release--Solar Power
Visit the Store

Solar Panel and Accessories

Green Solar Solution

Power Station and Refrigerator
Looking for specific info, product information, technical details, additional information, warranty & support, product guides and documents, compare with similar items, important information.
21 volts_of_direct_current
Customer reviews
Customer Reviews, including Product Star Ratings help customers to learn more about the product and decide whether it is the right product for them.
To calculate the overall star rating and percentage breakdown by star, we don’t use a simple average. Instead, our system considers things like how recent a review is and if the reviewer bought the item on Amazon. It also analyzed reviews to verify trustworthiness.
Customers say
Customers like the charging, efficiency, quality and value of the solar panel. For example, they mention it charges well, has a powerful technology and provides excellent output for a 180 watt panel. That said, opinions are mixed on size and power output.
AI-generated from the text of customer reviews
Customers like the quality of the solar panel. They say it's well made, and performs well. Some customers also mention that the latches, corner guards, and hinges are cheap.
"...Not only do they look super sleek (black anodized frame) but because of their small size and weight, they are easy to set up compared to larger..." Read more
"...a bit heavy but that’s to be expected - it’s supposed to be able to withstand high winds so we weren’t expecting a lightweight panel...." Read more
"...the bag is great! the panels work OK. The latches, corner guards and hinges are as cheep as they could find - ease to live with;replace the latch..." Read more
"...And I live at 47° north. Pretty good performance I’d say. Looking forward to seeing how they do further south." Read more
Customers like the value of the solar panel. They mention that it provides panels at a great price per watt, and they love the quality and the pricing.
"...Overall, their price is competitive (around 1$/W) and came very well packed...." Read more
"...Overall, really good panels though for the price ." Read more
"The kit gives you the basics to get started on a relatively inexpensive system ...." Read more
"... Great value Great product ...Thank you!" Read more
Customers find the installation of the solar panel to be easy. They mention that the MC4 connectors built in make installation simple. Some say that the panel is light weight and easy to mount.
"...but because of their small size and weight, they are easy to set up compared to larger panels......" Read more
"...It arrived in good condition and it was very easy to install and hook up . It doesn’t come with any kind of mounting so my husband made his own...." Read more
"These panels are easy to install thanks to their quick connectors. Pos and neg are nicely labeled...." Read more
" Light weight easy to install " Read more
Customers are satisfied with the efficiency of the solar panel. They mention that it has a 97% efficiency, it's powerful, and has an excellent output for a 180 watt panel. Some say that the bi-directional gain is outstanding and is anywhere from 5 to 15% without optimal.
"...The bifacial gain on these is outstanding and is anywhere from 5 to 15% without optimal placement. They are built well and packaged great...." Read more
"...the clouds on a late morning in December - that is excellent output for a 180 watt panel and I'm looking forward to seeing how well it performs in..." Read more
"...meter screen to see the real PV production of 5.6 A. These high efficiency panels are hands down the best on the market and at $89 each, how can you..." Read more
"...720 watts and I've gotten up to 700 watts in the summer which is 97% efficiency ...." Read more
Customers are satisfied with the charging of the solar panel. They mention that it provides a good charge current in low light, charges a 400 ah battery bank very well, and does so with no problems. Some say that the batteries are almost always at 100% now.
"...It charged up exactly the way it should ...." Read more
"...This panel charges a 400 ah battery bank very well ! For the price, power output, and size of the panel, it's excellent for what I'm doing...." Read more
"...Is hurricane cloud cover now yet still it's provided good charge current in low light.Way better than my old PVP." Read more
"...These are really easy to install and work amazing. Batteries are almost always at 100% now" Read more
Customers are mixed about the power output of the solar panel. Some mention that it generates power beyond their expectation, with great efficiency and output watts. However, others say that if the sun isn't there, they don't produce a lot of current or that it has very low output.
"...no matter what time/month/angle of panel, the highest wattage seen is 160 per panel . I run 6 panels to max out my victron 100/50 solar charger" Read more
"...All 4 panels put out acceptable power ...." Read more
"...15 days later I was only getting 5Amps in one of the panels in the same position, same location, same time...." Read more
"...At noon, it put out over 350 watts . I am very happy with the panel." Read more
Customers are mixed about the size of the solar panel. Some mention that it's the perfect size, easy for one person to install, and takes up less room on the roof of their van. Others say that it is a little bulky and heavy, and sacrifices portability.
"...look super sleek (black anodized frame) but because of their small size and weight , they are easy to set up compared to larger panels......" Read more
"...It’s a bit heavy but that’s to be expected - it’s supposed to be able to withstand high winds so we weren’t expecting a lightweight panel...." Read more
"This solar panel was just the right size for the area we had. I upgraded from a 140W panel that was so working well after 10 years...." Read more
"...Pros for me.Performance is greatEasy to use Good size Cons for meExpensive..." Read more
Customers are mixed about the support. Some mention that the product support was amazing, outstanding, and good. Others say that the support experience was disappointing, frustrating, and too experience for what it is.
"... Product support was amazing . A replacement panel was sent after testing bad. Got the keep the brok3en unit. However, replacement gens about 75w...." Read more
"It was too experience for what it is . It came late, it came broken...." Read more
"...You get what you pay for with these panels. Customer support is outstanding ." Read more
"...n’t use my power station adapter with my other panels tomorrow, super frustrating , not the first time BougeRV solar panel experience I had in mind...." Read more
Reviews with images

- Sort reviews by Top reviews Most recent Top reviews
Top reviews from the United States
There was a problem filtering reviews right now. please try again later..

Top reviews from other countries
- Amazon Newsletter
- About Amazon
- Accessibility
- Sustainability
- Press Center
- Investor Relations
- Amazon Devices
- Amazon Science
- Sell on Amazon
- Sell apps on Amazon
- Supply to Amazon
- Protect & Build Your Brand
- Become an Affiliate
- Become a Delivery Driver
- Start a Package Delivery Business
- Advertise Your Products
- Self-Publish with Us
- Become an Amazon Hub Partner
- › See More Ways to Make Money
- Amazon Visa
- Amazon Store Card
- Amazon Secured Card
- Amazon Business Card
- Shop with Points
- Credit Card Marketplace
- Reload Your Balance
- Amazon Currency Converter
- Your Account
- Your Orders
- Shipping Rates & Policies
- Amazon Prime
- Returns & Replacements
- Manage Your Content and Devices
- Recalls and Product Safety Alerts
- Conditions of Use
- Privacy Notice
- Consumer Health Data Privacy Disclosure
- Your Ads Privacy Choices
IMAGES
VIDEO
COMMENTS
A solar-power installation on a sailboat is made up of two independent systems: one system to charge the batteries, and another system to provide 120-volt AC power for household appliances. In the charging system, the solar panels convert sunlight into electrical current and deliver it to the batteries via a solar charge controller.
Getting Started with Sailboat Solar. Sunpower Solar Panels are considered by most in the industry as the gold standard. They use the highest-efficiency solar cells and have top-notch build quality. In this simple installation, three 50w panels are just enough to get you started. Plus, it's the most affordable installation! 150w Starter Solar ...
THE AVAILABLE SPACE. In practical terms, a modern 40ft monohull would have the space for around 1,200W of PV panels (cockpit arch, sprayhood top, deck), maybe 1,500W with the addition of a few portable panels for use at anchor. The 1,200W of fixed position solar array could produce around 360Ah on a sunny summer's day (zero shading) or more ...
Another factor you'll need to consider is the size of your boat battery bank. In general, a 100Ah deep cycle battery will need 180 watts of solar to fully charge, assuming you have at least four hours of sunlight a day. Thus, if you have a 200Ah battery bank, you'll need at least 360 watts of solar. In this case, two 200-watt panels would ...
A 10-watt horizontally mounted panel should generate between 3- and 5-amp hours per day. We'll need at least 13 volts to fully charge our 12-volt battery. As most solar cells generate at least 0.45 volts, you'll want a panel with a minimum of 33 cells, which should provide around 14.85 volts.
Researching solar panels for the first time in 13 years, we discovered that much had changed. Panels produced higher output for their size, but larger panels were being manufactured to meet the ever-growing demands of boaters. Our usage had actually decreased over time as our three children grew up and moved off the boat, and the space allotted ...
Selecting solar panels: Choose high-quality marine-grade solar panels designed to withstand the rigors of marine environments. Consider factors such as wattage, size and efficiency to meet your energy needs. Mounting solar panels: Install mounting brackets or racks on the boat's deck or cabin roof using appropriate hardware. Ensure that the ...
Nature Power Rigid. The nature power rigid is a large, powerful, single solar panel. If you are looking for the right panels to power your entire boat comfortably, these are the ones for you. They are very large so they will need a large flat surface area. alternatively, they can be hung vertically from rails.
Marine solar panels are a relatively niche market, but there are plenty of options to choose from since typically, you can install any DIY off-grid solar panel on your boat. Our favorite solar panels for boats are: Topsolar flexible solar panel. Renogy 100W 12V solar panel. SunPower 170W solar panel. Below, we get into the best solar panels to ...
Solar panels on boats replenish the DC power in your boat's battery system. A small solar panel or two can maintain or trickle charge your batteries while you're unplugged from shore power. Add a couple more panels, and you'll be able to produce enough energy to power appliances. And for sailboats that go on long passages, marine solar p ...
For our sailboat solar power installation, we had three 325 Panasonic Solar Panels, a 316 Stainless Steel frame made to weld over our davits and a Midnight S...
A few viewers have asked about my two solar panels in the cockpit of my sailboat. In this episode, I explain how I set up my solar system. It's super easy. E...
Using the example above, a 36 cell panel will produce (36 x 0.6) x 5.5 = 119 Watts in perfect conditions. 10 things that effect solar panel output in a marine installation : 1. Temperature - The hotter the cells get, the lower the voltage and hence the lower the panel output. Panel
0.1. 2.88. Energy requirement for Aderyn Glas over the course of a day. 'Current' is Amps. 'Duty' is the portion of the day the (12V) appliance is powered up. eg Fridge 4A x 12V x 12hr = 576Wh. Next, you need to decide how much of this requirement should be met by the boat solar panels.
Step by step guide for installing a solar panel boat system. First I list a quick summary on how to put this together. Details will follow after these instructions. 1. Mount your panel on your stern rail (see photos/details below). 2. Attach marine grade copper wires to the panel.
We had a 200w setup, nothing fancy but enough to supply our need for sailing the Bahamas. You will need between 2-8 solar panels for your sailboat. The exact amount depends on your sailboat's space and how many electronics you need to power. Most solar panels can absorb between 100-300 watts per hour.
INSTALLING SOLAR PANELS ON A BOAT. Solar panel technology has improved tremendously in the past few years. The panels are highly efficient, flexible, walkable and comes with very low weight. They can be attached to the deck or canvas with fasteners such as Tenax/Loxx, using velcro or glue. Some panels are suitable for boom/mast assembly as well ...
If you have limited space on your boat and don't want to build a structure to install a solar panel, flexible solar panels are a great solution. They can be...
In our opinion, the best solar panels for boat use are the SunPower 170W solar panels. These are flexible panels that allow for easy and versatile installation. They are some of the most efficient panels suitable for boat use, and they provide an incredible 170 watts each.
A 10-watt panel should contribute between 3 and 5 amp hours per day. You'll need at least 13 volts to fully charge your 12-volt battery. As most solar cells generate at least 0.45 volts, you'll want a panel with at least 33 cells which should provide around 14.85 volts.
It is typically single conductor and the insulation is .25 Inches in diameter. The wiring diagram below is taken from our dual output controller manual and illustrates the basic wiring required for a two panel system, a dual output controller and two battery banks. Most solar controllers are single output so charge only one battery bank.
Step 1: Determine the location for the solar panels. Step 2: Measure and mark the mounting points. Step 3: Install the brackets. Step 4: Install the solar panels. Step 5: Adjust the angle of the panels. Wiring and Connecting the Solar Panels to Your Boat's Power System. Testing and Maintaining Your Solar Panel System.
This Federal tax credit is a 15%-30% credit on all qualified expenses to purchase and install solar panels and a solar system (including any installation charges), ... are ideal for temporary mounting of our flexible solar panels on a boat's canvas bimini or dodger. Our rare earth magnet kit includes 8 or 12 magnets and adhesive to attach the ...
1. Install the racking system The racking system holds the solar panel mounts to the roof framing. Locate and mark your roof rafters using a hammer or mallet to tap on the roof.
It's not easy to install solar panels on a boat to get maximum efficiency. But after 8 months of testing, I came up with the simple idea that gave me almost ...
Compared to other 200W solar panels, the BougeRV 9BB 200W solar panel is about 8% smaller but it could power the same or even more. Compared to other 100w solar panels, it's about 48% larger, but 100% more power, which allows you to install the solar panel on the limited roof of the RV/VAN/Trailer, so you can get more power in the limited space.
The federal solar tax credit applies to any complete solar system (of any size) installed and operational between January 1, 2017 and December 31, 2034. Both on-grid or off-grid systems are included in the program, as well as any shared systems of which you might be a partial owner, referred to as Community Solar. If the ...
4Pcs 320-Watt Monocrystalline Solar Panel for RV Boat Shed Farm Home House Rooftop Residential Commercial House (31) $ 1299. 99 $1520.26. ... optimize your roof space and allow fewer modules per installation with this 320W solar panel.The PERC cell technology produces high power and high-efficiency solar panels, featuring smoother module output ...