
Please verify you are a human
Access to this page has been denied because we believe you are using automation tools to browse the website.
This may happen as a result of the following:
- Javascript is disabled or blocked by an extension (ad blockers for example)
- Your browser does not support cookies
Please make sure that Javascript and cookies are enabled on your browser and that you are not blocking them from loading.
Reference ID: b3e9a3f5-199f-11ef-a835-4c2e7d0d0cc1
Powered by PerimeterX , Inc.
Call us toll free (855) 980-8687 or email us: [email protected]
My shopping cart
Your cart is currently empty.
Free Shipping on most orders over $99, excluding shipments to Alaska & Hawaii
Please sign up to receive email alerts on new products and promotions!
Teak Hand & Grab Rails
Captain’s Marine Supply has a great selection of Classic Teak Hand & Grab Rails, produced by Whitecap. Ranging in length from 9 ¾ in. up to 73 in. in length, with numerous loops, your Sailing Vessel will look quite Bristol in the slip, or on a mooring buoy after these handrails have been installed. Stop by our store today & check out our wide assortment of Teak Hand & Grab Rails!
8 products found in Teak Hand & Grab Rails
- Sort by Featured Best Selling Alphabetically, A-Z Alphabetically, Z-A Price, low to high Price, high to low Date, new to old Date, old to new
Call For Availability
Whitecap Teak Grab Handle - 9-3/4"L
Whitecap teak handrail - 1 loop - 13"l, whitecap teak handrail - 2 loops - 23"l, whitecap teak handrail - 3 loops - 33"l, whitecap teak handrail - 4 loops - 43"l, whitecap teak handrail - 5 loops - 53"l, whitecap teak handrail - 6 loops - 63"l, whitecap teak handrail - 7 loops - 73"l.
© 2024 Captains Marine Supply | Powered by Shopify
- American Express
A Complete Guide to Teak Maintenance on Your Sailboat

By Joshua Bremmerer, CEO at Komodo Covers Teak surfaces are divisive in the boating world—loved by some for their sparkling appearance and perfect grip, loathed by others for the perceived difficulty of teak maintenance. The reality is that teak is nothing to be afraid of, as long as you follow some essential tips to take care of the material properly, minimizing costs in the process.
Teak is famed for its various grains of hard and softwood, making it naturally adhesive and anti-slip in practically any weather condition. Furthermore, it maintains a relatively cool temperature , insulating a boat to avoid engine overheating. Due to the several types of wood, different teak maintenance methods can drastically affect its ability to last.
So, it’s crucial to take the following steps into account to make sure you don’t mark the surface and keep your boat in excellent condition.
Cleaning is king
First things first, whatever you do, don’t use high-pressure cleaners on your teak because they will destroy the softer wooden elements, leaving ridges and areas that can quickly rot. Additionally, hard brushes or powerful cleaning detergents will cause a similar effect, damaging the vulnerable soft sections.
Instead, it’s much better to do regular cleaning—weekly if possible—with a very soft brush or Brite pad. You will see good results from lightly brushing against the grain with a mild detergent. If you see mildew or just want to make your sailboat sparkle, you could consider using a tiny amount of bleach, but do it with caution.

Smooth sailing with sanding
Most boaters with a teak deck consider it a standard practice to sand the surface once a year before the start of a season. Sandpapers come in various grits—for a teak deck, between 80 and 120-grit is the ideal level. The higher the number of grit, the more slippery the deck will be, so a medium level is suitable for teak as it will maintain the characteristic non-slip.
Seal the deal
Once you have cleaned and sanded the teak evenly, you can be forgiven for clapping your hands together and proclaiming a “job well done.” But you are still missing one last step—and it is a crucial one. A teak sealer will prolong the natural appearance of the wood for years to come while maintaining the pristine condition. Depending on the type of seal, some can contain biocides and even UV inhibitors which go that extra step in terms of preservation.
Aside from sealers, you can also consider using teak oil products, but be careful on how much you apply as sometimes overapplication of oil can promote mildew growth. If your boat isn’t going to be used regularly, this may not be the best course of action. The other issue with teak oil is that it doesn’t last particularly long, usually 4-12 weeks, depending on how well you have applied it.
Following these tips will put you in a great position to get your boat ready for a season on the water. If you choose the right cleaning products, sand your deck appropriately, and seal it with a good sealer, you should be able to maintain your sailboat deck for longer than you had ever imagined!
About Josh Bremmerer

Josh Bremmerer is an innate navigator, an experienced leader in the boating industry with over a decade of experience in management and company development and a lifelong passion for boating. As the manager of Glacier Ski Shop, Josh grew the small Shop into a nationally recognized business and increased profits by 400%. With that background, it’s no wonder Josh started his own business in the boating industry: Komodo Covers .
7 Wonderful Cities to Live on a Sailboat
American magic’s first new ac75 patriot revealed, sea.ai brain: how to enhance maritime safety with advanced machine vision, eight reasons why sailing is the best sport in the world, live your passion, subscribe to our mailing list.
- New Sailboats
- Sailboats 21-30ft
- Sailboats 31-35ft
- Sailboats 36-40ft
- Sailboats Over 40ft
- Sailboats Under 21feet
- used_sailboats
- Apps and Computer Programs
- Communications
- Fishfinders
- Handheld Electronics
- Plotters MFDS Rradar
- Wind, Speed & Depth Instruments
- Anchoring Mooring
- Running Rigging
- Sails Canvas
- Standing Rigging
- Diesel Engines
- Off Grid Energy
- Cleaning Waxing
- DIY Projects
- Repair, Tools & Materials
- Spare Parts
- Tools & Gadgets
- Cabin Comfort
- Ventilation
- Footwear Apparel
- Foul Weather Gear
- Mailport & PS Advisor
- Inside Practical Sailor Blog
- Activate My Web Access
- Reset Password
- Customer Service

- Free Newsletter
Hunter 35.5 Legend Used Boat Review

Pearson Rhodes 41/Rhodes Bounty II Used Sailboat Review

Hallberg-Rassy 42 Used Sailboat Review

How to Perform Your Own Pre-Buy Inspection

Thinking Through a Solar Power Installation

How Does the Gulf Stream Influence our Weather?

Can You Run a Marine Air-Conditioner on Battery Power?

Preparing Yourself for Solo Sailing

Practical Sailor Classic: The Load on Your Rode

Anchor Rodes for Smaller Sailboats

Ground Tackle Inspection Tips

Shoe Goo II Excels for Quick Sail Repairs

Diesel Performance Additives

What Oil Analysis Reveals About Your Engine

Painting a New Bootstripe Like a Pro

Penetrating Epoxy—Another Marketing Gimmick?

The Best Tools for Bottom Painting

The Hidden Maintenance Problems That Can Ruin Your Day: Part 1

Alcohol Stoves— Swan Song or Rebirth?

Living Aboard with an Alcohol Stove

Choosing the Right Fuel for Your Alcohol Stove

How to Select Crew for a Passage or Delivery

Preparing A Boat to Sail Solo

Re-sealing the Seams on Waterproof Fabrics

Waxing and Polishing Your Boat

Reducing Engine Room Noise

Tricks and Tips to Forming Do-it-yourself Rigging Terminals

Marine Toilet Maintenance Tips

Learning to Live with Plastic Boat Bits
- Boat Maintenance
- Sailboat Reviews
How to Restore Teak Wood on Boats
Probably nothing can make or break the appearance of a fiberglass boat more quickly than the appearance of the exterior teak trim. Contrary to popular belief, teak is not a maintenance-free wood that can be safely ignored and neglected for years at a time. Though teak may not rot, it can check, warp, and look depressingly drab if not properly cared for.
Although it is not immune to neglect, teak is incredibly resilient, and can be brought back to life after remarkable amounts of abuse. Therefore, there is no excuse for drab, ugly exterior teak on any boat.
Unlike other woods used for exterior trim, the grey weathering of teak rarely extends very far below the surface of the wood. Instead of the tedious scraping and sanding essential to restore the weathered surface of, for example, mahogany, a fairly simple chemical cleaning usually suffices to bring even the worst of grungy teak back to a semblance of its original glory.
However, chemical cleaning can be pretty tough on the wood. Most chemical cleaners rely on a caustic and/or an acid to clean and bleach the surface of the wood. Inevitably, these powerful cleaners gradually erode the surface, softening the pithy portions of the grain and leaving raised ridges along the tougher growth rings of the wood.
Chemical cleaners can, however, almost miraculously clean weathered teak. The four-color brochures published by teak care product companies do not exaggerate when they show bright tan teak next to grey ugly teak, claiming that only a few minutes work will transform the dirty to the clean.
For best results, however, you should never let your teak trim get to the point that such drastic measures are called for: and once you get it back to like new condition, you should be prepared to put in the time and effort required to keep it in that condition.
Cleaning Teak on Boats
If your teak is dark brown from old, oxidized dressing, or weathered grey from neglect, the first step is a thorough cleaning.
The severity of the discoloration of the wood will determine the severity of restorative measures required. Because cleaners containing acids and caustic are hard on the wood, you should try to use as mild a cleaner as will do the job, even though it may take some experimentation and a few false starts to come up with the right combination of ingredients.
The mildest teak cleaner is a general purpose household powdered cleaner such as Spic n Span . A concentrated solution of powdered cleaner and vigorous scrubbing using a very soft bristle brush or, better yet, a 3M pad, will do a surprisingly good job on teak that is basically just dirty. Don’t scrub any harder than you have to, and always scrub across the grain. Every time you scrub the teak, you are removing softer wood, which eventually results in an uneven surface that raises the grain. Regularly using a firm brush to scrub with the grain will lead to problems down the road.
The advantage of a gentle scrub using mild cleaners is that while it is more work for you, it is by far the most gentle for your teak. Since you are likely to have some powdered detergent around, always try this method before going on to more drastic measures.
Simply wet down an area with water, clean with the detergent solution, rinse with fresh water, and let it dry. If the wood comes out a nice, even light tan, youre in luck. If its still mottled or grey, a more powerful cleaner is called for.
The next step is a one part cleaner specifically designed for teak, or the equivalent. These can be either powdered or liquid. Most consist of an abrasive and a mild acid, such as phosphoric acid or oxalic acid. They are more effective in lightening a surface than a simple detergent scrub. Many household cleaners like Barkeeper’s Friend contain oxalic acid.
If the cleaner contains acid, however, some care in handling must be taken. It is advisable to wear rubber gloves and eye protection using any cleaner containing even a mild acid.
The cleaning procedure with most one-part cleaners is the same: wet the teak down, sprinkle or brush on the cleaner, scrub down, and rinse off. Be sure to rinse well.
Even badly weathered teak should come up reasonably well with a one part cleaner. When the wood dries, it should be a uniform light tan. If some areas are still grey, a repeat cleaning should do the job. If, however, the teak is still mottled or discolored, the time has come to bring out the heavy guns, and with them the heavy precautions.
The two part liquid cleaners are, with only a few exceptions, powerful caustics and acids which do an incredible job of cleaning and brightening teak, but require care in handling to avoid damage to surrounding surfaces, not to mention your own skin.
While the instructions on all two-part cleaners are explicit, a reiteration of the warnings on the labels is useful.
Adjacent surfaces, whether gelcoat, paint, or varnish, must not be contaminated by the cleaners, most of which can bleach gelcoat or paint, or soften varnish. Constant flushing of adjoining surfaces with water while cleaning is usually adequate, but masking off of freshly painted or varnished surfaces may be more effective.
Hand protection, in the form of rubber gloves, is absolutely essential. In addition, do not use these cleaners while barefooted, and preferably not while wearing shorts. Eye protection is also a good idea. The chemical burns which can result from some cleaners can be disfiguring and painful. If the product label has the key words caustic, corrosive, or acid, wear protection and avoid splashing!
There is slight variation in the instructions for the various two-part cleaners, but the general principles are the same:
1. Wet the teak down;
2. Apply part one (the caustic), spreading and lightly scrubbing with a bristle brush;
3. When the surface is a uniform wet, muddy brown, apply the second part (the acid), spreading with a clean bristle brush;
4. Apply and spread enough of the acid to turn the teak a uniform tan;
5. Rinse thoroughly, and allow to dry completely.
It is fairly common to use almost twice as much of the second liquid (the acid) as the first, in order to get uniform light color. For this reason, its a good idea to buy an additional bottle of the second solution, when it is available. Despite the fact that most manufacturers package two-part cleaners in kits of two equal-sized bottles, they usually make additional bottles of the second part available.
Unless the instructions require it, do not rinse off the muddy brown surface of the teak after it has been treated with the caustic. You will be washing unneutralized, corrosive liquid all over the rest of your boat. Thorough neutralizing with the acid wash will minimize problems.
Surface Preparation for Finishing
A freshly cleaned teak surface is a joy to behold, but it wont stay fresh, clean, and light for long if you don’t take care of it. In fact, the surface will begin to oxidise instantly as it dries. The sooner you complete treatment after cleaning, the better.
Teak, like many woods, has grain which varies a great deal in hardness, even within the same piece of wood. Over time, even a simple scrubbing with detergent will wear away the softer portions of grain, leaving ridges of harder grain. The irregularity of such a surface merely accelerates the rate at which it gets dirty again.
Before getting out the sander to smooth out the grain, however, look at both the function and construction of the wood youre dealing with.
If the teak surface youve cleaned is teak-faced plywood, theres a good chance that a thorough sanding to smooth the surface will go right through the layer of veneer, effectively ruining the piece. On the typical fiberglass sailboat, veneered or plywood components include conpanionway drop boards, hatch tops, and sometimes cockpit seats and soles. Before sanding any of the parts, examine them carefully to see if they are solid lumber or veneer. Since exposed edges of plywood are sometimes covered with veneer strips to make them look like solid lumber, you must look pretty closely.
Although decks are usually solid lumber, they also can present problems. If the decking is much less than 1/2″ thick, and has plugged (bunged) fastenings, sanding out the grain ridges may sand away enough material to sand through or loosen the bungs, exposing the fastenings.
Even when bungs are set in epoxy, they require a counterbore at least l/8″ deep to hold them in place.
Even if the grain is quite pronounced on laid teak decks, you may be better off living with a cleaned irregular surface than opening Pandoras box by trying to create a perfectly smooth surface.
On other solid teak items such as handrails, toerails, and Dorade boxes, thorough sanding of the chemically cleaned surface before treating with a sealer will result in a much more attractive surface.
Do not, as we have seen many times, attempt to restore badly weathered and grey teak by sanding before chemical cleaning. Chances are that you will quickly discover that a discouraging amount of sanding is involved, and you will end up using a chemical cleaner in any case. Sanding both before and after treatment is a waste of effort, and is likely to remove more wood than is necessary. On teak with pronounced surface irregularities, it could take forever to sand them out to get a uniform surface color, while chemical cleaning will quickly lighten even the deepest gouges or grain defects.
Wait until the cleaned teak is thoroughly dry before sanding or applying teak dressing.
Sanding of cleaned teak is not always required, particularly if the surface is to be treated with an oil-type dressing rather than a gloss finish such as varnish. Surface irregularities show far less with the matte finish of teak oils.
Granted, perfectly smooth teak is likely to be more even in color, and some esthetic sensibilities are offended by a surface showing pronounced grain pattern. From a simply functional point of view, however, irregularities are unimportant except in terms of simplified cleaning in the future.
Unless you intend to put in the effort required to maintain your teak between major cleanings, sanding the teak smooth is a waste of time. The next chemical cleaning will simply repeat the grain-raising cycle, requiring another sanding.
If you swear youre going to keep the teak up, however, a good sanding will enhance the woods appearance.
The safest tool for general sanding is a high speed orbital sander such as the Makita B04510. If you use successively finer grades of aluminum oxide sandpaper, and don’t slow the machine down by applying pressure, it will leave a smooth, relatively swirl-free surface suitable for finishing with a teak dressing.
Inexpensive, heavy, slow-speed orbital sanders should be avoided. They leave telltale swirl marks on the surface which are accentuated by the application of finish, and their sanding is generally too slow.
Never use a disc sander on a surface to be finished bright (oiled or varnished), unless you are one of the few experts who really know how to handle this potentially destructive tool.
The same goes for the belt sander. It is perhaps the most efficient tool for smoothing large, flat surfaces, but is capable of doing heartrending and irreversible damage in the hands of the inexperienced. For decks and hatches of solid lumber, the belt sander is the answer – but only if you are thoroughly experienced with the tool, and only with a heavy duty machine that has a large sanding surface.
When power sanding, always mask off adjacent areas of gelcoat. Even lightly touching a polished gelcoat surface with a sander will damage it. The same rule applies for hand sanding.
Remove masking tape immediately when sanding is completed. Even leaving the tape on overnight on an exterior surface is likely to make it difficult to remove. Tape adhesive residue can be removed with a mild solvent, such as alcohol, and gentle rubbing with a coarse cloth, such as a piece of toweling.
After sanding, remove sanding dust from all surfaces with a vacuum cleaner. If electricity is not available, sweep thoroughly with a dusting brush or a large paintbrush which will no longer be suitable for painting because it is full of sanding dust. Obviously, you don’t sacrifice your best badger hair brush for this. The cheapest bristle brush will do fine.
Applying a Finish to the Teak
The final step in rejuvenating an exterior teak surface is the application of a dressing or sealer to retain for as long as possible the appearance of the freshly prepared wood.
Our own preference is a dressing which does not darken the wood. For our top-recommended sealer check out the six-month results of our ongoing test of wood finishes . For really durable finishes on teak trim, or caprails, there are a variety of options. Search under wood finish, or teak treatments to turn up our most recent wood finish test results . This article on varnishing also has some good tips.
The choice of a teak dressing is, however, as much a matter of esthetics as function. Look around at the boats whose exterior teak looks best to you, and query the owners about the products they use.
A major caveat is in order. No exterior teak finish lasts very long. For optimum results, monthly application of dressing is required, with a good scrubbing with detergent and water before applying a fresh coat. Youre kidding yourself if you think a once-a-year treatment will keep your teak looking good.
Do not attempt to use household-type furniture oils for exterior teak. They will not stand up to the weather.
Whatever teak dressing you use, be neat in applying it. Slopped-about teak dressing may not show when it first gets on fiberglass, but it inevitably darkens with age, leaving stains that look just as bad as varnish spills, and are just about as hard to remove. Clean up spills and overruns immediately with a rag dipped in mineral spirits unless another solvent is specified by the manufacturer of the dressing.
Masking tape is not particularly effective in protecting surfaces from spills of teak dressings, as the viscosity of most dressings is so low that they simply bleed under the edge of the tape. The answer is careful application, and careful cleanup.
Maintaining Your Teak
Your job isn’t over when the last coat of dressing is applied. To look its best, exterior teak needs frequent attention. With a boat used in salt water, frequent washdowns with fresh water will prolong the life of the dressing, but scrubbings with salt water and a brush will reduce it.
Horizontal surfaces, such as hatch covers, will require more frequent coats of sealer than vertical surfaces, such as companionway dropboards. High traffic areas like a teak cockpit sole will require the most attention of all, but are the easiest to scrub and retreat, since sanding is not usually desirable.
If all this sounds like a lot of work, thats because it is. That explains why the exterior teak on so many boats looks so grubby.
It is still, however, less work than maintaining a varnished exterior teak surface – a lot less. If you really think you want varnished teak, try maintaining a clean oiled surface for a season first.
Few things look better on a boat, particularly a white on white fiberglass boat, than well-maintained exterior teak trim. An owner who neglects exterior wood is likely to be the same owner who rarely changes the oil in the engine, and who rarely bothers to put on the sail covers after a days sail when he expects hes going sailing again tomorrow.
Owning a boat isn’t all play. A boat is a major investment, and like most investments, the more attention you pay to it, the more it will return. The time you put into maintaining your exterior teak is well invested. The return is not only pride of ownership, but dollars in your pocket when the time comes to sell the boat.
RELATED ARTICLES MORE FROM AUTHOR
Well written and informative We just bought a 21 ft 1991 celebrity Cuddy and it’s like an antique with beautiful teakwood adorning this old girl! The boat has been well taken care of but teak is teak thanks for the tips Any tips on removing the discoloration on bottom after a few rides in the river I tried washing off but won’t rinse off I guess I waited too long to rinse Is there something you can put on the bottom so that dirt doesn’t stain
Starbrite hull cleaner
What is the caulking between the teak strips (usually black) I would like to replace some that has come out.
Jimbo. There are a few different types, each with their own characteristics. Here is a test that should help you find one that works for you. https://www.practical-sailor.com/boat-maintenance/paints/teak-deck-caulks-rated-for-durability-and-resistance-to-chemicals
That’s really nice post. I appreciate your skills. Thanks for sharing.
I really enjoy the simple yet concise steps on how to restore teak wood on a boat. As teak wood outdoors is exposed to different pollutants, it can require to keep it well-maintained as long as it is used. Thank you so much this information was certainly helpful
This was certainly the best written and most informative article I have read on the subject. I recently bought a sailboat with poorly maintained exterior teak, and now I have a solid plan going forward. Thanks
Enjoy your boat comments. Would appreciate your best idea for a older boat to be sold. I have a 43’Gulf Star Trawler,well kept,that l would like to sell How would you go about this? Will appreciate your comments.
LEAVE A REPLY Cancel reply
Log in to leave a comment
Latest Videos

An Italian Go Fast Sailboat – The Viko S 35 |...

What Is The Best Folding Bike For Your Sailboat?

The No Expense Spared Antigua 60 Cruising Sailboat Soolaimon

How To Buy Sails – With Joe Cooper
- Privacy Policy
- Do Not Sell My Personal Information
- Online Account Activation
- Privacy Manager

- Sails & Canvas
- Hull & Structure
- Maintenance
- Sailing Stories
- Sailing Tips
- Boat Reviews
- Book Reviews
- Boats for Sale
- Post a Boat for Sale
- The Dogwatch
- Subscriptions
- Back Issues
- Article Collections
- Free for Sailors
Select Page
Toe-tally Worth It – Toe Rail Replacement
Posted by Marissa Neely | Hull & Structure , Projects

Replacing leaky toerails with beautiful bulwarks was an intensive but rewarding job.
D espite her many attributes, our 1979 Cheoy Lee 41, Avocet , for a time was living up to the epithet “Cheoy Leaky,” and when my husband, Chris, and I realized that the toerail was a significant source for many of those leaks, we knew we had to come up with a solution. We put a Band-Aid on by applying a bead of Teak Decking Systems caulking on the seam where the toerail met the deck and hull. That mitigated the problem for a couple of years until we had the time, money, and plan to convert our leaky toerails to lovely bulwarks.
Back in the 1970s when Avocet was built, the Cheoy Lee Shipyard in Hong Kong was known for its strong fiberglass construction. To make the hull-to-deck joint on which the toerail would reside, Cheoy Lee glassed in a shelf where the deck would sit in and on the hull. As the deck was dropped into place, builders applied a generous amount of sealant in the joint, then fiberglassed the two pieces from the inside.
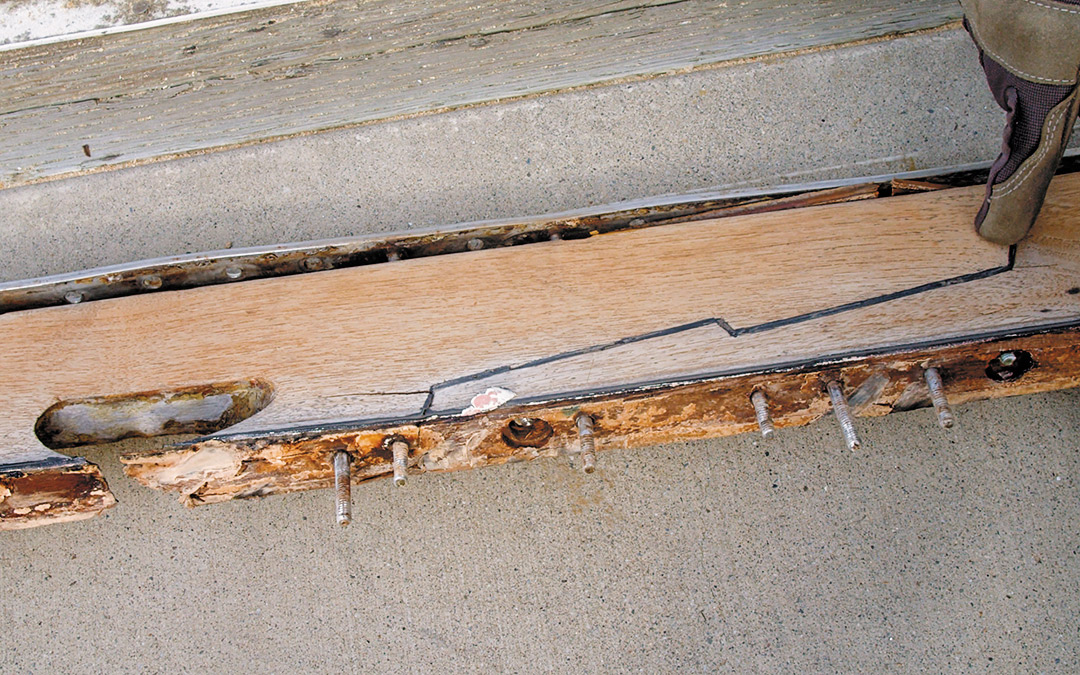
Externally, the joint was not glassed over—a labor-intensive and expensive additional step. The quicker, tried-and-true approach was to construct a toerail and through-bolt it on top of the joint; on Avocet , the 41-foot-long, 1¼-inch by 4-inch toerail was bent into place and drilled every 12 inches down through the wood, the deck, and the hull shelf before finally being bolted in place.
And in that final step—bolting—lay the rub. Cheoy Lee was also known for using poor-quality stainless steel, and the galvanically corroded stainless bolts and bronze nuts that connected the toerail to the deck compromised the otherwise solid structural integrity, in addition to being prone to leaking. When we removed what was left of 180-plus bolts, many of them crumbled in our hands, making it clear where the water had found voids to creep below.
Faced with the choice of repairing the damage and installing a new toerail or considering a completely new option, we opted for the latter and began looking into designing and installing a bulwark.
What’s the difference between a toerail and a bulwark? In the most basic way explained to us by various boat designers, a toerail is a piece of wood, aluminum, or fiberglass that usually does not exceed more than 3 inches tall and is bolted every few inches through the deck. Anything bigger, which typically is bolted to the stanchions for support, is called a bulwark.
Because whatever we chose would be integral to the hull-to-deck joint, we considered sailor and author John Kretschmer ’s advice on the matter, noting that the ideal hull-to-deck joint for a bluewater boat “does not rely on bolts, screws, rivets, or adhesive for strength or watertightness. The joint is heavily glassed on the inside, the entire way around the boat, and solid stainless steel rods [are used] for mounting stanchions [that] are recessed into the bulwark thus eliminating potential leaks so common when stanchion bases are through-bolted.”
Choosing the bulwark option would give us that sought-for seamless hull-to-deck joint, which would reinforce the interior glass as well as reconcile the damage and voids left by the old bolt holes. Unlike a toerail, we could drill far fewer holes to fasten the bulwark bases and stanchions, further limiting potential for leaks—and we wouldn’t use the dissimilar metals (stainless steel bolts and bronze nuts) as the builder had, so corrosion would be much less likely.
Inspired by a blog called Far Reach Voyages, in which the boat owners created and installed bulwarks on their Cape Dory 36 using a Lyle Hess Bristol Channel Cutter blueprint, we developed our design to incorporate a 6-inch-tall wooden bulwark that would sit about 1½ inches off the deck.
Chris concluded that the best way to mount the bulwark was by fastening it to a series of stainless steel L-brackets installed along the deck. Using this design, we could keep our existing stanchion bases by incorporating them into the L-brackets, making the brackets’ horizontal surface just slightly larger than the stanchion bases. When the time came to bolt the brackets to the deck, these bolts would first go through the stanchion bases, which would sit directly on top of the brackets’ horizontal surface. This would mechanically join each bracket and stanchion base without requiring us to weld them together, which would have been costly.
After running our bulwark plan by boatwrights, engineers, and local fabricators, we concluded that our design idea was sound, and we got to work. We planned to make the toerail-to-bulwark conversion part of a series of projects that included repainting the topsides and deck.
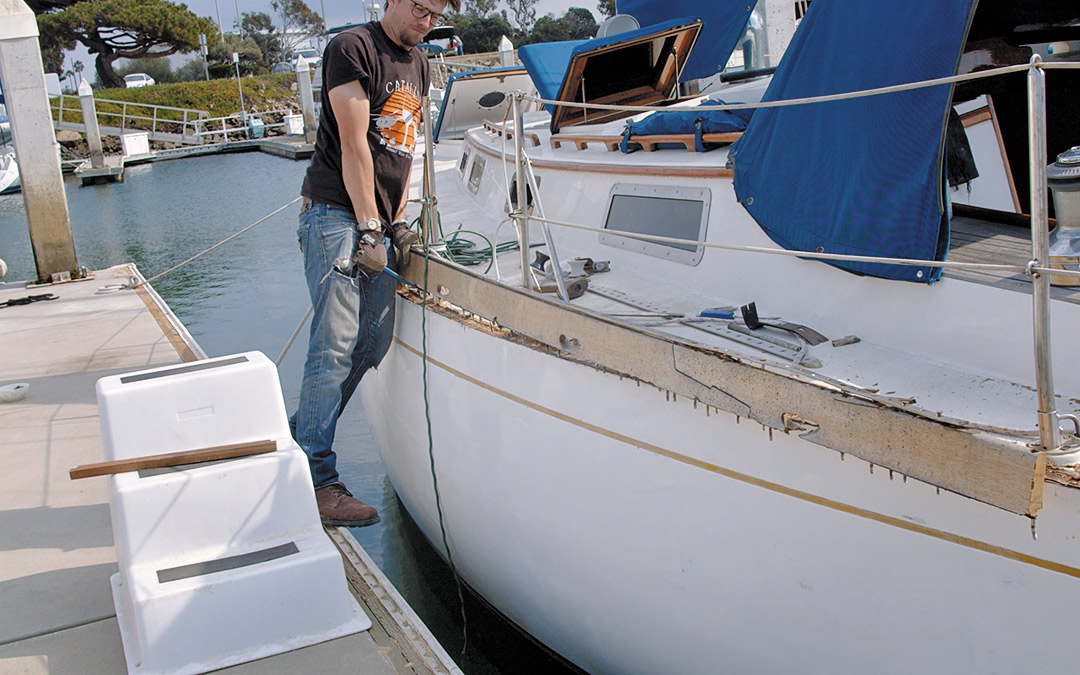
We did as much prep work in our slip as we could before our haulout. We removed the toerail by drilling out what was left of the corroded through bolts. We used a crowbar to pry the teak up from the hull-to-deck joint, though in some places where it had been sealed with 5200, we Sawzalled the pieces out.
We used an angle grinder with a flap disk to remove any remaining old caulking. Once the joint was clean(ish), Chris measured 3 inches down from the deck and marked a dot every few feet. Using a 15-foot batten we found in the boatyard, he laid the batten along the dots and then then hot-glued it to the hull. This would act as a guiding edge for the router, which he fitted with a 1/2-inch-wide straight bit.
With it, he removed a 3-inch-wide, ¼-inch-deep band of fiberglass along the outer edge of the deck and top edge of the hull. This created a bed for the two layers of 6-inch 1708 fiberglass cloth we would lay in to seal the exterior edges of the hull-to-deck joint beneath.
We did one last round of sanding with 60-grit before rounding the sharp edge where the deck met the hull, using a ½-inch roundover bit in the router. This would allow the glass to adhere better, as fiberglass does not like to conform to hard bends. Since we had anticipated laying up two layers of glass, we rounded this edge deeply enough for the glass to be inlaid with room on top for fairing compound.
With the surface prepped, we were finally ready to glass. Using a nifty worktable we had set up, I cut the glass and wet it out using a fin roller and squeegee before passing it off to Chris. This method preserved our epoxy supply and increased our efficiency. We started with the smaller area of the transom, then expanded our work to the starboard and then port sides.
Chris first applied a thin layer of US Composites medium epoxy hardener to the working surface. Working in 6-foot sections gave him just enough time to lay the fiberglass and work each piece into the edge with a fin roller to remove all the air bubbles, then be ready for the next layer as soon as I was done wetting it out. We continued this method for all 88 feet over the course of two days, taking three hours per side.
Twenty-four hours after the glass had set, we lightly sanded using 80-grit on the orbital sander to remove the amine blush and any high spots before we began applying fairing compound. Using US Composites fairing filler and epoxy, we applied three rounds of fairing compound, sanding with our Flexisander long board with 80-grit between each application to ensure a smooth surface. Then, we rolled on a two-part epoxy barrier coat that we used on not only the bottom but the topsides as well, since as a cruising boat, the entire hull is subjected to being constantly wet and rolling in the swell.
We used the barrier coat as blister protection as well as for its ultra-high-build primer characteristics that filled the small cracks, low spots, pinholes, and things we couldn’t see with the naked eye while fairing. This showed us where we needed to sand, fill, and fair more before continuing on to the Awlgrip primer for the topsides paint job.
Slowly, Avocet began to look a bit less derelict, with the grey barrier paint hiding her once-fairing-compound-pink hull-to-deck joint and various splotches revealing hull imperfections. Chris rolled the Awlgrip primer, and two days later, Avocet was completely off-white and only had to be sanded one more time before being ready for the final topcoat.
The Supports
First, though, we had to prepare for the installation of the bulwark supports. We had purchased nine 24-by-4-by-¼-inch-thick 316L stainless steel bars, which we then cut in half (it was cheaper to buy them at twice the length than to buy them at the actual length needed). After cutting them into 12-inch sections, Chris used an angle grinder with a 150-grit floppy disk to remove the matte finish left over from being cold-rolled in the manufacturing process.
Next, we had to measure the degree for each L-bracket to be bent. Each was slightly different due to the deck’s curvature. To obtain precise measurements, we used two straight pieces of timber about 16 inches long, placed one on the deck and one along the hull, and then measured the bisecting point. This measurement would ensure that the bulwark would be following the sheer line of the hull itself.
Then, we sent the measurements and the bases to a Southern California fabricator, Garhauer Marine, where a hydraulic press bent all 16 bases quickly and effortlessly. This sounds so much easier than it actually was, since dialing in the degrees on a 1/4-inch piece of stainless steel all comes down to the skill of the operator. Luckily, Doug Garhauer had over one million “hits” with this press, so we knew our metal was in experienced hands.
While Garhauer had the L-brackets, Chris used a brass L-bracket template made from a prototype to recess the bulwark bases down into the deck. This way, they would sit flush when mounted with the stanchion base on top, giving a more “factory” appearance. Chris placed the template at every stanchion base location as a guide and used a router to cut the 1/4-inch-deep pockets into the deck. Once this process of cutting holes in our so carefully faired deck was finished, we could complete the topside painting.
With the custom-shaped bases in hand, the next step was drilling out the holes to attach the stanchion bases. This also sounds easier than it was; for one thing, the stanchion bases had different hole patterns, so we would need to custom drill each one. Doug Garhauer had educated Chris on the proper technique for drilling through hard and thick material such as our stainless steel. It all comes down to using the proper tools—but not everyone can keep a drill press onboard! With Doug’s advice and our wonderful friend letting us borrow his drill press, Chris was able to drill the bases, as well as the four holes in each vertical where the bulwark boards would attach.
Finally, it was time to attach the L-brackets and stanchions to the deck. We placed the stanchion bases on top of the bracket bases with a healthy amount of butyl tape between them, then placed more butyl tape on the bottom of the brackets to seal the area between the deck and the base. We through-bolted the bases using 2½-inch-long 316 stainless steel 5/16 machine screws. Finally, we added a bead of Sikaflex to entirely fill the remaining 1/8-inch gap between the bases and the recessed deck edge.
The Bulwarks
The wood we used to construct our bulwarks was a hot topic aboard for weeks. We wanted to use teak again, but our wallets did not agree, so we researched alternative rot-resistant hardwoods. There were many great options like white oak, purple heart, black acacia, and mahogany, but we finally settled on cumaru, also known as Brazilian teak.
We ordered 100 feet of 20-foot-long, 6 x 1-inch boards from Advantage Lumber. On this part of the project, COVID became a factor when the supplier ran out of 6-inch boards, and we had to opt for 51/2-inch. At this point, we had already completed the L-bracket fabrication and drilling; this would mean that the verticals of the L-brackets would stand slightly proud of the tops of the bulwark boards. Not ideal, but it had taken months already just to get the 51/2-inch boards, so we decided to live with it.
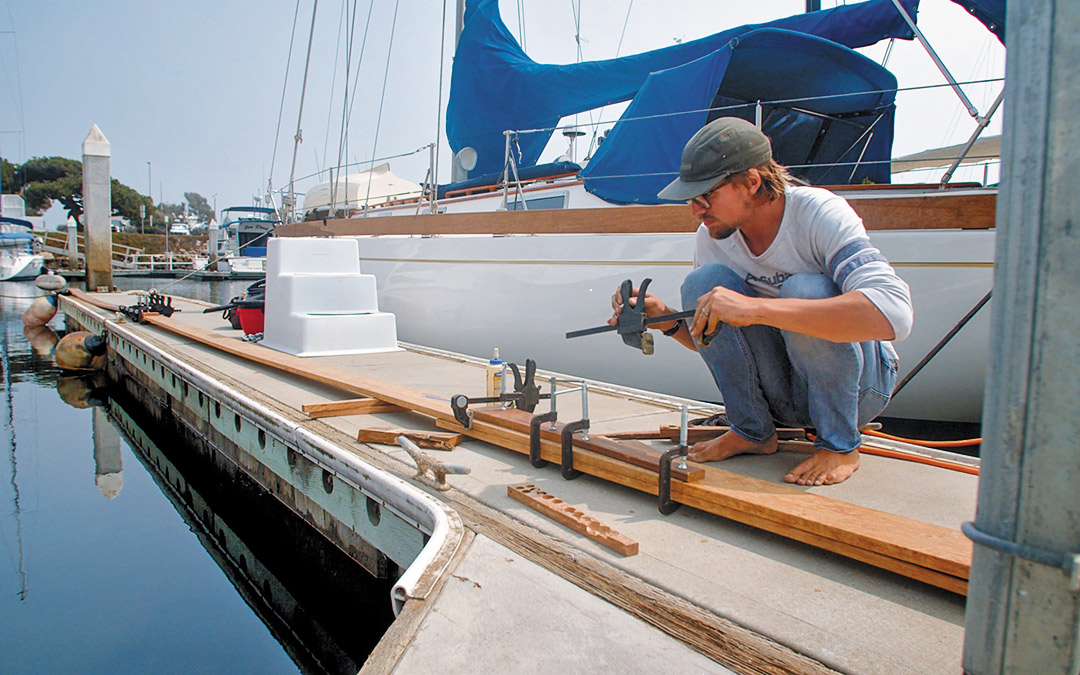
While waiting for the wood to arrive, Chris studied scarf joints to choose the best method to join three sections of wood into a single 42-foot board. He settled on a mechanically fastened, plated scarf joint that would be 32 inches long. Hours went into mathematical equations sketched out on his signature yellow legal pad to ensure the cuts would be precise, since we only had one shot at getting this right, or else we would have to order new wood—and who knew how long that would take to be delivered? Once he transferred the sketches to the wood, Chris used an accurate combo square, circular saw, Japanese hand saw, sharp chisels, assorted drill bits, 316 stainless hardware, and marine glue to construct the bulwark plank.
With the help of our friends, we carefully maneuvered the heavy, long, and bendy plank to the L-brackets, where I was quick to secure them with C-clamps. With the bulwark now dry-fitted into place, we stood back and admired how nicely this project had come together. We were thrilled to learn that we would not have to steam the wood to conform to the boat’s shape, which was ultimately a relief despite our elaborate plan to create a steam bag using a thick plastic bag and a turkey fryer for steam.
Sixty-four 316 stainless steel fasteners later, we had bulwarks! The wood completed Avocet ’s newly improved look, adding a hint of timeless design to her somewhat more modern construct, as well as an admiring nod to one of Chris’ favorite designers, Lyle Hess.
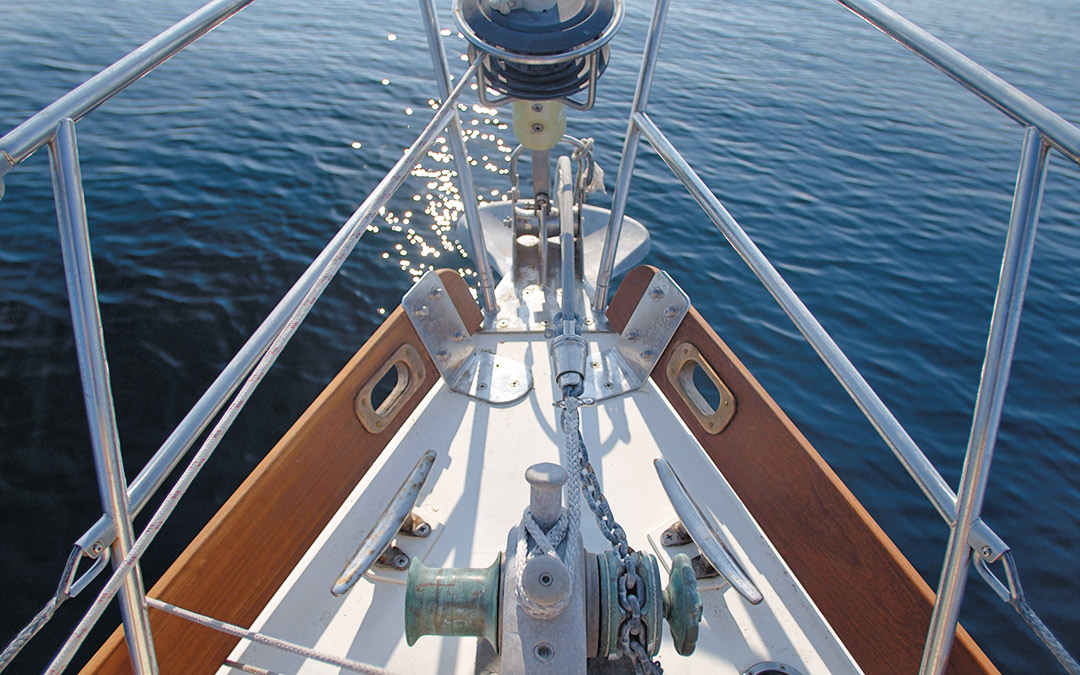
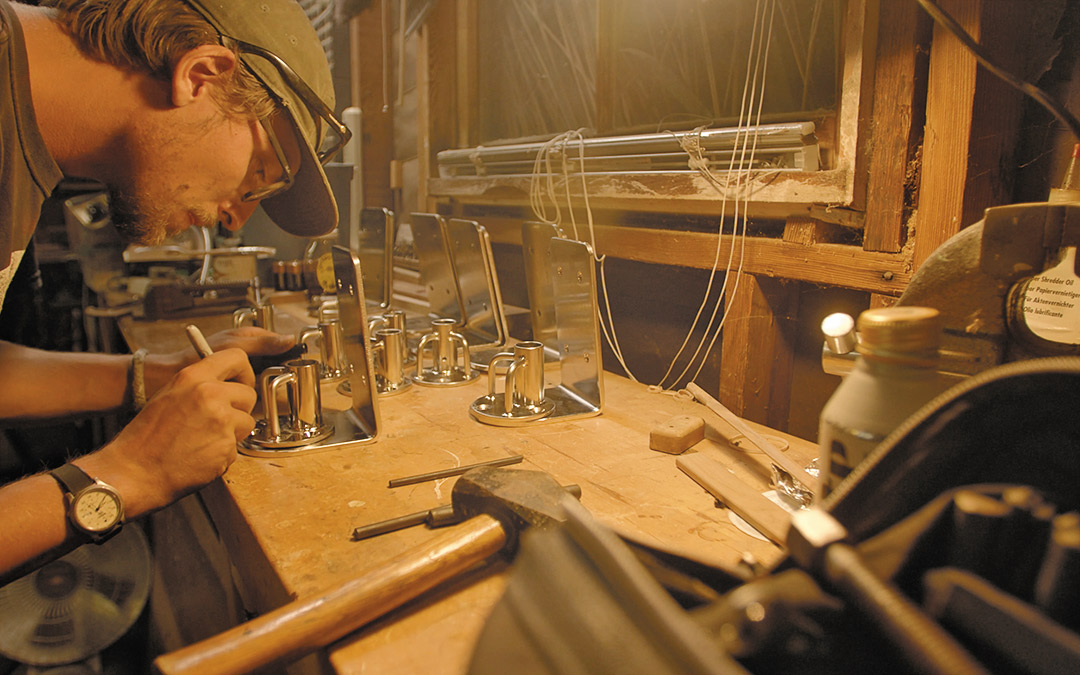
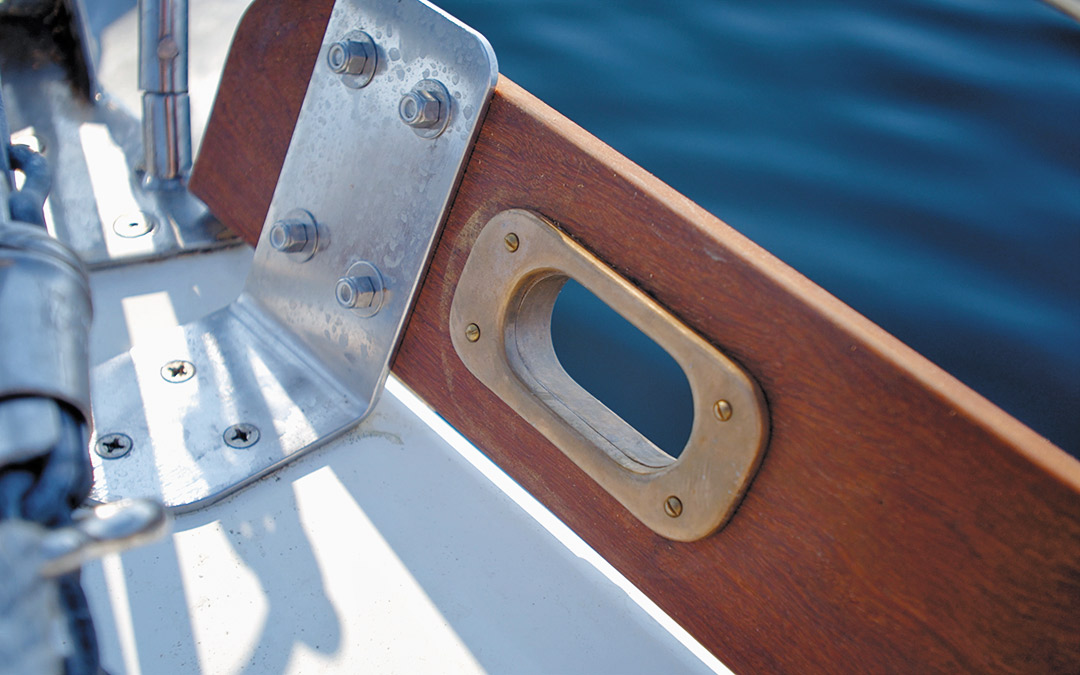
The final pieces were the hawse holes that would replace our prior fairleads, which we felt did not do the overall hull design justice. After Chris sanded, polished, and inset them into the bulwarks, the cast-bronze additions sparkled, beautifully complementing the wood and the boat’s overall look.
When the last hawse hole was in place, we broke free of the docklines that had seemingly weighed us down like shackles and made a mad dash to the Channel Islands so we could enjoy our boat the way she was intended. The water splashed on deck, washing overboard immediately under the bulwark through the slim gap. It was perfect. The bulwark’s height made it easy to safely store jerry cans, fenders, lines, and even the dinghy without the deck looking cluttered.

About The Author

Marissa Neely
Chris and Marissa Neely have been living aboard and upgrading their 1979 Cheoy Lee 41, Avocet, since 2018. Primarily they sail in and around Southern California’s Channel Islands. Follow them at svavocet.com, on other social platforms at @svavocet, and on their YouTube channel called Sailing Avocet.
Related Posts

Injecting Precision – Using Syringes on a Sailboat
June 15, 2021

Breakproof Tillers
July 25, 2019

Sticking Point
February 5, 2021

Warm, Not Fuzzy
November 1, 2019
Current Edition
Join Our Mailing List
Get the best sailing news, boat project how-tos and more delivered to your inbox.
You have Successfully Subscribed!
call 305-743-4090
Apply for a Wholesale Account
Product Search
Product Categories
- Milled Teak Lumber -- Thicknesses 1/4" To 2" Nominal -- 1/2" To 8' Wide -- 1' To 6' Long
- Rough-Sawn Teak Lumber -- 4/4 & 8/4 By The Board Foot
- Straight-Length Teak Molding, Rails, & Battens
- Teak Molding Corners
- Teak Louvered Inserts
- Teak Handrails -- 1 To 7 Loops
- Teak Rod Racks & Bases
- Teak Bungs -- 1/4" To 1" Diameter
- Teak Drawer Pulls & Handles
- Teak Outlet Covers
- Teak Cover Plates & Mounting Bases -- 3-1/5" To 6" Diameter
- Teak Ply Project Panels -- 1/8" to 3/4" Thick
- Teak Ply Quarter Sheets -- Quantity Discounts
- Teak Plywood By The Half & Full Sheet -- 1/8" To 3/4" Thick
- Project Panels -- 1/2 To 8 Square Feet -- 1/4" To 1-1/2" Thick
- Quarter Sheets -- Quantity Discounts
- Half Sheets & Full Sheets -- Quantity Discounts
- Anti Skid Project Panels -- 1 To 8 Sq. Ft. -- 1/2" - 3/4" & 1" Thicknesses
- Anti-Skid Quarter Sheets -- Quantity Discounts
- Anti-Skid Half Sheets & Full Sheets -- Quantity Discounts
- SUP Dock Storage
- SUP Dock Storage - Racing Paddleboard
- Custom Engraved Name Boards -- Teak & King Starboard Color Core
- Stock Design Name Boards -- Teak & King Starboard Color Core
- Boat Documentation Boards -- Asian Teak Or PVC
- On-line Boat Door Design, Pricing & Ordering
- Drink Holders
- Tackle Caddies
- Knife Holders
- Cover Plates
- Fishing Leader Spool Holders
- Glove Boxes
- Multi-Purpose Enclosures
- Enclosures With Graphics
- Tackle Centers
- Full-Sized King Starboard Fish Cleaning Stations
- Portable Fish Cleaning Stations
- Stand Up Paddle Board Racks
- King Starboard Hand Rails
- Armstrong & Garelick Swim Ladder Storage Brackets
- King Starboard Outboard Motor Storage Brackets
- Storage Chocks For RIB Dinghies, Personal Watercraft & Skiffs
- Fire Extinguisher Storage Brackets
- King Starboard Rod Racks
- Utility Brackets For Gaff Hooks, Boat Hooks & More
- Locking & Non-Locking Marine Latches
- Marine Hinges
- Hatch Supports
- Other Hardware
- Custom Shower & Cockpit Grates
- King Starboard Overstock Panels
- KSB Boat Doors -- New, Bargain Priced, Ready To Install
- Discounted Tackle Centers & Enclosures
- Teak Lumber & Accessories
- King Starboard Accessories
- Teak Veneer Overstock Plywood Panels
- Labels & Signs
Gift Certificate Link

- Sort by Price: Low to High
- Sort by Price: High to Low
- Sort by Popularity: Low to High
- 12 Per Page
- 48 Per Page
- 96 Per Page

Other sections offer louvered teak inserts that can add ventilation to cabinet doors and the like…solid teak handrails from 1 to 6 loops...several sizes of solid teak rod racks and (why not?) even a nice teak medicine cabinet.
And finally there are sections for small accessory items like teak drawer pulls, electrical outlet covers, teak bungs and general purpose circular teak cover plates/mounting blocks up to 6" in diameter.
Your Account
Information.
- Privacy policy
- Shipping, Return/Refund & Cancellation Policy
- Useful Links To Other Web Sites
Stay Connected
Enter your email address to receive special offers and promotions.
Buck Woodcraft, Inc. 120 49th St. Marathon, FL 33050 Tel 305-743-4090 [email protected]
© 2001-2024 Buck Woodcraft, Inc.. All rights reserved.
Custom Teak Boat Toe Rail Replacements
SYNTHETIC TEAK BOAT TOE RAILS
Weight: Varies Part #: M-TRTOERL
- toe-cap-replacement-custom
- plasteak-custom-toe-rail
- custom-boat-toe-rail-replacement
Product Information
Take off that old rotten teak!
Many boats have toe rails that are special in one way or another and we can match your exact specs. If you don’t have existing toe rails, we can start from scratch.
The warm look of teak adds charm and a classic look to any boat. Yours can be beautiful ALL of the time without the work. The next time you have them off, send them in for duplication and be done with maintaining them.
Custom PlasTEAK Installation Guide
Purchase Direct
This item is only available by contacting PlasDECK. Call us at 330-668-2587 or email us .
Select a Language

- [[html title]]
Stay in the loop! Never miss sale announcements, how-to blogs, new product launches, helpful tutorials and more!
- Galley Pumps
- General Hardware
- Hand Rail & Barrier Fittings
- Instruments
- Latches & Catches
- Refrigeration
- Steering & Controls
- Anchors and Accessories
- Bronze Blocks
- Tufnol Blocks
- Wooden Blocks
- Horn or Pillar Cleats
- Timber Cleats
- Torpedo Cleats
- Bollard Cleats
- Canopy Fittings
- Deck Lights & Hatches
- Eye Bolts & Pad Eyes
- Fairleads & Chocks
- Filler Caps & Drain Plugs
- Flag Poles & Sockets
- Hawse Pipes
- Hull Fittings
- Navigation Lights
- Mast & Deck Lights
- Light Bulbs & LEDs
- Portlights & Windscreens
- Chain Plates & Stemhead Fittings
- Mast, Boom & Gaff
- Sheet & Deck Leads
- Rudder Fittings
- Ventilators
- MURRAY Bronze Winches
- HUTTON Winches
- WILMEX Bronze Winches
- Other Winches
- Life Jackets & PFDs
- Bronze & Brass Hardware
- Decorative Rope
- Timber Oars
- Rowlock Sockets & Plates
- Rowing Accessories
- Flat Head Nails
- Miscellaneous
- Rose-Head Nails
- Wood Screws - Brass
- Silicon Bronze Slotted, Flathead CSK
- Silicon Bronze Slotted, Raised Head CSK
- Silicon Bronze Slotted, Round Head
- Silicon Bronze Square Drive, Flathead CSK
- Machine Screws
- Carriage Bolts
- Coach Screws
- Wood Screws
- Copper Nails
- Copper Roves
- Silicon Bronze Rod
- Braided Ropes
- Twisted Ropes
- Traditional Ropes
- Adhesives & Sealants
- Antifoul & Protective Coatings
- Bilge Cleaning
- Brass Bar & Strip
- Cleaning Equipment
- Cleaning, Waxing & Polishing
- Copper Sheet
- Books & Publications
- Epoxy Resin & Accessories
- Fibreglass, Peel Ply & Carbon Fibre Cloth
- Paints & Finishes
- Rust Treatment
Quick links
- Shipping Info
- Customer Feedback
- Altex Paint (NZ)
- Andersen Winches (Denmark)
- ATL Composites
- Barkley Sound Oars & Paddles (Canada)
- Davey & Company (England)
- DHR - Den Haan Rotterdam
- Foresti & Suardi (Italy)
- Harken (USA & Italy)
- HUTTON Winches (Australia)
- HYE - Holland Yacht Equipment (The Netherlands)
- Langman Ropes (The Netherlands)
- Murray (New Zealand)
- Spartan Marine (USA)
- Suncor Stainless Steel (USA)
- West System (Australia & USA)
- Wilmex (Poland)
Davey and Company
- Norglass Paints
- Yushung Fasteners
- Spartan Marine Hardware
- Foresti & Suardi
Nauteak Marine
- Langman Ropes
- WEST SYSTEM
- Default Currency
- Cabin Hardware
Teak Hand Rails

Write a Review
Description
Superior quality teak hand rails not to be confused with lesser quality products on the Australian market.
Available in a wide range of lengths.
All Nauteak Marine products are made from responsibly sourced and managed teak. When you purchase a Nauteak Marine product you can be sure it has been created from teak that has been sourced ethically and grown in a sustainable way.
Posted by Unknown on 26th Jul 2023
Received in very good shape. ?
- Related Products

Teak Cup Holder/Trivet
Solid teak cup holder that can be install in your boat or caravan, or simply placed on the table as needed. Attaches to our teak tables which have a straight edge and a lip, or any table with a...

Wooden Cleats - Teak
Teak cleats from Davey & Co. These quality timber cleats add warmth and style to any vessel. Available in a range of sizes, teak timber cleats can be made up to 20" (50cm) by special order...

Teak Folding Table Legs
These folding teak table legs come with lock-in nylon fittings to allow the legs to be easily removed from the table for storage. Suitable height for dining tables. Compatible with all Nauteak Marine...

Teak Flag Poles
High-quality teak flag poles produced from renewable plantation teak. Available in four lengths, these unique flag poles can be left natural, oiled or varnished. They come complete with a teak cleat...

Teak Table Legs with Shelf
Solid teak table legs complete with a slatted shelf ready for mounting one of our teak table tops. Stands 50cm tall so is ideal for coffee and occasional tables rather than dining tables. This table...
- Forums New posts Unanswered threads Register Top Posts Email
- What's new New posts New Posts (legacy) Latest activity New media
- Media New media New comments
- Boat Info Downloads Weekly Quiz Topic FAQ 10000boatnames.com
- Classifieds Sell Your Boat Used Gear for Sale
- Parts General Marine Parts Hunter Beneteau Catalina MacGregor Oday
- Help Terms of Use Monday Mail Subscribe Monday Mail Unsubscribe
Sealing Teak Toe Rail
- Thread starter Capri
- Start date Sep 18, 2017
- Forums for All Owners
- Ask All Sailors
Hi. I've got a 1981 O'day 22 with teak toe rails and I have several points where it screws down that are loose and have a noticeable gap between deck and rail where the screw is loose. I hope the screw, below the bung, is not stripped. How do you recommend sealing the point where the screw inserts?

So I don't try to repeat some great work, here is a link to Mainsail's instructions. It works well and will last. https://forums.sailboatowners.com/i...-deck-hardware-with-bed-it-butyl-tape.117172/ Ken
Thanks Ken!

In addition to MaineSails excellent tutorial, you might want to investigate a bit, exactly how the toe rail is attached. Is it just screwed into the deck fiberglass and/or core material with wood or sheet metal screws, or is it through-bolted? If the former, you may have to pull those bungs and re-fasten the toe rail. If they are all screwed, and into core material, you might be wise to make a project of pulling the toe rails up, entirely, filling the hole locations properly to prevent further water ingress (MaineSail has a tutorial on this, too), and then bedding and through-bolting, and bunging the screw holes. You can get a lot of good varnish work done on the rails when they are off! Big job, I know.

Hi - As I have an 1973 O'Day 22 and have done this - first off - they are screws not bolts - the deck is solid fiberglass where they are screwed in - I took all the toerails off - then drilled out the holes - potted them with epoxy - then positioned the toe rails and re-drilled pilot holes for the screws. I was fairly certain the bed-it butyl tape wouldn't work with the screws (it did a great job of rebedding everything else on the boat though) so I used Boatlife Life-Calk. Hope that helps.
Interesting. Was it impossible to through-bolt them? Or just not considered, or not necessary?
Thanks jviss and repawn.
It would have been pretty difficult - the location along the edge of the boat and with the lining in the boat made it a little challenging to pot the holes with epoxy. I don't think there would be enough room to run a bolt through. The toe rails are solid as is and I haven't had any issues with leaking after the rebedding.
- This site uses cookies to help personalise content, tailor your experience and to keep you logged in if you register. By continuing to use this site, you are consenting to our use of cookies. Accept Learn more…
IMAGES
VIDEO
COMMENTS
Teak C-Rail Molding, 5' Teak "L" Pinrail, 7/8"W x 3 1/2"H x 5'L Do-it-yourselfers select teak lumber from West Marine. Once you've spotted a beautiful boat gleaming with well-cared for teak, you know what a prize this is to boaters. By sourcing high quality and responsibly harvested teak wood from Indonesia and Thailand, we're able to ...
Teak Lumber, Handrails & Molding - Teak handrails, molding, battens, steps & teak lumber in its raw, board form let you be the designer & inst ... Customize your boat with teak to bring a clean, ... SeaTeak Teak Rail Molding. SailorSams Price: $29.49. SeaTeak Teak Track Corner w/Hand Hold Molding - 3/4" SailorSams Price: $61.99.
Still, wooden rails give a sailboat an admirably classic look, even when left unfinished to weather naturally, and can be a lot less work to maintain than people realize. Repairing wooden rubrails and toerails is also very simple, requiring nothing more than a couple of hand tools—as I learned when I repaired some sections of rail on my long ...
Whitecap Industries' teak handrails are safe, functional, and attractive. Shop teak boat handrails available in multiple lengths (13-93") at Fisheries Supply. ... Home Boat & Marine Hardware Boat Handrails, Grab Rails & Grab Bars . Teak Handrails. Whitecap Industries. Teak Handrails. Teak Handrail - 2 Loop, 23" Long. SKU: 60102 Item ID: TEK 60102 .
teak hand rails WHITECAP. Teak Handrails WHITECAP. Teak Handrails 4.6 out of 5 Customer Rating Model # P012482600. $24.99 - $167.99 Model # P012482600. 4X points on $100+ for ALL members! ... Replace cracked and faded handrails with new ones made of solid teak to make your boat look new again.
Fisheries Supply offers an extensive selection of marine handrails, including stainless steel grab rails for boats, which are essential for ensuring safe and secure movement onboard. Our range of boat grab rails includes options made from durable materials like stainless steel, teak, and nylon, catering to various aesthetic and functional needs.
Teak Handrails Eric "The Red" I just yesterday (09/23/2004)installed new teak handrails on my 1977 O'day 22. I had the bolts from the old rails, so I did not need to buy new ones. The bolts are stainless, appx. 3' long and I would guess a number 10. Common at chandlrey's, but not hardware stores. They are bolted completely through the coach roof.
Whitecap Teak Handrail - 7 Loops - 73"L. $93.99. Captain's Marine Supply has a great selection of Classic Teak Hand & Grab Rails, produced by Whitecap. Ranging in length from 9 ¾ in. up to 73 in. in length, with numerous loops, your Sailing Vessel will look quite Bristol in the slip, or on a mooring buoy after these handrails have been ...
Smooth sailing with sanding. Most boaters with a teak deck consider it a standard practice to sand the surface once a year before the start of a season. Sandpapers come in various grits—for a teak deck, between 80 and 120-grit is the ideal level. The higher the number of grit, the more slippery the deck will be, so a medium level is suitable ...
Straight-Length Teak Molding, Rails, & Battens. Teak Molding Corners. Teak Louvered Inserts. Teak Handrails -- 1 To 7 Loops. ... Boat Hooks & More. Marine Hardware. Locking & Non-Locking Marine Latches. Marine Hinges. Hatch Supports. ... Six-Loop Teak Handrail - Item 60110 -- Dimensions: 63" Long x 2-3/8" High x 1" Wide -- 10-5/16" center-to ...
Sanding staining and refinishing teak handrails on your sailboat
Solid Teak Handrails. Five-Loop Handrail. 53"L x 2-3/8"H x 1"D. Manufacturer Part Number: 60108. WHITECAP TEAK HANDRAIL 5 LOOPS 53LSolid Teak HandrailsFiveLoop Handrail53L x 238H x 1D ...
Sailboat railing hardware 101! Solid sailboat railing, as opposed to sailboat lifeline, is just the same as powerboat railing. Deck rail fittings and hardware combine with stainless tubing to create the perfect railing for your sailboat. Boat Handrails Handrails - Who doesn't love a teak handrail? Someone who prefers a stainless grab rail system!
1. Wet the teak down; 2. Apply part one (the caustic), spreading and lightly scrubbing with a bristle brush; 3. When the surface is a uniform wet, muddy brown, apply the second part (the acid), spreading with a clean bristle brush; 4. Apply and spread enough of the acid to turn the teak a uniform tan; 5.
There are only three different options: 1. bare wood, let it go gray 2. oil - which needs to be redone periodically or it will go black 3. coatings: Cetol, varnish or other types. Your boat, your choice. Heresy 101: you don't have to have your toe rails the same as the rest of your brightwork. T.
11,508. Sabre 362 113 Fair Haven, NY. Mar 13, 2021. #2. Sabres have a teak toe rail and keeping a finish on them is an endless conversation and debate among Sabre owners. Toe rails and your cap rail are often submerged or spend a lot of time with water sloshing up against them, especially when heeled and sailing to windward.
The quicker, tried-and-true approach was to construct a toerail and through-bolt it on top of the joint; on Avocet, the 41-foot-long, 1¼-inch by 4-inch toerail was bent into place and drilled every 12 inches down through the wood, the deck, and the hull shelf before finally being bolted in place. And in that final step—bolting—lay the rub.
11,498. Sabre 362 113 Fair Haven, NY. Feb 23, 2022. #3. I don't think flexibility is an issue. If you look closely the current teak toe rails are proabably secured every 6 to 12 inches, which should be adequate. Do some investigation on how the current toe rails are installed and how accessible the bottom of the rails are.
Straight-Length Teak Molding, Rails, & Battens. Teak Molding Corners. Teak Louvered Inserts. Teak Handrails -- 1 To 7 Loops. Teak Rod Racks & Bases. Teak Bungs -- 1/4" To 1" Diameter. Teak Drawer Pulls & Handles. Teak Outlet Covers. Teak Cover Plates & Mounting Bases -- 3-1/5" To 6" Diameter.
Purchase Direct. This item is only available by contacting PlasDECK. Call us at 330-668-2587 or email us. The warm look of teak adds charm and a classic look to any boat. Yours can be beautiful ALL of the time without the work.
Free shipping on domestic orders over $199. Stay in the loop! Never miss sale announcements, how-to blogs, new product launches, helpful tutorials and more! Teak grab rails give sailboats a beautiful, classic aesthetic, especially when the teak has been newly oiled and refinished.
Description. Superior quality teak hand rails not to be confused with lesser quality products on the Australian market. Available in a wide range of lengths. All Nauteak Marine products are made from responsibly sourced and managed teak. When you purchase a Nauteak Marine product you can be sure it has been created from teak that has been ...
73. Oday 22 Milwaukee. Sep 19, 2017. #5. Hi - As I have an 1973 O'Day 22 and have done this - first off - they are screws not bolts - the deck is solid fiberglass where they are screwed in - I took all the toerails off - then drilled out the holes - potted them with epoxy - then positioned the toe rails and re-drilled pilot holes for the screws.