- standing rigging
- rope and line
- cams, cleats and clutches
- head sail gear
- roller furling
- main sail control
- mast hardware
- eye straps and pad eyes
- fairleads and bulls eyes
- anchor and docking
- miscellaneous hardware
- Alexander Roberts
- My Wishlist
LIFE LINES All swaged sailboat, power boat and yacht lifelines are assembled right here in our rigging shop.
We use only the highest quality lifeline wire made 7x7 type 316 wire in our coated life lines never 7x19 or 1x19 wire. Our uncoated life lines are 1x19 wire, all strand polished and type 316 stainless steel
We refuse to compromise quality to save a few pennies, so you can be sure that your life lines provide years of service and safety.
- Customer Service
- Order Tracking
- Your Account
- Store Policies & Info
- Privacy Policy
- Helpful Links
- Payment Methods

Shopping Cart: 0 Items
- Welcome To The Seco South Online Store
- My Wishlist
- Login / Register
You have no items in your shopping cart.
- Select category
- Anchor Rodes
- Accessories
- Cable Assemblies
- Cable Railing Kits
- DIY Cable Trellis Kits
- Lifeline Kits
- Running Rigging
- Standing Rigging

- Anchor Rodes Hot!
- Trellis Kits Hot
- Sta-Lok Fittings (Mechanical Fittings)
- 316 - 1X19 Stain steel wire
- Hunter 35.5
- Beneteau First 235
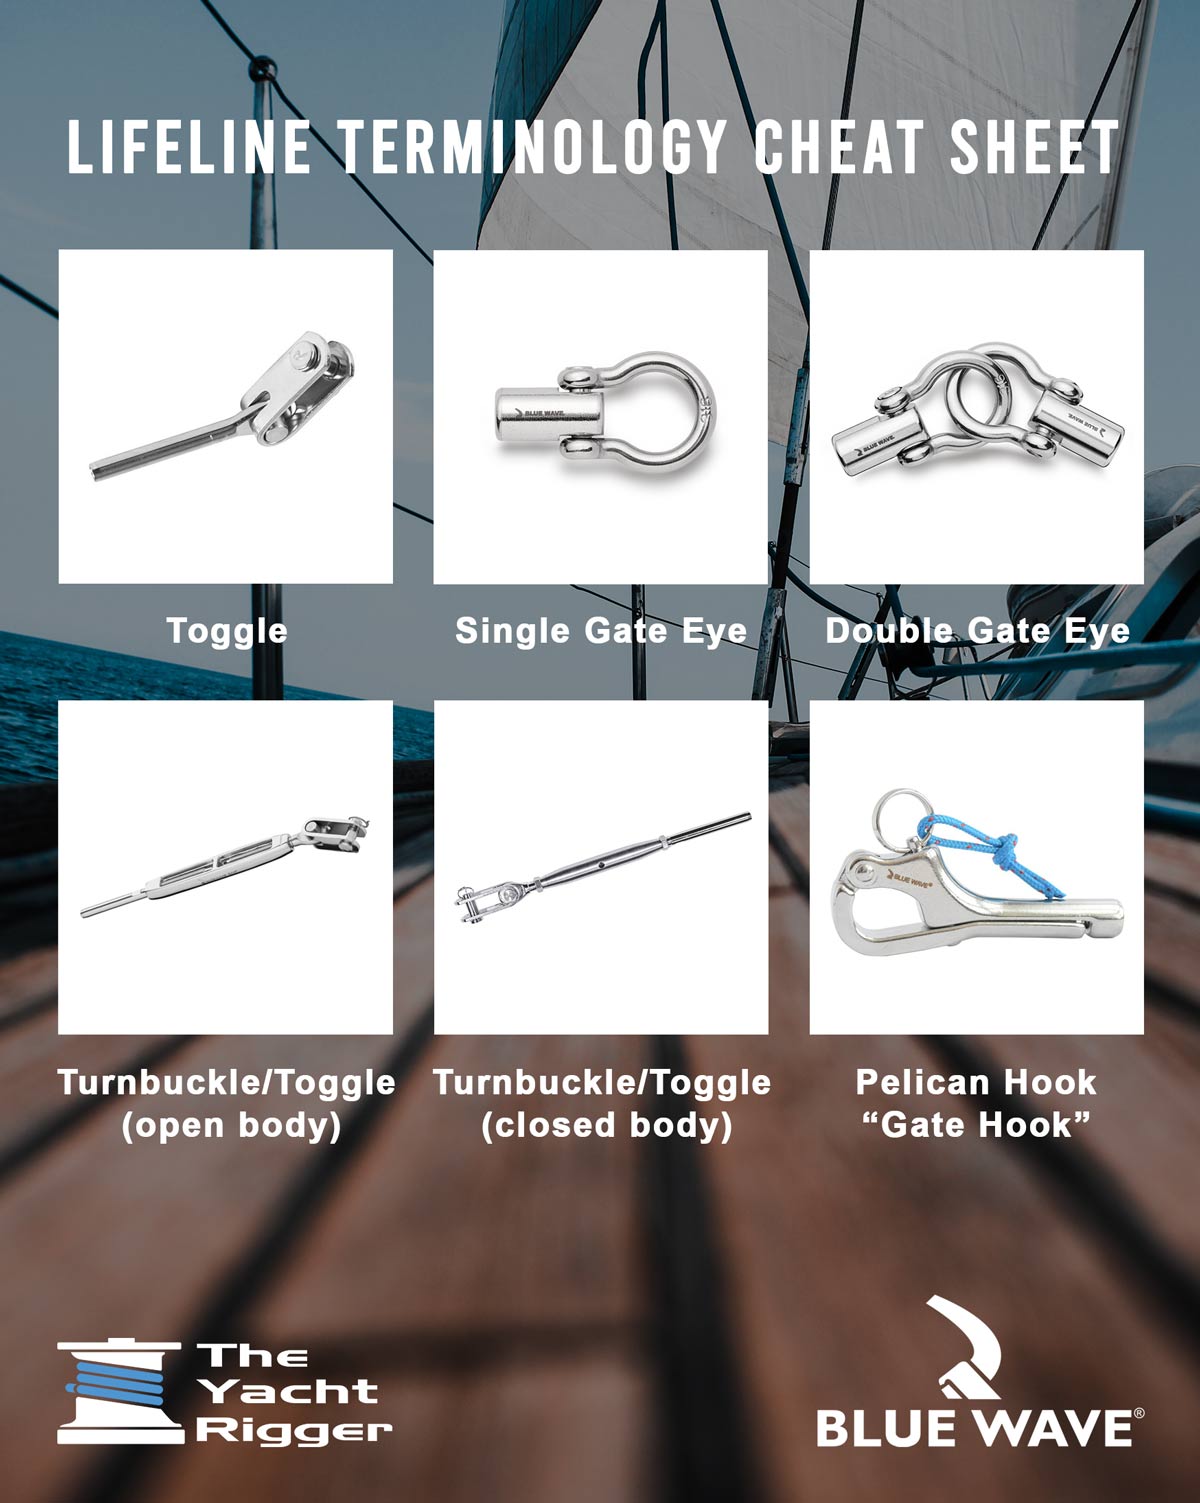
For over 35 years Seco South has manufactured lifelines for sailboats for nearly all of the leading sailboat manufacturers in the USA including Hunter, Beneteau, Island Packet, Compac, Irwin and Endeavour just to name a few. We manufacture our lifelines using only the highest quality type 316 stainless steel for all of our hardware including, turnbuckles, gate eyes, toggle jaws, and pelican hooks. We manufacture from (2) different types of wire: PVC coated 7×7 and uncoated 1×19.
For the DIY, you can purchase all the hardware individually if you have the proper swaging equipment or order our new self-attach fitting kit. The only tools required are a pair of cutters and a couple of crescent wrenches.
We offer (3) different kits:
LLK-1 Kit comes with a factory installed toggle jaw on one end of a length of cable of your choice and a self-attach toggle jaw turnbuckle you install on the opposite end.
LLK- 2 Kit comes with a factory installed gate eye on one end of a length of cable of your choice and a self-attach toggle jaw turnbuckle you install on the opposite end.
LLK- 3 Kit comes with a factory installed toggle jaw on one end of a length of cable of your choice and a self-attach pelican hook you install on the opposite end.
If you prefer to have us make your lifelines for you, please call our toll free number 888.535.SECO . All you need to do is provide us with the dimensions or you can send in your old ones for duplication.

7x7 Construction PVC-Coated Sailboat Lifeline Cable

Swage Lifeline Toggle Jaw*

Swage Lifeline Interlocking Swivel Gate Eye*

Swage Lifeline Swivel Gate Eye*

Swage Lifeline Turnbuckle
Seco south online store, quality products.
The Seco South store has been the go to source for quality marine and architectural products for more than 50 years. We have been a major supplier for many OEMs and individuals alike. Our products are crafted in the USA to the highest standards and are backed with our 100% customer satisfaction guaranty.

Build Your Own Custom Anchor Rode

DIY Cable Railing Kits

Green Wall Hub - Stainless Steel Cable Trellis Kit

Comparing box
Please verify you are a human
Access to this page has been denied because we believe you are using automation tools to browse the website.
This may happen as a result of the following:
- Javascript is disabled or blocked by an extension (ad blockers for example)
- Your browser does not support cookies
Please make sure that Javascript and cookies are enabled on your browser and that you are not blocking them from loading.
Reference ID: d7647f0c-fbf1-11ee-9b4b-3536bb395d66
Powered by PerimeterX , Inc.
- Billing Terms and Conditions
- Shipping and Return Policy
- Shopping Cart
DIY Install: Dyneema Lifelines

Note: This page contains affiliate links. We may receive a small commission if you purchase items through the links on this page. All recommendations are genuine. We would absolutely purchase and use ourselves any and all items that we recommend on this blog. Now, on to the good stuff: Dyneema Lifelines!
Click-to-Buy Supply List for your DIY Dyneema Lifeline Installation:
- Splicing Fids
- 1/4″ Dyneema (or whatever size best fits through your stanchions)
- 1/8″ Dyneema for lashing
- Steel Thimbles
- Gate Hooks: Pelican Hooks or Quick Release Snaps
How To DIY Install Dyneema Lifelines on a Sailboat
Back in April 2019, we decided to replace our original standard cable lifelines with Dyneema synthetic lifelines. I had already done several projects that helped me learn how to splice Dyneema line. ( This is the set of splicing fids that I use ! It works great!) This project seemed like it would be a good option for us and fairly easy to apply.
In updating this post in November of 2022, we can report that our Dyneema lifelines have held up spectacularly over the past 3 1/2 years. We’ve cruised from the Pacific Northwest in the Puget Sound down the west coast of the USA and into Mexico aboard our sailboat .
Step-by-Step Instructions for Splicing and Installing Dyneema Lifelines
On our boat, we have a mid-section of our lifelines that is stainless steel tubing so I needed to just replace the gate section on each side. Plus a longer section toward the bow on each side. I used 1/4-inch Dyneema for this project.
You will likely have a different arrangement on your boat so the project will merit some critical thinking and careful planning. But, that said, if you’ve got the desire, I assure you this is a project that you can absolutely tackle yourself. Contact me if you’d like to brainstorm ideas for installing Dyneema lifelines on your boat!
Measuring for the Dyneema You’ll Need
Our gate section, mirrored on each side, is 7-feet long and a straight shot (no stanchions or obstructions from start to finish). The forward section of lifeline is 13.5 feet long and has a stanchion that the line has to pass through. Of course, you’ll need extra length on each end of every section for making your splices. On my project, I calculated that I needed a total length of about 108 feet. I wanted to give myself some extra room, so I purchased 120 feet of Dyneema .
For the gate pieces, I calculated that I needed 13″ (bury) + 10″ (splice loop on one end) + 84″ (7-foot stretch) + 5″ (splice loop on thimble side) + 13″ (bury) = 125″ which is about 10 1/2 feet. So I need 4 lengths of that measurement as we have 2 lifeline gates on each side of the boat. That’s a total of 42 feet.
For the forward pieces, I calculated that I needed: 13″ (bury) + 10″ (splice loop on cow hitch side) + 162″ (13.5-foot stretch) + 5″ (splice loop on thimble side) + 13″ (bury) = 197″ which is about 16 1/2 feet. Again, times 4 = 66 feet.
Making and Installing Dyneema Lifelines with Stanchions
I spoke with several “seasoned” sailors about the project and had my plan in place. To start, I would just need to splice a locking eye-splice into one end of the Dyneema line. I would cow hitch that around the stanchion or through the attachment point like below.

Then, after threading the line through the stanchion, I would make another eye splice and insert a thimble . The thimble will protect the lifeline from chafe. I passed a smaller diameter piece of Dyneema through that thimble several times to tension the lifeline and lash it in place.

So, before doing anything else, I measured the distances again to double-check. For the forward section, I confirmed 13.5 feet. Then I made my first splice. For the eye splice, I would need a bury length of 12.5 inches, which I rounded up to 13″. On the cow hitch end, which I was doing first, I wanted an inside loop of about 10 inches.
**I’ll drop a link at the bottom of this post to the YouTube video I used for making my Dyneema Brummel locking eye splice using only one end of the line.
Here’s the first splice.

From that point, I needed to go up to and start working on-site. First, I detached the old lifelines and cut them off with a cable cutter to remove them from through the stanchion.

Once I had removed the old lifeline, I cleaned up the connection points. Then I attached the new lifeline to the forward stanchion with a cow hitch knot. For the bottom lifeline, I wrapped the line all the way around the stanchion and used the connection point as a guide.

For the top, I just cow-hitched it through the attachment point.

Then, I passed them through the stanchion, measuring to where I wanted the splice and thimble to be. I wanted it a good 6-8 inches from the attachment point on the other end to give plenty of room to stretch the lifeline tight before lashing. Remember to give yourself the extra room for the splice and bury.
Here you can see the 13″ marked on the line at the end for the bury, and the 5-inch section marked for the eye splice and thimble .

Once measured, go ahead and make your splice and insert the thimble .

From that point, you need to prepare your lashing. For mine, I used a smaller Dyneema line that I already had here at the boat: 1/8-inch Dyneema .
First, attach one end of the lashing line to the lifeline at the thimble with a double figure 8 knot. See below.
First, tie a loose figure 8 knot in your line, near one end.

Next, pass the tail through the thimble and then retrace the figure 8 knot backward through the knot.

Then, carefully tighten this up as much as you can.

Now you’re ready to do your lashing. Wrap it around at least twice and pull it as tight as you can get it. When it is tight, finish the lashing with a bunch of half hitches.

That wrapped up the first of the forward sections of Dyneema lifelines on our sailboat.
Doing the gate sections was a little different. I didn’t need to worry about a stanchion in the middle but I did need to figure out how I was going to tension it. That could be with a lashing or could be integral to the clasp, depending on what type of clasp you use.
Installing Synthetic Dyneema Lifeline Gates
Measuring for my gates was a little more complicated because I was trying to get them to be the correct length to be tight without using a lashing section as a tensioner. Instead, I used the adjustability of the screw section of my ‘pelican hook’ gate hooks to be able to shorten or lengthen the run.
The pelican hooks I used were the existing ones ( like these ) from the previous set of lifeline gates. (Hey, ya gotta save money anywhere you can when outfitting a cruising boat!) The problem I had was that I needed an eye bolt or some other way to cow hitch on the Dyneema lifeline gate. Here are two options that I found online which I think would work well: pelican hook or quick-release .

Thankfully, rather than buying new pelican hooks, I was able to get some assistance from my stepdad. We worked out a plan for him to weld some eye bolts onto the existing threaded piece.
So, I started out by making an eye splice on one end of each of the four pieces of Dyneema that I was going to use for my gates. Be very careful at this step to make sure to do your calculations correctly. Don’t cut your pieces too short!
My gates are 7 feet long, so for each piece, I made my first eye splice. Then I measured out 7 feet from the end of the splice loop, plus an extra 5 inches for the loop and plus another 13 inches for the splice bury. I added just a few extra inches on each piece so I wouldn’t be short.

From there, I went up top and cow hitched those sections on and pulled them tight to mark where I would need the middle of the other end’s eye splice to lay.

Above, I have the section pulled nice and tight so that I could try to see where I wanted the middle of that eye splice to lay.

However! That is not truly where you want the center to be because you need to account for a few extra inches that will be taken up in the process of the cow hitch to attach it to the pelican hook.

Above, my left index finger is pointing right to where the line actually bent back when I passed the line through the loop in the pelican hook. The bend in the line above, about an extra 2 inches, is where I decided I wanted the actual center of the next eye splice to lie.
Once noted, I went back down below and made my next splices. I gave myself 4 inches on each side of that center mark for the length of the splice loop. Remember your extra 13 inches needed to bury the tail of the splice.

Once that was done, it was simply a matter of heading back up top and attaching the first section to the attachment point. I slipped the splice through the loop on the pelican hook and looped the splice loop back over the pelican hook. This allowed me to bring it back around into a cow hitch on the pelican hook side.

Then, it was just a matter of adjusting the length of the screw/threaded section to ensure a nice snug fit of the gate.
Note: the Dyneema lifelines will most likely stretch out a bit over time. In just a couple days, I had to go back and tighten the lashings up. I periodically adjust the pelican hook settings to keep the lines as tight as we want them. So, pay attention to that when planning your lifelines. You will need enough room in them to go back and make them tighter later on.
Overall, I am SUPER happy with how these look and how they turned out. They look so much better than our old rusty cable lifelines and I trust the strength of the Dyneema.
Do you have questions on the process at all? Are you ready to replace your old cable lifelines with synthetic Dyneema !? If I can do it, so can you! Give it a go!! Feel free to shoot me a comment or a message on Facebook or Instagram and I would be happy to help if I can!
Cheers! ~Rachel

*Here’s a link to a YouTube video for the splice I used: Dyneema Brummel Lock-Splice with One Side Fixed
*And here’s a link to a YouTube video for the whole project: DIY Dyneema Lifelines by Tula’s Endless Summer
*We’re not associated with either of these videos in any way.
What’s boat life REALLY like?
Support us on social media, recent posts.
- Isla Partida, Espiritu Santo National Park, Baja California Sur- Dec 20-28, 2023
- Tambobiche, Baja California Sur- Dec 19-20, 2023
- Puerto Escondido, Baja California Sur- Dec 13-19, 2023
- San Juanico, Inside Baja California Sur – Dec 8-13, 2023
- Santo Domingo, Bahia Concepcion, Baja California Sur- Dec 7-8, 2023
Call us: 949-631-2161
Email us: [email protected]
Sailing with Confidence, Trusted Since 1972

SAILING SAFELY: LIFELINES
In sailing, lifelines refer to the cables or lines installed around the perimeter of a sailboat to enhance safety. They serve as a barrier to prevent crew members from falling overboard and into the water. Lifelines are particularly important when sailing in rough conditions or when the boat is heeling (tilting) due to strong winds.
FABRICATION OF LIFELINES
Furling & Rigging stands as a premier service provider in the maritime industry, specializing in the meticulous fabrication of sailboat lifelines. With an unwavering commitment to safety and quality, Furling & Rigging distinguishes itself by exclusively utilizing OEM (original equipment manufacturer) hardware for lifeline fabrication.
Sailboat safety hinges on lifeline gate design and placement. Choose from Mid-Gates for amidships access, Aft-Gates for stern entry, or opt for No-Gates, a sleek choice ensuring continuous lifeline integrity. These configurations offer sailors flexibility and control, all while upholding a steadfast commitment to safety and security.

A Mid-Gate is a strategically positioned opening in the lifeline system, typically located amidships on the sailboat. This gate provides a designated entry and exit point for crew members, facilitating convenient movement between the deck and the dock or tender. Mid-Gates are often equipped with secure latching mechanisms, ensuring that they remain closed while the boat is underway, thus contributing to overall crew safety.
Click for info!

Positioned towards the stern of the sailboat, an Aft-Gate serves as another crucial access point for crew members. This gate is particularly useful during activities such as docking and boarding. Aft-Gates are designed with durability and security in mind, featuring robust latches to prevent accidental openings while the boat is in motion. This configuration offers flexibility in on-board movement, accommodating various nautical activities with ease.
Positioned towards the stern of the sailboat, an Aft-Gate serves as another crucial access point for crew members. This gate is particularly useful during activities such as docking, boarding, or water sports off the stern. Aft-Gates are designed with durability and security in mind, featuring robust latches to prevent accidental openings while the boat is in motion. This configuration offers flexibility in on-board movement, accommodating various nautical activities with ease.

In certain lifeline setups, gates are only needed on the starboard or port side of the vessel. If this is desired, a No-Gate configuration may be employed. A No-Gate system consists of continuous lifelines without intentional gaps.

WIRE SIZE AND TYPES
All Wire Rope Is Stainless Steel Type-316
1/8″ VC x 7/32″ 7×7 wire rope – White Vinyl Coated or Uncoated 1×19
5/32″ VC x 7/32″ 7×7 wire rope – White Vinyl Coated or Uncoated 1×19
3/16″ VC x 5/16″ 7×7 wire rope – White Vinyl Coated or Uncoated 1×19
1/4″ VC x 3/8″ 7×7 wire rope – White Vinyl Coated or Uncoated 1×19

7×7 STAINLESS STEEL CABLE

1×19 STAINLESS STEEL CABLE

- New Sailboats
- Sailboats 21-30ft
- Sailboats 31-35ft
- Sailboats 36-40ft
- Sailboats Over 40ft
- Sailboats Under 21feet
- used_sailboats
- Apps and Computer Programs
- Communications
- Fishfinders
- Handheld Electronics
- Plotters MFDS Rradar
- Wind, Speed & Depth Instruments
- Anchoring Mooring
- Running Rigging
- Sails Canvas
- Standing Rigging
- Diesel Engines
- Off Grid Energy
- Cleaning Waxing
- DIY Projects
- Repair, Tools & Materials
- Spare Parts
- Tools & Gadgets
- Cabin Comfort
- Ventilation
- Footwear Apparel
- Foul Weather Gear
- Mailport & PS Advisor
- Inside Practical Sailor Blog
- Activate My Web Access
- Reset Password
- Customer Service

- Free Newsletter
What You Can Learn on a Quick Test Sail

Cabo Rico’s Classic Cutter

Bob Perrys Salty Tayana 37-Footer Boat Review

Tartan 30: An Affordable Classic

Preparing Yourself for Solo Sailing

Your New Feature-Packed VHF Radio

Preparing A Boat to Sail Solo

Solar Panels: Go Rigid If You have the Space…

When Should We Retire Dyneema Stays and Running Rigging?

Rethinking MOB Prevention

Top-notch Wind Indicators

The Everlasting Multihull Trampoline

Taking Care of Your 12-Volt Lead-Acid Battery Bank

Hassle-free Pumpouts

What Your Boat and the Baltimore Super Container Ship May Have…

Check Your Shorepower System for Hidden Dangers

Waste Not is the Rule. But How Do We Get There?

How to Handle the Head

The Day Sailor’s First-Aid Kit

Choosing and Securing Seat Cushions

How to Select Crew for a Passage or Delivery

Re-sealing the Seams on Waterproof Fabrics

Waxing and Polishing Your Boat

Reducing Engine Room Noise

Tricks and Tips to Forming Do-it-yourself Rigging Terminals

Marine Toilet Maintenance Tips

Learning to Live with Plastic Boat Bits
- Safety & Seamanship
Revised Lifeline Protection Plan
Multihulls are prime candidates for upgraded lifeline protection using high modulus fiber rope..

World Sailing (then ISAF) initially accepted Dyneema lifelines in 2012, but then banned it from all offshore racing in 2015. In 2018, World Sailing decided to allow Dyneema lifelines for offshore multihulls, realizing that the primary risk factor was stanchion chafe, and this resulted from hanging rail meat over the lifelines, something multihull sailors never do. Neither will most cruisers, though many will hang laundry, and in some smaller boats they use cockpit lifelines as a backrest.
In 2020 Australian Sailing produced a study of Dyneema lifeline chafe for World Sailing. They concluded that Dyneema was appropriate for lifelines in all categories, but that the installation was not simplistic [the word used in the report]. They further recommended that Dyneema lifelines be installed only by professional riggers because of the complexity of getting the design, chafe protection, and other installation details right.
Details on lifeline requirements, installation, chafe protection, and splicing methods can be found in the following Practical Sailor articles. We won’t repeat them here.
• “Fiber Lifeline Protection Plan,” PS September 2015
• “Long Term Test Evaluates Synthetic Lifelines,” PS September 2012 Other references include:
• Australian Dyneema lifeline study, https://cdn.revolutionise.com.au/cups/ sailing/files/bn1zle3qqnfxydut.pdf
• Rope inspection guide by Samson: https://samsonrope.com/docs/ default-source/technical-bulletins/tb_ inspection-retirement-pocket-guide_ aug2013_web.pdf?sfvrsn=c3d63bbd_2
• World Sailing Lifelines standards are found in the Off-Shore Special Regulations (which also includes in-shore racing as Category 4). https://www. sailing.org/documents/offshorespecialregs/ index.php
The most common cause of failure has always been chafe through the stanchion holes, accelerated by burrs. Some of these burrs are artifacts of manufacture, but most are the result of wires rubbing on the holes over time, often made much worse by rail meat hanging from bare steel lifelines. Smoothing these burrs and providing chafe protection are vital to a safe fiber lifeline installation. To smooth these burrs, use a Dremel tool, a rat-tail file, or an improvised cylindrical hand sanding device (sandpaper wrapped around a bolt will work). Sand down to 400 grit, and then polish.
Man Overboard Survey For Corsair Owners

OBSERVATIONS
I like to start with what I know best. My first cruising multihull (Stiletto 27) didn’t have lifelines. The designer reasoned that the cockpit was well enough protected by high cockpit coamings (about 18 inches) and a tiller crossbar across the aft cockpit boundary. I never heard of anyone falling from those areas, so apparently he was right.
When working forward, we either wore a tether or learned to be careful, but there is little reason to be near the rail on the bow of a multihull, and they don’t heel more than 10 degrees. However, I did learn about hidden corrosion of coated stainless cable when a cable bridle securing the reacher tack let go with a startling “bang.”
The wire was badly corroded under the vinyl coating, with less than 1/3 of the original material remaining. Because the tack ran back and forth along the bridle, like a traveler, the wire was regularly flexed under load, not unlike a racing boat lifeline that endures bouncing rail meat for hours at a time. Thirty years ago, long before bare wire became the standard for World Sailing standard, we replaced the bridle with bare wire.
Our 34-foot PDQ cruising cat had plastic coated lifelines. When the lifelines were about 15 years old, we stripped some of the lines, looking for signs of corrosion. There was very little rust and no broken strands, no doubt because the lifelines rarely had any load on them. The boat had a center cockpit and we seldom touched the lifelines.
Our Corsair F-24 has no lifelines. Most folding trimarans don’t, because they are designed to fold onto a trailer,with the amas on their sides, resulting in the stanchions protruding awkwardly from both sides. Some were ordered with the factory lifeline option, and most of these were subsequently removed.
As a trimaran, there is also no need to go within six feet of the rail while underway. (Six feet is World Sailing’s specified length for safety tethers). Yes, racing crews sit out on the windward hull, but you don’t need to. You can also wear a tether when going forward, and there are often hiking straps on the tramps, which provide some security for crew sitting on the windward ama. Before adding additional lifelines, we took a poll of Corsair racers to determine where people actually fall overboard. This is big racing fleet, so we got plenty of input.
We made some changes to address these risks. Permanent jacklines were installed along each side of the main hull so that they would always be available (see “Rethinking MOB Prevention,” November 2018).
The bow has a sturdy stainless tube pulpit. We added two short, downward angled lifelines to protect this narrow area. There is a safety net to leeward, but you’d rather not fall there. The lower lifeline is fixed, and the upper is removable so that it to be used as a part of the anchoring system.
At the stern we added a pair of angled lifelines connecting the stern rail to the tramp, providing additional security for the helmsman when sitting on the coaming and for crew coming in off the tramp. We did not extend them clear to the outboard hull, because that is where we board from dinghies and kayaks, and where they are pulled on deck for transport. The stern rail was extended vertically to provide additional handholds when coming into the cockpit from the tramp.
Material. We used a 6,400-pound breaking strength Safeway Tow Rope (see “Dyneema Abrasion Test,” November 2018) to provide a safety factor against UV and wear. This inexpensive, non-marine product has been holding up well as an adjustable bobstay, which has a much higher load than any of our lifelines would require.
The Safeway Tow Rope is a generic Dyneema product, less than 1/3 the cost/unit strength than name brands, but with lower strength per diameter than Samson and New England Ropes single braid Dyneema products. We used a slightly larger diameter to compensate. A covered product, such as New England Ropes WR2 has superior chafe resistance in stanchion holes.
Safety experts and manufacturers generally recommend replacing Dyneema lifelines after 8 years, as opposed to 12-15 years for stainless steel.
Some data suggests these high molecular- weight polyethylene lines (HMPE) lose 50 percent of their strength in five years, after which the loss levels off. World sailing does not specify a replacement interval, only that they be monitored for chafe. We’re suggesting 5-7 years in the tropics and 8-10 years in temperate latitudes. This compares to 12-18 years for uncoated stainless steel lifelines—although well maintained stainless steel lifelines that aren’t exposed to acid rain or other contaminants that can invite corrosion, can retain full strength for decades. (The most frequent site of failure are the studs, hasps, and terminals, not the wire itself.)
Size. World Sailing specifies that the uppermost lifeline on boats greater than 28 feet must be 5 mm (3/16”). Using existing stanchions and machineformed swages for stainless steel, this is the largest diameter that will allow the fittings (3/8-inches) to pass. But since Dyneema lifelines are typically spliced in place, the line can be as large as 9 mm, which is rated for loads far beyond what is required and beyond what most stanchions will support. But there is no physical reason not to use 6 mm (1/4”), which would allow a considerable reserve thickness to protect against UV. We recommend going up to 6 mm, at least for the top line, and have used this diameter for most of our testing.
Lashings. In “Lashing for Strength,” June 2019, we learned that lashings distribute stress inefficiently between strands. Between this unequal load distribution and the increased vulnerability of small diameter line to UV, it is recommended that a lashing have twice the required calculated strength. In other words, a 4-pass (8 strands) 7/64-inch Dyneema lashing will “calculate” to be 8 x 1,600 = 12,800 pounds, but is really only rated to 6,400 pounds, making it a good match for our test material and for 3/16-inch Amsteel lifelines (5,400 pounds).
Keep in mind that lashings have less redundancy than rope. Cut one strand of a rope, and the rest will probably hold. Cut one part of a lashing and all is lost. This is prevented to some extent by a tight tie-off around the entire bundle with a long string of half hitches; do not cut the tie-off short. (Technically, a lashing is slightly more efficient if the bitter end is tied off only to the last pass, since stresses can better redistribute, but this is less redundant in case a strand is cut.) Lashings should also be renewed more often than the lifelines, generally every few years, depending on use and latitude.
We’d skip the specialized terminators and oversized low friction rings for lifelines and jacklines. They protect against hazards that don’t exist in these applications; low radius turns do not weaken 4mm lashing twine and chafe is nonexistent at the ends and against the line because they are smooth surfaces and there is no movement. In fact, we have never noticed or heard of chafe even on lifeline eyesplices that are unprotected by thimbles, since there is very little movement.
Instead, keep the hardware compact enough to fit a 1-inch or 2-inch nylon tubular webbing UV cover. This can be easily slid aside for inspection.
Do not use conventional cable thimbles. These were designed for steel cable and often have sharp corners at the cut ends that can cut lines. Use a sailmaker’s thimble, small low friction ring, a webbing chafe covering, or nothing at all.
Forming eyesplices. A brummel lock is not stronger than a simple bury splice reinforced with lock-stitching. The purpose of a Brummel lock in a hollow braid bury splice is to prevent slipping at very low load. In fact, nearly the entire load is carried by the Chinese finger lock in just the first few inches of the splice, near the tail, which is why a smooth taper is recommended.
Brummel locks look neat and make you one of the cool kids, but testing has revealed that rather than being stronger than lock stitching, a Brummel actually weakens the line 5-10 percent compared to lock stitching (see PS October 2014, “Stitching Instead of Splicing”).
Large industrial cables are never spliced that way. Instead, follow Samson’s instructions for lockstitching, using either whipping twine, cord, or a few strands pulled from the same rope. The needle should be dulled on the end so that it cannot cut a strand.
In practice, a lock-stitched bury splice is easier to adjust to length—just leave the tail hanging out with room for adjustment (see PS April 2021, “ Slick Whoopie Slings for Sailors ”).
Because the greatest strain on the splice occurs right at the tip of the tail bury, make sure to taper the strands over a few inches. Buries as long as 72 times the diameter have long been consider the gold standard, but repeated testing suggests that 50 diameters is plenty with an effective lockstitch. The important thing is the taper. See Samson’s instructions for a 12-strand Class 2 splice at the Samson website (www.samsonrope. com/resources/how-to-splice-rope.) Class 2 ropes includes high-molecular weight fiber ropes like Dyneema, Spectra, and Vectran.
Each splice will shorten the rope a few inches because the inserted tail bunches up the rope. There are rules of thumb to predict the length reduction, but the rules varies slightly with each brand of rope. A more accurate determination can be made by measuring the length reduction caused by your first splice after carefully smoothing the cover and giving it a good pull. All the remaining splices should take into account this predicted size reduction.
Chafe. Stanchion chafe is accelerated by burrs inside the cable holes in the stanchions, sometimes from manufacture, but often made worse by rail meat hanging over worn or bare steel lifelines. Smooth off these burs, polishing progressively to at least 400 grit sandpaper. Additional chafe protection, in the form of plastic or textile tubing, is a good idea. Our lifelines have not chafed, because there is little motion under load and the surfaces are smooth. On the other hand, our Dyneema anchor bridle and Dyneema topping lift quickly chafed where they bore against sharp edges, prompting us to install chafe guards.
Keep an eye on your lifelines and take pro-active measures to reduce chafe if any of the ropes appear fuzzy.
If stanchion chafe is still an issue, swapping your lifelines end-for-end might buy you a little more time. This isn’t difficult since the lashing securing the lifelines should be replaced at the mid-point in the life expectancy anyway (2-3 years for safety).
A best practice is to secure the lifeline around the entire stern rail or pulpit post, not just the welded-on loop (see photo above). The welded loops are always used with cable lifelines, and there have been a very few failures— but given our familiarity with stainless, these welded eyes are vulnerable (see PS February 2007, “Marine Metal Warning”). At the very least, inspect the welds closely for cracks or pitting corrosion.
Girth Hitch vs. Splicing In Place. It’s handier to make the bury splice on your lap (or have a pro do it) and then girth hitch the eye around an object, rather make the splice in place, although the latter is not difficult with a simple bury and lock stitch splice. A girth hitch weaken the join, but only about 10-15% (testing by Samson), or about the same as a Brummel lock, so it is acceptable.
Animated knots offers a good demonstration of girth hitch ( www.animatedknots. com/girth-hitch-knot ).
We’ve used a Prusik or clove hitch when we wanted to prevent a lifeline from sliding down a stay or rail (typically a high lifeline—see PS June 2016 “ Raising the Bar on Lifelines “). The Prusik is used if that is where the lifeline terminates, and the clove hitch for intermediate tie-offs. In either case, a wrap of high-friction tape below the knot helps prevent it from sliding downwards. The Prusik weakens the line about as much as a girth hitch, and a clove hitch weakens the knot about 40 percent.

Covered lifelines excel in oscillating and pendulum chafe test.
We’ve been focused on Amsteel, because it is a popular choice and because most user experience is with Amsteel and close relatives (12-plait ultra-high molecular weight polyethylene, UHMWPE). But there are also specialty coreand- cover lifeline products, where the cover is woven specifically to resist chafe. The upside is that chafe resistance in covered rope is 5-10 times better than 12-plait.
The downside (beside the higher price) is that since the eye splices are core-only, a larger size is required for similar strength. An equal diameter of Amsteel or DUX will be 40-100 percent stronger and considerably cheaper, but will chafe more quickly. Which is best? The jury is still out, but we’re leaning towards using single braid, going up a size, and fitting chafe protection where needed. Another possibility is a Dyneema double braid, which can be stripped of its cover where needed, but these covers are less resistant to chafe than the lifeline products.
COVERED LIFELINES
Covered lifelines offer the strength of UHMW fibers with the additional chafe and weathering protection of a braided cover. For lifeline applications, the cover is typically made of Dyneema.
NEW ENGLAND ROPES WR2
We tested this for side-to-side abrasion over both cinder block and sharply cut stainless tubing, and were very impressed. The rugged cover is optimized for wear resistance.
Bottom line: Recommended.
LIFELINE BY MARLOW.
Similar to WR2, the cover is tight and should provide impressive wear.
Bottom line: Not tested.
12-STRAND LIFELINES
A 12-strand lifelines offer the strength of UHMWPE without the additional chafe protection of a braided cover. They are easier to splices and inspect, but are more exposed to UV, weathering, and chafe than covered lines.
AMSTEEL BY SAMSON
There probably more boats with this installed than any other product. As long as the stanchions are carefully polished and you don’t hang rail meat, it should last a long time.
Bottom line: Recommended and well proven.
STS BY NEW ENGLAND ROPES
Similar to Amsteel and used on a PS test boat (report to come).
DYNICE DUX SK-75
Because it is pre-stretched and made from the highest quality Dyneema, it packs an impressive 10, 500 pounds breaking strength in the just 5 mm. It will also stretch less as it settles in (there will still be some construction stretch resulting from your splices).
Bottom line: The Best Choice for Dyneema lifelines.
UHMPE BY SAFELINE
One of many generic high modulus ropes sold as winch cable. We started testing this one 5 years ago, first by strength testing (it met the claimed strength) and chafe, and then installing them on the boat in a variety of applications, including soft shackles used daily for mooring, bobstay, lifelines, and anchor bridle.
We removed one lifeline section after 3 years and retested the strength; it was 82 percent of new. Chafe seems similar. It is not as strong for a given diameter as Samson or NER 12-strand Dyneema rope, but the cost per unit strength is 3-5 times less. If you slightly exceed the strength requirement, we see a good value.
Bottom line: Dyneema winch cable can be a Budget Buy, but the diameter may need to be oversized. Because the Safelines on our test boat are not leaned on and because they do not pass through stanchions, we see no visible chafe. There is bleaching, and we know from experience that UV can penetrate to the inner fibers, so only future testing will reveal how much strength remains. For cruising sailors and offshore racers, uncoated 1 x 19 stainless steel lifelines will offer the most value—and peace of mind.
VALUE GUIDE: HIGH STRENGTH, LOW STRETCH ROPE LIFELINES
Although the modifications described in the adjacent report relate mostly to multihulls, many can be applied to monohull sailboats. Traditional boats with long bowsprits are often unprotected by lifelines, and removable fiber rope chest-high lifelines have been used since before the days of tall ships. It doesn’t take much imagination to see how these techniques can be used to fill gaps in your own lifeline system.

1. Our new mini-lifeline stretches outboard from the cockpit and out across the stern, offering some security when sitting on the coaming.

2. The new lifeline extension leads from the tramp to a welded extension on the pulpit stanchion, which also serves as a handhold when boarding from the stern or moving from the trampoline to the cockpit.

3. The new mini-lifeline at the bow stretches aft from the bow pulpit to the inboard lacing support for the tramp. The higher lifeline is temporary, since it also serves as a bridle for anchoring or mooring.

4. This stainless steel bolt hanger makes a strong, single hole anchor for lifeline on small boats. As with all lifeline attachments, it must be well backed (see PS August 2016, “How Big Does a Backing Block Have to Be?”).

5. Heavy bar stitching and reinforcement patches provide extra securing for the hiking footstraps on the tramp. The UV-resistant stitching is checked regularly for wear.

6. A Dyneema chafe sleeve from New England Ropes is slipped into place. Later, the sleeve will be stitched to the Dyneema 12-strand lifeline to stay fixed in place.

7. Secure the lifeline lashing to the entire pulpit, pushpit or stanchion— not just the welded-on loop. Girth hitching is easier than spllcing the rope in place.
RELATED ARTICLES MORE FROM AUTHOR

New Marine Fire Suppression Tools
Leave a reply cancel reply.
Log in to leave a comment
Latest Videos

The Great Loop – The Basics

Bottom Paint Showdown – Six Paints, One Winner!

Tartan 30 | Boat Review

Fuel Contamination? The Baltimore Francis Key Bridge Collapse
- Privacy Policy
- Do Not Sell My Personal Information
- Online Account Activation
- Privacy Manager
(480) 703-3675
dyneema lifelines sailboat
Colligo Marine can customize synthetic lifelines for boats of any size!
Colligo Marine Synthetic Lifelines
About our synthetic lifelines.
Colligo Marine ® Dux Lifelines are the strongest and toughest synthetic lifelines available. If the lashings are changed every 2-3 years your lifelines will last at least 5-8 years in the tropics. Colligo Marine can customize synthetic lifelines for boats of any size! Dyneema lifelines are approved for offshore use by the United States Sailing and the International Sailing Federation. Line is lighter and easier on the hands (& sails) than wire! If your synthetic lifelines get damaged the weak points are visible and the line gets fuzzy. These lifelines are completely inspectable for your safety!
We use Dynice Dux SK-75 , which has similar material stretch to that of stainless steel. 5mm Dux has a breaking strength of 11,000 pounds. It is pre-stretched at elevated temperatures to virtually eliminate constructional stretch. Other advantages include weight savings, DIY flexibility, and no corrosion!
See below for a great video on our Schock 35 Project boat!
Photo Gallery
Schock 35 project.
We have re-rigged a Schock 35! The Schock is a one design race boat and is a great boat to re-rig with synthetics as it is very tender. Most sail the Schock 35 with 8 or more sailors on the rail! Reefing a sail is recommended at 12 knots! That being said, getting weight off the mast could help this boats performance greatly.
The boat has an aluminum mast with rod rigging, tuff luff headsail foil, undersized synthetic running backs, a boom vang, and lifelines, which are rigged incorrectly and even dangerously. A heavy and leaking hydraulic backstay adjuster and several other areas on the boat that are begging for improvements. We outfitted this boat with Colligo hardware from stem to stern, including our new Extra Light Headsail Furling (ELHF) System, and use this opportunity to show the proper method of using low stretch and high strength synthetics to make things simpler and safer. In addition, we will document the changes in weight.
Schock 35 Project BEFORE and AFTER
The previous Dyneema lifelines were very poorly rigged. The entire lifeline system was replaced with 5mm Colligo Dux Lifelines with gates and 3mm lashing Dynice Dux. At the bow and stern a brummell splice with a 3 inch eye was luggage tagged to the bow and stern pulpits. At each end the line was then covered with PVC shrink tube. To create a gate, Infinite Dyneema Loops , a CSS70 Terminator® Fitting , and a CSS41 Standard Static Lashing Block was used. To keep the gates tensioned, a whoopee sling mechanism was implemented. This mechanism can be easily adjusted by unlatching the pelican hook and taking up any slack
After: Lifeline Gates, WHat is a Whhopie Sling?
Get in touch.
This site is protected by reCAPTCHA and the Google Privacy Policy and Terms of Service apply.
Are you ready to get started?
If you have questions about the opportunities available to you in our programs, feel free to send us a message. We will get back to you as soon as possible.
Colligo Marine LLC
Colligo Marine, LLC 1165 Highland Way, Grover Beach, California 93433, United States
Monday - Friday: 7:30am - 4:30pm
Saturday - Sunday: Closed
Copyright © 2018 Colligo Marine LLC - All Rights Reserved.
Powered by GoDaddy

Sailboat lifelines – plastic coated vs uncoated?

Note corrosion bleeding out through the plastic.
This is why the ISAF requires vessels longer than 28’ to have lifelines made of uncoated SS wire, or the equivalent HMPE (high molecular weight polyethylene) line , such as Dyneema or Spectra.
Besides being more resistant to corrosion, stainless steel 1×19 wire is stronger than the equivalent size stainless steel 7×7 construction plastic coated wire. Typical breaking strain differences are in the 30% range. So in addition to being easier to inspect, uncoated lifelines are significantly stronger.
We’ve heard proponents of plastic coated lifelines voicing concerns regarding the chafe of sails on coated vs uncoated lines, in our experience there is no measurable difference in wear and tear on sails from either product. We’ve been changing lifelines from plastic coated to bare for over a decade and never heard a complaint regarding this issue. If you have such significant damage to a lifeline that it results in “meathooks” on the wire it should be changed immediately anyway.
Another criticism of bare lifelines is that they are tough to hike out on for the crew sitting on the rail. In our experience neither bare nor plastic coated lifeline wire is comfortable to hike out on, we always recommend the installation of lifeline cushions for anyone who wants to provide any level of real comfort for their crew while racing.

Who knows what’s going on underneath that pvc?
Have a look at the pictures in this article, which lifeline material would you rather place your trust in?

Stronger, easier to inspect, and prettier too!
We’d love to hear some feedback regarding this article. If you are considering replacing your existing lifelines due to aging or damage, please CONTACT US with any questions regarding taking measurements, pricing estimates, or configuration of gates or lifeline cushions.

Visit our Youtube channel
Recent posts.
- Stretch Test On Amsteel Dyneema
- Rainman Watermaker Total System Overview
- Roller Furler Assembly & Build Instructions With Parts Overview
- Leopard 50 (2023) Upgrade project details
- Leopard 42 (2023) Upgrade project details
Recent Comments
- Paul Goldan on Tartan 37 centerboard pennant conduit repair and hose replacement
- Furler Sale
- Product Review
- Yacht Rigging
- February 2024
- December 2023
- October 2023
- September 2023
- August 2023
- October 2020
- September 2016
- August 2016
Previous Post Tartan 37 centerboard pennant conduit repair and hose replacement
Next post top down furlers. what are you waiting for, leave a reply cancel reply.
Save my name, email, and website in this browser for the next time I comment.
Empowering Your Marine Adventures
Contact number
We are monthly supporters. click below to donate..

- HVAC & Refrigeration Services
- Marine Solar
- Marine Electrical Systems
- Solar Frame Fabrication
- Standing Rigging & Forms
- Running Rigging & Forms
- Lifeline Rigging & Forms
- Anchor Chain & Rode Form
- DIY Marina Wet Slips
- Haul-Out Facilities
- Sailboat Arches
- Stern Arch & Davit Install
- Blue Wave USA
- Cyclops Load Sensors
- Robline Ropes
- Marlow Ropes
- Mantus Marine
- Tides Marine – SailTrack
- Anchor Chain and Rode
- Waterline Design
- Furlex Furling Systems
- Selden GX & CX Furlers
- Selden SMF System
- Bamar Products
- Hood Furling Systems
- RuuviTag Pro

- Victron & Solar Panel Store
- Kilovault Batteries
- Custom Fabricated Frames & Arches
- Mabru Air Conditioners
- Velair Air Conditioners
- RAINMAN WATERMAKERS
- Portable Rainman Watermakers
- Modular Rainman Watermakers
- Gasoline Rainman Watermakers
- Framed Rainman Watermakers
- Rainman Accessories
- Rainman Spare Parts & Consumables
- Spectra Watermakers
- Integrel Solutions
- Manuals/Catalogues
- Account details
ARCH INSTALLATION TIPS
- Measure where you think The arch feet are going to land on the back of the boat, pick either the front or back leg landing positions and measure the span. Check for backing plate/nut access at these positions.
- Assemble the arch laying on dock and slide the sides into the bridge evenly until the leg span you measured is Approx 5-6” wider than your goal span. Tape the joints at the bridge using masking tape to stop it sliding further in when you are test fitting.
- Measure the “drop” from where you think the forward legs will land and the aft legs will land and trim the forward legs. Accordingly. I usually leave them a couple inches longer than I think they need to be, and do the final trim once I’m at the mocking up stage.
- Assemble the arch feet and install them, using string to secure them to the arch legs using a rolling hitch.
- Use a block and tackle or a truckers hitch to squeeze the legs together to match the span you are aiming for. No more than 6”.
- Hoist arch into position using topping lift or main halyard (and two people) and test fit. At this point you can measure exactly how much you need to trim off the forward legs to make the arch fit level.
- If the arch needs to sit lower, once you have it level, you can trim both legs the same amount. Keep in mind that as the arch gets shorter the span will narrow slightly due to the geometry of the arch.
- Once you like the position, mark the feet in their positions using sharpie and lower the arch back to the dock. Release the block and tackle and drill/bolt the bridge. Drill and epoxy/bolt the feet into position.
- Hoist the arch again and check all landing positions on feet one final time. Mark bolt holes on gelcoat and move arch out of the way for drilling. Try to pick the forward or aft feet and do them in pairs, pick whichever set you think will allow you to bolt it down securely then pivot the arch back or forward to do the other pair after (check orientation of arch feet for pivot ability).
- Through bolt all feet and tighten. If fitting to an uneven surface, back fill the area behind the plate with thickened epoxy.
- Tighten all bolts on foot bases.

Salt Creek Marina and Yard Rules & Regulations (DIY & Storage)
“Common Sense, Compliance with Laws, Consideration Toward Others” (January 1, 2023)
This agreement shall be effective on the date hereunder by and between the undersigned Owner or Agent of the vessel(s) hereinafter (“Vessel Owner”) described below and Salt Creek Marina, Inc. and The Yacht Rigger LLC located at 107 15th Ave SE, St. Petersburg, FL 33701.
8/21/2023 UPDATE – If a hurricane system becomes a named storm and your boat is in one of our wet slips you MUST move it back to its original berth. The boat is not allowed to stay. The owner is responsible for planning with their preferred captain, or The Yacht Rigger has two captains on staff.
1. Fees: The Yacht Rigger and Salt Creek Marina reserves the right to change its rates upon one (1) months’ notice.
- Monohull DIY Dry Storage will be $900 monthly or $225 weekly, with a minimum of 1 week required. After the first 4 weeks, the rate will increase by $50 per week, for the remainder of the boat’s duration.
- Monohull Wet Slip will be $1,100 monthly or $275 weekly, with a minimum fee of $100.
- Catamaran Wet Slip will be $2200 monthly or $550 weekly.
- Haul / Block / Relaunch – One Time Charge $12 per foot
- Emergency Haulout – $25 per foot
- Short Haul – – – Special Haul to be scheduled by The Yacht Rigger or approved contractor only + $175 contractor fee (includes normal haul out rate)
2. Insurance: Vessel owners must provide insurance with Salt Creek listed as additional insurer on their vessel before arrival. Vessels must always be insured.
3. Hurricane & Summer Storm Season: June 1 – November 30 Haul out boats for storage or DIY work on the hard during this time are required to remove all canvas (including but not limited to Bimini, sail covers, dodgers, e.g.) as well as all sails on the boom or furlers. Remove all moveable equipment: canvas, sails, dinghies from davits, cushions, water toys, grills, biminis, roller furling sails, etc. Canvas and sails must be stored below and not on deck. Lash down everything you cannot remove tillers, wheels, booms.
4. Live Aboard – Wet Slip Only (Yacht Rigger Only Rule): Starting January 1st, 2024, customers may NOT stay on their vessel during electrical refit work or other major modifications or upgrades down below. Due to the nature of these projects requiring major upheaval down below within your living space and the need for our teams to work efficiently. Rigging and “above deck” type work will permit liveaboards. As much as we would love to accommodate liveaboards during this time, it is simply too inefficient for us and expensive for you, the customer. For vessels with excessive items on board preventing efficient work, we will provide on-site storage pods at market rates.
5. Third Party Warranties: This includes any warranty claim that is to be made against the original manufacturer or seller of the vessel or product. Should a warranty claim arise, The Yacht Rigger will estimate the job accordingly. It will then be up to the customer to obtain approval from the applicable 3rd party (boat manufacturer, spar manufacturer, etc.). If approved & immediately upon completion of the warranty issues, the customer is solely responsible for the payment of the work completed. It is then the responsibility of the customer to be reimbursed by the applicable 3rd party.
6. Yard Hours: The boatyard hours are 8:00am to 6:00pm, Monday- Sunday. The boatyard gate locks at 6:00pm. You may come check on your vessel, re-secure rigging, canvas and pump out water during business hours. Please check in with the office if you are near closing hours.
7. Utilities: Boatyard provides power & water to vessel owners as a part of their agreement so long as the owner fully adheres to all Rules and Regulations. When you are finished with the water hoses, turn them off and place them back neatly in the area you found them. Please ask a Salt Creek Marina Boatyard Employee for access to either option.
8. Outside Contractors/ Subcontractors With Management approval (determined individually) contractors may work on a storage vessel for a fee of $40 a day in addition to monthly storage/dockage fee. The owner shall be responsible for informing the office of any subcontractor working on the vessel for any purpose whatsoever. The subcontractor shall submit insurance before any work can commence. Salt Creek Marina and/or The Yacht Rigger reserves the right at its sole discretion to stop unsafe work practices and if deemed necessary to order the offending worker(s) to leave the site at the Owner’s/Skipper’s sole risk and expense.
9. Supplies: All paint including but not limited to, bottom paint, primer or barrier paint, haul or topside paint, varnish or otherwise any paint being applied to your vessel must be purchased through the Boatyard or approved by Management. This policy is for safety and environmental protection purposes of all persons operating in the Boatyard. Paint will normally arrive within 24hrs of purchase.
10. Paint Spraying: There shall be no spraying in the Boatyard under any condition. Any person spraying any paint will be immediately expelled and fines levied.
11. Cleanliness: All vessel owners shall be responsible for keeping their area clean and professional. The Boatyard reserves the right to charge the vessel owner for any cleanup required to comply with RR. All debris associated with boat repair activities must be disposed of daily. A dumpster is located near the parking area.
12. Disposal: There is a designed disposal station of 55 gal drums for oil and one for oily rags and filters located near the office door. PLEASE DO NOT PUT GASOLINE IN THESE DRUMS.
13. Facilities: Bathrooms are provided as a courtesy to all Customers. We will make our best efforts to keep it clean but reserve the right to limit access any time. Please use the outside sink for heavy clean up and use the indoor head/sink for bathroom purposes only. The Yacht Rigger has its own set of facilities to be used by its staff and customers. Please do not use SCM facilities.
14. Parking: Park in the designated parking area. Vehicles should be parked clear of travel lift path, not in storage areas, on the seawall or blocking boats. Salt Creek Marina and/or The Yacht Rigger is not responsible for vehicles that are damaged by equipment or conditions in the yard
15. Regarding noise outside of the scope of work not being completed, i.e., radio/stereo volume, please be respectful of neighboring boat owners’ tenants.
16. Salt Creek Marina and/or The Yacht Rigger is not responsible for any theft or loss of items left on or around the vessel.
17. The yard takes no responsibility for accidents, injury, or death to any persons in or working within the yard at any time. All people wishing to enter the boatyard for any reason do so at their own risk.
18. Failure to comply with these rules and conditions can result in additional charges if Salt Creek Marina and/or The Yacht Rigger personnel are required to do site cleanup operations and/or will be asked to remove your boat from the marina.
19. Additional Rules:
- Owners are not permitted to test engines, run water for AC or other purposes while on the hard. All electricity and water shall be for the sole purpose of working on their vessel and disconnected when unoccupied.
- There are to be no mobile AC / Heater Units or Refrigeration Units to be run on the hard.
- No unfurling of sails will be permitted at any time, under any circumstance.
- There is to be no hot work, flame cutting, welding etc. to be done in the yard.
- Jack stands and blocking may only be used and moved by employees of Boatyard.
- Boatyard reserves the right to move vessels when needed without permission or notifying owners.
- Any trailer, dingy, mast, or other personal property not directly attached to the vessel must be pre-approved, additional charges will apply if approved.
- Packages – you are welcome to send packages to our address here, but please make sure they state your name and “CO The Yacht Rigger” and limit your packages to 5 a week.
Any modifications outside of these rules will be determined individually by Management. REMEMBER THESE RULES & REGULATIONS ARE FOR EVERYONE’S BENEFIT. PLEASE HELP KEEP THIS BOAT YARD A CLEAN & SAFE WORKPLACE. ** Salt Creek reserves the right to change these rules at any time.

Use coupon code to activate discount. Add to coupon code box on your cart page.

There has been plenty of interest in recent years of replacing traditional PVC-coated steel lifeline wires with alternatives such as bare wire or low stretch, high tech rope.
Using the chart above, you may be able to come up with your own opinion about whether bare steel or rope lifelines are right for you. However, here's a quick synopsis (in our opinion):
PVC Coated Line is best for cruisers
, particularily elderly boaters or ones with young children. This line won't do much for your boat's resale value if they are nearing the end of their lifespan since eventually they will turn yellow and can look terrible. Ocean racers should avoid these lines altogether since any damage is hidden. Overall, these lines require little maintenance. They may be the least strong option, but at least you won't hurt yourself if you fall on them!
Uncoated 1X19 Wire is best for ocean going boats, or modern/stylish sailboats with teak decks. These lines look fantastic and are super strong. However, we pity the poor person who falls on them at full force, as the small diameters can cut you, sometimes badly. Mind you, a bad cut is much better than falling overboard while at sea! These lines may chafe your expensive genoa or spinnaker sheets, but anti-chafing equipment (or even PVC water hose slipped over trouble areas on sheets) can prevent these problems.
High Tech Rope is best for lightweight racing boats, old fashioned boat styles, and DIY boaters (self sufficient do-it-yourself'ers). The weight savings of high tech rope are sometimes worth it, but the ability to adjust, remove or repair lines yourself is the big advantage. For those with wooden boats, or unusual colours, the colour choices of high tech rope will help you find the look you're going for. Will you be boating in remote areas? At the very least, consider carrying lengths of small diameter Spectra as a back up; stainless steel wire can be very expensive in certain parts of the world... and swaging? Forget about it!!

WaterCraft 101
Your guide to fun on the water!
 1")
How Tight Should Sailboat Lifelines Be? (Need to Know!)
A lifeline is a safety device frequently found on sailboats and on construction sites. It’s composed of wire and stanchions, which are secured around the ship’s perimeter to prevent passengers from being thrown overboard or accidentally falling. But how tight should they be?
Sailboat lifelines should be tight enough so they only stretch about two inches when hit with a force of 11 pounds (4.98 kg). Lifelines must be tight to prevent falls in high wind, violent waves, and stormy weather in general. A lifeline that gives slack is useless and can not prevent falls.
Read on to learn more about sailboat lifelines and how to care for them!
Table of Contents
How To Inspect Sailboat Lifelines
Inspecting your lifeline is an essential part of sailboat safety. Here are a few things you should prioritize in your inspection:
- Coated lifelines: Check the PVC coating. Chafing, cracks, and wear at the stanchions should be repaired.
- Lock nuts: Make sure that the lock nuts are in place and aren’t loose.
- Sailboat fittings: Check for heavy rust and corrosion on the pelican hooks, gate eyes, toggles, and turnbuckles. Clean away any corrosion you find.
- Cotter rings or pins: Check that the pins and cotter rings are in place.
Tip: Securing Sailboat Lifelines
Some sailboat lifelines have a gate that will open to allow cargo to be loaded on and off a sailboat. These gates are often secured with a pelican hook. To keep the pelican hook from popping free once the sailboat is underway, secure it with electrical tape.
 3")
Here’s a YouTube video on how to make sailboat lifelines safe and secure:
In the event that your sailboat needs a replacement pelican hook for its safety rail, here are a few you can replace alongside your lifeline (each link here leads to Amazon.com):
- Heyous Stainless Pelican Hook : This pelican hook is designed for yachts. The package includes one pelican hook and one swage stud at a reasonable price. The swage stud fits 4mm (0.15 inches) wire, rope, or cable.
- Marine Part Depot Stainless Pelican Hook : These pelican hooks are for 3/16″ (0.47 cm) wire. The package comes with two pelican hooks with a classic design, and the product page guarantees “strength and security.”
- Isure Marine Pelican Hook : This pelican hook has a quick-release link. One customer gave it a positive review stating that it was a “real” pelican hook, unlike many of the other hooks marketed as “pelican hooks” on the market.
- JingYi Pelican Hook : This pelican hook is made of T316 marine grade stainless steel, and its product page boasts of “anti-fatigue strength,” meaning it won’t suddenly pop free while you’re sailing through a storm. It fits 5/32″ (0.39 cm) wire, rope, and cable, and comes with one swage stud.
Replacing Sailboat Lifelines (Wire or Synthetic)
If your sailboat lifelines need replacing, there are many options available. The standard sailboat lifeline is made of wire coated in stainless steel. Boats under 30′ (9.14 meters) take ⅛” (0.31 cm) wire, while longer boats take 3/16″ (0.47 cm) wire.
According to the 2016 Safety Equipment Requirements, coated wire is no longer allowed on ocean racing boats. If you don’t plan on racing your sailboat, however, you may still use coated wire.
Dyneema synthetic lifelines are the most popular type of coated lifelines to date. They’re stronger and lighter than steel, easy to install, can be spliced, are easy to handle, and don’t rust.
However, one downside of using Dyneema lifelines is that they’re prone to chafing. It would help if you covered vulnerable areas with tape to prevent chafing if using Dyneema lifelines.
 4")
The Average Lifespan of Sailboat Lifelines
When properly maintained, the average lifespan of a sailboat lifeline is 15 years. However, the lifespan is typically shorter if your sailboat frequents saltwater versus freshwater. Saltwater boats also have a shorter lifespan due to the damaging effect of sea salt.
As I’ve already mentioned, to extend the lifespan of your lifeline, you’ll need to inspect and maintain it on a regular basis. While the lifespan of lifelines mostly depends on the environment you’re in and how well-maintained the lifelines are, looking at the pros and cons of different lifelines is essential to know how long they would last for you. I’ll go over this in the next section.
Sailboat: Wire Lifelines vs. Rope Lifelines
When choosing lifelines for your boat, you may wonder which type you should purchase. After all, there are many variations of sailboat lifelines, including steel-coated, vinyl-coated, wire, and rope. This section will compare wire lifelines to rope lifelines and explore the pros and cons.
Wire Lifelines For Sailboats
Wire lifelines have their advantages, including being simplistic, relatively cheap to replace, and “reliably sturdy.” This means, that wire has much less stretch than rope lifelines.
However, uncoated wire lifelines can do significant damage to your hands. During the warmer months, they are unbearably hot to the touch. Also, gripping thin wire with your bare hands is painful even when the wire isn’t hot.
Due to the issues mentioned above, wire lifelines are commonly sold with a vinyl coating. But water tends to enter the ends of the coating over time, which leads to cracking and chafing in the vinyl and the corrosion of the slowly exposed wire. In the end, you will wind up replacing wire lifelines a great deal.
Rope Lifelines For Sailboats
As explained above, Dyneema lifelines are popular for good reason! They’re more robust than stainless steel wire and they’re sold at a more reasonable price than wire lifelines. This will save you the additional cost it would take when replacing your sailboat’s lifelines.
Other advantages include:
- Dyneema is immune to corrosion and will not be affected by saltwater as quickly.
- Dyneema lifelines are much lighter than wire lifelines.
- Dyneema rope lifelines are easily bent and cut with a knife. Therefore, any section of the rope can be removed at will, whereas wire lifelines require wire cutters.
- Dyneema lifelines are easier to store than wire lifelines.
- Unlike wire lifelines, Dyneema lifelines can be replaced without the hassle of tools or fittings.
The only downside to Dyneema lifelines is that they are subject to chafing.
Sailboat lifelines should be tight enough to withstand 11 pounds (4.98 kg) of weight or more without slack. No matter which lifeline you choose, it’s essential to inspect your lifeline regularly for any damage before sailing.
Additionally, you should choose your lifelines well when replacing them, for well-maintained lifelines can be the difference between life and death for you and your crewmates!

Bryan is a Las Vegas resident who loves spending his free time out on the water. Boating on Lake Mohave or Lake Havasu is his favorite way to unwind and escape the hustle and bustle of the city. More about Bryan.
Similar Posts
 8")
What To Do When a Sailboat Is Heeling Too Much (Explained)
Sailing is a fun activity for many people, but it comes with the innate prerequisite of being on the water rather than on stable ground. Aspiring captains must learn how to navigate and operate a boat while it rocks around in the water, which means dealing with things like heeling (i.e., leaning too far to…

Sailboat vs. Powerboat: Which Is the Give-Way Vessel? Understanding Navigation Rules on the Water
Navigating the waters is an exciting adventure, whether you’re at the helm of a sleek sailboat or commanding a powerful motorboat. However, along with this thrilling journey comes the responsibility of understanding and adhering to the marine navigation rules, specifically those concerning the right of way or the “give-way” vessel. This aspect is vital to…
 10")
Why Do Sailboats Have Two Sails? (Explained)
If you’ve ever been sailing or watched a regatta, you’ll know that boats typically have two or more sails. It’s uncommon to see them with less than that. But what’s the reason behind this? Sailboats have two sails to improve the boat’s maneuverability, balance, speed, and ease of handling. The front sail is called the…
 11")
How Far Can a Sailboat Heel? (The Simple Answer)
Heeling is when a sailboat leans to one side, which can occur naturally or deliberately. When done deliberately, proper heeling enables a sailboat to travel faster. This, in turn, begs the question of how far a sailboat can heel? The optimal heeling range for sailboats varies by model and preference but usually sits between 10…
 12")
Why Some Sailboats Have Two Helms (Dual Helms Explained)
While most sailboats have a single helm with a steering wheel in the center, some larger sailboats or racing boats may have two helms. So, why do these sailboats have double helms? Are there any practical benefits of two helms on sailboats? Some larger sailboats have two helms as it helps with steering from different…
- Forums New posts Unanswered threads Register Top Posts Email
- What's new New posts New Posts (legacy) Latest activity New media
- Media New media New comments
- Boat Info Downloads Weekly Quiz Topic FAQ 10000boatnames.com
- Classifieds Sell Your Boat Used Gear for Sale
- Parts General Marine Parts Hunter Beneteau Catalina MacGregor Oday
- Help Terms of Use Monday Mail Subscribe Monday Mail Unsubscribe
Proper Lifeline Tension
- Thread starter dkinzer
- Start date Feb 1, 2023
- Forums for All Owners
- Ask All Sailors
I have installed new 3/16" bare stainless lifelines on our 2007 H41AC. The last task is to tension them using the turnbuckles. I'm wondering, however, what the proper tension should be. I'm assuming that they shouldn't be guitar string taut but neither should they be flapping in the breeze. It is currently cool here in the Pacific NW (highs in the high 40s Farenheit, and lows near freezing) but in the summer it can get to 100* or more. If I make them reasonably taut now, I'm guessing that the long runs (bow pulpit to gate, about 26 feet) may loosen a little in the summer. The coefficient of thermal expansion for 316 stainless is 8.8 microinches per degree Farenheit per inch so the long runs would expand about 3/16" with a 60* temperature change. Any tips on the adjustment?

Congrats on your new safety lines. Tension on the life lines are not specific. They are what you desire. As you correctly state, weather and temperature will affect the cables. I find that I set them and adjust them as needed. It is relatively easy to accomplish. I head forward on the starboard side and they feel good as I pull up on the lifeline. I feel secure and my feet find the deck soundly. I return on the port side and there is an issue. The line feels loose. I immediately begin to identify why. Is there a stanchion bent or no longer properly attached at the deck. Did someone use the stanchion to pull the boat to the dock or push it away. Could it be that the turnbuckle has slipped a bit since my last sail. What ever it is I address the issue and resolve the safety problem. I walk the deck and use the life lines every time before I untie the lines. Straight forward and easy stuff.

I googled it for you. Most of the responses concur with the following quote I purloined from this piece on lifelines printed in Practical-Sailor. ......... "Lifelines should be tight, so tight that they deflect no more than about two inches between stanchions when a force of about 11 foot-pounds is applied at mid-span between stanchions.". .....
Joe said: I googled it for you. Click to expand

Hayden Watson
I like mine tight but you need to watch your stanchions as you are tightening them because they follow a curve, they exert a bending moment on the stanchions and if over tightened will bend them inward.

I teach new crew to use Life Lines to walk along my deck. [slack per @Joe needed] You "pull up" on the line till tight, as you walk. This action keeps your feet on the deck in choppy seas. Safety Officer Jim...

sailcapt340
On my boat I find that the tension changes, sometimes slightly and other very tight. When I connect the lifeline over the entry hatchway after we board the boat from the stern, after lifting the seat. The lines tighten all the way to the front, about 1/2” or so. When I have two people sitting on the wing seats, the lines tighten even more. In this scenario, its very difficult to open the pelican hooks if we get to a dock and I have to get off the boat. You‘ll need to do some testing to get them just right. Fun stuff to do, moving people up and down, and you’ll always be asked by someone “what are you doing?”
sailcapt340 said: “what are you doing?” Click to expand

Hello, US Sailing, Safety Equipment Requirements for COASTAL racing state: Lifeline deflection shall not exceed the following: a) When a deflecting force of 9 lbs (40N) is applied to a lifeline midway between supports of an upper or single lifeline, the lifeline shall not deflect more than 2” (50mm). This measurement shall be taken at the widest span between supports that are aft of the mast. b) When a deflecting force of 9 lbs (40N) is applied midway between supports of an intermediate lifeline of all spans that are aft of the mast, deflection shall not exceed 5” (120mm) from a straight line between the stanchions. https://www.ussailing.org/wp-content/uploads/2022/01/Monohull-SER-2022.0-Coastal.pdf Barry

BarryL said: Hello, US Sailing, Safety Equipment Requirements for COASTAL racing state: Lifeline deflection shall not exceed the following: a) When a deflecting force of 9 lbs (40N) is applied to a lifeline midway between supports of an upper or single lifeline, the lifeline shall not deflect more than 2” (50mm). This measurement shall be taken at the widest span between supports that are aft of the mast. b) When a deflecting force of 9 lbs (40N) is applied midway between supports of an intermediate lifeline of all spans that are aft of the mast, deflection shall not exceed 5” (120mm) from a straight line between the stanchions. https://www.ussailing.org/wp-content/uploads/2022/01/Monohull-SER-2022.0-Coastal.pdf Barry Click to expand
Tin Kicker said: it can be unrealistic in the real world Click to expand
- Smile at your boat as you approach her walking down the dock.
- Notice the feel of the deck
- Is anything out of place
- ask, How you doing old girl
- use the lifelines as you move about
- back to the cockpit, open the companion way, begin loading and your checklist of get under way procedures.

Ralph Johnstone
FastOlson said: Perhaps good advice when greeting your spouse, too.... ! "How you doing, old girl?" Click to expand
dkinzer said: I have installed new 3/16" bare stainless lifelines on our 2007 H41AC. The last task is to tension them using the turnbuckles. I'm wondering, however, what the proper tension should be. I'm assuming that they shouldn't be guitar string taut but neither should they be flapping in the breeze. It is currently cool here in the Pacific NW (highs in the high 40s Farenheit, and lows near freezing) but in the summer it can get to 100* or more. If I make them reasonably taut now, I'm guessing that the long runs (bow pulpit to gate, about 26 feet) may loosen a little in the summer. The coefficient of thermal expansion for 316 stainless is 8.8 microinches per degree Farenheit per inch so the long runs would expand about 3/16" with a 60* temperature change. Any tips on the adjustment? Click to expand
- This site uses cookies to help personalise content, tailor your experience and to keep you logged in if you register. By continuing to use this site, you are consenting to our use of cookies. Accept Learn more…
Free Shipping Over $99* - 366 Day Returns - Dedicated Customer Support
- Call Us +1-503-285-5536
- Sign in & Register
- Recently Viewed
West Coast Sailing offers a full selection of marine grade sailing line and rigging including One Design rigging, pre cut line, line kits, and line by the foot for halyards, sheets, control lines, and more. Shop running rigging and standing rigging today from trusted brands including Marlow, Robline, Samson, Kingfisher, New England Ropes, and more.

- Qty in Cart
")
Laser / ILCA 8:1 Cunningham TecPRO (Complete)
")
Laser / ILCA Vang Complete TecPRO (Allen Vang Block)

J/80 Main Halyard w/ Shackle

J/70 Backstay Flicker
")
Thistle Main Halyard Tapered (6mm Excel)
")
Thistle Spinsheet Continuous Tapered (6mm Excel Racing)

Melges 24 4:1 Main Halyard Vectran
")
Melges 24 Jib Sheet (Continuous/Tapered)
")
J/24 Spinnaker Sheet (Ultra Lite)
 with Ring")
J/22 Twings (Pair) with Ring
")
Laser / ILCA Outhaul TecPRO 6:1 (Complete)

10mm Marlow D2 Racing

8mm Marlow D2 Racing

Laser / ILCA Vang Control PRO
")
Laser / ILCA 8:1 Cunningham PRO (Complete)
- Total: items /
- Add all to cart
Adding your products to cart
Sailboat line & rigging - halyards, sheets, control lines & more.
Line is a critical part of any sailboat, from small dinghy to super yacht and everything in between. West Coast Sailing offers a wide variety of line and marine rope for every sailor from leading line manufacturers. Whether you're looking for a new control line for your Laser vang, jib sheet for your J24, replacement halyard for your cruising boat, or a high strength low stretch line for a high performance application, we've got what you need to get you back on the water. Shop by common application, diameter, material, and more with options available from Robline, Marlow, Alpha Ropes, and New England Ropes. All line sold by the foot with line kits for select boats and small diameter mini spools available.
Shop By Boat
West Coast Sailing offers custom rigging, line kits, and pre cut line for many popular one design dinghies and keelboats. These products make it simple to get the right line for your sailboat and you can be confident they will work great.
- Shop Line Kits
- Shop One Design Rigging
- Shop Pre Cut Line
Shop By Line Type
Line has come a long way in the past few decades, and current options offer great value and performance. We offer a variety of h igh tech Lines, which generally feature a non-stretch core for strength, durable cruising lines, which are typically polyester and less expensive but still strong and durable, or Dyneema, Spectra, & Vectran for non-stretch control line, halyard, and sheet applications. Shockcord bungee and floating Polypropylene also available. Scroll down this page for recommendations for line material based on your boat size and application.
- Shop by Line Type
Shop By Diameter
West Coast Sailing carries over 80 different lines from 6 of the best rope manufacturers in diameters ranging from 1mm all the way up to 12mm. Use our handy category filters to narrow in on the specific diameter of lines that work for your application, and then pick the one that meets your exact criteria for performance, color, or price.
- Shop by Line Diameter
Additional Line Options & Services
In addition to per foot line, pre cut line, line kits, and custom rigging, West Coast Sailing also offers mini spools, splicing equipment, and custom rigging services. If you can dream it, our team can build it!
- Shop Mini Spools
- Shop Splicing Tools
- Shop Custom Rigging
Line Fiber Type / Material Guide
Line application guide - dinghy, line application guide - racing, line application guide - performance cruising, line diameter guide.
Recommended Diameter by Application & Boat Length
If you are replacing an existing line, the easiest way to determine what diameter you need is to match what you already have. This can be done with a caliper or by close estimation with a tape measure. For example, if you've previously used a 7mm halyard and it has performed well, another 7mm line is likely a great choice. In most applications, there is some flexibility in the exact diameter that can be used. Most blocks, for example, have an 'ideal' diameter (ie, the line diameter that runs most effectively though the block's sheave) but also have a range so that you can run a slightly thinner or slightly thicker line. If you have a halyard that is getting hung up in your rig, stepping down 1-2mm might help the halyard run more efficiently. If you have a larger boat or rig and want to run a thinner halyard, consider a double braid line that features a Dyneema or Spectra core for strength. A similar approach can be applied to replacing sheets, control lines, and other line on your sailboat.

Double Braid vs Single Braid
Two terms you will often see in line descriptions are 'double braid' and 'single braid', which refer to the way the line is constructed. At the most basic level, a double braid line has a cover and a core whereas a single braid does not, but there are other important distinctions to consider when making a line selection.
Single Braids are made up of either 8 or 12 strands that are braided into a circular pattern, half clockwise and half counter clockwise. This produces a line that is supple, absorbs twists, and tends not to kink. There are two types of single braid lines: performance single braids and polyester/blended single braids. Performance single braids are made from fibers with very low stretch and designed to handle extreme loads - think Dyneema, Spectra, or Vectran. Polyester/blended single braids, sometimes called hollow braid, are soft and easy to grip, built for sheets and hand-adjusted control lines. These are less common than performance single braid lines but recommended in a few specific applications.
Double Braids , sometimes called braid on braid, have a braided core within a braided outer jacket or cover. This creates a strong, durable, smooth-running line that is easy to handle. Double braids are used for the vast majority of all running rigging on sailboats including sheets, halyards and control lines for both cruising or racing. There are two types to consider: polyester double braids and high-tech double braids. Polyester double braids, found most commonly on recreational and cruising sailboats, have a polyester cover with polyester core. These are low maintenance, affordable, and long-lasting, while offering relatively low stretch and high working loads. For additional strength and minimal stretch, consider high-tech double braids. These lines typically feature a Dyneema or Spectra core (non-stretch) inside a polyester or polyester/dyneema blend cover for additional durability. They are more expensive but often the go to choice for high performance racing boats.
Sailing Programs & Clubs - West Coast Sailing offers special program pricing on purchases for sailing programs, yacht clubs, and community sailing organizations. Visit our YC & Program Purchasing page for more details.
Subscribe To Our Newsletter
Sign up for our newsletter to receive exclusive discounts, new product announcements, and upcoming sales.
IMAGES
VIDEO
COMMENTS
1-45 results of 117. 1. 2. 3. Fisheries Supply is your premier supplier of sailboat lifeline fittings from top brands. We stock a full range of quality lifeline turnbuckles, pelican hooks, gate eyes, wire, rigging terminals and even lifeline kits if you want to DIY. We also offer a complete range of splicing and swaging services if you prefer ...
Lifeline Netting 24 - 32" in Height. Stanchion Eye for 1" x .065 Wall Tube Stainless Steel. Lifeline Base Stainless Steel. Stanchion Sleeve with Eye for 1" OD Tube Stainless Steel. Suncor® Quick Attach™ Wedge Kit 3/16". Wire Rope 7x7 Stainless Steel 3/16" Vinyl Coated to 5/16". Suncor® Quick Attach™ Lifeline Kit Without Gate.
All swaged sailboat, power boat and yacht lifelines are assembled right here in our rigging shop. We use only the highest quality lifeline wire made 7x7 type 316 wire in our coated life lines never 7x19 or 1x19 wire. Our uncoated life lines are 1x19 wire, all strand polished and type 316 stainless steel.
For over 35 years Seco South has manufactured lifelines for sailboats for nearly all of the leading sailboat manufacturers in the USA including Hunter, Beneteau, Island Packet, Compac, Irwin and Endeavour just to name a few. We manufacture our lifelines using only the highest quality type 316 stainless steel for all of
Sizing Lifeline Wire. Racing sailboats should follow the World Sailing Offshore Special Regulations 3.14.6, which are summarized as follows: Up to 28' LOA—1/8" wire; 28-43' LOA—5/32" wire; 43' LOA and up—3/16" wire. These sizes are minimums; you can use larger sizes. 5/32" wire is not common in the US, but West Marine Rigging offers it on ...
If it is time to replace your boat's lifelines, West Marine offers everything you need. Choices include a full, custom lifeline replacement, available from the West Marine Rigging Shop. Alternately, you can choose from our selection of lifeline wire and terminals and do the job yourself. Choices include 7 x 7 vinyl-covered lifeline, 7 x 7 ...
Description. Innovative lifeline kits feature Quick Attach™ compression fittings that make rigging lifelines yourself easier, with no need to peel wires apart. Fittings are precision machined from 316 stainless steel and are certified with a break strength greater than the wire itself. Add your own wire in the appropriate length (choose 5/16 ...
As a boat owner you have two options for renewing wire lifelines: source and purchase the wire and fittings and install them yourself, or measure the existing ones and send the details to a rigger or rigging service and have them made professionally. (There is a useful lifeline measurement guide at csjohnson.com.)
If you are more of a do-it-yourself sailor, we sell Sta-Lok, and Hi-Mod fittings designed to be fitted on site. Huge Inventory of Rope and Sailboat Hardware. Rigging and Lifeline Shop. Splicing Shop. Expert Knowledge. [email protected]. (305) 758 1074. Sailing Services Catalog. Find A Rigger.
Captain John with 25+ years of experience shows you the no-nonsense cruising skills you need for safer sailing worldwide. Visit his website at https://www.sk...
Part 2 lifelines installed on sailboat DIYPart 1 https://youtu.be/-qf4s0V_BZI whats in the box Suncor https://suncorstainless.com/ Subscribe now! Don't miss ...
First, attach one end of the lashing line to the lifeline at the thimble with a double figure 8 knot. See below. First, tie a loose figure 8 knot in your line, near one end. Next, pass the tail through the thimble and then retrace the figure 8 knot backward through the knot.
We will show you how to inspect & prepare your lifelines for measurement, the tools needed, and how to properly measure for replacement.
C.S. Johnson Splice Line End Fitting - Splice Eye to Splice Eye - LS-3200. $32.99. 1. 1 / 4 Next. Shop Cable & Lifeline for boats of all types at Defender. Get fast delivery and free shipping on eligible orders over $99.
1.A wrap of tape around the lifeline prevents the hitch from sliding. 2. Dacron lashing (with chafe gear) can be tensioned. 3. The orange line is the new, high lifeline on our test cat. Darrell Nicholson. Practical Sailor has been independently testing and reporting on sailboats and sailing gear for more than 50 years.
In sailing, lifelines refer to the cables or lines installed around the perimeter of a sailboat to enhance safety. They serve as a barrier to prevent crew members from falling overboard and into the water. Lifelines are particularly important when sailing in rough conditions or when the boat is heeling (tilting) due to strong winds. ...
World Sailing (then ISAF) initially accepted Dyneema lifelines in 2012, but then banned it from all offshore racing in 2015. In 2018, World Sailing decided to allow Dyneema lifelines for offshore multihulls, realizing that the primary risk factor was stanchion chafe, and this resulted from hanging rail meat over the lifelines, something multihull sailors never do.
If the lashings are changed every 2-3 years your lifelines will last at least 5-8 years in the tropics. Colligo Marine can customize synthetic lifelines for boats of any size! Dyneema lifelines are approved for offshore use by the United States Sailing and the International Sailing Federation. Line is lighter and easier on the hands (& sails ...
Besides being more resistant to corrosion, stainless steel 1×19 wire is stronger than the equivalent size stainless steel 7×7 construction plastic coated wire. Typical breaking strain differences are in the 30% range. So in addition to being easier to inspect, uncoated lifelines are significantly stronger.
Lifelines: Machine Swage. There has been plenty of interest in recent years of replacing traditional PVC-coated steel lifeline wires with alternatives such as bare wire or low stretch, high tech rope. Type. Pros. Cons. PVC-coated 7X19 wire. Comfy on hands and body parts. Attractive in short term. Corrosion, if any, is hidden.
Sailboat lifelines should be tight enough so they only stretch about two inches when hit with a force of 11 pounds (4.98 kg). Lifelines must be tight to prevent falls in high wind, violent waves, and stormy weather in general. A lifeline that gives slack is useless and can not prevent falls. Read on to learn more about sailboat lifelines and ...
Feb 2, 2023. #9. Hello, US Sailing, Safety Equipment Requirements for COASTAL racing state: Lifeline deflection shall not exceed the following: a) When a deflecting force of 9 lbs (40N) is applied to a lifeline midway between supports of an upper or single lifeline, the lifeline shall not deflect more than 2" (50mm).
Sailing line and rope including line kits, pre cut line, custom rigging, and line by the foot from Marlow, New England Ropes, Robline, Samson, and more. Free Shipping Over $99* - 366 Day Returns - Dedicated Customer Support. Menu. Search. Close Search. Call Us +1-503-285-5536;