- Skip to primary navigation
- Skip to main content
- Skip to primary sidebar


How To Make an Origami Boat

Sail the art of origami with our captivating paper boat. Unfold creativity, craft wonders, and set sail on a paper adventure today!

Is your favorite childhood memory sailing a boat in your backyard pool? Or is it playing with a paper boat in the bathtub? Either way, you've likely had some experience with origami boats. Good old days, right?
Luckily, the time when you can relive these memories is here! Make an origami boat with your little one and have a joyous boat ride without getting wet. You'll need some colorful origami paper and a special folding technique. It's going to be so much fun.

Want to save this project?
Enter your email below, and then we'll send it straight to your inbox. Plus get awesome new projects from us each week.
Is an Origami Craft Too Much for Young Kids?
Not at all! Having young children make origami boats is a great way to introduce them to the art of origami. With some guidance, even the smallest fingers can put together a beautiful boat that will impress everybody. Furthermore, it's a delightful experience for both children and adults alike.
Moreover, folding a rectangular piece of paper into different shapes is an excellent way to practice patience and attention to detail in preschoolers. It'll increase their concentration levels and fine motor skills.

What Is the Best Origami Paper for Making a Boat?
Usually, origami boats spend their lives as bath toys, so it's best to choose waterproof origami paper that won't smudge easily. A thin foil paper works best, as it gives the boat a shiny finish and adds extra durability. Moreover, it enhances the overall appearance of the boat.
Can't find it? No worries. Use construction paper. Even an ordinary plain white paper would do.
When I declutter my desk, I give my kids colorful Post-it notes and extra newspapers. It reduces paper waste and eliminates the worries about getting it wrong.
Rember if you are using it in water, air drying the boat at the side of a bath or dry place is best so there isn't growth of bacteria and there is multiple use.
Don't miss our other boat crafts including the Paper Plate Boat , Juice Box Boat , Pirate Ship Craft , and How to Draw a Sailboat .

Tips and Tricks for Making an Origami Boat
Most origami boat templates are not too complicated; in fact, they are relatively straightforward. You and your kids will soon get them right. Still, here are some helpful tips to make your project even easier:
- To begin, start with a flat square sheet of paper, as it simplifies the process of folding and makes it easier for kids to understand what they are doing.
- Use the reverse fold technique when folding the edges of the boat. It will give it a crisp and neat look.
- To make the boat sturdier, use a few dots of glue when you're done.

Ideas to Decorate the Origami Boat
Where's the fun in a solid-colored boat when you can liven it up with bright colors? Here are some ideas for decorative objects for your boat:
- Use colorful paper and stickers for endless fun
- Create tiny flags and sails from paper or fabric to make a boat look like a real one
- Draw a beautiful scene on the boat to make it artsier

What Else Can I Do with an Origami Boat?
The first thing that comes to our minds when we think of a boat is sailing. But you can do so much more with these paper creations!
- Attach strings to hang them as a whimsical mobile
- Display a tiny origami boat in a terrarium
- Use them as gift tags for special occasions
- Make them into keychains to remember the fun you had
Check Out These Other Origami Crafts!
Origami Butterflies
Hugs and Kisses Origami
Origami Car
Bunny Origami
How to Fold a Paper Football

Origami Boat Craft Is an Exciting and Creative Activity for All Ages
Not only is origami art suitable for adults, but it's also perfect for children! Engaging in making an origami boat with your little ones, moreover, is a wonderful way to spend quality time together. And, rest assured, it's not hard at all! With the right techniques, you can easily master it. Additionally, I've attached the step-by-step guide for you all below. I hope it helps.

Boat Origami Supplies
- A sheet of craft paper - origami paper
- Glue (optional).
- Scissors (optional).
- Colorful craft paper and or card stock paper (for the flag).

Step 1: Start with a rectangular sheet of craft paper. If the paper has a colored side, make sure it is facing down.

Step 2: Fold the paper in half horizontally to create a crease in the center of the paper.

Step 3: Fold the paper in half vertically to create another crease in the center.
Origami Boat Triangle

Step 4: Bring the right edge of the paper towards the center crease line, folding it diagonally to create a triangle shape. Crease the fold well.

Step 5: Repeat the previous step for the other edge of the paper, folding it diagonally to create another triangle shape. Crease the fold well.
Bottom of Boat

Step 6: Fold the bottom edge of the paper up. Fold up to the bottom of the diagonal creases you made in the last two steps.

Step 7: Flip it over.

Step 8: Repeat the step. Fold the bottom edge.

Step 9: Open the gap of the folded triangular-shaped origami pieces.

Step 10: Bring the top corners of the paper down.
Bring it toward the center of the paper.
Fold them along the diagonal creases on two sides.

Step 11: This will create a diamond shape.

Step 12: Fold the top layer of the bottom point of the paper up. This should be folded along the top edge of the paper to create a triangle shape.

Step 13: Flip it over.

Step 14: Repeat the process. It will create a triangle shape.

Step 15: Similar to step 9 open the gap in the middle.

Step 16: Fold it along the two creases. Fold on to sides to create a diamond shape.

Step 17: Gently pull the two sides of the boat apart to create a small opening.

Step 18: Pinch the bottom corners of the boat. Then pull them down slightly to make the boat more stable.

Step 19: To make the flags cut out triangular colorful craft paper and a thin strip from cardstock paper.

Your origami boat is now complete! You can now use it as a decoration or float it in water.
We highlighted these Origami Crafts along with some other fun kid's crafts in our Summer Crafts for Kids along with our 101+ Easy Kids Crafts .
You also do not want to miss our 101+ Coloring Pages For Kids and 101+ Printables full of Crafts and Coloring Pages.

Other Summer Crafts You'll Enjoy
- Paper Plate Sun
- Strawberry Painted Rock
- Squirt Gun Painting
- Beach Please Hat
- Popsicle Stick Bird Feeder
Origami Boat

- Origami paper
- Card Stock Paper (for the flag)
- Scissors (optional)
- Glue (optional)
Instructions

CONNECT WITH MADE WITH HAPPY!
Be sure to follow me on social media, so you never miss a post!
Facebook | Twitter | Youtube | Pinterest | Instagram
Looking for crafts to keep your child busy? Sign up for my 5 Ridiculous HAPPY Activities in under 30 minutes for your kids delivered directly to your inbox!
Find and shop my favorite products on my Amazon storefront here!
ORIGAMI BOAT
Pin it to your diy board on pinterest.
FOLLOW MADE WITH HAPPY ON PINTEREST FOR ALL THINGS HAPPY!

More Kids Crafts

Discover a world of creativity and joy with Alli Ward, the creative mind behind Made with Happy. From DIY crafts to delicious recipes, Alli brings happiness to every project!

Step-by-Step Guide: Make a Sailboat Out Of Paper Effortlessly
Alex Morgan

Creating a sailboat out of paper is a fun and creative craft activity that can be enjoyed by people of all ages. Paper sailboats are not only easy to make but also provide an opportunity for imagination and play. In this article, we will provide you with a step-by-step guide on how to make a paper sailboat, along with tips for building a sturdy boat and ideas for fun activities and games. So, gather your materials and get ready to embark on a paper sailing adventure!
Before we begin with the instructions, let’s gather the materials needed for making a paper sailboat. The type of paper you choose is crucial to ensure that your sailboat stays afloat and withstands the water. there are a few other materials required for the construction process.
Now that we have our materials ready, let’s dive into the step-by-step guide. We will take you through each stage of creating a paper sailboat, from folding the base to adding the mast and sail.
After completing the construction of your paper sailboat, you can add your personal touch by decorating it. This will make your boat unique and reflect your creativity.
Building a sturdy paper sailboat requires some tips and tricks to ensure it stays intact during playtime or races. We will share some techniques that will help strengthen the boat’s structure and enhance its durability.
Besides the construction process, paper sailboats offer various opportunities for interactive and engaging play. We will explore different activities and games that can be enjoyed with your paper sailboat, including how to organize a sailboat race and other creative ideas to make the most out of your sailing experience.
So, let’s gather our materials and get ready to embark on a wonderful journey of making a sailboat out of paper!
1. Making paper sailboats maximizes creativity: With just a few simple folds and materials, you can create a mini sailboat that sparks imagination and fun. 2. Using sturdy paper for sailboat construction is essential: Opt for thicker, heavier paper to ensure a durable sailboat that can withstand floating in water or racing against others. 3. Personalizing your paper sailboat adds charm: Enhance your sailboat by adding colorful decorations, custom designs, and unique details, making it a reflection of your style and personality.
Materials Needed
To make a paper sailboat, you will need the following materials:
- A sheet of sturdy, lightweight paper
- Scissors for cutting and adjusting the shape
- Markers or colored pencils for designs and colors
- A ruler for straight lines and accurate measurements
- Glue or tape for securing parts of the sailboat
Pro-tip: Consider using construction paper as it is more durable and less likely to tear, ensuring a longer playtime. Remember to be creative and have fun while making your sailboat!
What type of paper is best for making a paper sailboat?
The type of paper that is best for making a paper sailboat is crucial. When considering what type of paper to use, there are several options to choose from.
Construction paper is a sturdy choice that holds its shape well and can withstand exposure to water. Another option is cardstock , which is thicker and more durable than construction paper. This provides extra strength and reduces the likelihood of tearing or collapsing.
If you prefer a lighter and more delicate sailboat, origami paper is a good choice. It is lightweight and easy to fold.
Last but not least, for water resistance, it is a good idea to use water-resistant paper or coat regular paper with a waterproof sealant. This protects the sailboat from becoming soggy or falling apart when it comes into contact with water.
When choosing the paper for your project, it is important to consider the size and complexity of the sailboat design, as well as your personal preferences. Feel free to experiment with different types of paper to find the one that works best for you. Enjoy the process of creating your paper sailboat and let your creativity set sail!
Other materials required for building a paper sailboat
To build a paper sailboat, you will need various materials in addition to paper. Here is a list of the other materials required for building a paper sailboat:
- Scissors : Use scissors to cut the paper into the desired shapes.
- Glue or tape : Secure different parts of the sailboat together.
- Ruler : Use a ruler to measure and create precise folds and cuts.
- Pencil or pen : Use a pencil or pen to mark positions for folding and cutting.
- Decorative materials : Personalize the sailboat using markers, crayons, stickers, or other decorations.
- Optional : If you want a sturdy base, you can use a small piece of cardboard or foam board.
- Optional : If you plan to float the sailboat on water, you can use waterproofing materials like wax or clear nail polish.
It’s important to note that these materials are just suggestions. Feel free to be creative and use whatever materials you have available to build your paper sailboat.
Step-by-Step Guide to Making a Paper Sailboat
Looking to set sail on a creative adventure? Get ready to embark on a step-by-step journey to making your very own paper sailboat. We’ll start by folding the base, then move on to crafting the hull. Next, we’ll add the mast and sail, giving our paper creation that true sailor’s touch . And finally, we’ll let our imagination run wild as we decorate and personalize our paper sailboat, making it a unique vessel of our own. Get your scissors ready, because it’s time to make waves with paper!
Step 1: Folding the base of the sailboat
To fold the base of the sailboat, follow these steps:
Step 1: Start with a square piece of paper.
Step 2: Place the paper in front of you with one corner pointing towards you.
Step 3: Fold the paper in half diagonally, bringing one corner to the opposite corner, and crease firmly.
Step 4: Unfold the paper and repeat the previous step with the other two corners, folding them to the opposite corners and creasing firmly.
Step 5: Next, fold the bottom corner up towards the center, aligning it with the middle crease.
Step 6: Fold the top corner down towards the center, overlapping the previous fold, and crease firmly.
Step 7: Flip the paper over and repeat steps 5 and 6 on the other side.
By following these steps, you have successfully folded the base of the sailboat. This forms the hull of the sailboat, providing stability for the rest of the construction process.
Step 2: Creating the hull of the sailboat
To create the hull of the sailboat, follow these steps:
Step 1: Take a rectangular piece of paper and place it in front of you.
Step 2: Fold the paper in half lengthwise, creating a center crease.
Step 3: Unfold the paper and fold the right and left edges towards the center crease.
Step 4: Flip the paper over and repeat the folding process on the other side, folding the right and left edges towards the center crease.
Step 5: Fold the bottom edge of the paper up towards the center, about two-thirds of the way.
Step 6: Flip the paper over and repeat the same folding process on the other side, folding the bottom edge up towards the center.
Step 7: Take the bottom corners of the paper and fold them towards the center, creating a triangular shape at the bottom of the hull.
Step 8: Flip the paper over and repeat the same folding process on the other side, folding the bottom corners towards the center.
Step 9: Gently push the sides of the hull inward, creating a more three-dimensional shape.
Step 10: Your paper sailboat hull is now complete!
Fact: The hull’s shape is crucial for the stability and maneuverability of the sailboat, enabling it to smoothly cut through the water and resist tipping over.
Step 3: Adding the mast and sail
Adding the mast and sail is a crucial step in building a paper sailboat. Follow these steps:
- Take a 10-12 inch wooden or plastic dowel rod as the mast of your sailboat.
- Insert one end of the dowel rod into the top of the folded triangle, ensuring it stands upright .
- For step 3, create the sail by cutting a small square or rectangle out of decorative paper or fabric.
- Attach the sail to the mast by gluing or taping one edge to the dowel rod.
- Add extra decorations, like colorful patterns or stickers, to the sail or hull for customization .
- Once the mast and sail are added, your paper sailboat is complete and ready to sail!
With the mast and sail in place, your paper sailboat is now ready to set sail and bring joy to your paper boat adventures.
Step 4: Decorate and personalize your paper sailboat
Step 4: Decorate and personalize your paper sailboat.
1. Choose colors: Use colorful markers, crayons, or colored pencils to add vibrant designs to your sailboat.
2. Add patterns and shapes: Use your artistic skills to draw patterns like stripes or polka dots, or add shapes such as stars or hearts to make your sailboat unique.
3. Write your name or initials: Personalize your sailboat by writing your name or initials on the hull or sail. This will make it easily identifiable and show ownership.
4. Decorate with stickers or washi tape: Enhance your paper sailboat’s appearance by adding stickers or washi tape with various designs, giving it an extra touch of style.
5. Use glitter or sequins: Add sparkle to your sailboat by gluing on glitter or sequins, creating a dazzling effect and making it stand out.
6. Experiment with different materials: Get creative and try using fabric, ribbons, or feathers to give your sailboat a unique texture or embellishment.
7. Apply a protective spray: If you plan to display or play with your sailboat outdoors, consider using a clear protective spray to prevent smudging or fading.
8. Show off your creation: Once you’ve finished decorating your paper sailboat, proudly display it on a shelf, use it as a centerpiece, or take it for a sail in a nearby water source.
I once decorated a paper sailboat with my younger brother for a school project. We used bright markers to draw colorful stripes and added our initials to the side. We incorporated stickers of sea creatures and small seashells. Our sailboat won the “ Most Creative ” award, and we were proud of our artistic efforts. It was a fun bonding experience that allowed us to express our creativity and showcase our unique style. Decorating and personalizing our paper sailboat made it feel special and added a personal touch to the project.
Tips and Tricks for Building a Sturdy Paper Sailboat
When constructing a sturdy paper sailboat, it’s important to follow these helpful tips and tricks:
- Choose thick and durable paper such as construction paper or cardstock to ensure durability.
- Begin by folding the paper in half lengthwise to create a strong foundation .
- Achieve a pointed bow by folding the top corners of the paper down towards the center crease.
- Fold the bottom of the paper up, meeting the bottom of the triangle formed.
- Repeat the previous step on the opposite side for balance .
- Fold the bottom corners of the paper upwards, meeting the centerline and forming a diamond shape .
- To create a smaller triangle, fold the top point of the diamond downwards, meeting the bottom edge.
- Repeat this process on the other side as well.
To enhance the sturdiness of the sailboat:
- Apply glue or tape along the seams to securely hold them in place.
- Smooth out any creases or wrinkles in the paper for a clean finish.
- Allow the boat to fully dry before adding decorations or attempting to sail it.
By implementing these tips and tricks, you will construct a reliable paper sailboat that is ready to set sail!
Fun Activities and Games with Paper Sailboats
Get ready to set sail on a voyage of fun and excitement with paper sailboats ! In this section, we’ll delve into the world of entertaining activities and games you can enjoy with these nautical creations . From thrilling sailboat races to a variety of other games and activities, there’s something for everyone to dive into . So grab your scissors, fold your paper, and let the adventure begin!
How to have a sailboat race
To have a sailboat race with paper sailboats , follow these steps:
- Prepare multiple paper sailboats using the step-by-step guide in the article.
- Choose a suitable location with a body of water, such as a pond or a small pool .
- Mark the starting and finishing points of the race.
- Gather participants and assign each one a paper sailboat .
- Ensure the sailboats are evenly spaced at the starting point.
- Gently blow on the sails of the sailboats to create wind and start the race.
- Encourage participants to use their breath or a small handheld fan to propel their sailboats forward.
- Monitor the progress of the sailboats and announce the winner as the first to reach the finishing point.
Pro-tip: To add excitement to the race, create obstacles like floating objects for the sailboats to maneuver around. This will make the race more challenging and enjoyable for participants .
Remember, a sailboat race with paper sailboats is a fun and engaging activity that can be enjoyed by both children and adults .
Other games and activities to enjoy with paper sailboats
Did you know that paper sailboats are not only fun to make, but they can also teach important concepts about physics and engineering ? In addition to creating a paper sailboat fleet and racing them in a nearby stream or pool to observe which sailboat design sails the fastest and farthest, there are other games and activities you can enjoy with paper sailboats. One such game is “Sink the Sailboat.” You can set up targets in the water and use a water shooter to try and sink the paper sailboats . It’s a challenging game that adds an element of competition. Another activity is organizing a paper sailboat regatta . This involves holding a friendly competition among friends or family members to see who can navigate their sailboat through a course the fastest. It’s a great way to have fun and showcase your sailing skills. So, why not try out these other games and activities with your paper sailboats ? You’ll have a blast and learn a lot about physics and engineering at the same time.
Some Facts About How To Make A Sailboat Out Of Paper:
- ✅ Making a sailboat out of paper is a popular craft activity enjoyed by both children and adults. (Source: Wikihow)
- ✅ The process of making a paper sailboat involves various folding techniques to create a boat shape that can sail in water. (Source: Little Project)
- ✅ Using regular printer paper is sufficient for making a paper sailboat, although origami paper can also be used for a more authentic look. (Source: National Geographic Kids)
- ✅ It is recommended to reinforce the corners and bottom of the paper sailboat with clear tape to ensure its durability and water resistance. (Source: Nat Geo Kids)
- ✅ Paper sailboats can be customized with colored paper, markers, pencil crayons, and stickers, allowing for creative personalization. (Source: One Little Project)
Frequently Asked Questions
How do i make a sailboat out of paper using printer paper.
To make a sailboat out of paper using printer paper, follow these steps:
- Fold a letter-sized piece of printer paper in half vertically.
- Unfold the paper and fold it in half again, this time horizontally.
- Flip the paper so that the fold is facing you, then fold down the top corners towards the middle, leaving space at the bottom.
- Secure the folds by creasing along the edges.
- Bring the bottom of the paper up and fold it against both sides, creating a paper hat shape.
- Fold the bottom corners inward, wrapping them around the edges of the triangle.
- Fold the bottom flaps around the edges of the triangle and back towards you.
- Rotate the triangle 45 degrees to make it a square.
- Open up the bottom of the triangle with your fingers to maintain the square shape.
- Fold up the bottom flaps by aligning them with the top corners.
- Rotate the square 45 degrees and open up the bottom again.
- Pull out the triangles on the side of the square, creasing the bottom to strengthen the boat.
- Float the paper boat in water and make adjustments to prevent sinking.
What kind of paper do I need to make a sailboat out of paper?
You can use regular printer paper, construction paper, or origami paper to make a sailboat out of paper. Using origami paper may make the folding slightly easier due to its thinner and more flexible nature. Waxed paper or aluminum foil can also be used to make a waterproof sailboat.
Can I put things in the paper boat?
Yes, you can put lightweight objects in the paper boat. Be mindful of the weight and size of the objects to prevent the boat from tipping over or sinking. Avoid putting too many heavy or large items in the paper boat as it may compromise its buoyancy.
How long will the paper boat float in water?
The paper boat will float in water for at least 10 minutes before becoming waterlogged. To make it last longer, you can reinforce the bottom of the boat with a layer of tape to make it more waterproof. Remember that the longevity of the paper boat in water will depend on various factors such as the type and quality of paper used and how well it is folded.
Can I customize the paper boat?
Yes, you can customize the paper boat to make it more visually appealing. You can use brightly colored paper, markers, pencil crayons, and stickers to decorate the boat. Let your creativity shine and make your paper boat unique.
Is making a paper boat a suitable activity for kids?
Yes, making a paper boat is a fun and easy craft project that is suitable for kids. It can be a great summer activity or a low-mess craft idea. It offers an introduction to origami and allows children to improve their fine motor skills and creativity. Adult supervision may be required for younger children, especially when using sharp tools or handling water.
About the author

Leave a Reply Cancel reply
Your email address will not be published. Required fields are marked *
Save my name, email, and website in this browser for the next time I comment.
Latest posts

The history of sailing – from ancient times to modern adventures
History of Sailing Sailing is a time-honored tradition that has evolved over millennia, from its humble beginnings as a means of transportation to a beloved modern-day recreational activity. The history of sailing is a fascinating journey that spans cultures and centuries, rich in innovation and adventure. In this article, we’ll explore the remarkable evolution of…

Sailing Solo: Adventures and Challenges of Single-Handed Sailing
Solo Sailing Sailing has always been a pursuit of freedom, adventure, and self-discovery. While sailing with a crew is a fantastic experience, there’s a unique allure to sailing solo – just you, the wind, and the open sea. Single-handed sailing, as it’s often called, is a journey of self-reliance, resilience, and the ultimate test of…

Sustainable Sailing: Eco-Friendly Practices on the boat
Eco Friendly Sailing Sailing is an exhilarating and timeless way to explore the beauty of the open water, but it’s important to remember that our oceans and environment need our protection. Sustainable sailing, which involves eco-friendly practices and mindful decision-making, allows sailors to enjoy their adventures while minimizing their impact on the environment. In this…
- PRO Courses Guides New Tech Help Pro Expert Videos About wikiHow Pro Upgrade Sign In
- EDIT Edit this Article
- EXPLORE Tech Help Pro About Us Random Article Quizzes Request a New Article Community Dashboard This Or That Game Popular Categories Arts and Entertainment Artwork Books Movies Computers and Electronics Computers Phone Skills Technology Hacks Health Men's Health Mental Health Women's Health Relationships Dating Love Relationship Issues Hobbies and Crafts Crafts Drawing Games Education & Communication Communication Skills Personal Development Studying Personal Care and Style Fashion Hair Care Personal Hygiene Youth Personal Care School Stuff Dating All Categories Arts and Entertainment Finance and Business Home and Garden Relationship Quizzes Cars & Other Vehicles Food and Entertaining Personal Care and Style Sports and Fitness Computers and Electronics Health Pets and Animals Travel Education & Communication Hobbies and Crafts Philosophy and Religion Work World Family Life Holidays and Traditions Relationships Youth
- Browse Articles
- Learn Something New
- Quizzes Hot
- This Or That Game
- Train Your Brain
- Explore More
- Support wikiHow
- About wikiHow
- Log in / Sign up
- Hobbies and Crafts
- Paper Craft
How to Fold an Origami Sail Boat
Last Updated: April 25, 2024
This article was co-authored by Robert Homayoon . Robert Homayoon is an Origami Expert known for his engaging YouTube videos and accessible instructions. He has been teaching origami on YouTube since 2009. His channel has a following of over 676,000 subscribers, and his videos have garnered over 211 million views. Robert uses his channel to highlight his passion for teaching people origami, crafts, and how to solve puzzles. He graduated from SUNY Albany in 2007 and earned his D.M.D degree from Temple University Dental School in 2013. This article has been viewed 63,228 times.
Origami is fun, and can be a boredom buster. Learn how to make a sailboat with origami.
Expert Q&A

- You can also use wax paper so it can float on water, or other liquids. Normal paper will get soggy. Thanks Helpful 0 Not Helpful 0
- Use colored paper to make it look creative. Thanks Helpful 0 Not Helpful 0
- Don't get discouraged if you mess up the first time. Nobody is perfect! Thanks Helpful 0 Not Helpful 0

- Don't get paper cuts! Thanks Helpful 11 Not Helpful 3
- Be careful while using scissors. Thanks Helpful 10 Not Helpful 4
- Handle everything with care-or have an elder help you. Thanks Helpful 9 Not Helpful 5
Things You'll Need
- 8 1/2 by 11 sheet copy paper
- Wax paper (optional)
- Scissors (for wax paper if needed)
You Might Also Like

Expert Interview

Thanks for reading our article! If you’d like to learn more about origami, check out our in-depth interview with Robert Homayoon .
About This Article

- Send fan mail to authors
Did this article help you?

Featured Articles

Trending Articles

Watch Articles

- Terms of Use
- Privacy Policy
- Do Not Sell or Share My Info
- Not Selling Info
Get all the best how-tos!
Sign up for wikiHow's weekly email newsletter
Origami Way
Make a paper boat origami boat instructions and diagram.

If you've always wanted to play with boats in the tub, but your parents wouldn't get one for you, don't worry. I will show you how to make an origami boat out of paper, and yes it floats...for a little bit, but it's still fun nonetheless. However, I heard that if you color the bottom of the boat with crayon, then it will float longer. Just be careful not to splash too much water on it!
Before we get into how to make an origami boat, let us first discuss where this paper folding originated and where it first appeared. If you're interested in the history of paper folding, continue reading to learn the fundamentals of origami.
Research studies say that origami was first invented about a thousand years ago by the Japanese, but its roots may well be in China. The term refers to the craft of paper folding. The word "origami" is an inclusive term for the folding process of paper. "Ori" means "folding," and "gami" means "paper." The objective of origami is to transform a flat square sheet of paper into a fully completed piece of art through folding techniques and cutting methods.
How to Make a Paper Boat Float Longer?
If you're ready to make your paper boat origami, keep these tips in mind to ensure it will last a long time on the water. The most common is that if you color the bottom of the origami boat with crayons, it will float longer but not long enough to reach the finish line. Some people also say that to make the boat last longer when it is on water, try using foil paper or grease-proof paper.
How to Make a Paper Boat?
The origami boat is actually very simple to make. All you need is a rectangular piece of paper, so any 8.5x11 copy or lined paper will do. Then follow the instructions and pictures carefully and you'll be able to make your own origami boat that floats.
With the help of this simple step-by-step lesson, you can quickly and easily create the most well-known origami paper boat.

- © Origamiway.com
How to Make a Paper Boat – Origami for Kids
We love doing simple origami and this time we’re going to learn how to make a paper boat – a summer favorite!
We’ve done quite a few awesome origami tutorials for kids and each of them is a must make!

I loved to make these as a kid (the exact same ones) and I loved to play with them even more – we would sail them in the bathtub, puddles and lakes and when possible even have boat races with other neighbourhood kids.

This time though we took it a step further too see who can make the smallest origami boat – each time working with a smaller piece of paper (cutting the size of the paper to half each time) and I was genuinely surprised with the size of paper we have come down to – and too be honest we could probably do one even smaller if I’d have some tweezers at hand.
How to Make a Paper Boat
All you need is a sheet of paper letter sized or A4. Regular print paper is perfect for this project. Use as many colors as possible.

Start off with a sheet of paper and fold it in half downwards.
Fold in half again as shown on the second image (you don’t need to make the crease from top to bottom – you just need to mark the center).
Bring corners to the center so that you get a triangle shape with a rectangle under it.
Fold the rectangle part under the triangle upwards (as shown with the purple spots) – flip your origami and do the same on the other side.

Grab the center of the triangle shape as indicated on the first image above with the red spot and pull both sides (holding the red spot) out. Flatten.
You’ll get the shape as shown on the second image above (ignore that red spot in the left bottom corner – I have no idea how that one came there haha).
Fold the front layer up (as shown with the green spot) flip the origami boat to be and do the same with the back layer. You’ll get a triangle shape.

Slowly pull the top parts outwards and you have your paper boat!

More cool origami for kids you can try:

We’ve had a lot of fun creating this shark fortune teller – it’s fun to make and even more fun to play with. You should also give these origami frogs a try!

Want instant access to all of our printable crafts, activities, and resources?

With thousands of crafts, activities, worksheets, coloring pages, and drawing tutorials to print, you will always have just the resource you need at your disposal. Perfect for parents and teachers alike!
Sign Up Now and Start Printing!
Related posts.

Let's take a walk into the forest and learn about the animals there by making…

And here's something for the origami lovers! I've rounded up some of the most fun…

Time for another origami! This time we're making an easy origami hedgehog perfect for kids…

If your kids are into origami, or are just getting started this super simple origami…

Hedgehog crafts are usually "reserved" for fall but I do love this animal so much…

Why not use fun origami to encourage reading? This cute chick corner bookmark is an…
Origami Guide
Origami Instructions – Learn How To Make Origami
How To Make An Origami Sail Boat
Page 1 of 4.

Origami Sail Boat
Level: Easy
Copyright: Traditional ?
Time Needed: Approx. 5 Minutes
Tools: None
Supplies: 1 Sheet of Square Paper
Learn how to make a little origami sail boat made from 1 sheet of square paper. This easy origami boat has 2 sails & can stand up, can be used as a place card at parties!
Origami Sail Boat Instructions
Scroll down to follow the photo tutorial for the Origami Sail Boat .
Made this origami? Leave a comment & submit your photo on the last page here .

1. This is the front of the paper, our origami boat will be this colour on the lower section.

2. This is the back of the origami paper, the sails will be this colour.

3. Fold the bottom point up to the top point.

4. Unfold the previous step.

5. Fold the right point over to the left point.

6. Unfold the previous step.

7. Fold the right point over to the central point.

8. Fold the left point over to the central point.
Origami topics: Origami | Origami Instructions | How To Origami | How To Do Origami | Origami Folding | Origami Craft | Origami Tutorial | Origami Step By Step | Origami Lessons | How To Make Origami | Paper Origami | Simple Origami | Easy Origami | Origami For Kids | Origami For Children
What Origami Boats To Fold Next?

Leave A Comment
Did you fold this Origami Sail Boat? Let us know what you thought. You can also upload a photo of your result!

Origami Categories:

Sign Up For Our Free Origami Newsletter
Join our free mailing list to get an email when brand new origami tutorials have just been added. You can also expect some freebies such as printable origami paper and news updates too!
You will never get any spam from us.
Success! Check your inbox or spam folder now to confirm your subscription.
SailingEurope Blog - Sailing, Yacht Charter and Beyond

How to Make a Paper Boat
We get tons of queries about how to make a paper boat. So this blog post is dedicated to teaching you how to make a boat out of paper. Following our simple step-by-step guide, you will have a floating paper boat in a flash.
In folding a paper boat you will make a step in Origami technique ; a creative and innovative world of paper formatting. Origami is the Japanese name for the art of paper folding, and it has now become a beloved art form for people around the world. Origami has a history; the first use of the word “Origami” in Japan was not for our familiar recreational paper folding, but certificates. In Japan, there is an expression, Origami Tsuki , meaning “certified” or “guaranteed”.
The phrase stems from an ancient custom of folding certain special documents – such as diplomas for Tea Ceremony masters , or masters of swordsmanship – in such a way as to prevent unauthorized copies from being made. However, nowadays origami represents a creative way of spending time and a hobby for both adults and children.

How to Make a Paper Boat Step by Step
- Start from a rectangle. Fold in half.

- Fold in half again and unfold.

- Fold to the center.

- Fold the overlapping strip upwards.

- Fold corners backwards. Turn over.

- Fold strip upwards.

- Fold triangle upwards. Repeat behind.

- Open (like in the steps 7 and 8).

- Take upper corners and stretch out.

- Your boat is finished.

Now that we’ve taught how to make a paper boat, you’re ready to charter a yacht and enjoy some true sailing on a real boat. We hope you found these instructions useful. We would love to see your own made paper boats in the comments.
1 thought on “How to Make a Paper Boat”

you dont work
Leave a Comment Cancel Reply
Your email address will not be published. Required fields are marked *
Save my name, email, and website in this browser for the next time I comment.
This site uses Akismet to reduce spam. Learn how your comment data is processed .

Origami Boat - How to Make a Paper Boat That Actually Floats

Introduction: Origami Boat - How to Make a Paper Boat That Actually Floats

Learn how to make an origami boat by following our step-by-step instructions. Your kids will enjoy making and sailing their paper boats and watching them float in the sink or in the great outdoors!
An A4 piece of paper

Start off with a sheet of paper and fold it in half downwards.
Fold in half again as shown on the second image (you don’t need to make the crease from top to bottom – you just need to mark the center).
Fold the top right corner into the centre.
Fold the top left corner into the centre.

Fold the top layer of the bottom rectangle up
Flip your paper over and fold the bottom rectangle up.
Fold the 4 Side Corners Inward
Pick up the paper, holding the flat edge and with the pointed end facing down. Push the left and right side together to open the piece of paper into a diamond shape. Continue to push the opposite sides together until they are flat against each other and a diamond shape is made.

Fold the bottom point up to the top point on one side.
Flip the paper over. Fold the bottom point up to the top point.
Pick up the piece of paper by the flat edge, with the pointed end facing down. Push the left and right ends of the paper together as before, to make a diamond shape. Press flat.
Pinch the top two points of the diamond and gently pull them apart. Use your thumb to press along the bottom edge.

Push the opposite end of your boat to give it shape and use your fingers to form a pyramid shape in the middle.
Your origami boat is now ready to sail! Bring it to the nearest pond. A puddle left over from the next big rain shower will also work fine.

Recommendations

Pets and Animals Contest

Made with AI - Autodesk Design & Make - Student Contest

Paper and Cardboard Contest

Making an Easy Origami Boat
:max_bytes(150000):strip_icc():format(webp)/chrissy-pk01-56a6d65e3df78cf772907c07.png "paper sailboat instructions")
The Spruce Crafts / Chrissy Pk
- Total Time: 10 mins
Origami comes from the Japanese. The word means the art of folding paper. " Ori " means "folding," and kami means "paper." In modern usage, the word "origami" is used as an inclusive term for all folding practices. The goal is to transform a flat square sheet of paper into a finished sculpture through folding and sculpting techniques.
Learn how to make the most well-known origami boat with this quick and easy step-by-step tutorial. This origami boat can also float in water .
Watch Now: How to Make an Origami Boat
This origami boat is a great model to teach kids. It is similar to the origami hat that you make with newspaper. Also, origami can be a great math-related activity for kids as your child creates using geometry.
What You'll Need
- 1 Rectangular sheet of paper
Instructions
Make the first folds.
Start with your rectangular paper, orient it vertically, with the long edges going up and down. Fold the bottom half up to the top.Fold the bottom right corner over to the left corner and make a small pinch, just enough to crease the paper. Open it back up.
Create a Triangle Shape
Using the crease as a guide, fold the left and right bottom corners up and to the middle. Flatten the folded pieces down. Rotate the paper. Fold one layer from the bottom up along the bottom of the front flaps.
A Boat Begins to Take Shape
Flip the paper over to the other side. Fold the bottom edge up in the same way. Unfold, and then fold the bottom right corner in along the crease you made. Repeat on the bottom left flap.
Form the Bottom of the Boat
Re-fold the bottom edge back up. Open the bottom of the model. Look at the corners. Flatten and then insert the overlapping flap on the left underneath the right section.
Continue Folding
Fold one layer up to the top. Repeat on the back. Open the bottom of the model.
Finalize the Folds
Pull apart the left and right flaps. Flatten it out, in the shape of a boat. Open it slightly. The triangle in the middle resembles a sail.
More from The Spruce Crafts
- 10 Best Origami Projects for Beginners
- How to Make Origami Lucky Stars
- How to Make an Origami Crane
- How to Make a Cute Origami Sail Boat!
- How to Make an Easy Origami Dollar Shirt
- How to Make an Origami Elephant
- How to Make an Origami Witch Hat
- How to Make an Origami Mouse
- How to Make an Origami Ninja Star
- How to Make a 3-D Origami Apple
- Japanese Origami Doll Tutorial
- How To Make an Origami Flower
- Origami Star Box Tutorial
- Decorative Origami Lotus Flower
- How to Make an Easy Origami Envelope
- How to Make an Origami Purse

How to make a paper boat (step-by-step instructions)

I think everyone has made a paper boat at least once in their lifetime. Making paper boat is easy as we don’t need many materials to make it.
This is an origami craft, so all you need is a sheet of paper.
And this is a craft that every parent passes onto their kids, right?
Here is the step-by-step way to make a boat out of paper.
Materials required
A4 sheet / Letter size paper/Any rectangular paper
Step-by-step tutorial to make an easy paper boat for kids

a. Take an A4 sheet paper. Hold it horizontally as shown in the picture.
b. Fold it from left to right.
c. Make a crease.
d. Now, fold the paper from bottom to top.

e. Fold it well and make a crease.

f. Unfold the fold we just made in step d.
g&h. Now, fold the right corner towards the centre and make a crease.
i. Similarly, fold the left corner towards the centre.

j. Flatten the folded pieces down and now you have the figure as shown in pic j.
k&l. Now, from the bottom, fold one layer upwards along the bottom of the folds we made in j.
m. Make a crease and flatten it well.

n. Turn the figure over.
o. Now, like we did in the previous step, fold the bottom layer upwards.
p. Flatten the fold and make a crease again.

q&r. Open the bottom of the figure.
s. After opening as shown in pic r, flatten the top corner to the bottom as you can see in pic s.
You can see that the edges of the paper boat are overlapping on each other.
t. Insert one edge into the other (see pic t).

u. You get the figure in u.
v. Now, fold the layer from bottom to the top as shown in pic v.
w. Flatten the fold.
x. Flip the paper over and fold the other layer too. You will get the triangle shape in x.
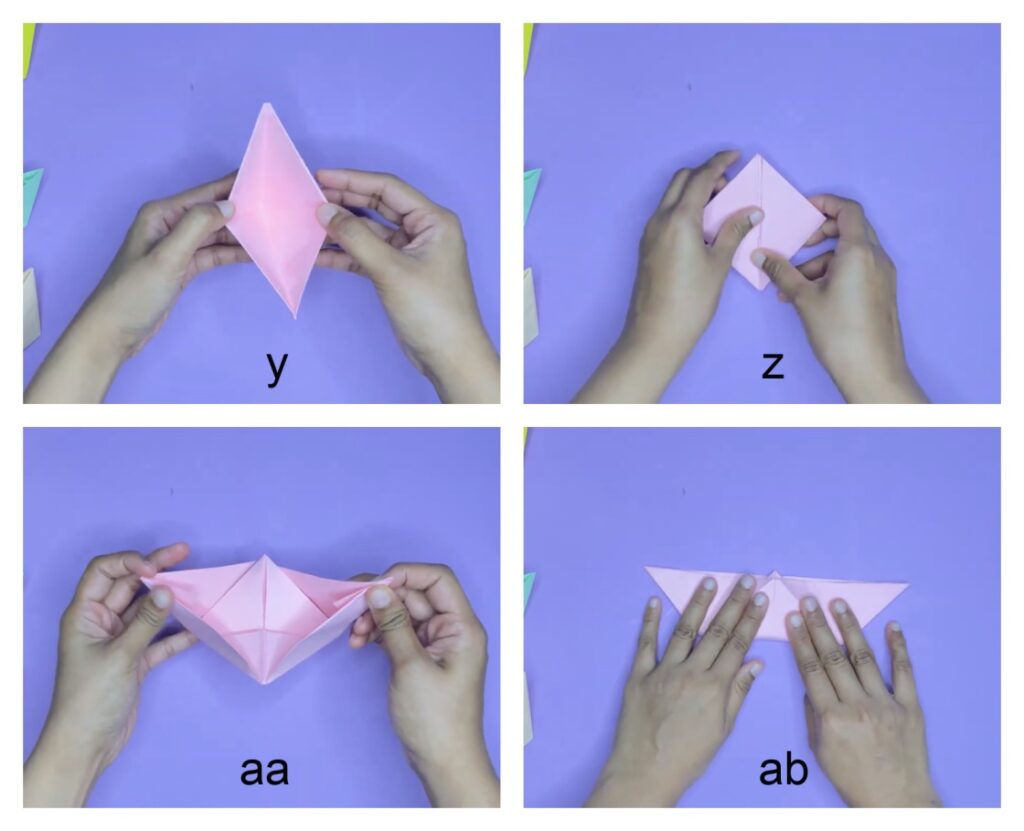
y. Open the bottom of the figure again by pulling the flaps apart.
z. Flatten it out and you will get a diamond shape now.
aa. Open the figure by pulling the sides apart from the top to get the shape of the boat.
ab. Flatten it out an open again and your paper boat is ready.

In case you have any doubt regarding any step, feel free to watch the step-by-step video tutorial below. Please make sure you also subscribe to our Youtube channel to get more craft ideas for kids every week.
Never miss new craft ideas!
Subscribe to get our latest content by email.
Video tutorial to make a paper boat
More paper crafts for kids
- How to make a paper airplane step-by-step
- How to make an easy and beautiful paper flower
- How to make an Origami jumping frog step-by-step
Similar Posts

How to make an Origami paper vase at home (step-by-step photos)
Origami paper vase is a useful craft to make. You can quickly make this paper vase following the step-by-step instructions and make some paper flowers to put in the vase and keep it as a decorative item. If you have patterned paper, more points because patterned paper makes the vase look more beautiful. But if…

How to make paper leaves step-by-step
Learning to fold paper leaves is one of the basic things you can learn in paper crafts. It will be handy to learn making leaves because you can do crafts with leaves, make paper leaf garlands, use it in making paper flowers, etc. Here, we have done a step-by-step tutorial of making two types of…

How to make a paper corner bookmark (5 cute kawaii bookmark tutorials)
When you are creative-brained and love making things from scratch, seeing your creations all around the house makes you feel happy and accomplished. Same with your kids – it helps to improve their self-esteem and belief in their abilities. If you or your family is into reading, the following corner bookmark ideas will be useful….

Easy Paper Puzzle Game for kids
If you are wondering how to make a homemade picture puzzle game for kids, you are in the right place. Here, we show you how to make a puzzle game using paper that can keep your kids busy for a few hours. It’s a simple game that can be made using paper and a few…

Easy Ramadan Lantern Craft for kids
The Holy month of Ramadan is here. During the month of Ramadan, Muslims all over the world observe fasting and engage in other spiritual activities. This is a great time to teach your kids more about the importance of this month. So let’s do a craft that can double up as a Ramadan decor while…

Paper Cup House Craft
Paper cups are so flexible. We can do so many crafts using paper cups that the list is endless. All you need are some paper cups, a few craft materials and some creativity. But if you don’t want to be creative, let US do that part and you can enjoy your idea. So today, we…
Leave a Reply Cancel reply
Your email address will not be published. Required fields are marked *
Save my name, email, and website in this browser for the next time I comment.
- Experiments
How To Make An Easy Origami Paper Boat
- Paper Art Videos
When I as a kid, I used to make paper boats during the rains and float them in a large puddle that collected outside my grandmother’s place. The basic origami boat is another model that many children come across and we forget as adults. Let’s float back down memory lane.
The basic paper boat requires a rectangular sheet of paper, so if you’re using square origami paper, cut off a strip to make it rectangular.
Like most basic models, this is very forgiving and you can get away with using almost any sort of paper. If you plan on actually floating it in water, however, paper that’s too thin will not last very long, so keep that in mind.
Instructions

To begin, keep the rectangle in portrait format in front of you, i.e. laid tall rather than wide. Fold the paper down in half, making it half as tall.

Next you should fold it in half again along the width of the sheet. That’s 4 layers of paper, so be careful to make a neat crease.

Open up the last fold and now fold down one half of the top folded edge down towards the central crease. It will form a triangle like this.

Mirror the same fold on the other half and you’ll create this peak or point at the top of your paper.

The model now has two loose layers of paper towards the bottom. Lift the top layer and fold it upwards. Turn the model over and do the same with the bottom flap of the paper again.

The model is now almost a perfect triangle except for these extra corners at the bottom. Fold the extra bits over the sides of the thick triangle, and repeat from the other side. Now you have a perfect triangle with a hollow bit at the bottom.

Open up the hollow gap and bring the two side corners of the triangle flat together like this. Fold the rest of it flat to form this small square.

The square still has a hollow area inside and one end has two free corners. Fold one of them to the opposite corner like this to form a smaller triangular shape.

Turn the model over and repeat with the remaining free corner.

You now have a smaller triangle with a hollow area inside. Like before, open this up and fold it flat into a smaller square.

The top end now has two loose triangular corners like you can see here. Pull those apart, and fold the base of the boat flat.

Open up the boat model and it should look like this with a triangular shape sticking out from the middle.
That triangular shape is hollow and can be opened up from the bottom. Pull it apart a little to make the boat more stable, It will also help it float on water without tipping over.
Your boat is done. Try it out!
P.S. Please subscribe to Papernautic on YouTube to keep track of the latest videos and tutorials.
IMAGES
VIDEO
COMMENTS
Bring the bottom of the paper up to fold it against both sides. Grab the flap at the bottom of the paper and fold it up against the bottom of the 2 folded triangles. Turn the paper over and do the same thing to the flap on that side. This will make a paper hat. [4] The 2 folds should line up with each other.
Learn how to make a paper boat with easy steps and video tutorial. Have fun with this simple origami project for kids and adults.
Pick up the folded piece of paper. At the top point, pull apart the 2 sides of folded paper. As you pull it apart, it should open up into a boat shape, as shown in the photo below. Adjust the paper if needed to make sure it's boat-shaped, then pinch along the bottom edges to make a fold on each side.
Step 1: Folding the Hull. To make the hull of a paper sailboat, follow these steps: - Step 1: Start with a square piece of paper. - Step 2: Place the paper in front of you in a diamond shape, with one corner pointing towards you. - Step 3: Fold the bottom corner up to meet the top corner, creating a triangle.
Paper Boat Instructions. By gbusta18 in Craft Paper. 13,687. 16. 3. Featured. Save PDF Favorite. Introduction: Paper Boat Instructions. Here is a fun, quick and easy paper sail boat that can be made in no longer than 5 minutes. Step 1: Materials. Get one piece of a simple sheet of paper. It can be out of a notebook or even just regular printer ...
INSTRUCTIONS PAGE 1 www.marthastewart.com PAPER SAILBOAT 1. Fold an 8-1/2-by-11-inch sheet of plain white paper in half, and crease.. 2. Unfold, then fold top and bottom edges toward the center. ... PAPER SAILBOAT 8. Now fold the top flap into the center of the boat. The hull of the little boat is now complete. 9. A bamboo skewer serves ...
Folding the Paper Square to Make a Triangle. Have your paper boat-side up. If you want your sails to be white, have the color-side facing up. Now fold the paper diagonally. Bring the bottom corner of the paper up to the top and unfold. Next, fold the right corner over to the left and unfold.
Pro-tip: When folding the paper in half, use your fingertips to gently guide the paper along the crease line for a smooth and precise fold. Step 5: Creating the Sail of the Origami Sailboat. 1. Fold the top edge of the paper diagonally to the bottom edge, firmly creasing the fold. 2.
Let's Make an Origami Sailboat! [INSTRUCTIONS] In this folding tutorial, I use a multi-color 6 x 6 sheet of origami paper that is blue on one side and white on the other. To make the boat blue and the sails white, I started on the colored side. If you need a square piece of paper, you can cut a regular printer sheet into a square. 1.
Instructions. Step 1: Start with a rectangular sheet of craft paper. If the paper has a colored side, make sure it is facing down. Step 2: Fold the paper in half horizontally to create a crease in the center of the paper. Step 3: Fold the paper in half vertically to create another crease in the center.
To fold the base of the sailboat, follow these steps: Step 1: Start with a square piece of paper. Step 2: Place the paper in front of you with one corner pointing towards you. Step 3: Fold the paper in half diagonally, bringing one corner to the opposite corner, and crease firmly.
Obtain a piece of 8 1/2 x 11 inch computer paper. 2. Fold it in half. 3. Fold down the corners to make a triangle. 4. Fold the bottom flaps over the edge of the triangle on both sides to form an origami hat. 5. Flatten by opening the figure and folding the right and left corners together.
With the help of this simple step-by-step lesson, you can quickly and easily create the most well-known origami paper boat. Step 1: Start with an 8.5x11 sheet of rectangular paper. Step 2: Fold the paper in half left to right, then unfold. Step 3: Fold in half again, this time folding top to bottom. Step 4: Fold the upper left and right corners ...
Difficulty: ★ ☆ ☆ ☆ ☆ (Simple)In this video, you will learn how to make a paper boat. This is an easy traditional design that is perfect for beginners!This v...
Start off with a sheet of paper and fold it in half downwards. Fold in half again as shown on the second image (you don't need to make the crease from top to bottom - you just need to mark the center). Bring corners to the center so that you get a triangle shape with a rectangle under it. Fold the rectangle part under the triangle upwards ...
1. This is the front of the paper, our origami boat will be this colour on the lower section. 2. This is the back of the origami paper, the sails will be this colour. 2. This is the back of the origami paper, the sails will be this colour. 3. Fold the bottom point up to the top point. 3.
2D Paper Sailboat Making Out of Color Paper for makers. Its a DIY origami sailing boat making video tutorial where I've shown how to make a paper boat that h...
In folding a paper boat you will make a step in Origami technique; a creative and innovative world of paper formatting. Origami is the Japanese name for the art of paper folding, and it has now become a beloved art form for people around the world. ... you're ready to charter a yacht and enjoy some true sailing on a real boat. We hope you ...
Step 2: Fold the top layer of the bottom rectangle up. Flip your paper over and fold the bottom rectangle up. Fold the 4 Side Corners Inward. Pick up the paper, holding the flat edge and with the pointed end facing down. Push the left and right side together to open the piece of paper into a diamond shape. Continue to push the opposite sides ...
Finalize the Folds. Pull apart the left and right flaps. Flatten it out, in the shape of a boat. Open it slightly. The triangle in the middle resembles a sail. Make the most well-known origami boat at home. This paper boat can float in water and is a perfect project for kids.
x. Flip the paper over and fold the other layer too. You will get the triangle shape in x. y. Open the bottom of the figure again by pulling the flaps apart. z. Flatten it out and you will get a diamond shape now. aa. Open the figure by pulling the sides apart from the top to get the shape of the boat.
Paper. The basic paper boat requires a rectangular sheet of paper, so if you're using square origami paper, cut off a strip to make it rectangular. ... Instructions Step 1. To begin, keep the rectangle in portrait format in front of you, i.e. laid tall rather than wide. Fold the paper down in half, making it half as tall.
To create a floating paper boat, first, fold a square piece of paper diagonally in half to form a triangle. Then, fold the bottom corners of the triangle towards the center, forming a diamond shape. Open up the bottom of the diamond and shape it into a square. Gently pull the top flaps apart to form the boat shape.