J Class Yachts For Sale (Sail)
- Upcoming Events
- AMYA J CLASS History
- Stuff for Sale
- Construction Videos

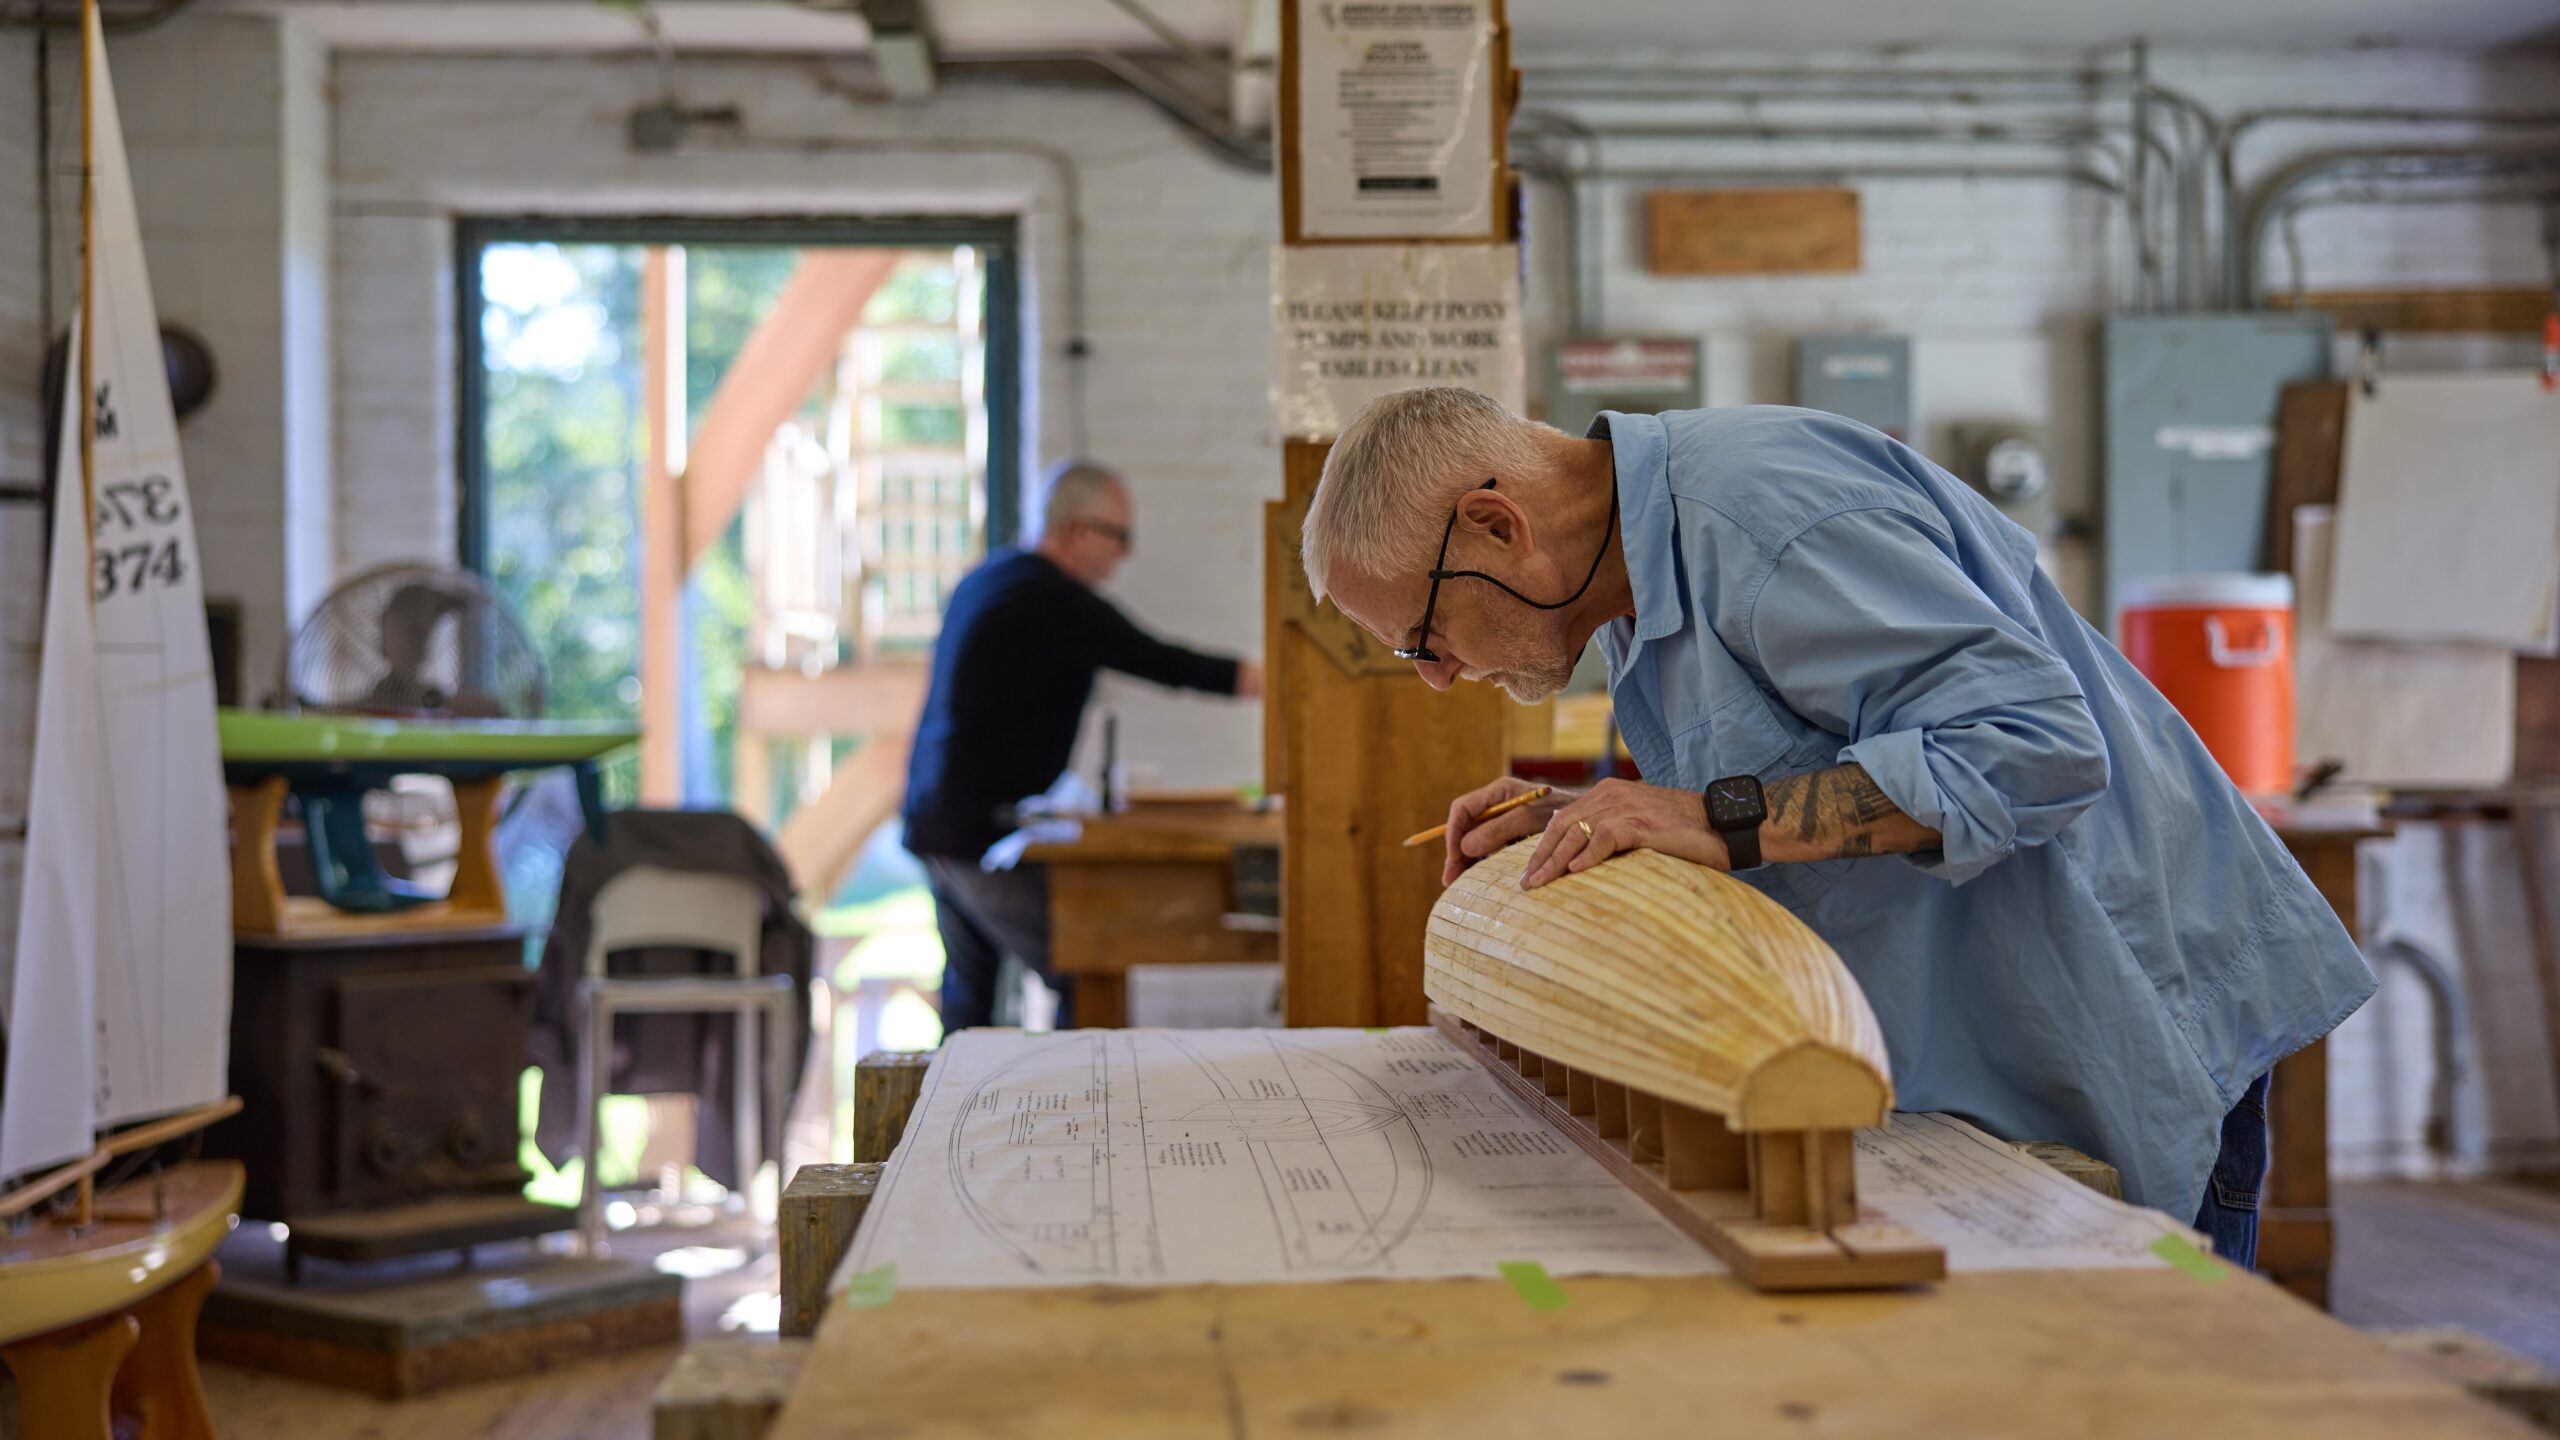
Building a J Class Model
By john hanks iii.
Now you may be wondering what is involved in building a model of a J Class yacht. I will give you an idea of what is involved in getting your J model in the water.
To begin with, let me say that you will need to do some scratch building to get your J model completed, regardless which yacht you choose to model. The scratch building will involve the deck, the rig, and probably the hardware associated with the mast, boom and rigging. With that said, you will need to decide which yacht you would like to model. In the full size J Yachts there was a definite advantage associated with which hull was in the water, but with the models, it appears that any of the J designs will make a good fast sailing model, if it is built correctly. So your decision should be driven by your personal preference for a particular boat. Once you decide which yacht you would like to model you will need to either buy a fiberglass hull or get the drawings for your chosen hull. There are hull line drawings available in the proper scale for all of the J's as well as some deck plans. You can get line drawings from several of the maritime museums, such as the Mystic Seaport Museum.
The amount of time that you will spend on building your model will vary with your building ability, whether you start with a fiberglass hull and how much detail you want to put on your model. Should you decide to scratch build the entire model with a lot of detail, you should plan on spending about 500 to 550 hours building your model. If you begin with a fiberglass hull, subtract about 150 hours, if you do not want to detail your model, deduct about another 100 hours. The cost of materials will be about $800 to $900 if you decide to completely scratch build your model.
I will begin the actual building process with a plank-on-frame hull. You can skip these steps if you start with a fiberglass hull. The process for completing the remainder of the model will be the same from that point on.
To begin the building process, you will need to get your drawings ready by extending each frame to a “waterline” that is above the deck line on the drawing. This new “waterline” will be the part of the frame that rests on the building board. The new “waterline” gives you a flat plane so that all of the frames are referenced to the building board surface, while allowing the arc of the sheer at the deck line to maintain its shape. Your modified drawing should show the hull shape, the shape of the deck beams, and the building board surface.
You will begin the building process by building a building board. The easiest way that I have found to do this is to buy an 8 foot long 4”x6” and mount it at a convenient building height on 2”x4” legs. You will need to make sure that the 4”x6” plank is straight and true and that it will stay that way through out the building process, as this will determine the trueness of your model.
Mark a centerline on your building board and then mark all of the station locations on the centerline. You will then need to draw a line perpendicular to the centerline at each of the station locations. You will next attach small blocks (approximately 1-1/2 x 1-1/2 x ¾ inch) to the building board on the centerline and aligned with the perpendicular station lines. The blocks need to be placed so that the frames that will be glued to these blocks will be centered on the perpendiculars.
The next step will be to cut out the frames that will form the hull. For this step you will need to keep in mind the difference between the line drawings for a metal hull versus a wooden hull. The drawings for a metal hull show the frames to the outside of the plating and for a wooden hull, they are to the outside of the framing, not the hull planking. This will make a difference in your model, as all of the Js were metal boats, and if you draw your frames to the lines, your model will be oversized by the thickness of your planking.
I use 1/8 inch Luan plywood for the frames. The plywood comes in a 4’x8’ sheet and I can get all 28 to 30 frames from one sheet of plywood. The frame patterns are cut from your drawing, and each frame pattern is traced on the wood. With careful placement you should have no trouble getting all of the frames traced onto the plywood. You will need to draw the cutouts for the keel, inwales and king plank in the frame tracings. The centers of the framed are also cut out so that you end up with a ring of wood that is about ¾ inch from the outside to the inside of the frame.
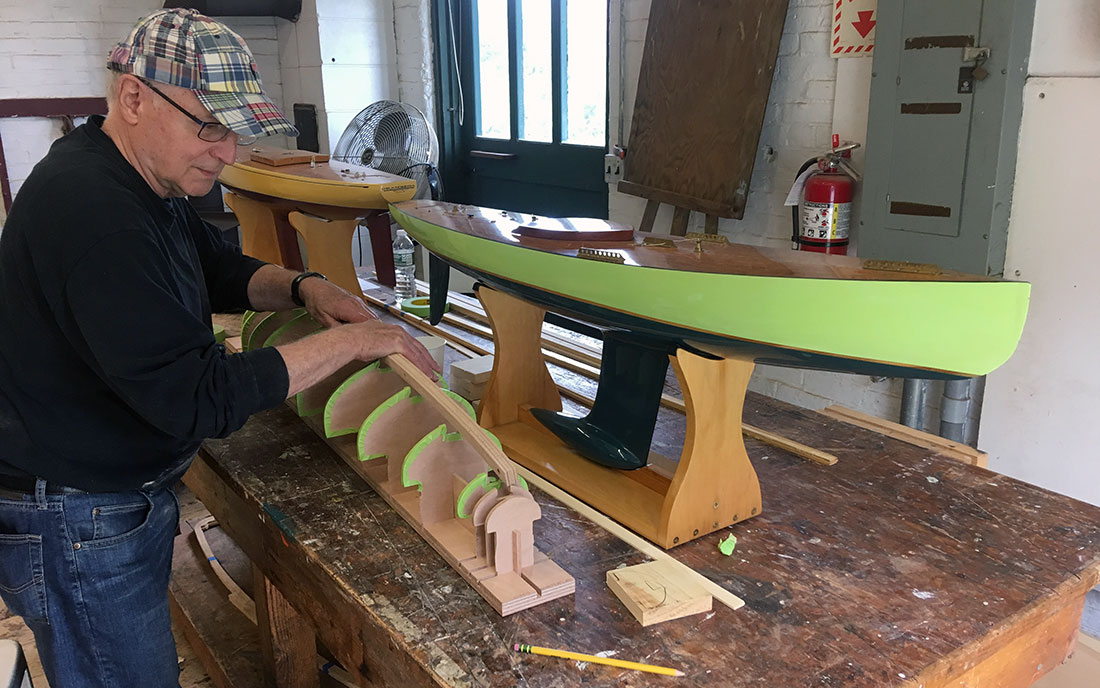
When I cut my frames I do not try to cut on the line that I have drawn; I am not that good with the saw. I leave a little wood, about a 1/16 inch next to the line and sand the frame to the final shape. I find that this makes it much easier to control the accuracy of the frame shape. Once all of the frames are cut and notched for the keel and inwales, they are glued to the blocks on the building board. At this point you should be able to sight down the frames and get a good idea of the shape of your hull.
With the frames glued in place, you are now ready to install the keel and the inwales. I like to use ¼ inch birch plywood for the keel and 1/4x1/4 inch square for the inwales. The inwales can be cut from the same material that you will use for the planking. The hull framing is very limber at this point but it becomes very ridged once the keel and inwales are in place.
The hull is now ready for planking. I have used pine, bass, aspen, spruce and alder for planking. All work well. The availability and price of the material is what determines which material I use. When I built my first J some 30 years ago, clear pine in 8 foot lengths was plentiful and inexpensive. Since then, it has become hard to find and very expensive. As a result I have used other woods that were available, hence the bass, aspen, spruce and alder. The planking material is cut into strips that are about 5/32 inch thick and 3/8 inch wide. This is a nice working size, as the planks are limber enough to form to the hull without the need for spiling (tapering), wetting, or steaming them. You will start the planking at the first frame and end at the last. The 2 to 3 inches of hull that remain at the ends will be filled with solid wood blocks shaped to the dimensions of the hull. Begin planking your hull at the sheer and work to the keel. Each side of the hull will require about 50 to 60 planks. Remember that you will need to alternate sides of the hull as you plank so that you keep the stresses equal on both sides of the hull, thus preventing distortion in the hull.
You will need to change direction of the planking when you get to the bilge area of the hull. The planking will take on an increased twist towards the stern that will prevent the planks from laying fair. The planks will tell you when you have reached this point, usually about 15 to 20 planks up on the hull. To overcome this you will need to lay a plank in a straight line along the hull so that it lays flat between the areas where the existing planking meets the keel. This will leave a lens shaped gap of about 4 or 5 inches between this plank and the existing planking at the middle of the hull. Fill this area by planking from the new plank that you laid down to the existing planking. Once you have completed that step, then continue to plank the rest of the hull. When you have finished your planking, you are ready to attach the bow and stern blocks, shape them, and sand the entire hull to get it ready for fiber glassing.
I like to build the rudder next and fit it to the hull. I build the rudder as I would build an airplane control surface, with a leading edge spar, three ribs, and a trailing edge. The framework is then covered with 1/32 inch plywood. The square tube that accepts the 5/32 inch brass rod rudder shaft is installed in the leading edge as well as the pivot pin at the bottom of the rudder. The hull is drilled and the rudder log is installed and the rudder is fitted in place. Once the rudder is fitted and works well, the hull is fiber glassed using a single layer of 6 ounce cloth and three to four coats of resin. Each coat of resin is sanded before the next coat is applied. When the sanding is complete you will have a smooth and fair hull that will look great when it is painted. The hull is now ready to be removed form the building board. At this time, you should also have a stand built and ready to accept the hull.
Once the hull is off of the building board, it is time to seal the inside with epoxy and install the mechanical workings in the hull as well as install any reinforcements that are needed, such as at the chain plates, mast step, and sheet exits. From this point on, the building process is the same for the fiberglass hulls once you have the deck beams in place. This is also the time to lay out the hatch openings. When laying out the hatch openings you want to keep them as small as possible and still be able to do any work inside the hull that is necessary. Nothing is more frustrating than to find out that you cannot reach some part of your equipment once the deck is in place, so be sure that you can work on and remove and replace all of the fittings, winches, ballast, etc., through the hatch(s) that you have framed in your deck.
Building the deck is the next big step in getting your J ready to sail. There are several different ways to build your deck, and your decision on how much scale detail you want on your model will drive part of that process. If you want a slick deck with no scale detail, then a simple plywood deck will do. The 1/8 inch plywood will be more than adequate for the job and can be finished so that you have a very good looking wooden deck on your model.
Another option is to build a plank deck that represents the deck on the full size yacht. If this is your preference, then you begin by cutting the deck planking to the same dimensions as the hull planking. I cut my planks to a length of 15 inches so that I have scale 20 foot planks. To simulate the deck caulking, I use black construction paper glued between the planks. Once you have the planking cut, you will need to lay the king plank down the center of the deck and the water way planks down each side of the hull. All of the Js had the planking run parallel to the edge of the hull, so you will need to begin laying your deck from the edge of the hull, and work to the center. The paper between the planks helps the glue, thin CA, flow and form a good bond at the seam. From this point on you just continue your planking until the deck is completely covered. As you build your deck you will need to cut your planking at the hatches so you will have access to the inside of the hull when you have finished your planking.
When the deck planking is complete, you will sand the whole deck and get it ready for finishing. At this point, you should have a great looking model.
Again your decision on the amount of detail that you want on your model will determine your next step. If you opt for a scale appearance, by this time you will need to make the cabins, deckhouses, winches, cleats, and anything else that goes on the deck.
The hull is now ready for finishing. I use non-water-based, clear gloss, polyurethane on the deck, cabins, and spars and automotive acrylic enamel for the color on the hull. These make very nice durable finishes which should last many years on your model. I chose to use polyurethane because it does not yellow like varnish does as it ages. This is a personal choice driven by how you would like your deck to look as it ages.
At this point you will have to ballast your model. I have found that the easiest time to do this is after the model is painted and has the scale waterline in place. Place your model in a swimming pool or other suitable tank, and place the lead in the hull until the hull sits on the waterline that is painted on the hull. You will need about 60+ pounds of lead in a manageable form, about 5 pound pigs, for this exercise. Once the lead has been placed in the hull and the proper trim established, you will need to note where the lead is in the hull and the amount at each location. You can then remove the lead from the hull and using your notes, make molds for the ballast so that it fits into the hull cavities.
The next step is building your rig. The masts for the J models will be anywhere from 8 to 91/2 feet tall, depending on which boat you are building and how you lay out the sail plan. For support, the mast will need at least two sets of spreaders with accompanying side stays, and a diamond stay. I have used both aluminum and wood to make J masts. The last mast that I built was made from spruce and was 109 inches tall, with a tear drop cross section that measured about 1-1/4 x ¾ inches. The mast was tapered in its top 3 feet and had a bolt rope slot cut in it used to attach the main sail to the mast. The mast was made from two pieces of spruce that were glued together on the centerline with the grain in each piece set so that any warps canceled each other out. The result was a stiff spar that weighed about 1-1/2 pounds ready to step on the deck Extruded aluminum masts are also available in lengths up to 10 feet, from Ludwig Manufacturing. These masts have a bolt rope slot molded in them and are both light, about 1 pound for a 10 foot piece, and stiff.
The main boom and jib club were both made from spruce. The jib club was about 33 inches long and 1x1/2 inch in cross section and tapered to 1/2 x1/2 inch at both ends. The main boom was about 45 inches long and was about 1 inch from top to bottom with a scale cross section that resembled an old wine jug. These shapes were made for a model of Rainbow.
The gooseneck attachment was made for a piece of ¼ inch thick aluminum plate and secured in a slot cut into the base of the mast. The gooseneck and boom vang pivot on a single stainless-steel rod, (welding rod) about 3 inches long. The boom can be removed from the mast by simply pulling the pivot pin; then the gooseneck and vang are released. The sail can then be slid down out of the bolt-rope slot and rolled for storage.
This is a quick overview of the building process that is needed to build a model J boat.
Below is a list of most of the materials that were used.
2 – 1”x8”x8’ pine, aspen, bass or other suitable wood that can be cut into 5/32”x3/8” strips for hull and deck planking
1 – 4’x8’x18” plywood used for hull framing, 2 if you are using one for the deck
1 – 1’x4’x1/4” five ply birch plywood for the keel
1 – 1’x2’x1/32” plywood used for the rudder sheeting
1 – 1”x4”x8’ spruce for the mast and booms (optional if you are using an aluminum mast)
4 – ¼”x12”x.030” brass strap used for chain plates, mast, and boom fittings
1 – 1/8”x3’ stainless steel welding rod used for gooseneck pivot and spreader stubs in the mast
1 – 1’x6”x1/4” aluminum plate used for the gooseneck and vang fitting (use only if you are scratch building the fittings
1 – 5/32”x12” brass round tube used for spreader bases
1 – 3/16”x12” brass rod used for the rudder shaft
1 – 7/32”x12” brass round tube used for rudder log
1 – 3/16’x12’ square brass tube used for the rudder shaft socket in the rudder
60+ pounds of lead used for ballast
4 – 8oz bottles of thin CA used for planking the hull and deck as well as general construction
1 – 2oz bottle of medium CA for general construction
32oz of 30 minute or longer set epoxy used to seal the hull interior
1 – 10’x50” 6 oz fiberglass cloth used to cover the outside of the hull
2 – Quart cans of polyester resin with catalyst used with the fiberglass cloth
6 to 8 – 2” disposable brushes used to apply polyester resin
8 – Turnbuckles used for the side stays, boom vang and diamond stay
36 – 1-72x 1” stainless steel machine screws with nuts and washers used for various attachments
90’ – 60 pound test nylon coated stainless steel fishing leader with swages used for the standing rigging
8 – Single blocks used for back stay, winch arm, up haul and rudder control
1 – Spool of 40 to 60 pound test braided Dacron line for the sheets
12 – Bowsies for various rigging adjustments
Reference Information
Reference book: Enterprise to Endeavour by Ian Dear, ISBN 1-57409-091-7
This covers most of what you would need to build your J model. I did not mention the wood or brass that I used to make the scale detail, as most of it was obtained as scrap from a cabinet shop and salvage yard. Some additional things that you will need are a radio (at least 2 channels), a quarter scale servo for the rudder, and a sail winch, either arm or drum with about 3,000 inch ounces of pulling power. You would also need to order your sails from your favorite sail maker.
I hope that this answers most of your questions about what it takes to build a model of a J Class yacht. By the way the process described above applies to scratch building any R/C model sail boat, the only difference is the scale of the project. Good luck with your building project

AMYA J CLASS
1330 North Andrew Drive, Kuna, Idaho 83634, United States
Copyright © 2022 AMYA J CLASS - All Rights Reserved.
Important Registration Information - 2024 Registration
Build Your Own Plank Constructed Pond Yacht
A vintage marblehead-class pond yacht designed for radio control..
While growing up in western Pennsylvania, Bruce Richter spent countless hours in his dad’s workshop learning the ropes, building models, and making sawdust before getting sidetracked with garage bands, sports, and college. The urge to build returned around the time he and his wife Jan moved to New York City, although he quickly realized apartment living wasn’t exactly conducive to woodworking. The planets aligned when he discovered WoodenBoat School and Kerbs Boathouse in Central Park, home to over one hundred radio-control sailboats. Since then, Bruce took WoodenBoat School’s pond yacht construction course six times and served as former instructor Thom McLaughlin’s assistant before taking over as lead instructor a few years ago. Bruce has earned several national craftsmanship awards for the Vintage Marblehead RC sailboats he built at WBS. He is former Commodore of the 100-plus-year-old Central Park Model Yacht Club, has served as Class Coordinator of the US VMYG Vintage Marblehead fleet, is designer/art director of the vintage group’s publication The Model Yacht, and occasionally builds guitars. Following a career as a writer/creative director in major New York City advertising agencies and as president/executive creative director of his own marketing services firm, Bruce and wife Jan are beginning their next chapter in life as Blue Hill, Maine transplants.
This course is appropriate for students with some knowledge and experience. Basic knowledge and use of hand tools is required for most shop courses. Basic knowledge and ability to sail is required for most waterfront courses.
This course involves a low level of activity throughout the week including: occasional standing and working, seating is usually available, working on your own project at your own pace is common.
This is a six-day course ending Saturday
Other Sessions: September 1-7
Pond Yacht I: $385 (Includes CNC cut molds, strongback, keelson, planking, fin, and rudder.) Pond Yacht II: $169 (Includes materials to finish the boat other than sails, fittings and electronics.) Pond Yacht III: $35 (Shop supplies to help you continue your project.)
In this course each student will begin the construction of his/her own pond sailboat using the plank on frame process. This practice is similar to those used in building full-sized boats and allows for a flowing hull form that is beautiful on display and swift on the water. The course boat NORUMBEGA was designed by former instructor Thom McLaughlin. The class of this boat is known as Vintage Marblehead (VM) and is still actively sailed today under the guidance of the U.S. Vintage Model Yacht Group. The Marblehead class of small boat originated in 1932 using minimal design requirements of 50″ LOA and 800 square inches of sail. When fully rigged the boat is over 7′ tall, which makes it quite impressive from shore. The boat can be easily dismantled for transport. Construction of this pond yacht will pleasantly challenge and inform the builder. While group and one-on-one instruction will take place daily, students will also make decisions based on blueprints and developing an eye for form. During this week, the boat will be planked, faired, and the fin and rudder will be fabricated. Bruce will also discuss the steps that follow to complete the boat—decking, rigging, electronic installation, and painting.
Students who have started construction of their VM model in previous years at WoodenBoat School are also welcome to participate in this course to finish their boat. This week will be an excellent opportunity for further guidance. It will also provide inspiration to those individuals just beginning their boat and to view firsthand the final steps in construction.
This course is appropriate for students with some knowledge and experience. Basic knowledge and use of hand tools is required for most shop courses.
“Bruce Richter was an excellent instructor. He taught the pond yacht course in a knowledgeable, caring, and professional manner.”
T.S., Wilbraham, Massachusetts
“Bruce Richter taught a great course. I liked that he checked our work each evening and made note of our mistakes to correct the next day. He pulled together regular meetings to discuss theory. I especially enjoyed the pond yacht history lesson! Great teaching skills. Great personality and a sense of humor.”
J.J., Phoenix, Maryland

Register For This Course
Courses fill quickly, so don't delay if this is a course you want to take.
Related Courses
Woodcarving, carving name boards, introduction to woodworking.
- THE £100 CUP
- THE 1ST CHALLENGE
- THE 2ND CHALLENGE
- THE 3RD CHALLENGE
- COUNTESS OF DUFFERIN
- THE 4TH CHALLENGE
- THE 5TH CHALLENGE
- THE 6TH CHALLENGE
- THE 7TH CHALLENGE
- THE 8TH CHALLENGE
- VALKYRIE II
- THE 9TH CHALLENGE
- VALKYRIE III
- THE 10TH CHALLENGE
- THE 11TH CHALLENGE
- SHAMROCK II
- CONSTITUTION
- INDEPENDENCE
- THE 12TH CHALLENGE
- SHAMROCK III
- THE 13TH CHALLENGE
- SHAMROCK IV
- SHAMROCK 23M
- THE 14TH CHALLENGE
- THE 15TH CHALLENGE
- THE 16TH CHALLENGE
- ENDEAVOUR II
PLANS & MODELS OF ENDEAVOUR
Yves GARY Hits: 31896
Category: ENDEAVOUR

Contact Details
The global authority in superyachting
- NEWSLETTERS
- Yachts Home
- The Superyacht Directory
- Yacht Reports
- Brokerage News
- The largest yachts in the world
- The Register
- Yacht Advice
- Yacht Design
- 12m to 24m yachts
- Monaco Yacht Show
- Builder Directory
- Designer Directory
- Interior Design Directory
- Naval Architect Directory
- Yachts for sale home
- Motor yachts
- Sailing yachts
- Explorer yachts
- Classic yachts
- Sale Broker Directory
- Charter Home
- Yachts for Charter
- Charter Destinations
- Charter Broker Directory
- Destinations Home
- Mediterranean
- South Pacific
- Rest of the World
- Boat Life Home
- Owners' Experiences
- Interiors Suppliers
- Owners' Club
- Captains' Club
- BOAT Showcase
- Boat Presents
- Events Home
- World Superyacht Awards
- Superyacht Design Festival
- Design and Innovation Awards
- Young Designer of the Year Award
- Artistry and Craft Awards
- Explorer Yachts Summit
- Ocean Talks
- The Ocean Awards
- BOAT Connect
- Between the bays
- Golf Invitational
- Boat Pro Home
- Superyacht Insight
- Global Order Book
- Premium Content
- Product Features
- Testimonials
- Pricing Plan
- Tenders & Equipment

The ultimate J Class yachtspotter’s guide
The J Class is undoubtedly one of the most beautiful and powerful classes of sailing yacht in the world. An original fleet of 10 was constructed in the 1930s for the purpose of competing in the America’s Cup, but in a sad twist of fate, only a few were able to survive the cull for metal during World War II. Some were later salvaged from the scrapheap and rebuilt as modern-day racers while others were constructed as replicas by owners who admired their classic lines and racing credentials. Nine J Class sailing yachts race today but could you tell an original from a replica? Could you identify which J Class yacht is which by its sail number? Here's an essential guide to the J Class fleet...
Sail number : JK3 Length : 36.5m Year of build : 1929
With more than 80 years under her keel, Shamrock V is one of the most historic sailing yachts still afloat today having been built by Camper & Nicholsons in 1929. Her current owner bought Shamrock V in March 2016 and in the process inherited a legacy. This 36.58 metre is the original J Class yacht and the only one with a wooden hull to have survived to the present day. Her original owner Sir Thomas Lipton is remembered as the lovable loser of the America’s Cup , having unsuccessfully challenged on five separate occasions between 1899 and 1930, taking each defeat with characteristic good grace.
Sail number : JK4 Length : 39.56m Year of build : 1934
Endeavour was launched by Camper & Nicholsons in 1934 and is hailed as one of the most iconic sailing yachts in the world . Commissioned by Sir Thomas Sopwith, this 39.56 metre design was a highly rated contender heading into the 16th America’s Cup, but ended up losing 4-2 to Harold S. Vanderbilt's Rainbow . However, this is widely acknowledged to have been more down to tactics than design or performance. After spending the better part of 50 years languishing in obscurity, she was meticulously restored by Dutch yard Royal Huisman in 1989 and was most recently refitted in 2011 by New Zealand yard Yachting Developments .
Sail number : JK7 Length : 38.5m Year of build : 1933/2016
Velsheda was built in steel in 1933 for WL Stephenson, the chairman of Woolworths in Britain, and named after his three daughters Velma, Sheila and Daphne. This 38.5 metre yacht is the only original J Class not to have been built for the America's Cup . Between 1937 and 1984 she languished in a mud berth on the Hamble River before scrap-metal merchant Terry Brabant rescued her and chartered her on a shoestring budget with no engine, mostly in the Solent but also in the Caribbean. In 1996 she was purchased by Dutch fashion entrepreneur Ronald de Waal who commissioned Southampton Yacht Services to rebuild her. Since then de Waal has raced her extensively .
Sail number : J5 Length : 41.55m Year of build : 2003
Ranger is a 41.55 metre replica of the J Class yacht of the same name, which was built for the 1937 America’s Cup by a syndicate led by railroad heir Harold Vanderbilt. Starling Burgess and Olin Stephens had been asked to produce eight sets of lines and the one selected as most suitable for the conditions expected off Newport, Rhode Island — design number 77C — was one of Burgess', although Stephens later helped with some refinements. Known as 'The Super J', the original Ranger comprehensively beat Endeavour II in the Cup and won all but two of the other 33 races in which she competed that year. She never sailed after that and was broken up in 1941. With the design optimised by Reichel-Pugh , the new Ranger was built in steel — true to the original but unlike the subsequent modern Js — by Danish Yachts in 2003 for an American owner.
Sail number : JK6 Length : 42.1m Year of build : 2009
The reincarnation of the 1937 launch Endeavour II , Hanuman was launched in 2009 by Dutch shipyard Royal Huisman . This 42.1 metre yacht features her predecessor’s original Charles E. Nicholson design, while the underwater geometry is courtesy of Dykstra Naval Architects . After completing the rebuilds of Endeavour , Shamrock V and Velsheda , Hanuman was Dykstra's first J Class new build project. Commissioned by serial yacht owner Jim Clark , Hanuman is named after the son of the Hindu wind god, which it flies on its spinnaker, and her regatta performances have backed up this name. She took first place at the 2017 St Barths Bucket , which saw six J Class yachts battling it out on the high seas.
Sail number : JH1 Length : 43.4m Year of build : 2010
Lionheart is based on Burgess and Stephens design number 77F, which was one of those rejected in favour of 77C for the 1937 America’s Cup. However, after extensive research by Hoek Design Naval Architects , 77F was considered to be the best set of lines for the variety of racing conditions likely to be encountered at regattas around the world today. Lionheart was built in aluminium by Bloemsma and Claasen Jachtbouw in Holland, and was launched in the summer of 2010. Her first owner's business commitments forced him to sell her and she was purchased in mid-2011 by Dutchman Harold Goddijn, the founder of Tom Tom. At 43.4 metres overall and with a stunning 17 metre overhang, she is the second longest J afloat. Lionheart became the first Hoek-designed J to hit the race course and made its debut at the Superyacht Cup in Palma.
Sail number : JH2 Length : 39.96m Year of build : 2012
The original Rainbow was launched in 1934 at the Herreshoff yard in New England after a mere 100 days under construction and went on to win the America’s Cup in the same year. However, she was requisitioned during World War II and eventually scrapped. The modern Rainbow is an altogether more high-tech affair — built at Holland Jachtbouw in 2012 as the fourth of the new generation Js. She was built for an experienced sailing yacht owner to a design by Dykstra Naval Architects and is the first J to be fitted with a hybrid propulsion and power system. Rainbow is currently listed for sale . When heeled over, its red underside is a dead giveaway for yachtspotters out there.
Sail number: J8 Length : 42.62m Year of build : 2015
Topaz is based on an unbuilt 1938 design by Frank C Paine, the son of the three-time America’s Cup winner General Charles J Paine. Her modern aluminium incarnation measures 42.62 metres and was launched by Dutch yard Holland Jachtbouw in 2015. Hoek Design Naval Architects, who styled Topaz inside and out, describe her as “a good all-round performer”. She was the longest J by waterline length at the time of her launch but was later dethroned by Svea .
Sail number : JS1 Length : 43.6m Year of build : 2017
The newest and longest member of the J Class fleet, Svea was launched by Dutch yard Vitters in February 2017 measuring 43.6 metres. Her design by Hoek Design Naval Architects incorporates an integrated traditional long keel from the original 1937 drawings by Swedish designer Thore Holm, which were unearthed by yachting historian John Lammerts van Beuren. However, the designers have brought the 75-year-old design right up-to-date with an aluminium hull and 53.75 metre carbon fibre main mast. As a result, Svea displaces just 182 tonnes — two tonnes less than Hanuman and six tonnes less than Ranger .
More about this yacht
More stories, most popular, from our partners, sponsored listings.

Login to my account
Enter your e-mail and password:
New customer? Create your account
Lost password? Recover password
Recover password
Enter your email:
Remembered your password? Back to login
Your cart is empty

Pond Yachts: How to Build & Sail Them
Description.
This is beautifully illustrated in watercolors, and shows you a bunch of neat detail items to make your model building all the easier and more pleasurable.
Table of Contents:
- Introduction
- Getting a Perspective
- The Rule and why have a Rule
- Designing to fit the Rule: ideas for shape, aesthetics, of hull design, displacement ,and other practical matters.
- Materials needed
- Carving the hull
- Making and fixing the keel
- Making a rudder
- Paint and Finishes for hull, keel, rudder, mast, etc.
- Boat stands
- Going for a sail
- Living with a pond model
- Other boats to build
- Appendices: Glossary, Materials, Miscellaneous Helps
by M. de Lesseps
86 pp., hidden wire-o-binding, softcover
Customer Reviews
This a helpful book very informative and clear language about the principals of design and construction.
very handy for my project
I was expecting the information to be a little more technical
Recently viewed
Our Store is in Brooklin, Maine
at 84 Great Cove Drive. We're open Mon-Fri 8am to 4:30 pm Call 1.800.273.7447. WE'RE RIGHT HERE .
Timely Shipping
We are 99-3/4% sure... that we will ship your order within 24 hours Granted, that does not include weekends and holidays.
Secure payments
Rest assured... not only is our site secure, we do not hold your credit card/payment info.
- Opens in a new window.
- 1-772-287-7022
- 8AM - 6PM East Coast Time
- [email protected]
GIANT VINTAGE POND YACHT HULL – CUSTOM STAND – MAGNIFICENT
Presented is a beautifully built pond yacht hull made using traditional plank on frame construction important information added in italics . It is so finely made and built like a real sailing craft that it must have been built by a master shipbuilder. The hull is made by nailing a series of planks called “strakes” on a frame of sawn ribs that are mounted crosswise on the keelson with beams across at deck level. The ribs are placed at three inch centers. At the very bow is a screw standing 1/8 inch above the deck level, and 6 inches behind it is a metal strap. These markers can be seen in a number of the photographs. Taken together, both these items were likely used to hold a bowsprit in place. The hull is shaped in accordance with the plans which give the desired profile shape. The inside shows dried old paint and some accumulation of grit and grime again adding to look of a many years old derelict. Due to this model’s age, many of the joints between the strakes have dried out and leave a small gap between the adjoining planks adding to a look of a boat yard derelict. The streamlined shape of the hull originally made us think of a “J Class” racing yacht, but the addition of fittings for a bowsprit puts it in an entirely different category. The Universal Rule to which the J Class was designed was adopted in 1920. The class was selected for America’s Cup racing in 1928. But a bowsprit installed on the model easily dates it back into the mid to last half of the 19th Century. Consequently, the model likely replicates any of the international large size racing yachts prior to 1900. This would include any of the yachts in the America’s Cup 1893-1903 Class, known as the great 90-footers, and could include some earlier ones that had a single mast. The vessels in this class with a 90 foot waterline length were: Pictured is COLUMBIA of 1899. 1893 VIGILANT vs. VALKYRIE II 1895 DEFENDER vs. VALKYRIE III 1899 COLUMBIA vs. SHAMROCK 1901 COLUMBIA vs. SHAMROCK II
The rigging and much of the deck has been removed but the original rudder and the lead keel are in place. What you see is an advance state of aging. All the gear that was removed was lost, and there is nothing more than what you see in the pictures. DIMENSIONS: HULL Length Overall without bowsprit: 50 1/2″ L x 10″ W x 14 /8″ H to deck WEIGHT: 15 lbs STAND: 33 1/4″ L x 9 1/2″ W x 1 1/2″ H 5 lbs
Buy as a work of art, it is truly a masterpiece, and makes a beautiful display.
CONDITION: As with all hand made models, particularly very old pond yachts that were sailed, expect imperfections. This one has the blunted bow that is typical of a model that has sailed into something and also has an age crack on the starboard side amidships. The rudder and the lead keel are present which is not commonly found with models of this genre. The hull finish has been abraded with bear wood showing in places. In our view, this adds to the model’s charm. The end result is this is a fine, high quality model of which anyone will be proud to display.

About Land and Sea Collection™
The Source for the Finest Nautical Antiques, Affordable Marine Art, Vintage Dive Helmets, New Sextants, Antique Sextants, and beautifully executed Antique & Vintage Boat, Ship and Aircraft Models.
Contact Information
By Appointment Only Palm City, FL 34990 USA
- +1-772-287-7022
- 8am-6pm EST
Join Our Mailing List
Email (required) *
First Name *
Last Name *
Example: Yes, I would like to receive emails from Land and Sea Collection. (You can unsubscribe anytime)
CPM Model Sailboats
J class rc sailboats, header content region, insert text, image or banner ads here, or just delete this text and leave this area blank.

1/25 (36") Scale America's Cup high performance model sailboat
5ft Replica of the 1962 Americas Cup 12 Meter
45" Scale Model of the Olympic Star Boat
J Class Boat-Shamrock V
1/16 (8'-10')Scale Replica of the 1930's America's Cup Class Yacht
RMG Sail Winches
High Performance sail control winches

- Create as many news links as you need. News links are simple bullet lists.
This is where you would add your text, images, or advertising banner
2023 J Boat Down the River Race Aug 25th Info CPM is now producing the Shamrock V Original Plug and mold by Dave Brawner and Ranger mold and plug by Gary Mueler
Shamrock V and Range Fiberglass hulls, Rudders, Mast fittings.
Current prices for the Shamrock V are as follows Hull - $625.00 Rudder w/Shoe - $175.00 Ballast (3 Piece) - $200.00
Current prices for the Ranger are as follows
Hull - $700.00 Rudder w/Shoe - $175.00
SHAMROCK V BUILD SITE
Fully Built Ready to sail Shamrock V J boat cost estimate.
Shipping is additional
Are you interested in building a J Boat?
Take a look the Shamrock V Build Web site for all aspects of building a J Boat
SHAMROCK V BUILD SITE
Build queue Deposit Policy
To be placed into the CPM Build Queue a min deposit of $100 is required. Due to the custom nature of building fiberglass hulls and components this deposit is NON refundable.
J Boat Video's
J BOAT Photos and Construction
2011 J-Boat National Championships - Mystic, CT
CPM's David Ramos 2013 J-Boat National Champion sailing the Shamrock V
CPM's David Ramos 2014 J-Boat National Champion sailing the Shamrock V
CPM's David Ramos 2016 J-Boat National Champion sailing the Shamrock V
CPM's David Ramos 2018 J-Boat National Champion sailing the Shamrock V
CPM's David Ramos 2020 J-Boat National Champion sailing the Shamrock V
CPM's David Ramos 2022 J-Boat National Champion sailing the Shamrock V

Copyright © 2021. Chesapeake Performance Models LLC. All Rights Reserved..

Setting up and tuning the J class
Setting up and tuning your J Class model with Bermuda rig.
Introduction
The Nottingham 48 and the 60 are well designed models which in a good state of trim should be elegant, rapid and predictable on the water and a very satisfying model to sail. The underwater profile will resist the weed that is becoming a feature of summer sailing and which can be so frustrating for skippers of yachts will finned keels and separate rudders and the relatively shallow draft adds to the models versatility.
The model is fairly forgiving of poor sail trim but setting up the model correctly will add greatly to the pleasure of sailing it. Setting up a yacht and trimming it for the prevailing wind conditions is the subject of lengthy and protracted writing and my intention here is not to replicate these missives but to create a simple guide to how to get the most out of your model. For some this guide may be too simple but I make no apologies and hope that most readers will find the guide of use.
Basic principles.
The sails operate as two wings and are subject to the same rules of aerodynamics as an aircraft but unlike an aircraft the aerofoil shape of a sail can be altered to suit the wind conditions. These alterations are referred to as “tuning” the rig. There are two objectives in tuning the rig, to obtain maximum speed and also maximum control and the two objectives achieved together will get you round a course in the shortest time.
The 48 inch model is available with three rigs, A, B and C. The A rig has the biggest sail area and is cut to suit light winds. The B rig has a slightly smaller sail area and is cut to suit stronger winds whilst the C rig is often referred to as a “storm” rig. The operating parameters of each rig will overlap so that an A rig can be detuned as wind speed increases and the B rig can be tuned for more power as wind speed decreases. The most versatile rig for day to day use is the B rig as it can be tuned for most conditions. I don’t have a C rig as if the wind speed dictates the use of this rig it’ s probably time to go to the pub but serious racing skippers will have a C rig.
The sail is not just a flat sheet but consists of a number of panels. Each panel is cut and joined so that it will naturally try to adopt an aerofoil shape. Further, the luff of the sail is cut with a curve or arc so that when it lies against a straight mast the sail will adopt even more shape.
Initial setting up.
Place the mast in the mast tube and fix the shrouds and backstay. Attach the jib swivel so that the sails are relaxed with no tension in the shrouds and only slight tension in the backstay and jibstay. Back off the kicker on the mainsail boom and ensure the leech line is loose. Stand back and look at the rig. The leech of the jib should lie parallel to the mast and as close to the mast as possible and the mainsail boom should lie roughly parallel to the deck. At this stage ensure that the foot of the mainsail and jib is fitted a close to their respective booms as possible and that the jib boom is fitted as close to the deck as possible.
Increase the tension in the rig first by tensioning the jibstay and then with the backstay so that the top of the mast is firmly located against fore and aft movement. Nip up the shrouds so there is just sufficient tension to secure the mast against sideways movement. Nothing should be “tight” at this stage.
Adjust the foot of the jib and mainsail using the clew adjuster so that the foot is flat (but not tight) and adjust the luff of the jib and mainsail the same ensuring that there are no wrinkles in the sails. This should make a good starting point for tuning and you should ensure that there is sufficient room to adjust on all of the adjusters.
Adjust the kicker or vang so that the end of the mainsail boom is able to move up and down about 10mm. The kicker changes the twist in the leech of the mainsail.
Adjust the foot of the mainsail and jib so that the foot adopts a slight curve. Add a little tension to the leech line on the jib so that this too has a slight shape. The general rule of thumb is that the curve in the leech of the jib should match the twist in the leech of the mainsail
In general terms, you will want to achieve a “full” shape in both sails for light winds and as the wind speed increases you will add tension to the rig to “flatten” the sails.
Note that any adjustment you make to one part of the rig will require additional adjustments to the other elements of the rig.
Adjustments.
Backstay. This has the biggest effect on the rig overall. Tension in the backstay is transferred through the mast, creating a bend in the mast, tension is transferred down the jibstay to the tack of the jib, along the jib boom which pivots on the jib swivel and so puts tension into the leech of the jib.
As you add tension to the backstay you will see the shape of the mainsail flatten as the mast curves forward in the middle. As the top of the mast moves aft the end of the mainsail boom will drop so add tension using a mixture of tension in the jibstay and tension in the backstay. If the mainsail boom drops too far it risks dipping into the water as the yacht heels in the wind which will upset the shape of the mainsail.
Kicker. Increasing the movement in the back of the boom will increase the twist in the mainsail. This will allow wind to spill out of the top of the mainsail, depowering the top part of the sail and improving control in windy conditions.
Main sail luff tension. As you increase the tension in the backstay the tension in the luff will reduce. Use the adjuster to add tension. The luff shouldn’t be tight, but should be tight enough to keep a straight edge whilst still being able to swing around the mast on the luff rings.
Clew adjustment. (Both the mainsail and the jib) Moving the adjuster forward will put more shape in the foot of the sail and also the lower part of the sail. More shape will give you more power but also increase the drag created by the sail. Less shape will reduce power for better control in higher winds. Try to keep a similar shape in the foot of both mainsail and jib.
Jib luff tension. As with the Mainsail, the tension should be sufficient to maintain a good shape in the sail without wrinkles but not so tight that it creates more tension than the jibstay.
Leech line. As you put more tension into the rig you will flatten the leech of the jib and reduce its power. Use the leech line to take the tension out of the leech and add shape to match the shape of the mainsail.
Shrouds. The main purpose of the shrouds is to stabilise the mast. Putting too much tension into the shrouds will emphasise the curve in the mast and distort the shape of the mainsail. You should add just sufficient tension to stabilise the mast. Mounting the shrouds further back on the chainplate will reduce curve that will be put into the mast by the power of the wind, thus retaining the original shape you created when the model was at rest. A second set of shrouds fitted at the spreaders will add more support to the mast as it comes under pressure from the power of the sail as wind speed increases.
Jib slot adjustment. The jib boom should be opened up by adjusting the loose sheeting so that the end of the boom points toward the chainplate on the deck as a start. The jib slot serves to accelerate air through the slot and over the mainsail and this increased airflow over the mainsail improves the efficiency of the sail and the speed of the model. If your slot is too narrow the forward part of the mainsail will distort, and loose its aerofoil shape, (known as backing) but if too wide the slot will have little effect. Adjustment on the 48 is something of a compromise but the 60 has a separate servo to adjust the slot on the water. At slower speeds with reduced airflow the slot is narrowed to increase the velocity of the air travelling through it. As the hull speed increases the mainsail will start to “back” under the pressure of both velocity of the air and the increased volume so the slot can be opened improving the efficiency of the mainsail
Mainsail boom adjustment. The mainsail sheet should not be tight when sheeted in. I adjust the end of the boom so that when sheeted in its about 10 to 15mm off the centre line. As a guide, I start by looking at the back of the mainsail which should be pointing in a direction so that the airflow from the sail is directed aft, along a line parallel to the centre line of the hull
Weather helm and lee helm. This term refers to the tendency for the model to point up into the wind and stall, (weather helm) or point away from the wind (lee helm) especially when travelling into the wind. The model is designed to be “balanced” ie, that it should track a straight line without radical movements to the rudder which creates drag and reduces speed. If you experience weather helm this can be solved by increasing the power in the jib/reducing the power in the main and if you have lee helm vice versa. Lee and weather helm is a response in the hull to the sails not being tuned to act together.
Tuning the sails should sort both lee and weather helm but if not you can change the weight distribution in the hull. The centre of effort of the rig is designed to be forward of the centre of lateral resistance of the hull. As the yacht heels in the water the curvature of the hull acts as a rudder and tries to steer the hull in a direction opposite to the heel, into the wind. Placing the centre of effort forward overcomes the steering effect of the hull but it’s a fine calculation and will be slightly different for each model. The answer to weather helm is to move the centre of effort further forward by powering up the jib or depowering the main, (preferred) or, moving the entire rig forward, or alternatively moving the centre of lateral resistance aft. This is achieved by adding weight to the back of the keel which puts more stern in the water and takes some bow out of the water.
If you have lee helm which cannot be solved by tuning you can add weight to the forward part of the ballast which will put more bow in the water and take some stern out of the water, moving the centre of lateral resistance forward.
This is a radical solution and before you embark on changing the weight distribution I suggest you talk to me first as the tuning of the rig is likely to be the prime suspect of lee and weather helm issues.
You may find that as the model is accelerating (eg, having just rounded a buoy and sailing into the wind) and is heeling in the wind, that the hull tries to turn around the mast. This is often confused with weather helm but issues relating to weather helm and lee helm are better assessed when the hull is up to speed. This perceived weather helm is caused by the sails accelerating in an environment where there is little resistance and the hull, subject to the resistance of the water, has yet to catch up with momentum of the sails. This causes the hull to continue turning into the wind even if you have applied opposite rudder.
There are a number of solutions, all to do with how you sail the model, not necessarily tuning. The first is to straighten the rudder when half way round the buoy and let the hull do the rest (a straight rudder creates less resistance and the hull will accelerate more quickly). The second is to operate the sails with less vigour, bringing the sails to their final position for the run more slowly. Or a mixture of the two above. Maximum speed and maximum control are achieved by making slower, measured and progressive movements to the controls.
- Join Newsletter & Get 10% Off Your First Order
Join / Login
Ship plans – yacht endeavour – j class – americas cup – 1:80.

Out of stock
Notify me when item is back in stock.
- Fast Shipping
- Safe & secure
- Worldwide delivery
- Product Description
- Additional information
The Schooner Endeavour staked a claim on the America?s Cup, winning the first two races. The third regatta was bound to be the most exciting. Fate played an unkind trick to Sir Thomas Sopwith, who failed and thus couldn?t win the America?s Cup. Model Kit includes plank-on-bulkhead construction; laser cutted wooden deck and planking; brass and wooden fittings; photo etched brass details; cloth sails; plans and detailed instructions.
Amati ship model plans are faithful interpretations of the original vessel. Amati ship model plans and instructions are always excellent and easily followed. Amati has integrated computer design and the latest materials to produce high quality ship model plans.
Join 18,543 other modelers to hear about specials, new products and modeling tips
- Become a Member
- Modeling Hub
- Model Ship Building
- Maritime History
- Affiliate Program
Information
- Terms & Conditions
- Privacy Policy
Copyright © 2023 Modelers Central. ABN: 31 114 830 732
- Claim 10% Off First Order
- Get 5% off ALL orders with a Membership
- Gift Vouchers
- Help & Advice
Modelers Central. 2023, All rights reserved.
- Claim 10% Off Your First Order
- Get 5% Off All Orders With A Membership
Get 10% off
Your first order.
10% off applies only to full-price items. By providing your email address, you agree to our Terms & Privacy Policy
10% off applies only to full-price items. By providing your email address & mobile number, you agree to our Terms & Privacy Policy and consent to receive marketing messages from Modelers Central at the addresses provided. You can unsubscribe at any time by replying STOP.
- Yachting World
- Digital Edition

J Class: the enduring appeal of the world’s most majestic yachts
- October 9, 2023
Only ten J Class yachts were built before the Second World War stopped the movement in its tracks, but in the last 20 years these magnificent sloops have made an incredible comeback. Why has the J Class remained irresistable? David Glenn explains.

One of the most awe-inspiring sights in modern yachting is the Spirit of Tradition fleet blasting off the start line at the Antigua Classic Yacht Regatta. It happens every year at the end of April. Chances are it will include at least two J Class yachts, hitting the line on the gun at full tilt, exploding through the cobalt blue Caribbean rollers at anything up to 12 knots as they charge upwind.
Watching Velsheda , Ranger , Shamrock V and Endeavour will bring a lump to your throat, such is the emotion generated by these beautifully proportioned 130ft racing machines with their carbon rigs driving 170 tonnes of steel, aluminium and teak towards the weather mark. It’s heady stuff.
Watching them is one thing; racing quite another matter. In 1999 I was aboard the rebuilt Velsheda , taking part in the Antigua Classic Regatta. I had a single task as part of a four-man team – to tend the forward starboard runner. Nothing else. “Let that go once we’ve tacked and the whole rig comes down,” warned skipper Simon Bolt, as another wall of water thundered down the leeward deck and tried to rip me from the winch.
Dressed in authentic off-white, one-piece cotton boiler-suits, which had to be worn with a stout belt “so there’s something to grab if you go overboard”, they were tough, adrenaline-filled days out. God knows what it was like up forward as massive spinnakers were peeled and headsails weighing a quarter of a tonne were wrestled to the needle-sharp foredeck as the bow buried itself into the back of yet another wave. Sometimes you daren’t look.
But with the race won or lost, back on the dock the feeling of elation, fuelled by being part of the 36-strong crew aboard one of these extraordinary yachts, triggered a high like no other. You knew you were playing a role, no matter how small, in a legendary story that began in 1930, was halted by World War II and then defied the pundits by opening another chapter 20 years ago. Today with five Js in commission, all in racing trim, and at least two more new examples about to be launched, the J Class phenomenon is back.
Why is the J Class so popular?
Why does a yacht with an arguably unexciting performance – they go upwind at 12 knots and downwind at 12 knots – costing £20 million to build and demanding eye-watering running costs, seem to be burgeoning during the worst recession since the class was born?

There is no single answer, but you only have to look back to the 1930s and the characters that owned and raced the Js on both sides of the Atlantic, sometimes for the America’s Cup , to understand why the class occupies a special place in yachting history. Underlying everything is the look of the J Class. It seems to transcend any change in yachting vogue, displaying a timeless line with outrageous overhangs and a proportion of hull to rig that is hard to better.
They possess true elegance. There is no doubt that captains of industry who want to flex their sporting muscle have been drawn to a class which only the very rich can afford and there are distinct parallels between J owners in the 1930s and those of the past 20 years. The difference is that in the 1930s owners liked to shout about their achievements and hogged the pages of national newspapers. Today, they are as quiet as mice.
Origins of the J Class
The J Class emerged in 1930 and marked a quantum leap in yachting technology, but comprised a hotchpotch of design altered over many years.

The J Class – so named because it was the letter allocated to its particular size by the Universal Rule to which the yachts were built (K and M Class yachts were, for example, shorter on the waterline) – emerged in 1930 and marked a quantum leap in yachting technology.
The so-called Big Class, which flourished in the UK in the 1920s, was impressive, but comprised a hotchpotch of design altered over many years. Yachts like King George V’s Britannia , built in 1893 as a gaff-rigged cutter but converted in the 1920s to Bermudan rig to rate as a J, Candida , Cambria , White Heather and schooners like Westward were even larger and more expensive to run. But as the greater efficiency of the Marconi or Bermudan rig became apparent their days were numbered.
One catalyst for the J Class itself was legendary grocer Sir Thomas Lipton’s final crack at challenging for the America’s Cup in 1931. He did so under the Universal Rule with the composite, wooden-planked, Charles E. Nicholson-design Shamrock V .
It was the 14th challenge since 1851 and the Americans, despite the withering effects of the Great Depression, reacted in dramatic fashion, organising their defence with four syndicates, each bulging with millionaires, putting forward separate Js: Enterprise , Whirlwind , Weetamoe and Yankee , which apart from Enterprise had already been launched.
Key to the American effort was the remarkable Harold Vanderbilt of the New York Yacht Club, who had inherited fabulous wealth from the family’s railroad companies, making him one of the country’s richest men.
Brought up on the family’s Idle Hour estate on Long Island Sound, he was a keen and accomplished sailor, and he used American technology and teamwork to build a far superior J in Enterprise. The defence completely overwhelmed Lipton’s effort. The British press castigated Lipton’s lack of preparedness and old-fashioned attitude. Vanderbilt, who among other things is credited with inventing contract bridge, left no stone unturned. “Mr. Harold Vanderbilt does not exactly go boat-sailing because summer is the closed season for fox-hunting,” stated an acerbic critic in the British yachting press.
Later when Shamrock was owned by aircraft builder Sir Richard Fairey and was being used to train crew for another Cup challenge, Beecher Moore, a skilful dinghy sailor who was draughted aboard the J to try to sort her out, reported in Yachts and Yachting many years later: “We found that when we got on board it was very much like a well-run country house, in that the gentleman does not go into the kitchen and on a well-run J Class the owner does not go forward of the mast.”
J Class tactics: Britain vs USA
A look at the huge gap between the British and American J Class tactics and designs in the early years of the America’s Cup.

In the early days there was a yawning gap between the way the Americans and British approached the Cup and, for that matter, how they ran a yacht. Revolutionary metal masts, Park Avenue booms to improve sail shape (the British copied this American design with their ‘North Circular’ version), bronze hulls that needed no painting, superior sails, and campaigns that cost £100,000 even in those days, blew away the Brits. Lipton had spent just £30,000 to build and equip Shamrock .
In the second Cup challenge in Js, in 1934, Sir T. O. M. Sopwith’s first Endeavour , also designed by Nicholson and equipped with wind instruments designed by her aircraft industrialist owner, nearly won the Cup, snatching defeat from the jaws of victory after leading the series 0-2. Sopwith was also up against Vanderbilt, who this time sailed Rainbow , which many considered to be the slower boat. But the British campaign was hobbled by a pay dispute – Endeavour ’s crew got £5 a week but they wanted a raise for ‘going foreign’ – and the campaign approach was again brought into question when the first thing to be stripped off the yacht when they won a dispute over reducing weight was the bath!
Back in Britain, the 1935 season proved to be the zenith of J Class and Big Class racing, although by the end of it the Js were under the cosh for their tendency to lose masts. Five went over the side that year and Endeavour II , launched with en eye on the next Cup challenge, lost hers twice.
There was added spice in the competition off the shores of the UK with the arrival of the American J Yankee , now owned by millionaire and Listerine businessman Gerard Lambert, who enjoyed sparring with the Brits. But even Yankee lost her mast and the press rounded on the class for being dangerous and wasteful! That wasn’t enough to stop Sopwith, whose tail had been extracted from between his legs following the last defeat in Newport: Endeavour II was towed across the Atlantic in a veritable armada that included the first Endeavour. The British yachts found themselves up against the most advanced sailing machine the world had ever seen – Ranger , dubbed ‘the Super J’.
Vanderbilt was the man to beat again. Not only had he bankrolled the entire defence as American business remained beset by a struggling economy, but he used highly scientific means to perfect design. The brilliant naval architect Starling Burgess, who had designed for Vanderbilt throughout the 1930s, was now aided by the equally brilliant but considerably more youthful Olin Stephens. Between them they finally selected ‘model 77-C’ from six tank tested.
The yacht was considered ugly by some and not a natural to look at, but Vanderbilt’s team trusted the science (still the difference between the Americans and the Brits) and Ranger with her bluff or barrel bow and ‘low slung’ counter was the result. She proved to be dynamite on the race course and Endeavour II didn’t stand a chance. She was beaten in five straight races by large margins. The Americans and Vanderbilt had done it again. War then brought an end to an extraordinary era in yachting.
Only ten J Class yachts were built to the Universal rule and not a single American yacht survived. Most were scrapped for the war effort. In any case, the American way was to discard the machine once it has served its purpose. In Britain they faired a little better, and some Js were mud-berthed on the East and South Coasts. Two survived in the UK: Velsheda , originally built by the businessman who ran Woolworths in the UK (W. L. Stevenson named her after his daughters Velma, Sheila and Daphne), but which never challenged for the America’s Cup; and Endeavour , saved by becoming a houseboat on the Hamble. Shamrock ended up in Italy and survived the war hidden in a hay barn.
J Class resurgence
Seemingly resigned to the history books, the J Class made a triumphant return in the 1980s.
In his seminal book about the J Class, Enterprise to Endeavour, yachting historian Ian Dear predicted in the first edition in 1977 that the likes of the Js would never be seen again. By the time the fourth edition was published in 1999 he was quite happily eating his words!
The American Elizabeth Meyer was, without doubt, instrumental in bringing the class back to life when in the 1980s she extracted what was left of Endeavour from a amble mud-berth, began rebuilding her in Calshot, and then moved her to Royal Huisman in Holland, who completed the restoration superbly. With the transom of the original Ranger mounted on a bulkhead in her saloon, Endeavour is still regarded as one of the best-looking and potentially fastest Js.
She was owned briefly by Dennis Kozlowski, the disgraced tycoon who ran Tyco, who famously said: “No one really owns Endeavour, she’s part of yachting history. I’m delighted to be the current caretaker.” Unfortunately he ended up in prison and the State of New York became Endeavour’s ‘caretaker’ before they sold her to her current owner, who has kept the yacht in the Pacific. She’s currently being refitted in New Zealand.
Ronald de Waal is a Dutchman who until recently was chairman of the Saks Group in the USA and has made a fortune in clothing. He has dedicated a lot of time to improving Velsheda over the years since he had her rebuilt by Southampton Yacht Services to a reconfigured design by Dutch naval architect Gerry Dykstra. Ronald de Waal steers the yacht himself to great effect and has had some legendary tussles with Ranger, the new Super J built in Denmark for American realestate magnate John Williams.
The rivalry between the two is fierce and even led to a collision between the yachts in Antigua last year. But Velsheda would have been lost had it not been for British scrap-metal merchant Terry Brabant who saved her from a muddy grave on the Hamble and famously sold his Rolls-Royce to cast a new lead keel for the yacht. With very little modern equipment he sailed her hard in the Solent, chartering her and crossing the Atlantic for a Caribbean season, all without an engine! Without Brabant’s initiative Ronald de Waal wouldn’t have what he has today.
Shamrock V is owned by a Brazilian telecommunications businessman Marcos de Moraes who had the yacht rebuilt at Pendennis Shipyard in Falmouth in 2001. He tends to keep away from the race course but with a number of events being planned in the run-up to the 2012 London Olympics he might be tempted back. The latest new J to launch, Hanuman, a modern interpretation of Endeavour II, has recently entered the racing fray. She was commissioned by serial yacht owner Jim Clark (Hyperion and Athena), the American who brought us Netscape and Silicon Graphics, and who remains a colossus in Silicon Valley.
Hanuman, named after a Hindu deity, built by Royal Huisman and designed by Gerry Dykstra, has had no expense spared when it comes to rig and sail wardrobe. Last year she beat Ranger in the Newport Bucket but in March this year she lost out 2-1 to the same boat at the St Barths Bucket. They were due to meet again with Velsheda at the Antigua Classic Yacht Regatta in April. Another Dutchman, property developer Chris Gongriep, who has owned a number of yachts including Sapphire and Windrose of Amsterdam, has given the go-ahead for a new version of Rainbow, which is well advanced in Holland at Freddie Bloesma’s aluminium hull fabrication yard. The yacht, reconfigured by Gerry Dykstra, will be in the water in 2011 with a full-on race programme.
About to be launched is Lionheart, the biggest J so far, redesigned by Andre Hoek and built in Holland by Claasen Jachtbouw, after an extensive research programme. Unfortunately, her owner’s business commitments mean that he won’t be able to enjoy the fruits of this project – she’s for sale with Yachting Partners International and Hoek Brokerage. What an opportunity to join a class with such a remarkable history and one which looks destined to run and run!
First published on SuperYachtWorld.com on Aug 4, 2010
Frank Russell Design
R/c and model yacht design, plans, boats, sails..
I have been a designer of model and radio yachts since 1968. Boats been built from my plans now number in the hundreds both from both home and production builders. Many of my designs have won State and National Championships in Australia and overseas. New designs are added periodically and occasionally I do receive requests for specific designs. I also from time to time produce free plans.
Most of my older plans Pre 2000 will eventually be available as PDF files of the original large format drawing. The plans are located here:
A more complete list of my designs is here:
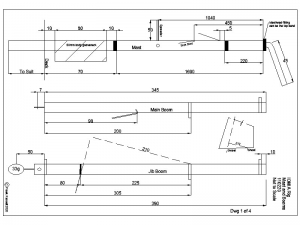
Plans are normally drawn on A4 and A3 format. Sections and appendages are normally drawn full size, 1:1. Some fin and bulb drawings are drawn to be printed in two halves and joined after printing. Arrangement drawings are 1:5 and sometimes 1:4.
Make sure when printing that the “Scaling” or “Fit to Page” option is turned off in your printer setup when you print. I also have the “Print Preview” turned on as well so I can check if the page size is correct. All drawings are in either A4 or A3 size paper.

Each drawing has a 100mm scale which will allow you to see if the drawings are the correct size.
The PDF drawings are usually emailed within a few hours of receiving your order from Paypal by email. DXF and DWG formats are available for most plans. Just ask and they also will be emailed.
Printed Paper Plans are avialable and are printed from the same plan as the PDF. Please ask before ordering. There is usually an additional postage charge for Printed Paper Plans.
LATEST PLANS:
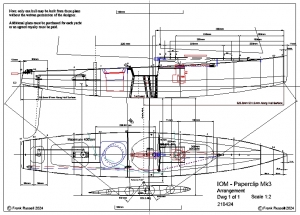
Paperclip Mk3 IOM 2024 The hard chine version of the Ellipsis and Equinox IOM’s. It is intended to be built “Tape and Glue” from 1mm plywood sheets. The PDF and DXF drawings for theses hull and deck panels are included as are the sections if you would like to build the hull over frames. The prototype built by Tony Goldsworthy seems to perform well.
The PDF Plan is on 7 A4 and 2 A3 sheets, The laser cut sheets are on 2 large sheets PDF and DXF. The Plan is also available on DXF, or DWG
LOA: 938mm LWL: 915mm BOA: 190mm Disp: 5.1kg
PDF Plan emailed or Printed and posted on 6 A4 and A3 sheets
If you require another format: DXF, or DWG, 2D or 3D or printed paper plan, postage extra.
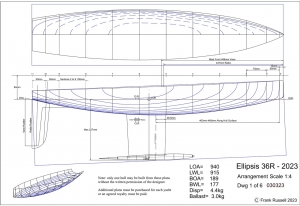
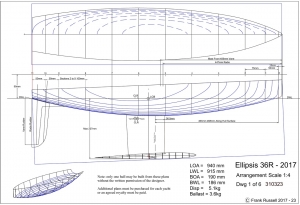
Ellipsis 36 2023 is a 36 inch restricted class designs based on the Ellipsis IOM design. The 36r design was a request from a UK skipper for a lighter version of the 2017 design for both Radio and vane sailing. This design shuld be more suitable for lighter wind smooth water venues than the 2017.
LOA: 938mm LWL: 915mm BOA: 189mm Disp: 4.4kg
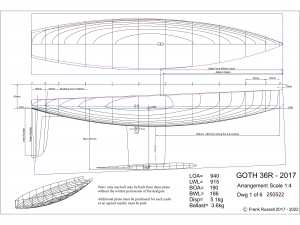
Goth 36 2017 is an 36 inch restricted class design based on the Goth IOM design. The original request came from John Fisher in 2013 who wanted a very light 36r for vane sailing. This design is the third design in the series, which has progressively become heavier and more successful.
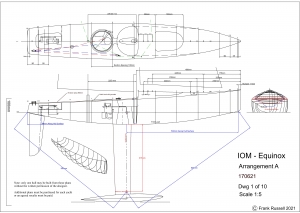
New Equinox IOM Plan : The Equinox is a variant of the Ellipsis… IOM. The basic design was produced initially as a 3D printed project that never eventuated for various reasons. Two prototypes were built including a 3D printed boat which was built by John Taylor in the UK. The design incorporates several features of some of the newer IOM shapes including a fuller higher bow profile and wider stern. The design is well balanced and well behaved like the Ellipsis and should be as easy to plank from wood.
Hulls an components for this design are now available. See IOM COMPONENTS Page.
After payment is made. I will email you the pdf file.
Please ask If you require another format: DXF, or DWG, 2D or 3D or printed paper plan, Postage extra.
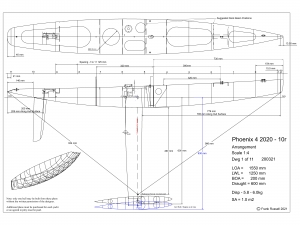
Phoenix 4 2020 10r Every new design presents a designer with options to consider and directions to go. After a ten year gap from the P3, all 10r’s had adopted the deep keel, light weight approach and although it did seem to work I after the P5 I though that the Phoenix 4 design although fast went in the wrong direction. I always have thought about what I should have done. So this is P4- 2020, with 2020 hindsight is the result.
LOA 1550mm LWL 1250mm BOA 200mm BWL 180mm, 4.2kg ballast on 600mm Draught and P1 to P3, Marblehead style sail plans on a flat deck.
She even drawn in the same software as the original.
After payment is made. I will email you the pdf file. Plan has A3, A4 sheets and a larger sheet with sections deasigned for laser cutting.
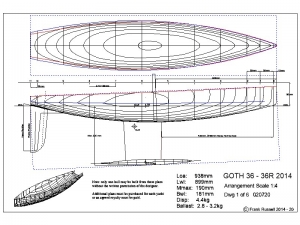
Goth 36 is an 36 inch restricted class design based on the Goth IOM design. The original request came from John Fisher in 2013 who wanted a very light 36r for vane sailing. this design is the second in the series, heavier and more successful. There is also a later 2017 version which will be published soon.
LOA: 938mm LWL: 899mm BOA: 190mm Disp: 4.4kg
If you require another format: DXF, or DWG, 2D or 3D or printed paper plan, just ask.
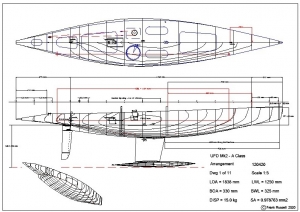
UFO Mk2 – A development of the successful UFO with a heavier displacement and larger sail plan. Improved aft sections with the chine removed.
LOA: 1838mmLWL: 1250mm Disp: 15kg SA: 0.978763 m2
PDF Plan emailed or Printed and posted on 12 A3 sheets
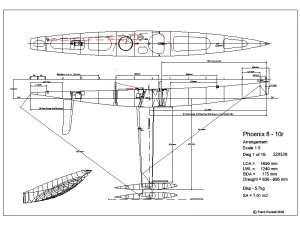
Phoenix 8 – 10r: The Phoenix MK 8 is a larger more powerful boat than the last three Phoenix Mks. The P8 is a return to the simple design, No chines, no raised fore deck and Marblehead rig profiles as used from P1 to P3. This allows simpler light weight construction and fully open soft decks and shared rigs if you have a Marblehead.
LOA: 1650 mm LWL: 1240mm, BOA: 170mm, Draught: 630 – 680mm, Disp 5.7kg, SA: 1.00 m2
The Free updated IOM mast and boom schematic along with FRD IOM Setup Guide
FRD IOM Setup Guide Mast and Booms combined Feb 2020
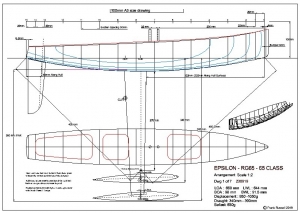
Epsilon RG65 – 65 2019: This design is based on the successful Ellipsis IOM concept, that of correct volume distribution rather than fashionable features with the emphasis on simplicity and efficiency.
Plans are PDF format or printed paper plan only. 3D hull and 2D bow and stern sections in DXF or DWG format are available on request.
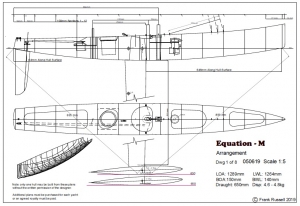
Equation Marblehead 2019: This design is based on the successful Ellipsis IOM concept, that of correct volume distribution rather than fashionable features with the emphasis on simplicity This design is the result of two Sailing Marblehead prototypes, The Ellipsis 1c and Ellipsis 2a.
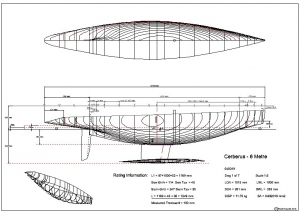
Cerberus – 6m Something more of a challenge from a designers and builder’s point of view. A class I have always admired. This is Cerberus, my first published Six Metre design. This is the result of several requests for a design in the class and also a desire on my part build a six Metre for fun sailing locally. There are a couple of boats that will be built in the UK to join the fleet there. This design is intended to excel in moderate winds and will outperform anything of similar size drought and displacement in Australian conditions. Plans are $30 pdf plans from my PLANS page with other formats available. This design may also be available for 3D printing at a later date.
LOA: 1515mm, LWL :1020mm, Displacement: 11.75kg, SA:0.682019m2
In total nine J Class yachts are currently active, including three original surviving Js - Velsheda, Shamrock and Endeavour - and six replicas that have been built since 2003; Ranger, Rainbow, Hanuman, Lionheart, Topaz and Svea.

Endeavour, JK4

Velsheda, JK7

Rainbow, JKZ1

Shamrock V, JK3

Hanuman JK6

Lionheart, JH1

This site uses cookies to enhance your experience. By continuing to browse the site, you consent to the use of cookies. View our Privacy Policy for more information.
The home of the worlds best R/C Model Aircraft Designers
UK Manufactured to order: Guaranteed Quality
Products search
Login FAQ
[email protected] +44 (0)1684 311682
- Unorthodox Aircraft
- X-List Plans (Aircraft)
- F/F Sport & Competition
- C/L Aerobatic
- Round The Pole
- All Aircraft Plans not yet categorised
- All Short Kit (Sets)
- Scale Short Kit (Sets)
- Sport Short Kit (Sets)
- Depron Short Kit (Sets)
- All Laser Cut Wood Packs
- Scale Laser Cut Wood Packs
- Sport Laser Cut Wood Packs
- All Additional Wood Packs
- Scale Additional Wood Packs
- Sport Additional Wood Packs
- Private & Trainer aircraft
- Transport Aircraft
- WW1 Aircraft
- WW2 Aircraft
- Static Aircraft Wood Kits
- All Aircraft Parts
- ABS Sets & Fairing
- Cowls & Nacelles
- Intakes & Rads
- Spats & Undercarriage
- Spinners & Prop Nuts
- Cliff Charlesworth Cowls
- All Canopies & Screens
- Cliff Charlesworth Canopies
- Jilles Smits Canopies
- Pat Teakle Canopies
- Guns, Sights & Cockpits
- All Materials
- Depron Foam
- All Covering & Tools
- DiaCov 1000 Covering
- Lightweight Tissue
- All Perma-Grit Tools
- Sanding & Filing Tools
- Rotary Tools
- Cutting Tools
- Screwdrivers
- Hex Wrenches
- Clamps & Pliers
- Airbrushing
- Lighting & Magnification
- Marking & Measuring
- Model Aircraft Covering
- RTF Aircraft
- ARTF Aircraft
- Free Flight
- Books & Specials
- DVDs & Blu-Ray
- Bargain Aircraft DVDs SAVE!
- Full Size Focus CD
- Line Drawings
- Model Aircraft Magazine Plans
- Cabin Cruisers
- Coastal Forces
- Fishing Boats
- Paddle Steamers
- Leisure Craft
- Scale Traditional Craft - British Isles
- Merchant Vessels
- Scale Traditional Craft - Non British Isles
- Passenger Ferries
- Steam Designs
- Patrol Launch
- Rescue & Lifeboats
- Working Boats & Ships
- Traditional Craft - British Isles
- Traditional Craft - Non British Isles
- Racing Sailing Boats
- Sport Sailing Boats & Yachts
- Scale Sailing Boats & Yachts
- Competition Powerboats
- Competition Powerboats - IC
- Competition Powerboats - Electric
- Easy to Build Boats
- Engineering
- Hydroplanes
- X-List Plans (Boats)
- All other Boat Plans & not yet categorised
- All Plan & Hull Sets
- Sailing Plan & Hull Sets
- Motor Boat Plan & Hull Sets
- David Alderton Plan & Hull Sets
- All Boat Short Kit (Sets)
- Sailing Short Kit (Sets)
- Motor Boat Short Kit (Sets)
- All Boat Laser Cut Wood Packs
- Sailing Laser Cut Wood Packs
- Motor Laser Cut Wood Packs
- Sailing Additional Wood Packs
- Motor Additional Wood Packs
- All Boat Additional Wood Packs
- All Static Model Boats
- Narrow Static Boats
- Motor/Steam Static Boats
- Sailing Static Boats
- Working Static Boats
- RC Boat Kits
- Ready To Run Model Boats
- Boat Fittings
- Electronics (Boats)
- Hulls (FG & ABS)
- Plastic Materials & Parts
- Airbrushing (Boats)
- Rotary Tools (Boats)
- Internal Combustion Engines
- Steam Engines & Plant
- Workshop Equipment
- Model Railway Plans
- All Engineering Plans not yet categorised
- Military Vehicles
- Maintenance Trays
- Scale Model Boats
- Scale Model Buildings
- OO Gauge Parts & Kits
- O Gauge Parts & Kits
- HO Scale Parts
- White Metal Fittings
- Airbrushing (Engineering)
- Rotary Tools (Engineering)
- Engineering DVDs & Blu-Ray
- All Model Aircraft Covering
- DiaCov 1000
- Sanding & Filing
- Aircraft Books & Specials
- Aircraft DVDs & Blu-Ray
- Bargain DVDs SAVE!
- Boat Books & Specials
- Boat DVDs & Blu-Ray
- Books & Specials
- Chargers & Leads
- Control Boards & Accessories
- Hot-end Parts/Kits
- Motors/Drivers
- Teeth, Wheels & Bearings
- VORON Parts
- Automotive Parts
- Crafts & Games
- Electric Scooters
- Medical / Health
- Shot Glass Trays

30 years Experience
Of Scratch Building & Modelling The Home of the Model Builder

Made in our Workshop
Laser Cut & Printed to Order Guaranteed Quality & Detail

Sailing Boats & Yachts
Showing 1–50 of 160 results

Varmint MM2129

Water Baby ‘A’ – Plan

Ardent – Plan + Article

Argus MM405

Ariel MM746 Static Sail Plan

BALLAST PROFILES

Banoosh MM1353 Static Sail Plan

Barge Yacht MM902 Static Sail Plan

Birkenhead Catamaran MM1121

Bluebottle MM293

Boom Safar MM1327 Static Sail Plan

BRAINE AND VANE STEERING

Breakaway MM1369

Breeze (Bristol Channel Pilot Cutter) – By Dave Alderton

Brig SY34 Static Sail Plan

Brigantine SY33 Static Sail Plan

‘Hilda 2’ (Bristol Channel Pilot Cutter) – By David Alderton

Britannia – The Kings Racing Cutter – Plan

Buoy Cat MM728

Burutu & Bajima Tug

Caribee MM403

Celia Jane MM1365

“Gypsy Queen” Yarmouth Lugger

Galway Hooker – by Mike Mayhew of Waverley Models

China Boy MM501

Nookie Bear – Radio 10 Rater – Plan

Wing Ray – Plan by Vic Smeed

Comet Catamaran Plan MM1139

Crackerbox – Plan

Cumulus (Marblehead) – Plan & Article

Cutter Rig SY29 Static Sail Plan

Cygnette MM762

Dabchick – Plan

Dinghy MM153 Static Sail Plan

Duckling RC1344

Dutch Auxiliary MM240

Dutch Yacht MM1203 Static Sail Plan

Early Sixth Rate SY24 Static Sail Plan

Eowyn Of Rohan MM1181

- Patrol Launch (9)
- Scale Traditional Craft - British Isles (9)
- Scale Traditional Craft - Non British Isles (4)
- Cabin Cruisers (27)
- Coastal Forces (83)
- Fishing Boats (25)
- Leisure Craft (47)
- Rescue & Lifeboats (23)
- Merchant Vessels (51)
- Steam Designs (22)
- Passenger Ferries (11)
- Trawlers (41)
- Tug Boats (85)
- Warships (129)
- Paddle Steamers (13)
- Working Boats & Ships (147)
- Traditional Craft - British Isles (13)
- Traditional Craft - Non British Isles (7)
- Warship (4)
- Racing Sailing Boats (26)
- Scale Sailing Boats & Yachts (71)
- Sport Sailing Boats & Yachts (27)
- Easy to Build Boats (12)
- Engineering (21)
- Competition Powerboats (7)
- Competition Powerboats - Electric (7)
- Competition Powerboats - IC (9)
- Hovercraft (11)
- Hydroplanes - Electric (7)
- Hydroplanes - IC (7)
- Straight Runners (2)
- Submarines - Scale (18)
- Submarines - Sport (3)
- Unconventional Boats (15)
- X-List Plans (Boats) (20)
- All Boat Plans not yet categorised (150)
Filter by price
Average rating.
- Rated 5 out of 5 (2)
- Rated 4 out of 5 (1)

J Class yacht J9 ready to build
J Class yacht J9 ready to build – and may be “the fastest and finest yet”
Plans for the unbuilt J9, from a Frank Paine design of 1936, have been developed by Hoek Design and the project is ready to go straight into construction.
As the J Class gears up for a showcase regatta that will form part of the 35th America’s Cup in Bermuda in 2017, the fleet is growing. The J Class J8, from an unbuilt 1935 Frank Paine design reimagined by Hoek Design, will launch in the Netherlands next month, and a Swedish design, J11, is being developed.
In addition to these boats from (as the rules stipulate) original designs, J9 is ready to go straight into construction at Holland Jachtbouw. Andre Hoek, whose company Hoek Design has carried out exhaustive tests on all the super-Js, believes J9 could be the fastest and finest yet.
Ten Js were originally built between 1930 and 1937, while a number of other striking designs were drawn but never saw the light of day. The new J9 project is one of these. The original hull lines were drawn in 1936 by Frank Paine, the designer of Yankee. The design was commissioned by Gerhard Lambert, who owned Yankee and the three-mast schooner Atlantic.
“The yacht we now call J9 was never built as Lambert did not win the right to defend the America’s Cup in 1937,” explains Andre Hoek. “But Paine’s template for a super-J with the maximum allowable waterline length impressed back then and still does so today.
“The term ‘super J’ was used with good reason. During the early 1930s the waterline of the Js grew from around 80 feet in 1930 to 83ft in 1934 and 87ft by 1936. The latter were significantly faster and dubbed the super-Js because of their increased size. As Ranger and Endeavour II – which competed for the last America’s Cup race in 1937 – were both 87ft, the romantics among us can be forgiven for seeing another reason for calling them super!”
“Frank Paine designed her with a waterline length of 88ft as he was convinced that the extra foot in length would more than make up for the penalty on sail area she would have incurred,” says Andre Hoek with the air of someone who has spent a great deal of time studying his subject.
“The design also featured a fascinating hull shape with a new underwater body in the foreship. When she is finally launched, I am certain that this hull shape development will enable J9 to perform extremely well both upwind and downwind in light and heavy airs.”
Like the other three Js optimised by Hoek Design, the 21st-century version of J9 has been designed on the basis of continuous longitudinal framing in order to reduce longitudinal deflection and to reduce the head stay sag. She has been extensively optimised under the new J-class handicap system and extensive studies have been completed into key factors such as the displacement-length ratio, stability, mast position and sail area.
All the Hoek designs – whether eventually built in the 1930s or not – have been analysed with an in-house velocity prediction program. Purpose-made for these hull shapes, the VPP was calibrated on the basis of tank tests carried out at the Marin institute and the aero-dynamics were tuned using wind tunnel data.
The best performing Js in this initial research were then further analysed using Numeca’s Computational Fluid Dynamics (CFD) software. The first to be built was Lionheart, JH1, which was redesigned and reconfigured by Hoek Design. Launched by Claassen Jachtbouw in 2010, she has been very successful on the race course, winning three of the four major regattas in 2014 by significant margins.
The America’s Cup organisers are to set a series of races in Bermuda in 2017, followed by a match race between the two best yachts in the regatta.
Read more at http://www.yachtingworld.com/news/j-class-yacht-j9-is-ready-to-build-and-may-be-the-fastest-and-finest-yet-64764#ITdkMOyHxQ3wV1wP.99
www.abmys.eu
Leave a Comment Cancel Reply
Your email address will not be published. Required fields are marked *
Save my name, email, and website in this browser for the next time I comment.
Sign me up for the newsletter
{{#message}}{{{message}}}{{/message}}{{^message}}Your submission failed. The server responded with {{status_text}} (code {{status_code}}). Please contact the developer of this form processor to improve this message. Learn more {{/message}}
{{#message}}{{{message}}}{{/message}}{{^message}}It appears your submission was successful. Even though the server responded OK, it is possible the submission was not processed. Please contact the developer of this form processor to improve this message. Learn more {{/message}}
Submitting…
Uso de cookies
Este sitio web utiliza cookies para que usted tenga la mejor experiencia de usuario. Si continúa navegando está dando su consentimiento para la aceptación de las mencionadas cookies y la aceptación de nuestra política de cookies , pinche el enlace para mayor información. plugin cookies
Racing Sparrow Plans
Check out these plans and resources, ranging from a 375mm boat to a 1500mm yacht. Pair these with our eBook guide for a fast, easy, and affordable home build RC yacht.

RS-RG65 - 650mm plans, measures to international RG65 rules
A full forward hull and a straight stern. This boat has proven to be a very fast and competitive racer.

Free Book Sample - PDF
A few pages from the eBook absolutely free

Racing Sparrow 750 plans
The plans that come with the eBook.

Racing Sparrow 1000 plans
A one metre version, scaled up lines. Bulkhead only plans. Look at the 750 for full schematics.

Racing Sparrow 1500 plans - A scaled up Racing Sparrow
A larger size model yacht. I haven't seen many of these surface. It's a good challenge to build.

Racing Sparrow 375 plans - The smallest sparrow
A miniature RacingSparrow. A great introduction to building with balsa.

RacingSparrow Footy plans
A double diagonal design footy from RacingSparrow.
Logos & Sticker Sheet
Downloadable logos and an EPS file to be sent to a printer and printed out on navy blue cutout vinyl.
Common questions about the plans
What tools do i need to build a racingsparrow.
1. Chisel 2. Craft-knife 3. Drill Bit - 2mm (5/64in)bit 4. Drill Bit - 5mm (3/16in) bit 5. Electric Drill 6. Felt Marker 7. File 8. Hacksaw 9. Hammer 10. Hole Punch 11. Lighter 12. Pen 13. Pencil 14. Pins 15. Pliers 16. Ruler (steel) 17. Sanding Block 18. Scissors 19. Screwdriver 20. Spirit Level (optional) 21. Sponge Brush (several) 22. Vice Grips
Do I need the eBook to build this cool rc sailboat?
No you don't. The book is designed for the newcomer to model yacht building. The book does make it a much simpler process with every detail figured out and covered in the book. Seasoned builders can simply have a go with the free plans.
Are the plans really free?
Yes all the plans are free to download and use as you see fit. The most comprehensive plans are the RS750 A1 full size.
Are there CAD files or 3D files?
Yes there is a 3D dxf file inside a zip file that you can download for free and use how you want. Some people use this in CAD programs or in 3D modelling programmes to great effect. Look under Racing Sparrow 750 plans on this page. An STL file for 3D printing is in the pipelines. Email me if you want a copy.
While we think 3D printing is great, we believe old-skool strip planking balsa is a wonderfully simple way to make a very lightweight boat with excellent longitudinal strength and beauty.
Builders eBook
Dive into the world of boat building with our eBook. Discover the craft of hull planking, fibreglass strengthening, and lead keel ballast casting.
Master the art of electrics installation, spray painting, sail making, and tuning of sails. Download a sample today and embark on a rewarding journey of boat construction.

What the builders and sailors say:
Being a complete novice, I purchased your book a couple of years ago and built two racing sparrows. Building on this experience I then went on to build, from scratch, an IOM (Triple Crown design). I've since joined a local club and sail virtually every weekend. I would just like to thank you for your endeavours which have allowed me to enter a world I never thought was in my reach.
John Sterland, Australia
Coming upon your book, "Build your own Radio Controlled Yacht" in the Napier Public Library, I am hugely impressed. The combination of your superb photos and illustrations with your easy writing style make it a standout publication and I hope it does well for you.
Richard Spence, New Zealand
Thanks for an excellent design in your RG65. I trialled her again today in a solid 20 knots gusting higher. Even so in a steep chop and fingers off the rudder she drove upwind remarkably well, balanced perfectly. Very impressed that a model boat can handle that with a large rig. I found the book excellent. Ive built several big boats, plus a few skiffs and without that resource building such a good boat would have been impossible.
Mike Bennett
Look at all these cool boats folk have made at home
There is also a full gallery with a boat load of photos of Racing Sparrow's
Racing Sparrow #3 - rigging , Auckland, New Zealand
Apr 1, 2004

Andy Saunders + Son , New Zealand
Sep 9, 2021

Tools of the trade
Feb 2, 2019

Eric Rosenbaum , USA
Feb 2, 2009

John Clark , Perth, Western Australia
Nov 22, 2008

Jonathan Daniel
Oct 9, 2008

Racing Sparrow 750 - Terry Plumridge , Vienna, Austria
Jan 26, 2018

Miss Sunshine, RS750 by Terry Plumridge from Vienna Austria. Built for his wife Gertraud. Terry writes " Firstly thanks for writing your book, it introduced me to building from plans, and plank on frame construction, both of which I enjoyed tremendously."
An icy looking spot for a 375!
Jan 3, 2011

Mel Kitson's 750 , Watford UK
Jun 5, 2013

Hi, Bryn, I enjoyed the build immensely. There were areas where I had some uncertainties, some of which were assisted through the forum posts, and some of which I improvised. All in all I am truly delighted with the end result and now look forward to learning to sail and enjoying many happy hours "playing". Kind regards, Mel Kitson
Budi Santoso , Indonesia
Apr 4, 2019

IMAGES
VIDEO
COMMENTS
This is a quick overview of the building process that is needed to build a model J boat. Below is a list of most of the materials that were used. WOOD. 2 - 1"x8"x8' pine, aspen, bass or other suitable wood that can be cut into 5/32"x3/8" strips for hull and deck planking.
I want to build a real old school type, all wooden pond yacht. i've built scale models, but I'm after a specially designed pond yacht. all I can find on the net is sight unseen "plans", usually no more than one 8x11 sheet. it would be nice if a sailplan was included, as well a bit of rigging detail. I don't care if it calls for plank on frame ...
The class of this boat is known as Vintage Marblehead (VM) and is still actively sailed today under the guidance of the U.S. Vintage Model Yacht Group. The Marblehead class of small boat originated in 1932 using minimal design requirements of 50″ LOA and 800 square inches of sail. When fully rigged the boat is over 7′ tall, which makes it ...
Build Manuals and Information. This section contains the build manuals, Canterbury Rules and other information which will be of use in building and setting up your model. Click on the relevant document to open it up. There are two main purposes for publishing the build manuals on this web site. The first is to help those who have bought a kit ...
Feel free to contact me on [email protected] if you have any questions. You can also phone on 07969 538626 but I'm often out of the country and calling can be expensive.
Inconnu. Endeavour demi-coque 43, 53, 63, 87, 100, 120 cm sans plateau par L'Herminette. Inconnu. MM-07 ENDEAVOUR 1934 HALF HULL by Abordage. Inconnu. HM-PM-07 ENDEAVOUR I - 1934 FRAMED HALF MODEL by Abordage. Inconnu. Half Hull Endeavour red 80cm. Inconnu.
Ranger is a 41.55 metre replica of the J Class yacht of the same name, which was built for the 1937 America's Cup by a syndicate led by railroad heir Harold Vanderbilt. Starling Burgess and Olin Stephens had been asked to produce eight sets of lines and the one selected as most suitable for the conditions expected off Newport, Rhode Island — design number 77C — was one of Burgess ...
Introduction. Getting a Perspective. The Rule and why have a Rule. Designing to fit the Rule: ideas for shape, aesthetics, of hull design, displacement ,and other practical matters. Materials needed. Carving the hull. Making and fixing the keel. Making a rudder. Paint and Finishes for hull, keel, rudder, mast, etc.
In total nine J Class yachts are active now with six replicas having been built since 2003; Ranger, Rainbow, Hanuman, Lionheart, Topaz and Svea. ... It's objective is to keep the J Class fleet and races alive and to encourage new build yachts (replica builds from original plans) to join the Class. The intent is to race the surviving Js, new ...
The class was selected for America's Cup racing in 1928. But a bowsprit installed on the model. easily dates it back into the mid to last half of the 19th Century. yachts prior to 1900. This would include any of the yachts in the America's Cup 1893-1903 Class, known as the great 90-footers, and.
J Class yacht Velsheda sailplan. LOA: 39.25m/128ft 9in · LWL: 27.8m/91ft 3in · Beam: 6.57m/21ft 7in · Disp: 180 tonnes. Original lines: Charles E Nicholson. Modified design: Dykstra Naval ...
The J Class model range consists of two J Class hulls, the Nottingham 48 and the Nottingham 60, each of which can be built to carry either bermuda rigs, gaff rigs and coming shortly a genoa rig. In addition I'm nearing the end of the development of the International Dragon, a little under 60 inches and designed from outset to carry a genoa rig ...
J Boat. J Class. The J Class models are 1/16th scale hulls of the J Class yachts that sailed for the America´s Cup from 1930 through 1937 as well as the yachts that were converted to the J Class and competed with the America´s Cup yachts in club regattas. The models are the largest recognized class in the AMYA with hull lengths ranging from ...
This should make a good starting point for tuning and you should ensure that there is sufficient room to adjust on all of the adjusters. Adjust the kicker or vang so that the end of the mainsail boom is able to move up and down about 10mm. The kicker changes the twist in the leech of the mainsail. Adjust the foot of the mainsail and jib so that ...
Amati ship model plans are faithful interpretations of the original vessel. Amati ship model plans and instructions are always excellent and easily followed. Amati has integrated computer design and the latest materials to produce high quality ship model plans. The J Class Yacht Endeavour Americas Cup Model Plans (1:80) by Amati Models.
The J Class emerged in 1930 and marked a quantum leap in yachting technology, but comprised a hotchpotch of design altered over many years. The J Class - so named because it was the letter ...
J Class yachts Velsheda, Topaz and Svea downwind legs. The J Class is one of several classes deriving from the Universal Rule for racing boats. The rule was established in 1903 and rates double-masted racers (classes A through H) and single-masted racers (classes I through S). From 1914 to 1937, the rule was used to determine eligibility for ...
The J Class Association was founded in 2000 to protect the interests of the Class, present and future, and organises an annual calendar of racing for these magnificent yachts. 2024 Calendar. 19-22 June.
I have been a designer of model and radio yachts since 1968. Boats been built from my plans now number in the hundreds both from both home and production builders. ... Goth 36 2017 is an 36 inch restricted class design based on the Goth IOM design. The original request came from John Fisher in 2013 who wanted a very light 36r for vane sailing.
Yachts. In total nine J Class yachts are currently active, including three original surviving Js - Velsheda, Shamrock and Endeavour - and six replicas that have been built since 2003; Ranger, Rainbow, Hanuman, Lionheart, Topaz and Svea.
Ardent - Plan + Article. SKU: MAR3022. Two sheet plans for a classic ply chine sail cruising yacht length 900mm and beam 260mm. Hull lines and rig... £ 20.00 £ 18.00 Add to basket.
J Class yacht J9 ready to build - and may be "the fastest and finest yet". Plans for the unbuilt J9, from a Frank Paine design of 1936, have been developed by Hoek Design and the project is ready to go straight into construction. As the J Class gears up for a showcase regatta that will form part of the 35th America's Cup in Bermuda in ...
Build a sparrow in less than 3 hours! Oct 18, 2013. Take a look at the blog section for a full write up about this model. 7 designs absolutely free to download. Here is a selection of plans and resources. Everything from a 375mm boat right up to a 1500mm fast yacht.