Building, restoration, and repair with epoxy


Replacing Damaged Balsa Core
By bruce niederer — gbi technical advisor.
Above: Surprisingly, much of the damaged balsa core on TRIPLE THREAT was well bonded to the glass skin, as it was to this section of skin around the chainplate. The bad core that didn’t come out with the glass skin was removed with a chisel.
I love my boat. I love to spend time with it-sailing it, working on it, improving it.
I think I need my head examined.
Seriously, there’s got to be something wrong with me! I actually expected that applying a new non-skid deck to TRIPLE THREAT, our 1981 Pearson Flyer, would be a fairly straightforward project. I always think like that before I get started. One would think I might know better by now, but that type of learning apparently requires some protein sequence that’s missing from my DNA.
I started the project by removing all the hardware from the deck-winches, cleats, instruments, lights, sail tracks-everything. This included the old teak toe rails, which I would replace with extruded black anodized aluminum. My apologies to wooden boat enthusiasts, but since I primarily race our boat, maintaining wood trim is time wasted for me.
After removing everything, I planned to apply the hardware bonding techniques described in the WEST SYSTEM® User Manual and repair manuals. Hardware bonding involves drilling all the existing holes oversized. These holes then get filled with thickened epoxy and the proper sized hole is re-drilled through the center of the epoxy when the hardware is ready to be remounted. Doing this would be a good way to protect the balsa core from moisture damage.
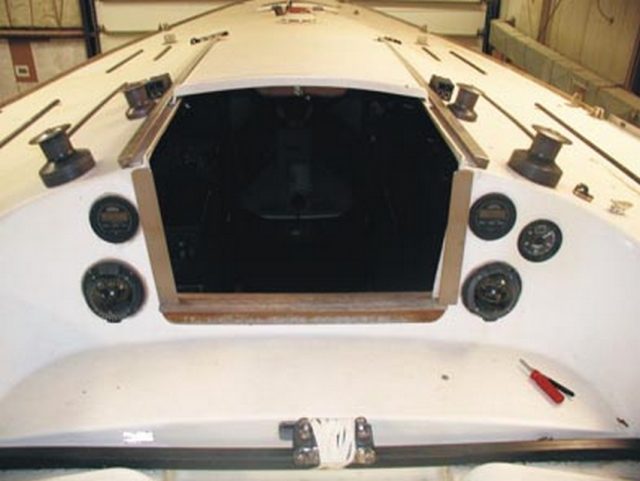
Before removing the hardware, it looked like a straightforward project.
As I started drilling the oversize holes, my project expectations headed south. There are tracks for the #3 Jib just behind the chainplates, and drilling these holes oversize revealed that the balsa wood coming out was black and wet. This is bad. When I used another technique where a bent nail or Allen wrench is mounted in a drill motor and used to ream out more damaged balsa core material than just the diameter of the hole, water actually splashed out on deck.
#@*%! This was worse. I found the same condition where the middle reaching track for the #1 Genoa is mounted (below). So now, my new non-skid deck replacement would have to include removing and replacing the bad core—on both sides of the boat, of course.
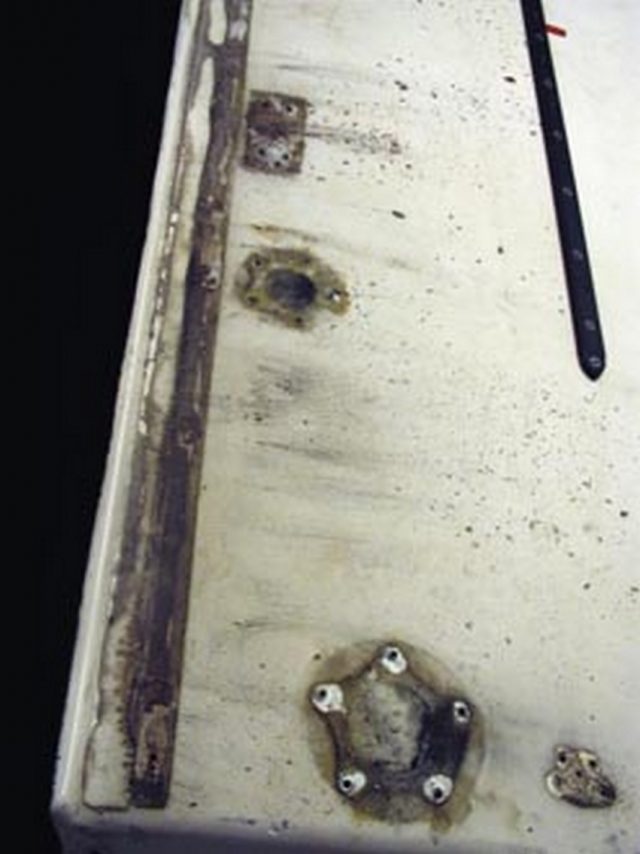
The damaged balsa core began to be revealed when the hardware was removed.
Replacing the damaged balsa core involves removing the fiberglass skin to expose the core. This can be done either from the topside or below deck. In my case, since the deck was getting new non-skid anyway, the repair would be easier from the topside. Using a circular saw, shallow cuts were made just deep enough to cut through the top skin to open up the damaged area once the skin was removed. A series of cuts were needed, enlarging the area incrementally until good core was reached. The bad core that didn’t come out with the glass skin was removed with a chisel.
It may seem odd that rotten, wet balsa was still bonded securely enough that it had to be removed with a chisel. Many folks have the misconception that balsa is a poor choice for core material, that it will act like a sponge and disintegrate quickly if water gets to it. This is not the case. End grain balsa retains a high percentage of its compression strength and structural integrity for a surprisingly long time after it gets wet exactly because of the grain orientation. Water soaks in much more slowly perpendicular to the grain than it does with the grain-and the end grain is bonded to the skins, so it’s inaccessible. There was no softness in the deck or any indication of the core damage in the deck while the boat was in use last season. Eventually, there would have been, but since the boat is 20 years old, I was very impressed with how well the balsa performed over the years.
Yes, balsa core is heavier than foam, but foam cores have their own weaknesses to be dealt with, and it’s wise to replace whatever core was originally used with the same material. Assuming the skins are the same, a balsa core laminate would be stiffer than a foam core laminate due to balsa’s higher density and shear modulus. Also, according to the Forest Products Laboratory ratings of numerous wood species regarding rot resistance, balsa has the same rating as okoume and meranti: mildly resistant. Okoume and meranti are widely considered a good choice for marine applications, especially when properly coated and installed. So, application and technique are the key factors in using any mildly resistant species of wood, balsa included.
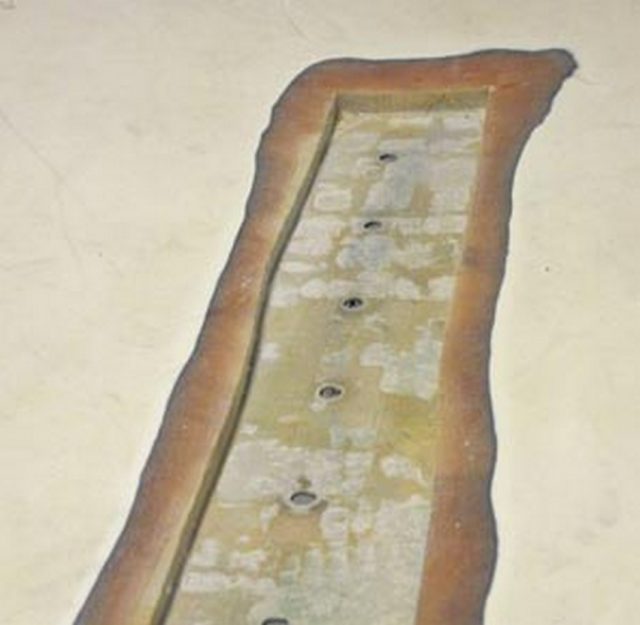
The exposed openings were prepared for repair after the damaged balsa core was removed. A 12:1 bevel was sanded into the fiberglass deck skin around the openings.
After the damaged areas were defined and the bad core removed, the exposed openings needed to be prepared for the repair (above). First, the inside of the exposed bottom skin was sanded with a palm sander and 80-grit paper to clean and level the surface that the new core would be bonded to. Then a smooth and uniform 12:1 bevel was sanded in the fiberglass deck skin around the openings with an orbital sander. Since the skin was 1/8″ thick, this meant the bevel extended 1½” back from the edge of the cut (below). The 12:1 bevel is necessary to provide an adequate bonding surface when laminating in the skin repair patches. (Refer to Chapter 5 in Fiberglass Boat Repair & Maintenance .)
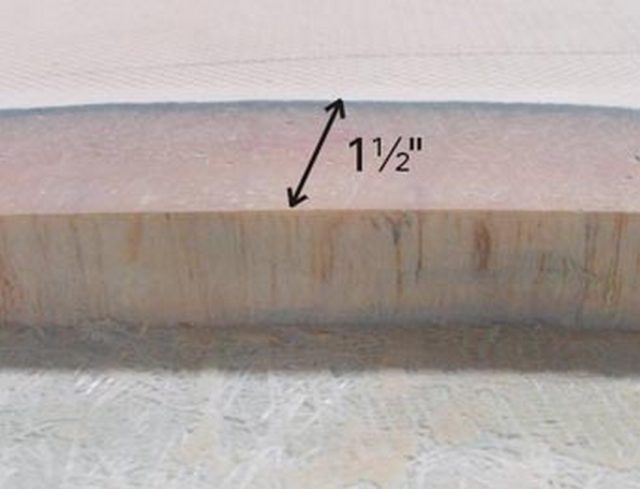
Since the skin was 1/8″ thick, I needed to grind 1½” back from the edge of the cut to make a 12:1 bevel.
Next, ¾” contour core balsa was cut to fit the openings. The term ‘contour core’ means that the core, whether balsa or another core material, has a series of cuts through it. Typically these cuts run perpendicular to each other along the length and width about 1″ to 1½” apart, forming a grid of blocks that are held together by a loosely woven cloth called scrim. This allows the core to follow curvatures in the deck, whether convex or concave. One problem in using contour core is that the blocks of core will separate to some varying degree in conforming to a curve. The resulting gap must be filled to prevent water migration within the deck or hull. With this in mind, I installed the core using a two-step bonding technique.
The first step was to brush neat (unfilled) WEST SYSTEM® 105 Resin®/ 206 Slow Hardener ® over the entire bonding surface inside the opening. This was necessary because even after sanding, the surface remained somewhat irregular because of the chopped strand fiberglass used to build both the upper and lower deck skins. The neat epoxy flows to better fill this fairly level but uneven surface.
The next step was to thicken 105/206 with 407 Low-Density Filler to a consistency slightly thicker than mayonnaise. With an 809 Notched Spreader , a small amount of this “core bedding” mixture was applied around the edges of the repair against the existing core; more was spread out over the neat, uncured epoxy already brushed on the area. The core was then draped over a 10″ diameter PVC tube. Then core bedding mixture was applied in the cuts between the blocks as they opened, both in the 0° and 90° directions, when the tube was rolled. Then the filled core was fit in place and compressed down, squeezing out any excess bedding mixture. Finally, the repair area was cleaned up, all excess bedding mixture was removed, and any voids or gaps were filled using a squeegee, taking care to maintain the 12:1 bevel. A layer of release fabric was placed over the repair and worked down with a squeegee, and everything was allowed to cure completely.
The core was fit in place and compressed to squeeze out excess bedding mixture, and any excess bedding mixture was removed.
The density of the core bedding mixture is greater than that of the core. Therefore, care should be taken to avoid filling too large an area with bedding mixture. This can cause hard spots that affect the designed stress loading patterns of the deck structure or exotherm if too thick of a layer is applied at one time. One area that was filled with the epoxy bedding mixture was around the chainplates, which are notorious for leaking, and were the primary source of trouble on TRIPLE THREAT as well. A gap was left between the core and the chainplate on all sides, then filled with the core bedding mixture to isolate the new core from any water that may leak along the chainplate in the future (below).
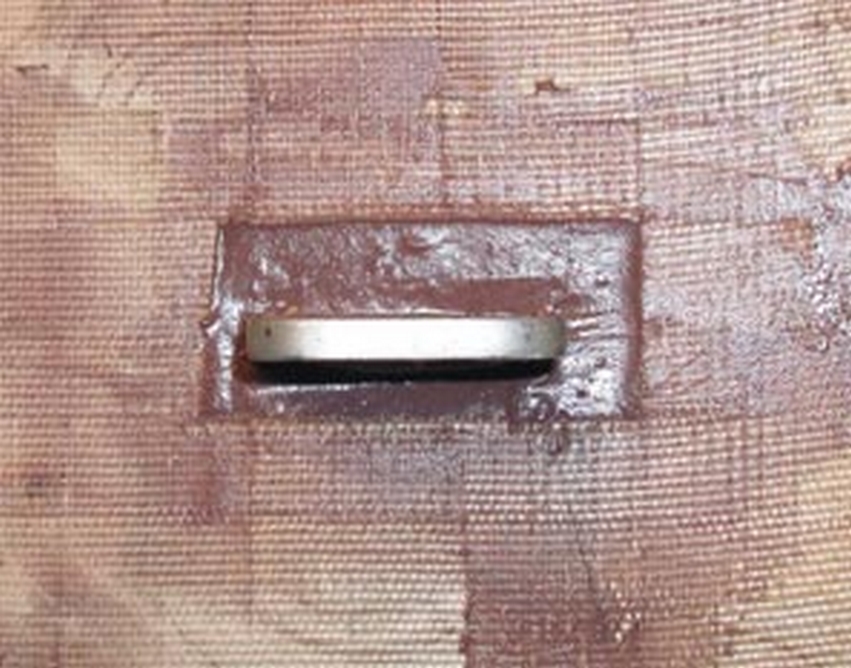
A gap between the chainplate and the new core was filled with a bedding mixture to isolate the core from any water that may leak along the chainplate.
The next step involved cutting fiberglass for the patches and laminating them in place. As mentioned earlier, both the top and bottom fiberglass skin of the deck laminate is completely built using chopped strand construction. This was undoubtedly achieved using a chopper gun, which was and continues to be, widely used in production boat building where polyester or vinyl ester resin systems are used. The thickness of a piece of removed deck skin measured with calipers was approximately 0.14″. Instead of doing the whole repair in chopped strand mat alone, I decided to use Episize™ 738 Biaxial Fabric with mat, which is a 15 oz/yd2, ±45° fabric with an 8 oz chopped strand mat on one side. The main reason was that I could build up the same skin thickness with only two layers of the 738 as opposed to 3-4 layers of chopped strand mat. Measurements indicated that two layers of 738 would make the repair slightly lower than the surface of the surrounding deck. This depression would eventually get filled and sanded.
The repair patch technique mentioned starts with the 12:1 bevel that was ground before the core went in. Then, two pieces of 738 glass were cut to shape for each repair area. The bottom, or first piece in, got cut so that it fits about ½” smaller than the outer edge of the bevel around the circumference of the repair. The top piece was cut so that it was about 1″-1½” smaller around the same circumference. Using WEST SYSTEM® 105/206 and a plastic spreader, the two patches were laminated into each repair area, the larger piece going in first followed by the smaller one (below). We are very confident based on testing done at GBI that this repair technique (described in detail in Chapter 4 Fiberglass Boat Repair & Maintenance ) will produce the strongest repair possible. Once again, 879 Release Fabric was used to firmly squeegee the repair laminate in place to compact the fibers and create a no-prep surface for fairing.
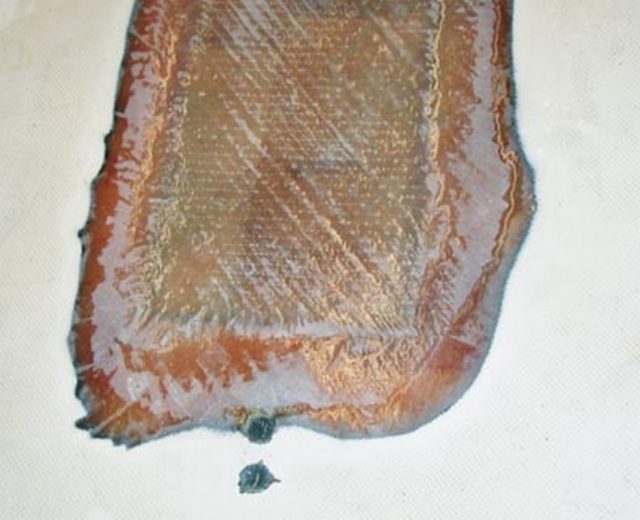
With the larger piece of fabric going into the repair area first, followed by the smaller one, only the edges of the fabric are abraded when the repair is cured and sanded.
Once the epoxy cured for a few days, the release fabric was removed. Any rough edges or high spots around the circumference of the repairs were sanded off with an orbital sander. Then a fairing mixture of 105/206 with 407 Low-Density Filler was prepared to a consistency of peanut butter. The higher the percentage of 407, the easier the sanding would be. I made a special tool using an old heavy mainsail batten mounted to a piece of wood so that half the batten was off the wood (below). The tool was long enough to span beyond the length of the long repair. The areas that needed filling were slightly overfilled with the fairing mixture using a squeegee; then, the batten tool was used like a long spreader to smooth and scrape off excess mixture. This was allowed to cure a couple of days. Then a 4′ longboard (long sanding block) was used to sand the filled patches. High and low spots were identified, more filler was applied where needed, and the repair was sanded with the longboard again. Once the repaired area was smooth and fair with the deck, a neat coat of 105/206 was rolled over the sanded 407 surface to fill any porosity and to ready the surface for painting.
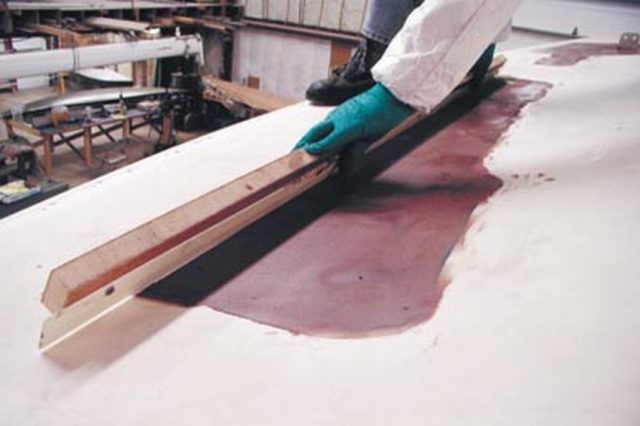
I used the batten tool like a long spreader to scrape off excess mixture.
After all this, I was finally back to where I started. Having replaced the damaged balsa core, I was ready to properly reinstall the hardware to avoid more damage and get back to applying a new non-skid surface to the deck (below). In the next issue of Epoxyworks , I describe the details of that portion of the project . I should be nearly done by then.

After replacing the damaged balsa core, I was finally back to where I started-ready to start applying new non-skid surface.

- Forums New posts Unanswered threads Register Top Posts Email
- What's new New posts New Posts (legacy) Latest activity New media
- Media New media New comments
- Boat Info Downloads Weekly Quiz Topic FAQ 10000boatnames.com
- Classifieds Sell Your Boat Used Gear for Sale
- Parts General Marine Parts Hunter Beneteau Catalina MacGregor Oday
- Help Terms of Use Monday Mail Subscribe Monday Mail Unsubscribe
Wet HULL Core Repair
- Thread starter RobC222
- Start date May 31, 2010
- Forums for All Owners
- Ask All Sailors
Discovered this spring wet core in lower half of the transom in in the starboard side hull from the transom forward to the keel, from the water line down to the centerline. Likely source is exhaust tube and engine water inlet. Core samples indicate balsa is wet, but not yet rotted. Balsa came out normal color (not black), saturated with water. I have seen the info on this site and related blogs about recoring. With this extensive an area (at least 100 sqft), a professional recoring is not possible given my limited financial commitment to the boat. Likewise, I am not in a position to do it myself. Ideally, I would like to sell to someone with the time/skill/money, but, in lieu of that, I am seeking alternative methods to repair other than recoring. Is it possible to open the core to the air by drilling a grid of holes thru the outer skin, and allowing to dry over a winter? Or drill from the inside, and run a humidifier for several months to dry out the core?? Any ideas you have heard of, or leads to sites/blogs where project like this have been completed would be welcome.
Hermit Scott
You have a cored hull BELOW the waterline? Did you use a moisture meter to determine that the core is wet in all of that area? How accessible is the inside of the hull in the area that has the wet core?
That is pretty much a dead boat
tommays said: That is pretty much a dead boat Click to expand
100 Square feet on a 30 foot boat? That is like 8x12 feet or 4x25 feet or 10 feet square. Or 3-4'x8' sheets of corecell. It will take 5 gallons of core bond and 30 yards each of chopped strand mat and glass cloth Probably 10 gallons of resin. if you can't do the job yourself then get a different boat.
I hate to say it but it sounds like a death blow to the boat. Even if you could repair it, the economics of repairing it hardly make sense. You might be better of piecing the boat apart and trying to sell them (engine, rigging, sails etc.). Sorry for your loss....
I think that the material cost for the repair would fall between 2000 and 3000 dollars. The special handling needs for the work may add another 1000. If you had to hire the work done it would break the bank.
- This site uses cookies to help personalise content, tailor your experience and to keep you logged in if you register. By continuing to use this site, you are consenting to our use of cookies. Accept Learn more…
- New Sailboats
- Sailboats 21-30ft
- Sailboats 31-35ft
- Sailboats 36-40ft
- Sailboats Over 40ft
- Sailboats Under 21feet
- used_sailboats
- Apps and Computer Programs
- Communications
- Fishfinders
- Handheld Electronics
- Plotters MFDS Rradar
- Wind, Speed & Depth Instruments
- Anchoring Mooring
- Running Rigging
- Sails Canvas
- Standing Rigging
- Diesel Engines
- Off Grid Energy
- Cleaning Waxing
- DIY Projects
- Repair, Tools & Materials
- Spare Parts
- Tools & Gadgets
- Cabin Comfort
- Ventilation
- Footwear Apparel
- Foul Weather Gear
- Mailport & PS Advisor
- Inside Practical Sailor Blog
- Activate My Web Access
- Reset Password
- Customer Service

- Free Newsletter

Pearson Rhodes 41/Rhodes Bounty II Used Sailboat Review

Hallberg-Rassy 42 Used Sailboat Review

How to Perform Your Own Pre-Buy Inspection

Beneteau 323 Used Boat Review

How Does the Gulf Stream Influence our Weather?

Can You Run a Marine Air-Conditioner on Battery Power?

Preparing Yourself for Solo Sailing

Your New Feature-Packed VHF Radio

Practical Sailor Classic: The Load on Your Rode
Anchor Rodes for Smaller Sailboats

Ground Tackle Inspection Tips

Shoe Goo II Excels for Quick Sail Repairs
What Oil Analysis Reveals About Your Engine

An Unusual Sailboat Shines a Light On A Sustainable Future

Is It Time to Get an Electric Dinghy Motor?

Bottom Paint 30-Month Update

Battle of the Teak Cleaners — Snappy Teak-Nu vs. Star Brite

New Seacocks for the Offshore Sailor
Bottom Paint Care

Are E-bikes Worth the Extra Weight and Cost?
How to Handle the Head

How to Select Crew for a Passage or Delivery

Preparing A Boat to Sail Solo
Re-sealing the Seams on Waterproof Fabrics

Waxing and Polishing Your Boat

Reducing Engine Room Noise

Tricks and Tips to Forming Do-it-yourself Rigging Terminals

Marine Toilet Maintenance Tips

Learning to Live with Plastic Boat Bits
- Inside Practical Sailor
Rotten to the Core: Deck Core Repair Advice
Best deck core repair depends on core type and extent of damage.
Cored decks are a soggy subject for many owners of older boats, but owners of new boats have to be wary too. I turn to one of our regular contributors, Capt. Frank Lanier, for this week’s blog on this topic. Captain Frank Lanier is a 27-year Coast Guard veteran and Accredited Marine Surveyor with over 30 years of experience in the marine and diving industry.
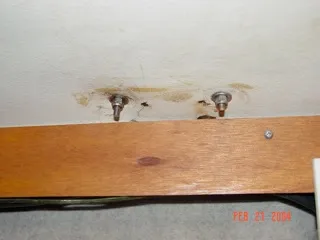
Mounting hardware directly through a cored decking without taking the proper precautions to prevent moisture entry is asking for trouble. Photo 1 shows a leaky lifeline stanchion that has caused the coring beneath its base to rot. The mounting nuts are drawn up so tight they’re crushing the panel, no doubt caused when the owner tried to stop the stanchion from wiggling, and to try and stop the leak as well. Note the inadequately sized washers and lack of a backing plate.
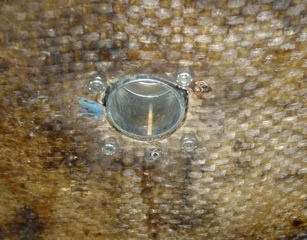
Anytime you screw or drill through a cored panel, the first rule is to properly seal the core against moisture entry. There are a number of ways to do this, but the best one is to avoid breaching the core material in the first place. In a perfect world, your boat’s manufacturer has anticipated where all deck penetrations are necessary (stanchion bases, cleats, etc) and has “de-cored” these areas by reverting to solid fiberglass, allowing you to mount hardware without drilling into the core.
In the case of new installations however, chances are slim-to-none that any of these areas will coincide with whatever aftermarket doo-dad you want to mount, meaning you’re going to have to seal and protect the core the yourself. There are a number of ways to handle this problem, and how you deal with them will depend on a variety of issues, such as what sort of hardware you are mounting, what kind of access you have below decks, what sort of loads are expected, etc. In all the recommended approaches, the object is to make it impossible for any leaks to get to the core.
The typical approach to sealing core for any new hardware installation is to carve out about 3/16-inch of the surrounding core using a makeshift “bit” on a drill. A bent nail works, but we’ve had more luck with a DIY modified roofing nail core-removing-bit , which made quick work of the core without damaging the inner or outer fiberglass skins. Once the core is removed, you mix up some high-density epoxy filler compound to a non-sag consistency (peanut butter-ish), and spread it into the cavities you just carved out. For the nitty gritty details on how to seal core for hardware mounting (and a range of other repair and maintenance issues), check Chapter 7 of the free book “ Fiberglass Boat Repair And Maintenance ” published by Gougeon Brothers. You can order a hard copy or download a free PDF. It’s a good how to booklet and well worth space on any vessel’s bookshelf – or hard-drive.
And for a more detailed discussion on the pros and cons of cored construction, check out our October 2007 feature “In cored hull construction, does high-tech mean high-quality?” Don Casey’s book “ This Old Boat ,” also offers some tips on how to address cored deck installations.
Our two-part series on core repair explored some unconventional methods of repairing plywood and foam deck core using glue injection , as well as described a step-by-step decl core replacement project . We’ve also looked at ways to ensure maximum penetration of any glue or resin injection using a grease gun to force the resin laterally through the core. If you are repairing hardware be sure that it is well reinforced with a backing plate. In an August 2016 report “ How Big Does a Backing Plate Need to Be ?”, Practical Sailor tested various backing plate materials as well as discussed the proper sizing.
If you are facing a deck core repair or replacement project, two other reports worth reading are Practical Sailor June 2013 “ Through-bolting Fiberglass: An Inquiry into Failure Modes ,” and Practical Sailor October 2007 “ Cored Hull Construction, Does High Tech Mean High Quality? .”
RELATED ARTICLES MORE FROM AUTHOR
I just recorded my Mainship mk1 78 model. The cabin top felt pretty good and I thought it would be spot repairs. 90% was gone. I cut gutted recored with balsa and refiberglassed. The flybridge and the railings are all 3M 5200 attached. No penetration anywhere in that cabin top except the 1 controls tube that allows the controls and electronic feeds down below. You nay sayers, it’s solid as a church. 3M 5200 sheer strength is about 750 psi. Cheers rl.
LEAVE A REPLY Cancel reply
Log in to leave a comment
Latest Videos

What Is The Best Folding Bike For Your Sailboat?

The No Expense Spared Antigua 60 Cruising Sailboat Soolaimon

How To Buy Sails – With Joe Cooper


Bavaria C42: What You Should Know | Boat Tour
- Privacy Policy
- Do Not Sell My Personal Information
- Online Account Activation
- Privacy Manager

- Boat Accessories
- Where to Buy

Special until May 31st: 35% off Teak Deck Sealant for the month of May. Use Code MAY24 at checkout. *restrictions apply
Free ground shipping in the Continental US for any orders over $150!
Sailboat Deck Repair Guide...
Sailboat deck repair guide.

A sailboat is only as good as two things: the people sailing it, and the materials keeping it afloat. And though you may be an expert navigator and sailor, sometimes, the latter can disappoint you. That’s when it’s time to dust off the work gloves and consider handling some light repairs yourself. But how can you do a sailboat deck repair your own—and is it worth the extra time and labor? Here are a few tips for handling your sailboat deck and keeping it in tip-top shape.
Know Your Sailboat Deck—And How to Repair It
It starts with a basic understanding of your sailboat deck. According to Sail Magazine , many “decks are cored with end-grain balsa or plywood with a fiberglass laminate on each side.” If this is the case for you, you might notice that moisture can work its way into the core of the deck, which tends to rot the quality of the wood over time.
When the plywood core of the deck goes bad, it will generally be better to replace this plywood rather than work around the issues. However, try to get a second opinion before you start tearing out old decking. For example, you might be able to use:
Liquid LifeSeal® Sealant 5.2 fl. oz. Clear
Stainless Steel Cleaner 16 fl. oz.
Related blogs, thanksgiving trivia.
Thanksgiving is one of America’s oldest and most loved holidays. Even though the story is steeped in a dark history […]
Detailing Your Boat
There’s nothing better than hitting the water in a beautiful boat. A warm summer day with the sun shining, there’s […]
How To Properly Clean Your Boat Trailer
We all know that cleaning your boat is important to not only keep it looking great, but to also ensure […]
All products proudly made in the usa


Delamination repair
Wet core is a recipe for problems, but repairing the problem is often not as hard as you may think.
Wet core is one of the most common problems you’ll find in boats constructed with a cored-laminate hull or deck, particularly those of a certain age. Although tackling such damage can be a messy job, repair jobs are not as difficult as you might think.
Decks and cabinhouses are often made of cored laminates, typically using balsa, plywood or foam, and all of these are susceptible to water intrusion. It’s a misconception that foam cores are impervious to water intrusion, and even these cores can sustain damage. When moisture enters the core, it starts to degrade, compromising the integrity of the deck or hull.
Balsa is the most common core material because it’s inexpensive, light weight and has very good compressive strength. The downfall of balsa is it absorbs water very quickly and degrades faster than plywood. Plywood is typically used in areas where strength is needed such as around chainplates, mast partners and winch bases. Decks with foam core may have multiple densities of foam to achieve the strength needed in areas of high load or where weight savings are needed.
There are a couple ways damage to the core occurs from moisture intrusion. The primary damage is from rot. You can mitigate the damage by carefully sealing every fitting in the area of wet core, which prevents additional moisture from entering, but also seals the core from oxygen, slowing the decomposition process.
This is an important measure to take as soon as you notice an area of soft core. When core material rots it loses its bond to the FRP skins, also known as delamination.
Laminate with moisture intrusion can also be damaged from the freeze-thaw cycles. When damp laminate is exposed to repeated freezing and thawing and therefore expansion and contraction, delamination occurs.
Regardless of why an area delaminates, when it gets bad enough, it will need to be repaired.
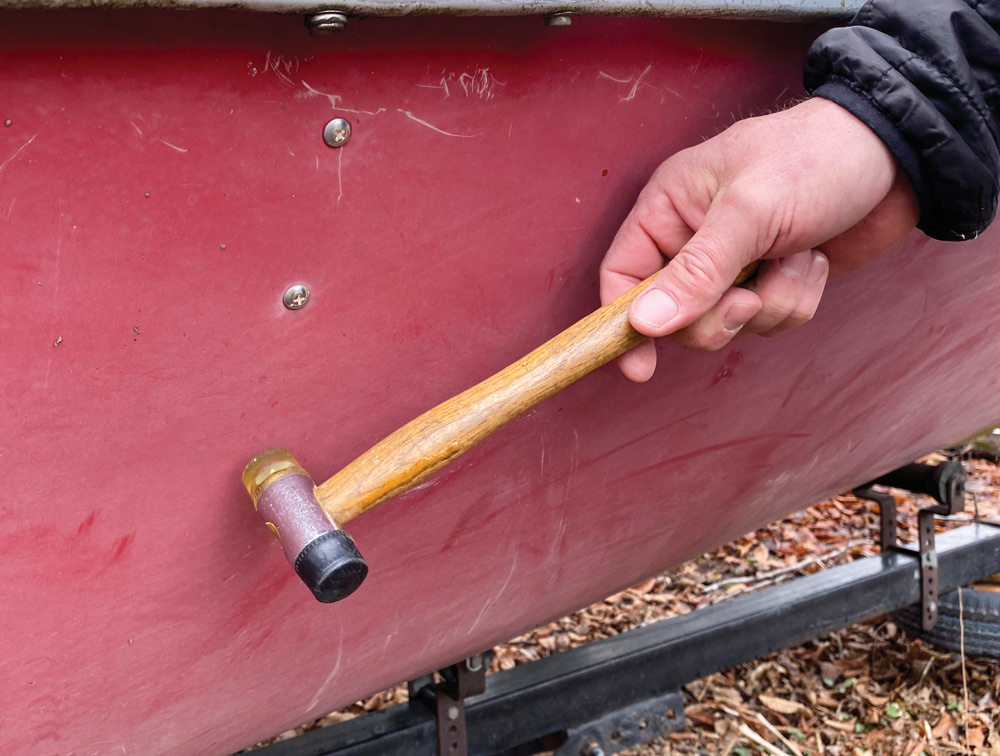
Severe delamination can sometimes be easy to spot; you’ll literally be able to feel the soft area. But you can check for and identify delaminated areas with a plastic hammer. Tap on suspect areas, listening for a change in tone. Areas in good shape will have a “solid” tone. Delaminated areas will sound dull. If you come across a dull-sounding area tap around it, working out until you get to a solid sound. Mark off the suspect area with chalk or tape.
If you suspect delamination under a fitting such as a stanchion, try putting some load on it and watch to see if the deck moves. If it does, there is likely delamination.
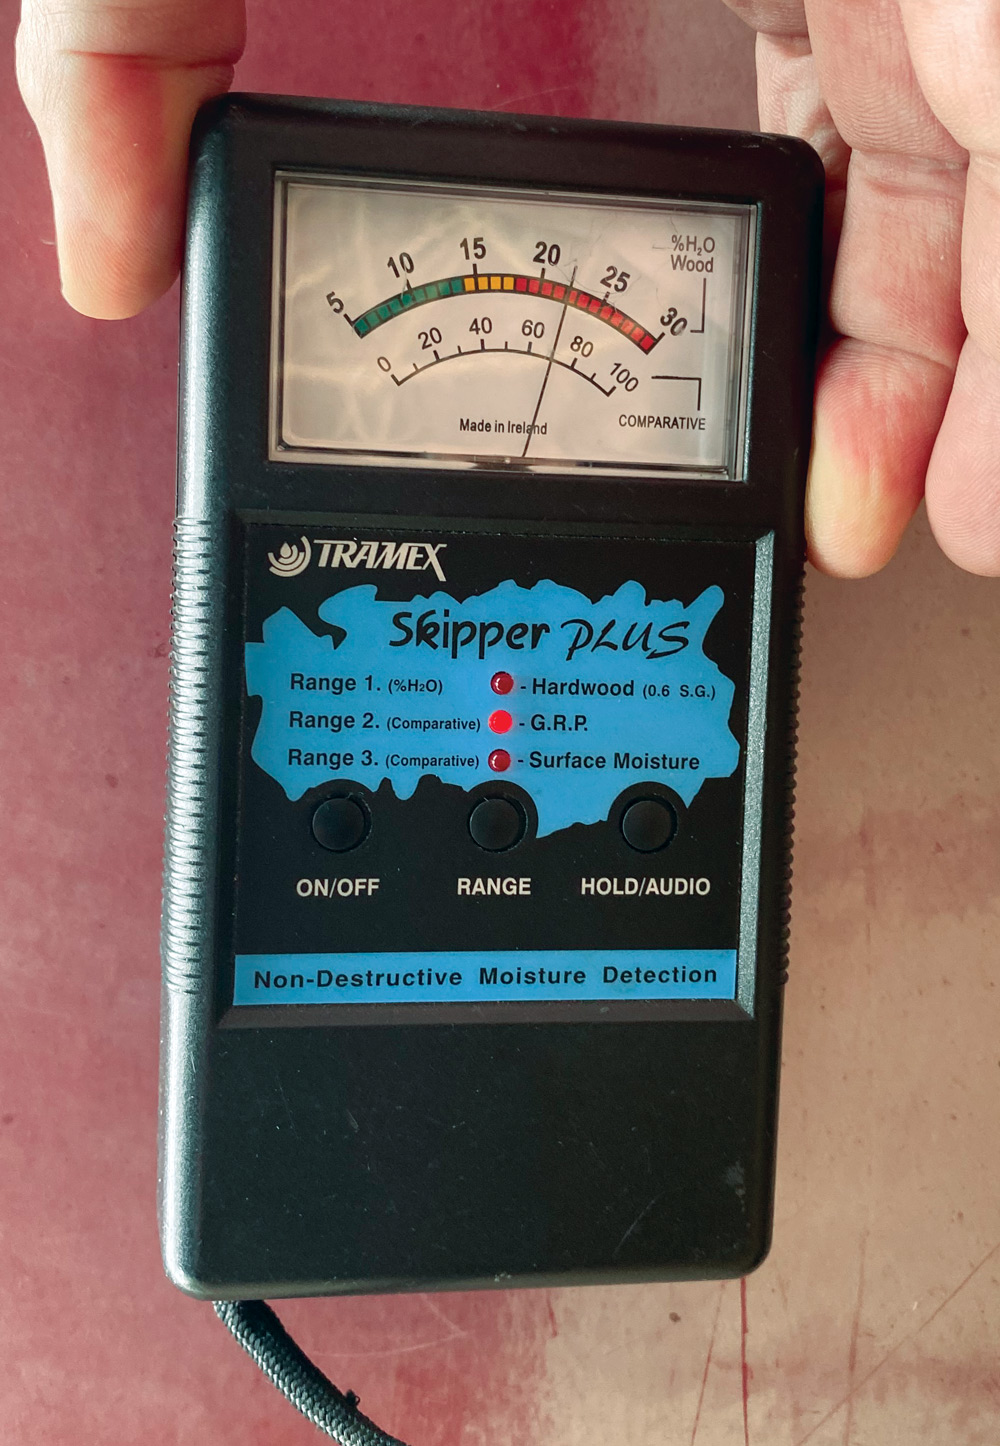
Moisture meters can also be used to check for delamination, but use caution in interpreting the reading. Moisture meters work by reading how conductive a surface is, but there are many materials that are conductive, including additives in paint and gelcoat. The best way to use a moisture meter is to take comparable readings from similar locations to see of the laminate is more conductive in one location compared to a similar location.
Once you’ve identified an area of delamination that needs repair, it’s time to get started on what will be a messy project.
1. Start by removing all fittings in the area to be repaired and determine how you want to attack the project. Consideration should be given to ease of working conditions and the final finish of the repaired area. For example, if the area to be repaired is on the deck, you may want to consider performing the repair from the interior to minimize any gelcoat or paint work on the deck needed to match the existing finish. However, if it is physically impossible to reach the damaged area from the interior, you’ll save time by doing the repair from the outside even if it includes fairing and paint or gelcoat work.
2. Determine the area of the damage to be repaired and mask off and protect as much of the surrounding area as possible. You will need to do a fair amount of grinding and sanding and fiberglass dust gets everywhere.
3. Using a small oscillating saw, cut the fiber-reinforced plastic skin and remove it. If you are lucky and manage to remove it in one piece you may be able to reuse the skin, but typically it is damaged or needs to be cut out in smaller pieces, which renders it useless. When cutting the outer skin, take care not to cut too far into the laminate and definitely do not cut completely through. Start small and when you remove the outer skin you can then get a good assessment of the condition of the core. From this point, you can start to remove the core and addition outer skin until you get to a point where the core material is dry and the laminate is sound.
4. Once you have opened up the laminate and cut out all the damaged areas it is time to start prepping the areas for the new core and skin laminate. The core area will need to be sanded to remove any imperfections, contamination or ridges. Grind a scarf joint around the repair area to a width of 12 times the thickness of the skin, about 1.5 inches for 1/8th-inch skin. Go slowly when grinding and sanding to minimize heat buildup on the existing laminate. Heat can damage the resign and could lead to bonding problems later.
5. Once the grinding and sanding is completed it’s time to start assembling the repair. Cut and dry fit the new core material as precisely as possible. A good-fitting core insert will minimize the amount of resin needed. With the new core in place, take a sheet of clear plastic (something like a disposable dropcloth works fine) and lay it over the area. Trace the outline of the area on the plastic and include alignment reference marks. This will be used to cut the fiberglass, carbon fiber or Kevlar to the correct shape.
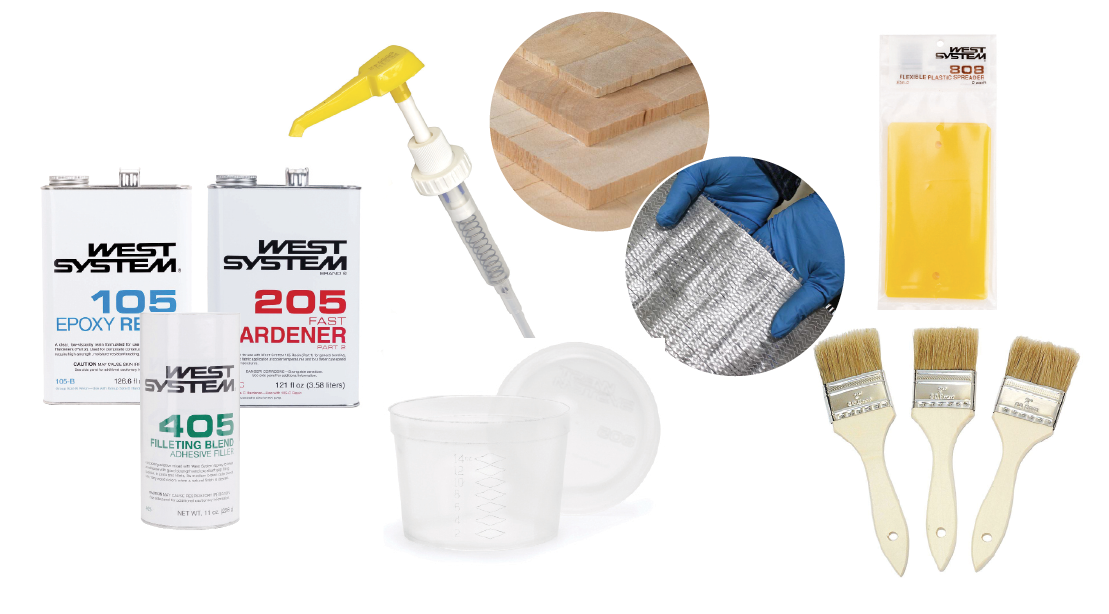
6. Carefully clean the area of all dust and debris. Mix up enough two-part epoxy or polyester resin to wet out the area where the core will be replaced, including the bottom and the sides. A cheap, disposable paint brush will work fine for this job. If the new core is not a perfect fit, you can add some thickening additive to the resin but keep the consistency as thin as possible to allow it to flow into any voids. Press the core firmly into place and allow it to set up before putting the outer skin laminate on place. You can allow it to fully cure but for the best adhesion it is better to add the final laminate while the resin is not fully cured and somewhat soft.
7. Using the plastic that you traced the outline of the repair area, cut and place layers of fiberglass, carbon fiber or Kevlar to the desired thickness needed to match the original skin thickness. The first layer should be slightly bigger than the traced outline and each succeeding layer slightly smaller and smaller. The goal is to match the taper of the patch to the scarf that you ground out. At this point, wet out the fiberglass and layer each piece as you go until all layers are fully saturated with resin. Place another piece of plastic over the top and use a squeegee to firmly squeeze out the excess resin.

8. With a scissors, cut the now wet fiberglass on the traced line making sure you note any reference points. Peel off the plastic on the side where the largest layer is as that will be placed over the core and scarf area first. Once the piece in place, use your squeegee to smooth out the fiberglass.
9. At this point, you can add additional steps such as a vacuum bag to fully clamp the repair in place. Vacuum bagging compresses the repair as the resin cures, however it requires additional equipment that many DIYers may not have access to. If you have access to peel ply, a thin nylon fabric, you can remove the plastic film and then apply the peel ply and smooth it out.
10. Once the repair is fully cured per the resin manufacturer’s instructions, remove the peel ply or plastic and fair and paint or gelcoat as desired. Remount the hardware, making sure to bed it properly using a marine-type sealant/adhesive such as 3M 4000 or Sikaflex and go sailing.
Also in Technique
- How to start sailing shorthanded
- Winch servicing
- Repairing delaminated core
- Splicing Dyneema
- DIY custom bug screens
- Anchoring and mooring a catamaran
- Co-owning a boat
- Installing a steering wheel
- Helming skills
- Captain your own charter
Also from Richard Reichelsdorfer
- Docking under power
- Installing a new battery system
- Powerful passagemaker
- 2024 BOAT BUYERS GUIDE
- Email Newsletters
- Boat of the Year
- 2024 Freshwater Boat and Gear Buyers Guide
- 2024 Boat Buyers Guide
- 2024 Water Sports Boat Buyers Guide
- 2024 Pontoon Boat Buyers Guide
- Cruising Boats
- Pontoon Boats
- Fishing Boats
- Personal Watercraft
- Water Sports
- Boat Walkthroughs
- What To Look For
- Watersports Favorites Spring 2022
- Boating Lab
- Boating Safety

Dryboat Treatment for Wet Hull Core
- By Kevin Falvey
- Updated: January 25, 2019

Tim put his meticulously maintained 10-year-old 36-foot sport-fisher up for sale last spring, and he soon found an eager buyer.
All that remained was for the boat to pass the survey, and the money — a down payment for his next boat — would be Tim’s to spend.
It failed. The surveyor discovered wet hull core with a moisture meter, and subsequently pulled hull fittings and portholes to physically reveal the wet balsa core. Tim returned the deposit to the buyer, who left angry. And he was stuck with $95,000 worth of unsaleable boat.
Learn About Different Hull Construction Types
Of course, he might have been able to sell the boat at a fire-sale price, but that would have meant walking away from many tens of thousands of dollars. Plus, “I wanted to sell the boat with a clean conscience,” Tim says. Traditional methods for dealing with wet core, including cutting, chiseling, replacing and reglassing, can also cost $40,000 to $50,000 or more. Not to mention the destructive damage such measures incur. Ugh!
How-To Drill Into and Install Accessories in Cored Hulls and Decks
Enter Dryboat. This Michigan-based moisture-remediation firm offers a mobile, nondestructive system to dry out cored fiberglass boats. According to company president Scott Richmond and developer Jon Bartnick, the process restores the affected areas to moisture levels acceptable by the builder. It is the only method they know that maintains the original design of the manufacturer, as well as the structural integrity of the affected vessel.

I saw it in action. In simple terms, the first step is to determine the extent of the moisture intrusion, using a moisture meter, and by mechanically removing fixtures and drilling exploratory holes. Next, a series of holes, sized to fit the application, is drilled. Into these are inserted hoses connected to the system, which is housed in a trailer and runs 24/7 until the boat is dry. All of this, plus the price, varies from job to job, depending on circumstances. For Tim’s boat, it took a month and “$1,000 worth of electricity, though the weather was very damp when we started, which lengthened the drying time,” Tim explains.
Read Next: Inspecting Your Boat’s Finish
Once the structure is dry, the holes need to be repaired and repainted or regelcoated. Tim, an auto-body man, did that work himself. And his business’s yard provided a space to run the equipment all the time without extra cost or complaints.
Tim’s Dryboat bill was $13,000. His boat passed the survey, and he sold it for $85,000. Subtracting the $15,000 he’d spent on remediation, that netted him $70,000. He was happy with that, given the expense of the alternatives, plus “I sold it with a clear conscience,” he says.
More Information Dryboat – 855-379-2628; dryboat.com
Five Tips For Preventing Wet Core In Your Boat’s Structure
The boater in this story was caught by surprise. He didn’t realize his boat’s hull core was soaking wet until a marine surveyor turned it up during a pre-purchase inspection arranged by a potential buyer. To help avoid a similar situation yourself, take these five proactive and precautionary measures.
Learn the proper way to install accessories in cored hulls and decks . Whether you are adding a transducer, an antenna; replacing a hatch; or repairing a bowrail stanchion, the procedure for cutting and drilling holes in cored laminate are more complex than the techniques that apply to solid fiberglass. Basically, the cutout must be sealed as well as sealing the fitting
Pull through-hull fittings, engine mounting bolts and other penetrations on a periodic basis in order to inspect the core and make sure water is not getting in.
Reseal fittings and fixtures regularly. We can’t give you a specific time frame for this, because different caulks and different environmental conditions, result in the need to re-seal or re-caulk at different rates. Bottom line, caulk isn’t forever, so pull and reseal fuel fittings, engine bolts, antenna mounts, rail stanchions…..any fitting that passes through or into the core or that is fastened through or into the core—needs to be resealed regularly.
Buy a moisture meter and use it if you have a cored hull. These can be had for as little as $250. Of course, if you don’t want to buy a meter and learn how to use it, you can always hire a marine surveyor to check your boat’s core material for moisture periodically.
Inspect your boats finish for irregularities and flaws that might indicate structural concerns.
- More: boat maintenance , How-To
More How To

On Board With: Brian Grubb

Installing Clear Acrylic Livewell Lids

Captain of Dive Boat That Caught Fire Sentenced to Four Years

How to Make DSC Fully Functional on a VHF Radio

Boat Test: 2024 Solara S-250 DC

Boat Test: 2024 Checkmate Pulsare 2400 BRX

Cox 350 Diesel Outboard

- Digital Edition
- Customer Service
- Privacy Policy
- Cruising World
- Sailing World
- Salt Water Sportsman
- Sport Fishing
- Wakeboarding
Many products featured on this site were editorially chosen. Boating may receive financial compensation for products purchased through this site.
Copyright © 2024 Boating Firecrown . All rights reserved. Reproduction in whole or in part without permission is prohibited.

- CREATE AN ACCOUNT
- Boat Cover Finder
- Bimini Top Finder
- Boat Propeller Finder
- Engine Parts Finder
- Anchor & Dock
- Watersports
- Clothing and Footwear
- Engine Parts
- Cabin and Galley
- Covers and Biminis
- Electronics
- Paint and Maintenance
- Pumps and Plumbing
- Anchor Chains & Ropes
- Boat Fenders
- Boat Mooring
- Boat Protection
- Dock Storage & Protection
- Ladders, Steps, & Platforms
- Top Sellers

- Fishing Rods
- Fishing Reels
- Fishing Rod & Reel Combos
- Fishing Tools & Tackle Boxes
- Fishing Line
- Fly Fishing
- Fishing Bait & Fishing Lures
- Fishing Rod Holders & Storage Racks
- Fish Finders, Sounders & Sonar
- Trolling Motors
- Fishing Nets
- Fishing Downriggers & Acessories
- Fishing Outriggers & Acessories
- Fishing Kayaks
- Fish Cleaning Tables

- Inflatable Rafts
- Paddle Boarding
- Paddles & Oars
- Wakeboard, Wakesurf & Ski
- Wakeboard Towers
- Tow Ropes & Handles
- Life Jackets & PFDs
- Snow Sports
- Roof Racks, Carriers, Dollies

Men's Clothing
- Accessories
Men's Footwear
- Atheltic Shoes
- Water Shoes
Women's Clothing
- Dresses & Skirts
Women's Footwear
- Fuel Systems
- Sacrificial Anodes & Zincs
- Generator Parts
- Inflatable Boats
- Propeller Parts & Accessories
- Boat Manuals
- PWC Parts & Accessories

- Fishing Boat Seats
- Offshore Boat Seats
- Ski Boat Seats
- Pontoon Boat Seats & Furniture
- Boat Seat Pedestals & Hardware
- Boat Seats by Manufacturer
- Boat Tables & Hardware
- Boat Seat Covers
- Boat Seat Vinyl
- Floating Boat Cushions

- Barbeque Grills
- Boat Drink Holders
- Cabin Accessories & Hardware
- Boat Ventilation
- Interior & Cabin Lighting
- Marine Teak Products
- Carbon Monoxide & Smoke Detectors
- Binoculars & Telescopes

Boat Bimini Tops
- Bimini Top Accessories
- Pontoon Bimini Tops
- Other Biminis
- RV & Trailer Covers
- Boat Shrink Wrap & Accessories
- Boat Shelters
Boat Covers
- Boat Cover Accessories
- Boat Lift Canopy Covers
- Other Covers
- Boat Wiring & Cable
- Marine Batteries & Accessories
- Marine DC Power Plugs & Sockets
- Marine Electrical Meters
- Boat Lights
- Marine Electrical Panels & Circuit Breakers
- Power Packs & Jump Starters
- Marine Solar Power Accessories
- Marine Electrical Terminals
- Marine Fuse Blocks & Terminal Blocks
- Marine Switches
- Shore Power & AC Distribution

- Marine Audio & Video
- GPS Chartplotters & Accessories
- Electronic Navigation Charts & Software
- Digital Instruments
- Display Mounts
- VHF Radios & Communication
- Marine Radar
- Auto Pilot Systems
- Action Cameras

- Fiberglass & Epoxy Boat Repair
- Boat Paint & Varnish
- Marine Adhesives, Sealant, & Caulking
- Marine Engine Maintenance
- Boat Cleaners & Waxes
- Boat Cleaning Supplies

- Fresh Water Boat Systems
- Bilge Pumps
- Marine Plumbing Parts
- Wash Down Pumps
- Livewell Aerator Pumps & Live Bait Wells
- Toilet & Waste Pumps
- Marine Pump Replacement Parts

- Tires, Rims, & Hub Kits
- Boat Trailer Winches
- Boat Motor Supports & Transom Savers
- Boat Trailer Guides & Rollers
- Boat Trailer Fenders
- Boat Trailer Lights
- Boat Trailer Hardware
- Boat Trailer Jacks
- Boat Trailer Brakes & Axles
- Boat Trailer Tie Downs
- Couplers, Mounts, Hitches, & Locks

- Boat Deck Harware
- Marine Nuts, Bolts, & Screws
- Boat Handles, Pulls, & Rings
- Prop Nut Kits & Hardware
- Boat Cabin Hardware
- Marine Fasteners
- Boat Windshield Parts
- Boat Tubing & Rails
- Boat Mirrors
- Marine Tools & Tool Kits
- Boat Lettering

- Women's Clothing Deals
- Men's Clothing Deals
- Fishing Deals
- Anchor & Dock Deals
- Electrical Deals
- Electronics Deals
- Paint & Maintenance Deals
- Pumps & Plumbing Deals
- Boat Seats Deals
- Trailering Deals
- Camping & RV Deals
- Dealer Login

- Forums Login

- Search forums
- Boat Repair and Restoration
- Boat Restoration, Building, and Hull Repair
Injection repair of wet balsa core
- Thread starter Simplesailor
- Start date Jan 25, 2014
Simplesailor
- Jan 25, 2014
If this is a dupe, I apologize but my earlier post doesn't seem to have made it! I have discovered that water is entering the core of the coach roof on my 30 ft Nonsuch sailboat through failed bedding on the roof hatch. I plan to replace the hatch. So far there is no noticeable damage to the fiberglass around the hatch but a moisture meter shows that the core immediately around the hatch is wet. I have been told that wet core can be stabilized and the area strengthened by injecting Caviseal or some other substance into the area between the fiberglass layers. I am interested in any personal experiences with this type of repair. What did you use and how did you apply it, any lessons learned, etc.? Thanks
- Jan 26, 2014
Simplesailor said: If this is a dupe, I apologize but my earlier post doesn't seem to have made it! I have discovered that water is entering the core of the coach roof on my 30 ft Nonsuch sailboat through failed bedding on the roof hatch. I plan to replace the hatch. So far there is no noticeable damage to the fiberglass around the hatch but a moisture meter shows that the core immediately around the hatch is wet. I have been told that wet core can be stabilized and the area strengthened by injecting Caviseal or some other substance into the area between the fiberglass layers. I am interested in any personal experiences with this type of repair. What did you use and how did you apply it, any lessons learned, etc.? Thanks Click to expand...
Seaman Apprentice
- Jan 27, 2014
Re: Injection repair of wet balsa core I've injected thickend resin in dried out soft plywood as a last option before. The boat had been drying for a couple of months before I drilled holes and injected polyester thickend with microglass balloons. The area got much stiffer, but some hard spots can be felt if you know what too look for. I've also helped a friend do the same on his 33' sailboat where the balsa was rotted out under a winch. If I would do it again I would use epoxi instead but same procedure.
Woodonglass
Supreme mariner.
- If the core is not rotted, it can be dried out. To determine if the core is rotted, get at the back side of the laminate and drill a grid of 1/8” holes in a 1” checkerboard arrangement. Of course you are not drilling through both sides of the laminate. Drill only through the inside. Do this over the entire area that has a moist core. To get a neat, consistent pattern of holes I apply sticky back cabinet shelf paper. It comes in a checker board design.
- Clean out the flutes of the drill every few holes. Unrotted balsa will have no smell or smell like resin and it will be fibrous when you roll it in your fingers. Rotted balsa will smell moldy and have more of a mushy or dusty feel. If you are really unsure, drill a ?" hole and pick some of the balsa fibers out with a tweezers. Rotted fibers will crumble or mush. Good balsa will be much harder to remove and it will be very fibrous.
- If you are lucky enough to live in a northern climate, where the temperature moves above and below freezing in the spring and the fall, nature will dry the laminate after you’ve drilled the hole grid described above. Here, ice crystals form as the temperature drops and the moisture is driven out of the wood. Ever look at a loaf of freezer burnt bread with ice crystals collected in the plastic bag? This occurs when the temperature inside the freezer fluctuates above and below freezing. What you want is a freezer burnt core in your boat.
- If you are not in a northern climate, or worse you are in a high humidity climate, I cannot help you. Text books talk about injecting alcohol, using tents and halogen lights but I have not used these methods.
- If the core is rotted, you need to fix it or the lack of core support will lead to much bigger problems. The question is when can you use simple injection versus tearing out the rotted area and replacing it?
- If the upper and lower fiberglass layers are structurally sound, the core can be repaired with injection. If the fiberglass does not show stress cracks or obvious hydrolysis (blisters or milky looking fiberglass), it will be fine.
- Large areas with stress cracks may be repaired with injection but I have not done that so I cannot predict the success. However, I can tell you this. I did do what was to be a temporary repair to a 30 foot Pearson Flyer that had a 6 inch crack in the hull. The outer hull had been punctured from a bad cradle pad. That was 10 years ago. When we injected the polyurethane from inside the hull, the polyurethane oozed out of the hull crack on the outside and then set up. The intent was to do a permanent repair after the racing season ended. A final repair was never done because the area around the temporary repair is stronger than the surrounding original hull.
- If she is a racing boat without a headliner the air holes can be left unsealed. But if a headliner is installed you must seal the air holes. Here’s why. The wet core was a potential problem because of possible delamination from rot or ice. But now that the core is open to air another problem can occur, mildew. Mildew requires air and moisture. If a headliner is installed and a deck leak traps moisture between the headliner and deck, mildew is sure to occur. Mildew is a sure way to delaminate any structure but you can avoid it if you cut off the air by filling the air holes. While you are doing that you may as well fill any voids in the core at the same time."
cruisers5357
- Feb 11, 2014
Woodonglass said: My research found this which might be of interest... " When can a core simply be dried out instead of injected? If the core is not rotted, it can be dried out. To determine if the core is rotted, get at the back side of the laminate and drill a grid of 1/8? holes in a 1? checkerboard arrangement. Of course you are not drilling through both sides of the laminate. Drill only through the inside. Do this over the entire area that has a moist core. To get a neat, consistent pattern of holes I apply sticky back cabinet shelf paper. It comes in a checker board design. Clean out the flutes of the drill every few holes. Unrotted balsa will have no smell or smell like resin and it will be fibrous when you roll it in your fingers. Rotted balsa will smell moldy and have more of a mushy or dusty feel. If you are really unsure, drill a ?" hole and pick some of the balsa fibers out with a tweezers. Rotted fibers will crumble or mush. Good balsa will be much harder to remove and it will be very fibrous. How can a core be dried? If you are lucky enough to live in a northern climate, where the temperature moves above and below freezing in the spring and the fall, nature will dry the laminate after you?ve drilled the hole grid described above. Here, ice crystals form as the temperature drops and the moisture is driven out of the wood. Ever look at a loaf of freezer burnt bread with ice crystals collected in the plastic bag? This occurs when the temperature inside the freezer fluctuates above and below freezing. What you want is a freezer burnt core in your boat. If you are not in a northern climate, or worse you are in a high humidity climate, I cannot help you. Text books talk about injecting alcohol, using tents and halogen lights but I have not used these methods. When can a core be fixed with polyurethane injection versus traditional reconstruction? If the core is rotted, you need to fix it or the lack of core support will lead to much bigger problems. The question is when can you use simple injection versus tearing out the rotted area and replacing it? If the upper and lower fiberglass layers are structurally sound, the core can be repaired with injection. If the fiberglass does not show stress cracks or obvious hydrolysis (blisters or milky looking fiberglass), it will be fine. Large areas with stress cracks may be repaired with injection but I have not done that so I cannot predict the success. However, I can tell you this. I did do what was to be a temporary repair to a 30 foot Pearson Flyer that had a 6 inch crack in the hull. The outer hull had been punctured from a bad cradle pad. That was 10 years ago. When we injected the polyurethane from inside the hull, the polyurethane oozed out of the hull crack on the outside and then set up. The intent was to do a permanent repair after the racing season ended. A final repair was never done because the area around the temporary repair is stronger than the surrounding original hull. High pressure polyurethane injection Some jobs need high pressure injection and a very thin polyurethane sealant. Basically these are places where you cannot remove the core. Here, a grid of 1/8? holes needs to be drilled in the back side of the laminate. Or, you may be filling the hollow space within a rudder. The good news is that Vulkem 45, a thin polyurethane sealant, is available from Home Depot at a fraction of the cost of tradition thick, marine polyurethane such as 5200. Vulkem 45 comes in quart cartridges and it is thin enough to go through a pin hole. You can fill a handheld grease gun directly from the cartridge of Vulkem 45. Vulkem 45 is good for injection made under foot such as injection into a hull from the inside. Vulkem 45 can also work for large vertical injection such as a rudder. But for over head jobs use Vulkem 640. It is sold in gallon pails at a professional construction material dealer. Call Vulkem for a dealer location. Where as 45 is self leveling, 640 is the opposite. It will hang overhead yet it is quite thin. Buy a cheap grease gun from an automotive store. For the grease gun buy a POINT fitting at an automotive parts store such as NAPA and replace the normal grease fitting. Pump caulk into each of the 1/8? holes in your grid until caulk is oozing out of the hole(s) ahead. You may need to plug the hole(s) you?ve already done with golf tees. Buy a few bags of tees. Use a grease gun filled with Vulkem 640 or 45 and inject it into the core. Each 1/8" hole will take about 1.5 pumps from a handheld grease gun before you meet resistance. If you do not meet resistance, just keep pumping until sealant is coming out of at least one adjacent hole. You will hit some voids in a core that take a couple dozen pumps. These are spots where there was no core originally. This is typical on corners. Or the core may be rotted and you are compressing the rotted core material with the sealant. Once the sandwich has been dried and injected, water cannot reenter because the sandwich is solid. As a bonus, once the sandwich cures, it will feel much more solid. Note, it may take several months to fully cure. Low pressure polyurethane injection If you have removed the core, there is no need for high pressure or a thin polyurethane sealant. For example, if you have removed a 1 ft diameter circle of core material around a through fitting, the void will be easy to fill. Use 5200 or Vulkem 921 above the water line. Note, 921 is only available at a commercial construction material distributor. Removing a core around a through fitting is tedious but can be done. You will be able to remove the core for about 6? around a through fitting. To do this, you can make a routing tool from a flexible screwdriver extension attachment made by Vermont. Use a cutting wheel on a Dremmel to cut teeth in the end of the Vermont screwdriver attachment that normally holds the screwdriver bit. Then put the flexible screwdriver attachment into an electric drill and route out the core sliver by sliver. For a through hole fitting, after the core is removed, drill three holes at the edge of the removed core in a triangular pattern. Then wrap the through hull/deck fitting in enough cellophane so that it is hard to press it into the hole. Force it into the hole and inject caulk into the first of the three holes until it oozes out of the next hole, plug the hole and move on until all three holes are under pressure. Note, it takes weeks to months for the polyurethane to fully cure. Polyurethane cures in the presence of moisture so it will eventually cure. A partial cure is good enough to screw things back together. Wait a few weeks before doing that. After the core is dried can the air holes drilled under the deck be left open? If she is a racing boat without a headliner the air holes can be left unsealed. But if a headliner is installed you must seal the air holes. Here?s why. The wet core was a potential problem because of possible delamination from rot or ice. But now that the core is open to air another problem can occur, mildew. Mildew requires air and moisture. If a headliner is installed and a deck leak traps moisture between the headliner and deck, mildew is sure to occur. Mildew is a sure way to delaminate any structure but you can avoid it if you cut off the air by filling the air holes. While you are doing that you may as well fill any voids in the core at the same time." Click to expand...
Re: Injection repair of wet balsa core There is a company with a (portable) patent-pending process that injects extremely dry (<2% RH) heated air into 1/4" to 1/2" holes to dry out wet balsa and wet stringers. You can google the company it is called Dryboat

Current time by city
For example, New York
Current time by country
For example, Japan
Time difference
For example, London
For example, Dubai
Coordinates
For example, Hong Kong
For example, Delhi
For example, Sydney
Geographic coordinates of Elektrostal, Moscow Oblast, Russia
City coordinates
Coordinates of Elektrostal in decimal degrees
Coordinates of elektrostal in degrees and decimal minutes, utm coordinates of elektrostal, geographic coordinate systems.
WGS 84 coordinate reference system is the latest revision of the World Geodetic System, which is used in mapping and navigation, including GPS satellite navigation system (the Global Positioning System).
Geographic coordinates (latitude and longitude) define a position on the Earth’s surface. Coordinates are angular units. The canonical form of latitude and longitude representation uses degrees (°), minutes (′), and seconds (″). GPS systems widely use coordinates in degrees and decimal minutes, or in decimal degrees.
Latitude varies from −90° to 90°. The latitude of the Equator is 0°; the latitude of the South Pole is −90°; the latitude of the North Pole is 90°. Positive latitude values correspond to the geographic locations north of the Equator (abbrev. N). Negative latitude values correspond to the geographic locations south of the Equator (abbrev. S).
Longitude is counted from the prime meridian ( IERS Reference Meridian for WGS 84) and varies from −180° to 180°. Positive longitude values correspond to the geographic locations east of the prime meridian (abbrev. E). Negative longitude values correspond to the geographic locations west of the prime meridian (abbrev. W).
UTM or Universal Transverse Mercator coordinate system divides the Earth’s surface into 60 longitudinal zones. The coordinates of a location within each zone are defined as a planar coordinate pair related to the intersection of the equator and the zone’s central meridian, and measured in meters.
Elevation above sea level is a measure of a geographic location’s height. We are using the global digital elevation model GTOPO30 .
Elektrostal , Moscow Oblast, Russia

COMMENTS
Cut smaller pieces to fill the larger gaps, and then spread thickened resin over the entire area using a flexible spatula, forcing it into the remaining hair line cracks. Allow to cure. Use 60-80 grit on an orbital sander (or a disk grinder with a very light touch) to sand the new core smooth.
Oct 7, 2017. #1. I have recently been following a couple of threads where wet deck core is being repaired by cutting off interior or exterior skin and full replacement of the core. Two years ago I thought that I was in for the same on my 1988 Catalina 30. I found a crack in the deck that was weeping brown water and a moisture meter showed that ...
The damaged balsa core began to be revealed when the hardware was removed. Replacing the damaged balsa core involves removing the fiberglass skin to expose the core. This can be done either from the topside or below deck. In my case, since the deck was getting new non-skid anyway, the repair would be easier from the topside.
WEST SYSTEM Tech Advisor Greg Bull demonstrates how to replace wet core around the chain plates on a fiberglass sailboat.
J Boat J30 LaSalle,MI. May 31, 2010. #1. Discovered this spring wet core in lower half of the transom in in the starboard side hull from the transom forward to the keel, from the water line down to the centerline. Likely source is exhaust tube and engine water inlet. Core samples indicate balsa is wet, but not yet rotted.
the procedure: Cut out. enough fiberglass mat to cover the area with up to ½ inch around. Continue. cutting out these layers, expanding the area by an additional ½ of an inch each. time, until you find the original thickness of the fiberglass. The top layer of. fiberglass mat should cover the entire affected area. Mix catalyst.
Subscribe to our channel Sailboat Care and Repair for more tutorial videos! Click https://bit.ly/2K2hBriThis is the basic data on what a cored deck looks lik...
The typical approach to sealing core for any new hardware installation is to carve out about 3/16-inch of the surrounding core using a makeshift "bit" on a drill. A bent nail works, but we've had more luck with a DIY modified roofing nail core-removing-bit, which made quick work of the core without damaging the inner or outer fiberglass ...
Sailboat DIY And Repair Tips. Maintenance. Know How: Core Principles. Author: Don Casey. Updated: Aug 2, 2017. Original: ... Many production sailboats also incorporate a core in the hull construction in pursuit of better performance. It is important to understand that core rigidity is not what determines the stiffness of the laminate. Balsa ...
It starts with a basic understanding of your sailboat deck. According. to Sail Magazine, many "decks are cored with end-grain balsa or plywood. with a fiberglass laminate on each side.". If this is the case for you, you. might notice that moisture can work its way into the core of the deck, which.
We finally get to start the repair of the fiberglass on my salvage sailboat. At the end of the video I share my insights on for choosing the right core mater...
Almost every cruising boat built since the mid-1990s contains core material in the hull and/or deck and cabin. Cored boats are lighter, stiffer, quieter and better insulated than their solid ancestors. Builders have a variety of materials from which to choose, including end-grain balsa wood, closed-cell foams, and honeycombs.
I am considering a boat (Morgan 32) built in 1979. The hull is solid fiberglass laminate and I'm assuming the deck is balsa cored fiberglass.A recent survey found high moisture levels in areas of the deck and cabin.Ordinarily I would walk away from a boat with this issue but the boat is in otherwise good condition and the price is attractive. So I am considering taking this on as a project.
Grind a scarf joint around the repair area to a width of 12 times the thickness of the skin, about 1.5 inches for 1/8th-inch skin. Go slowly when grinding and sanding to minimize heat buildup on the existing laminate. Heat can damage the resign and could lead to bonding problems later. 5.
Perette and Group say that water generally enters the core through loose, ill-fitting or improperly bedded deck hardware, seat and rod holder bases, stanchions, hinges and locker latches. "If there are open drill holes scattered about the deck, you know there's a good chance the core is soaked," says Perette.
His boat passed the survey, and he sold it for $85,000. Subtracting the $15,000 he'd spent on remediation, that netted him $70,000. He was happy with that, given the expense of the alternatives, plus "I sold it with a clear conscience," he says. More Information. Dryboat - 855-379-2628; dryboat.com. Advertisement.
Buy a few bags of tees. Use a grease gun filled with Vulkem 640 or 45 and inject it into the core. Each 1/8" hole will take about 1.5 pumps from a handheld grease gun before you meet resistance. If you do not meet resistance, just keep pumping until sealant is coming out of at least one adjacent hole.
A general handyman in Elektrostal', Moscow Oblast, Russia can cover a wide variety of home repair services — that's what makes them so handy! So if you have a loose doorknob, damaged drywall and a leaky faucet, hiring one local handyman service instead of three separate home repair contractors makes the most sense.
Heat-ex is located in Elektrostal. Heat-ex is working in General contractors, Heating installation and repair activities. You can contact the company at 8 (495) 505-21-45.You can find more information about Heat-ex at heat-ex.ru.
Search 8 Elektrostal' paving & driveway contractors to find the best driveway and paving contractor for your project. See the top reviewed local driveway & paving contractors in Elektrostal', Moscow Oblast, Russia on Houzz.
Geographic coordinates of Elektrostal, Moscow Oblast, Russia in WGS 84 coordinate system which is a standard in cartography, geodesy, and navigation, including Global Positioning System (GPS). Latitude of Elektrostal, longitude of Elektrostal, elevation above sea level of Elektrostal.