How To Paint A Sailboat: A Complete Guide

Last Updated by
Daniel Wade
June 15, 2022
Whether you’re new to owning a sailboat or not, you have likely put some thought into painting your boat yourself. It is important to keep your boat well painted as it can save you a lot of money in the long run. It can also save you a lot of money if you choose to paint your boat yourself.
Whether or not this is the first time you have painted your boat, you will still find this article useful. It has lots of tips and tricks for making sure you get the job done and get it done well. Hiring a professional may be easier, but there is a sense of pride and accomplishment in doing it yourself. If you use this article as a reference, you can’t go wrong.
Table of contents

Why is it important to paint your sailboat?
Painting your boat is not just an excuse to put some creative flair into your boat, it is an important process in keeping the boat safe. Safe from salt, safe from barnacles, and safe from damage. The paint acts as a vital protective layer, without it your boat will be vulnerable to all kinds of damage. If you have a wooden hull, this protective layer will keep the wood from rotting. It can also plug any minuscule holes that might allow sea life and salt to make its way into the body of the boat.
There is also, of course, the added benefit of having a boat that looks good . A boat is a point of pride and should be treated as such. Having a glossy looking boat is something to be proud of. Most boats are not painted far above the waterline, so it is even an opportunity to make your boat stand out. Some people also believe that painting a boat brings good luck. Unless of course, you paint it green, green is thought to bring bad luck. Whether or not you believe that is up to you.
What are the benefits of painting your boat yourself?
When it comes to painting your boat there are only two options. Hire a professional boat painting contractor, or bite the bullet and do it yourself. They both have their pros and cons, of course, but there is so much more to be gained by doing it yourself. First of all, painting your boat yourself is just as fun as it is difficult. Learning to paint is a valuable life skill that you won’t regret learning as early on in your sailing career as possible. If you can learn to paint your boat now, you will save yourself a small fortune in the long run.
Hiring a contractor is expensive, to say the least, it may be faster and easier overall, but the extra cost can make it simply not feasible. Or simply unappealing. If this is the first time you are painting your sailboat you will need to make a one-off purchase of all the equipment needed for prepping, painting, and finishing the boat. After these one-off purchases are out of the way, you will only need to buy paint and new rollers the next time. Even if you need to buy all the equipment brand new, it can be cheaper than hiring someone else to do the job for you.
How often do you need to paint your sailboat?
The general rule of thumb for painting your boat is that it will need bottom paint about once a year. This is when you will need to take the boat completely out of the water and give it a fresh new coat. If your boat spends all of its time in the water, it certainly needs painting at least once a year. The saltwater is so corrosive that you shouldn’t let your boat go without a fresh coat of bottom paint for more than 2 years. Even if your boat only spends half its time in the water, and the other half on land, you will find that its best to keep its coat topped up.
The top paint, or the above waterline paint, doesn’t need painting anywhere near as often. It isn’t in direct contact with the seawater so it simply isn’t going to get eroded down as much. The salty sea spray can still be damaging over time so this paint should be re-done every 3 years. It can be more or less frequent depending on use and personal preference. Some people like to do above waterline paint yearly, with the rest of their boat, but it isn’t necessary.
What are the best paints to use for your sailboat?
There are plenty of great brands of paint out there, in various colors and shades, so you won’t struggle for choice. There are some things you might want to look for in your paint . For example, you may have noticed that a lot of boats tend to have red hulls. This isn’t just a fashion statement, and while red is supposed to bring luck this isn’t the main reason either. The reason is that this red/orange paint is perfect for added protection along the bottom of your boat.
This red/orange paint is interestingly chosen because it is, of course, traditional; but mostly because of its copper. The copper is actually what gives the paint its red/orange color.
Copper is perfect for the bottom of your boat for several reasons. First, copper acts as a biocide. It stops worms from making their way into the hull if your boat is wooden. If it is metal or fiberglass, it still has the benefit of stopping barnacles and other sea life from attaching themselves deep into the hull of the boat. Copper is also strong enough to hold up to scraping.
Scraping is when you scrape barnacles and other sea life off the hull of your boat. Scraping is an important part of keeping your boat in good condition. It is important to check with the marina or port authority whether or not you are allowed to scrape. If you scrape without permission you may find yourself on the receiving end of a hefty fine. The reason is that they don’t want you introducing invasive species on to the marina floor. This is mostly a problem when you are coming from somewhere vastly foreign, not sailing from New York to Chicago for example.
How many coats of paint does a sailboat need?
When painting your boat it’s a good idea to think about how many coats of paint you are going to need. There is no exact number that is needed, it is mostly to do with how well protected your boat needs to be and how much time you have on your hands. Every coat takes time and attention to detail.
If you choose to do four coats of paint it is going to be time-consuming but very well protected. That being said, the minimum number of coats is two. One is not enough. If your boat only spends part of the time in the water, two to three coats are plenty.
If you are someone who lives on their boat full-time, or at least most of the time, you may want to do more coats. Three, maybe even four, might be ideal here. The reason is that first, your boat is going to experience way more wear and tear than one that is just an ocean part-timer. And second, taking out your boat (which is also your home) is a giant hassle. It is a tedious process, so doing it as infrequently as possible is probably in your best interest. More coats last longer. When you are sailing from place to place, finding somewhere to take your boat out of the water and perform this maintenance is inconvenient. You want to be doing it as little as possible.
What safety precautions do I need to take when painting my sailboat?
All paint can be toxic when inhaled. Even if it is “non-toxic” paint it is going to be harmful to your lungs. They aren’t meant to inhale anything but air, even non-toxic paint is going to be bad for them. This is why it is important to wear a face mask.
Your mask should be specifically for painting, not surgical masks or other cheap medial masks. They are not going to be strong enough, with a fine enough air filter. Whether you feel the need to wear eyewear is up to you during the painting process.
Before the painting begins, when you are scraping and sanding, it is a good idea to wear some goggles to keep debris and splinters out of your eyes. It is also a good idea to wear gloves. You don’t want to rough your hands up too much, they need protection from not only the paint but splinters and sharp pieces of metal.
Painting a boat can be dangerous work. Without taking the proper safety precautions you are putting yourself at unnecessary risk. This safety equipment costs just a few bucks and is equally important as any of the other tools needed to paint your boat.
What tools do I need to paint a boat?
There is more to painting your boat than just using paint and a brush . You will also need tough sandpaper , potentially an angle grinder or welder , paint, primer , brushes, paint rollers , paint thinner , and solvent. You will need to make sure you have all of these things before you start painting. You can pick any of these items up at a boating goods store.
It is a good idea to bring some buckets with you for filling with water, both for rinsing off your boat and your brushes. All of your safety equipment needs to be brought too.
If this is your first time painting your boat yourself, you may find you need to buy all of these things at once. That can be a lot to stomach when its all in one go, luckily, most of these tools and equipment can be reused. Besides, it is still going to be far cheaper than hiring someone to do it for you. All of this equipment is an investment in your boat.
How to paint a sailboat
Whether this is the first time you have painted your boat or not, you may find some of the tips in this next section useful. Painting your sailboat may be tricky at first, but over time you will get the hang of it. The problem with painting your boat is that it can be a very expensive mistake if you get it wrong.
It is important to read this guide carefully, take your time, and make sure you do the job properly. It may be slow going at first, speed will come over time. Once you have gathered all of your safety equipment and tools you are ready to get started.
The workspace
First of all, you need to ensure you have the right workspace. You cant paint your boat in the water so you are going to need to find somewhere to do your work. This is easy enough if you don’t live on your boat full time, take the boat to your house and do your painting on the driveway. If this isn’t an option because you don’t have space or live on your boat full time, you are going to need to rent somewhere. There are typically places affiliated with the marina that you can use. In some cases, these even come with a majority of the equipment you will need. This, of course, drums up the price a bit, but that’s unavoidable.
Your workspace needs to be well ventilated, or you risk making yourself very sick. Both from paint fumes, rubbing alcohol fumes, and fine matter from when you sand the hull down. This means painting your boat in your garage, if it even fits, is not always the best idea. If you do decide to paint outside, it is important to consider the chance of rain. Of course, your boat is pretty waterproof, but once you begin sanding rain might damage the wood if left to sit there.
Before you do anything else, it is important to look your boat over fully from top to bottom. You are looking for any bumps, scrapes, cracks and general damage. This damage is not going to be noticeable while the boat is in the water, so just before you paint it is one of the only times you get to have a close look. Once you have made note of all this damage, it is time to get to work repairing it. Depending on just how severe this damage is, you may want to get help with this next stage.
All of this damage needs to be repaired before anything else can take place. Painting over these damaged areas is just going to hide the problem temporarily, the next time it comes to painting you will find they are far worse. If you don’t deal with this now, they are going to snowball into complicated and expensive repairs.
After your repairs are done it is time to start sanding. This is very time consuming as you need to do it three times. Per coat. First, take the 600 grit sandpaper and make your way around the boat. It is best to use electrical tape to mark out a section at a time so you don’t keep losing your place. After you have finished with the 600 grit sandpaper, it is time to move on to 800, then 1200. This process is important so you will be painting on as smooth a surface as possible. It is then a good idea to wipe the surfaces of the boat down with a damp cloth to remove any of the dust and flakes of metal/wood. Otherwise, you end up painting over them.
You could wash the boat down with a hose but you want to avoid getting the boat unnecessarily wet now that the hull has lost its protective layer. If you are sanding down a boat with a copper paint bottom, you may find the sanding process difficult. Just do your best, it doesn’t need to be 100% perfect. It is important to get as much of the old paint off as possible. Your new paint won’t adhere to the old paint as well as it would to the boat hull itself.
Putting on a layer of primer is not 100% necessary but it is recommended. The idea is that you want your topcoat to adhere to the boat as well as possible, a layer of primer can help you do that. The primer needs to be painted on evenly all over the boat. If you only feel like doing below the waterline, that is fine too. It will save you a lot of time. Putting on the layer of primer is not the most time-consuming part, it is mostly the sanding down that you will have to do. You will need to sand down using the 600 grit paper, then the 800, then 1200. Just like last time. Your layer of primer needs to be as smooth as possible for the maximum adhesion.
Now comes the paint. It is recommended to do at least two layers of paint. One undercoat and one top. Some people choose to go as far as two layers of primer, two layers of undercoat, and three layers of topcoat. This is going to be very time consuming, remember you will need to sand down three times between each layer of paint. You can paint using a brush if you like but is far easier to use a roller. It is also far easier if you employ someone to help you with this stage. It could be your spouse, child, friend, or anyone. It doesn’t need to be a paid professional. It can take a long time to go through this process. Especially if you are effectively doing 8 layers of paint (including primer).
The fastest way to paint, especially if you are on your own, is to use a sprayer. They are easy to use, with a little practice. If you haven’t used one before you may find that you struggle to get an even coat. You should always paint in vertical stripes, not horizontal. Additionally, it is a good idea to have someone following after you with a small brush doing small touch-up jobs. Any unevenness will need to be sanded down and repainted. The whole painting process can take a week if you aren’t efficient.
Take pictures
It is a good idea to take pictures throughout the whole process. This is for future reference. For example, if you take pictures of the boat when you are assessing it for damage, you can compare them to after you have repaired or sanded the trouble spots down. If you cant see the trouble spots still, great! If you can, it will help you keep an eye on them after you have painted too. It’s a good idea to catalog all of these areas if they start to become regular problems you may want to have your boat looked at by a mechanic. You might also like to have a before and after picture for your blog, or just as a personal memento.
Hopefully, you now have all the theory needed to paint your boat. There is a lot more that goes into painting your boat than simply grabbing some paint and a brush. It takes planning, practice, and attention to detail. If you follow this guide you will have no trouble at all. If this is your first time painting your boat, don’t be disheartened if it takes a lot longer than you expected. Speed will come with time, it is far more important to get the job done right than get it done quickly. If you put the work in you will be painting like a pro in no time at all.
Related Articles
I've personally had thousands of questions about sailing and sailboats over the years. As I learn and experience sailing, and the community, I share the answers that work and make sense to me, here on Life of Sailing.
by this author
Repairs and Maintenance
Most Recent

What Does "Sailing By The Lee" Mean?
October 3, 2023

The Best Sailing Schools And Programs: Reviews & Ratings
September 26, 2023
Important Legal Info
Lifeofsailing.com is a participant in the Amazon Services LLC Associates Program, an affiliate advertising program designed to provide a means for sites to earn advertising fees by advertising and linking to Amazon. This site also participates in other affiliate programs and is compensated for referring traffic and business to these companies.
Similar Posts

How To Choose The Right Sailing Instructor
August 16, 2023

Cost To Sail Around The World
May 16, 2023

Small Sailboat Sizes: A Complete Guide
October 30, 2022
Popular Posts

Best Liveaboard Catamaran Sailboats
December 28, 2023

Can a Novice Sail Around the World?
Elizabeth O'Malley

4 Best Electric Outboard Motors

How Long Did It Take The Vikings To Sail To England?

10 Best Sailboat Brands (And Why)
December 20, 2023

7 Best Places To Liveaboard A Sailboat
Get the best sailing content.
Top Rated Posts
Lifeofsailing.com is a participant in the Amazon Services LLC Associates Program, an affiliate advertising program designed to provide a means for sites to earn advertising fees by advertising and linking to Amazon. This site also participates in other affiliate programs and is compensated for referring traffic and business to these companies. (866) 342-SAIL
© 2024 Life of Sailing Email: [email protected] Address: 11816 Inwood Rd #3024 Dallas, TX 75244 Disclaimer Privacy Policy
- Forums New posts Unanswered threads Register Top Posts Email
- What's new New posts New Posts (legacy) Latest activity New media
- Media New media New comments
- Boat Info Downloads Weekly Quiz Topic FAQ 10000boatnames.com
- Classifieds Sell Your Boat Used Gear for Sale
- Parts General Marine Parts Hunter Beneteau Catalina MacGregor Oday
- Help Terms of Use Monday Mail Subscribe Monday Mail Unsubscribe
Underwater metal and paint
- Thread starter Pagan Baby
- Start date May 25, 2020
- Forums for All Owners
- Ask All Sailors
I have always hear that one shouldn’t use regular bottom paint on props due to potential corrosion issues and I’ve always used other coatings on my props. However looking at the through hulls the other ay I realize that I usually just slather them with bottom paint and looking at other boats in the yard it appears this is what most do. So, should I be using the same coating (Petite) on the through hulls that I use on the prop or am I overthinking this an just slather some more bottom paint on the through hulls? What say you O great and good forum?

If those thru hulls are being used for bonding any groundings to seawater, do not paint. Otherwise, slather away. But, if you decide you need an electrical connection to the sea and you slather you thru hull, then you will be SOOL!

Pagan Baby said: .............so, should I be using the same coating (Petite) on the through hulls that I use on the prop................ Click to expand
sail sfbay said: My boat yard applied Prop Speed Primer and Prop Speed Clear Coat to prevent fouling of propellers, shafts, struts and more to give the running gear a long-lasting, ultra-smooth surface. Click to expand
Pagan Baby said: did they paint the through hulls too?................... Click to expand
Attachments

Another option is to use a copper free antifouling paint. Steel and aluminum boats can not use copper based AF paints.
This thread caused me to go back and search the archives for prop treatments. In the past, I've painted with regular ablative bottom paint and not painted: never noticed any difference. I tried some spray treatment one year, but it was a long time ago. Anyway, based on old postings, today I tried 3 coats of Rustoleum cold galvanizing spray paint on our bronze prop. Seems to be highly recommended by some other sailors in the high-fouling Chesapeake environment. Cost 8 bucks and I used way less than half a can. Splashdown is tomorrow morning!
jaysweet said: This thread caused me to go back and search the archives for prop treatments. In the past, I've painted with regular ablative bottom paint and not painted: never noticed any difference. I tried some spray treatment one year, but it was a long time ago. Anyway, based on old postings, today I tried 3 coats of Rustoleum cold galvanizing spray paint on our bronze prop. Seems to be highly recommended by some other sailors in the high-fouling Chesapeake environment. Cost 8 bucks and I used way less than half a can. Splashdown is tomorrow morning! Click to expand

Not exactly relevant (but maybe). I have used the Rustoleum cold galvanized on all of my boat trailers with very good results. It is a good product. The only underwater metal I have on my boat is the ballast tank valve.... so now I'm thinking maybe I should paint it with rustoleum as well? I have shore power but I don't think I have a ground to water anyplace on my boat.
Pagan Baby said: Thanks for the tip on Rustoleum. In the past I used a Petite product-way more than 8 bucks and in my opinion not very effective. Click to expand

Rich Stidger
I have posted that I use either the Rustoleum or the Ace Cold Galvanize. Read the label - it is exactly the same stuff as the Pettit Barnacle Spray. I have used a Prop Speed type of coating once and was very disappointed. It lasted only one year for me and did not meet my expectations. The Cold Galvanize is about as good as you are going to get these days or until something that is actually better becomes available. The governments have prohibited all the good old stuff that actually worked.
jaysweet said: Just to be clear: I'm not recommending this. I'm just saying that several (I think) well-respected forum members have recommended either Rustoleum or Ace Hdwre cold galvanizing spray, and I dug up their postings and gave it a try this year. I hope it works, but in the Chesapeake, nothing much seems to work for me unless I dive on the boat or hire a diver a couple of times a season. Click to expand
- This site uses cookies to help personalise content, tailor your experience and to keep you logged in if you register. By continuing to use this site, you are consenting to our use of cookies. Accept Learn more…

Step-by-Step Guide: How to Paint a Sailboat with Acrylics
Alex Morgan
Painting a sailboat with acrylics can be a rewarding and enjoyable artistic endeavor. Whether you are a beginner or an experienced artist, this article will provide you with a comprehensive guide to creating a stunning sailboat painting using acrylic paints.
To begin with, you will need specific materials and tools to ensure a successful painting process. These include acrylic paints in various colors, a set of brushes suitable for acrylic painting, a palette for mixing colors, a canvas or painting surface, a water container for cleaning brushes, a palette knife for texture, and a reference image or sketch of a sailboat.
Before you start painting, it is essential to prepare the surface properly. This involves cleaning the surface to remove any dust or debris, and then applying a layer of primer or gesso to create a smooth and even base for your paint to adhere to.
To achieve the desired result, it is important to understand and practice basic techniques for painting with acrylics. This includes learning how to mix colors to create different shades and tones, how to layer and blend colors to add depth and dimension, and how to create texture and detail in your sailboat painting.
Once you are familiar with the techniques, you can follow a step-by-step guide to painting a sailboat. This includes sketching the sailboat outline, blocking in the background colors, adding base colors to the sailboat, adding details and highlights, and refining the painting to ensure a polished and professional look.
To complete your sailboat painting, don’t forget the finishing touches and sealing the artwork to protect it and enhance its longevity. We will share some tips and tricks to help you master the art of painting a sailboat with acrylics, allowing you to express your creativity and create beautiful marine-inspired artworks. So gather your materials and get ready to set sail on your artistic journey!
Key takeaway:
- Using acrylic paints and appropriate tools is essential for painting a sailboat. Acrylic paints are versatile and easy to work with.
- Properly preparing the surface by cleaning and applying primer or gesso ensures a smooth painting surface.
- Understanding basic techniques such as color mixing, layering, blending, and creating texture and detail is important for painting a realistic sailboat.
- Following a step-by-step guide helps in achieving a well-executed sailboat painting.
- Finishing touches and sealing the painting enhance its longevity and protect it from damage.
- Tips and tricks such as using reference images or sketches and refining the painting contribute to a successful acrylic sailboat painting.
Materials and Tools Needed for Painting a Sailboat
Are you ready to set sail on a creative painting journey? This section has all the juicy details about the materials and tools needed to paint a stunning sailboat with acrylics. We’ll dive into the vibrant world of acrylic paints , the magic touch of different brushes , the perfect palette for mixing colors, the ideal canvas or painting surface, the essential water container and palette knife , and the importance of having a reference image or sketch. Get your creative gears ready, because we’re about to embark on an artistic adventure !
Acrylic Paints
When painting a sailboat with acrylic paints , it is crucial to choose the right type of acrylic paint . Consider the following factors when selecting acrylic paints :
– Quality : Opt for high-quality acrylic paints for vibrant and long-lasting colors.
– Color range : Look for brands that offer a wide range of colors, including various shades of blue for painting the sky, water, and sails of the sailboat.
– Opacity : Consider the opacity of the acrylic paints . Some colors are more opaque, allowing for solid coverage, while others are more transparent, allowing for layering and glazing techniques.
– Drying time : Check the drying time of the acrylic paints . Faster drying paints are great for quickly building layers, while slower drying paints allow for more blending and wet-on-wet techniques.
– Brand reputation : Research and choose acrylic paints from reputable brands known for their quality and consistency.
Pro-tip : Before starting your painting, it’s recommended to do a small color swatch test to see how the colors appear on your chosen canvas or painting surface. This will help you make any necessary adjustments before committing to the final artwork.
When painting a sailboat with acrylics, the right brushes are crucial for achieving desired results. Here is a list of brushes to consider:
1. Round brushes: Perfect for creating fine details like rigging and small waves. They come in various sizes, from small for intricate work to larger for broader strokes.
2. Flat brushes: Ideal for creating straight lines and sharp edges. Great for painting sails, the horizon, or other flat surfaces on the sailboat.
3. Fan brushes: Excellent for creating texture like foliage or water splashes. Can also blend colors and create soft, feathery strokes.
4. Filbert brushes: Versatile brushes for both fine details and broader strokes. Particularly useful for painting the hull and larger areas.
5. Detail brushes: Perfect for adding intricate details and highlights. Allows for precise control in adding fine lines, textures, and highlights.
Fact: Using the right brushes not only makes painting a sailboat easier but also enhances the overall quality of your artwork. Experimenting with different brush shapes and sizes can help achieve different effects and add depth to the painting.
When painting a sailboat with acrylics , a palette is essential for effectively mixing and organizing colors. A palette serves as a flat surface where you can arrange and blend paints.
Canvas or Painting Surface
Choosing the right canvas or painting surface is crucial for a successful sailboat painting with acrylics. The size and material of the canvas are important factors that affect the outcome of the painting.
A larger canvas allows for more details and a grander composition, while a smaller canvas is more manageable and quicker to complete. The most popular canvas materials are cotton , linen , and polyester .
Cotton canvas is affordable and suitable for beginners. Linen canvas , though more expensive, offers a smoother surface and better longevity. Polyester canvas is a synthetic option that is resistant to moisture. Regardless of the material you choose, it is important to prime the canvas with gesso or primer before painting.
This creates a smooth and stable surface for the acrylic paints, resulting in better color vibrancy and a longer-lasting artwork. When selecting a canvas or painting surface, consider your artistic vision and preferences to create a stunning sailboat painting with acrylics.
Water Container and Palette Knife
The sub-topic “ Water Container and Palette Knife ” in the article “ How To Paint A Sailboat With Acrylics ” can be represented in a table format:
Using a water container is essential in acrylic painting to keep your brushes clean and prevent paint from drying. The container should be filled with clean water and changed when dirty to ensure a constant supply of clean water for rinsing and thinning paint.
The palette knife is a versatile tool for mixing colors directly on the palette. Its flat blade is perfect for scraping and lifting paint, allowing for experimentation with color combinations and creation of various textures in artwork. The palette knife can be used to apply paint directly to the canvas for precise and controlled brushwork.
By having a water container and palette knife in your painting toolkit, you’ll be equipped to efficiently and creatively work with acrylic paints, bringing your sailboat painting to life.
Reference Image or Sketch
When painting a sailboat with acrylics, having a reference image or sketch is crucial for accuracy and capturing the essence of the subject. The reference image serves as a visual guide, helping artists understand the structure, proportions, and details of the sailboat.
To create a reference image or sketch, start by selecting a clear and high-resolution photograph of the sailboat. It should showcase the desired angle and composition for the painting. Then, use a pencil or grid method to transfer the main outlines and important features onto your canvas or painting surface.
The reference image or sketch acts as a roadmap throughout the painting process. It helps artists determine the placement of the sailboat, the position of the sails, the shape of the hull, and other details. By referring to the image or sketch, artists can ensure accuracy and achieve a realistic representation of the sailboat.
Remember to use the reference image or sketch as a guideline rather than strictly copying it. Allow yourself to add your own artistic interpretation and style to make the painting unique. Experiment with colors, textures, and brushwork to bring the sailboat to life on your canvas.
With a well-prepared reference image or sketch, artists can confidently paint a sailboat with acrylics, capturing its beauty and spirit in their artwork.
Preparing the Surface for Painting
Preparing the surface is a crucial step in painting a sailboat with acrylics . In this section, we’ll discover the necessary techniques to ensure a smooth and long-lasting finish. First, we’ll explore the importance of cleaning the surface thoroughly. Then, we’ll dive into the significance of applying primer or gesso before starting the actual painting process. These essential steps will set the foundation for a successful sailboat painting adventure. So let’s get our brushes ready and make that canvas shine!
Cleaning the Surface
When preparing to paint a sailboat with acrylics, it is essential to follow these important steps for cleaning the surface:
1. Begin by using a soft brush or cloth to remove any dust or debris from the surface. This step is crucial for ensuring proper adhesion of the paint.
2. In case there are stains or dirt that cannot be removed using a brush, gently clean the area with mild soap and water. It is important to avoid harsh chemicals as they may cause damage.
3. Prior to painting, it is necessary to eliminate any peeling or flaking paint. This can be done by carefully smoothing the surface using sandpaper or a scraper.
4. After the cleaning and preparation process, it is recommended to apply a layer of primer or gesso. This will create a smooth surface, enhancing color saturation and durability.
Remember to take your time and handle the surface gently during the cleaning process to prevent any damage. Properly cleaning and preparing the surface guarantees a beautiful painting that will last for a long time.
Applying Primer or Gesso
Applying primer or gesso is necessary for preparing the surface before painting a sailboat with acrylics . It creates a smooth base for the paint, improving the quality and durability of the artwork.
To apply primer or gesso:
- Clean the surface: Remove dust, dirt, and grease using a soft cloth or brush.
- Choose the right primer or gesso: Use acrylic gesso , which dries quickly and works well with acrylic paints.
- Prepare the primer or gesso: Stir it thoroughly and thin with water if needed, following the manufacturer’s instructions.
- Apply the primer or gesso: Use a brush or palette knife to apply an even layer, covering the entire area to be painted.
- Allow drying time: Let the primer or gesso dry completely, which usually takes 1-2 hours, but may vary based on the product and environment.
Applying primer or gesso creates a strong foundation for your sailboat painting, ensuring vibrant colors and good adherence to the surface. It also prevents unwanted paint absorption into the canvas or other surfaces. Follow the manufacturer’s instructions for best results.
Understanding Basic Techniques for Painting a Sailboat
Discover the vibrant world of sailboat painting as we delve into the fundamental techniques that bring these majestic vessels to life. From mixing colors to layering and blending, and even creating texture and detail, we’ll explore the artistry and skill required to capture the essence of a sailboat on canvas. Get ready to embark on a creative journey as we unlock the secrets of painting a sailboat with acrylics !
Mixing Colors
When mixing colors in acrylic painting, there are techniques to achieve the desired result.
– Start with the primary colors : red, blue, and yellow. These are the foundation for all other colors.
– Use a color wheel to understand color relationships. Opposite colors on the wheel, such as blue and orange, create contrast when mixed.
– Experiment with different color ratios to create shades and tints. Adding more blue to yellow creates a green shade , while adding more yellow to blue creates a green tint .
– Gradually add small amounts of one color to another, mixing and blending until the desired hue is achieved.
– Consider the effect of adding white or black to a color. Adding white creates a lighter shade , while adding black creates a darker shade .
– Take note of the drying time of acrylic paints, as the color may slightly shift once dry. Let the mixed colors dry before making adjustments.
– Clean brushes thoroughly between color mixing to avoid contamination and achieve accurate colors.
By understanding these mixing techniques, you can confidently create a wide range of colors for your sailboat painting. Experiment and explore different combinations to achieve unique and vibrant results.
Layering and Blending
Layering and blending are pivotal techniques in the realm of acrylic painting. Employ the following strategies to attain the desired effect:
– Emphasize layering: Begin by applying thin coats of paint and gradually intensify the color and texture in order to exercise better control over the varying shades and values.
– Master the art of wet-on-wet blending: Meld hues by applying wet paint atop another still wet layer, resulting in seamless transitions and smooth gradients.
– Harness the power of dry brushing: Utilize a minimal amount of paint with a dry brush to fashion texture and highlights, which is ideal for incorporating intricate details.
– Embrace glazing: Introduce translucent layers of paint onto dry layers to yield depth and radiance, thereby permitting subtle variations in color and an atmosphere-like aura.
– Achieve blending with a palette knife: Directly mix and blend colors on the painting surface using a palette knife, imbuing the artwork with texture and dimension.
Experiment with these techniques to ascertain the most effective approach. The combination of layering and blending can augment the depth, dimension, and opulence of your acrylic paintings, thereby enabling you to create captivating sailboat masterpieces.
Creating Texture and Detail
Creating texture and detail is essential when painting a sailboat with acrylics . These techniques enhance the depth and visual interest of the artwork. To achieve texture, it is recommended to utilize methods such as dry brushing , sponging , or palette knife strokes.
Implementing these techniques effectively can add texture not only to the sails , water , but also to the boat as a whole.
One approach to create texture on the sails is by using the dry brush technique. This involves applying a small amount of paint to a dry brush and gently brushing it onto the canvas. By doing so, a rough and textured appearance is achieved, giving the impression of fabric on the sails. To replicate waves and ripples on the water, consider using a palette knife to apply thick, undiluted paint with a scraping motion.
Adding intricate details is crucial in bringing the sailboat to life. Using fine brushes and thin paint, you can incorporate intricate elements such as rigging , ropes , and various features on the boat. Paying close attention to these details will greatly enhance the realism and overall quality of the painting.
Don’t be afraid to experiment with different techniques and brushes in order to achieve the desired textures and details. Remember, practice and patience are key when mastering the art of creating texture and detail in sailboat paintings.
Fun Fact: Incorporating texture and detail in a painting can give the artwork a three-dimensional appearance, captivating viewers.
Step-by-Step Guide to Painting a Sailboat
Master the art of painting a sailboat with acrylics with this step-by-step guide.
We’ll take you through the process, from sketching the sailboat to refining the final touches.
Discover how to block in the background, add base colors, and bring your sailboat to life with details and highlights.
With these expert tips and techniques, you’ll be able to create a stunning sailboat painting that showcases your artistic skills.
Get ready to embark on a creative journey and immerse yourself in the world of sailboat artistry.
Sketching the Sailboat
To begin sketching the sailboat before painting with acrylics, follow these steps:
1. Take a blank canvas or painting surface.
2. Take a look at the reference image or sketch of the sailboat.
3. Recognize the basic shapes and proportions of the sailboat, including the hull , sails , and mast .
4. Use a pencil or charcoal to create a light outline of the sailboat on the canvas. Begin with simple shapes and lines.
5. Pay close attention to the positioning and size of various elements, such as the sails and the angle of the mast.
6. Add more intricate details to the sketch, such as windows, ropes, or flags. It is important to ensure accurate proportions and perspectives.
7. Erase any unnecessary lines or mistakes while refining the sketch. Focus on capturing the overall shape and composition.
8. Once you are satisfied with the sketch, go over the lines with a fine-tipped pen or marker to define them. Alternatively, you can use a dark pencil.
9. Review the sketch to make sure it accurately represents the sailboat and the desired composition.
10. The sketch is now ready to serve as a guide for painting the sailboat with acrylics.
By following these steps, you can create a detailed and accurate sketch of a sailboat before starting the painting process.
Blocking in the Background
Blocking in the background is an important step in painting a sailboat with acrylics. It establishes the composition and sets the tone for the rest of the painting. Here is a step-by-step guide on how to block in the background :
1. Choose the colors for the background based on the atmosphere and mood you desire. Soft blues and greens create a calm and serene scene, while bold and contrasting colors produce a dramatic and vibrant effect.
2. Apply the background colors onto the canvas with a large brush, starting from the top and working your way down. Use broad strokes to cover the entire background area.
3. Block in the basic shapes and forms of any objects or elements that will be part of the background, such as the sky, clouds, trees, or distant land .
4. Focus on capturing the general shapes and colors rather than intricate details. Use loose and expressive brushstrokes at this stage.
5. Blend the colors together where they meet to create a smooth transition. Use a clean, damp brush to softly blend the edges.
6. Step back and assess the overall look and feel of the background. Make necessary adjustments to the colors or shapes to ensure it complements the rest of the painting.
By following these steps, you can effectively block in the background of your sailboat painting and set the stage for the rest of your artwork.
Blocking in the background has been used by artists for centuries to establish the foundation of a painting. It creates depth, atmosphere, and a harmonious composition. Whether it’s a landscape, still life, or sailboat painting, blocking in the background is an essential part of the painting process, allowing artists to develop their vision and bring their artwork to life.
Adding Base Colors to the Sailboat
To effectively add base colors to the sailboat when painting with acrylics, adhere to the following instructions:
1. Begin by preparing your palette with the necessary base colors for the sailboat. This includes utilizing blue for the water, white for the sails, and brown for the wooden parts.
2. Use your brush to apply the first base color to the appropriate areas of the sailboat. For larger areas, employ broad strokes , while smaller details require finer strokes .
3. Layer each base color onto its respective area of the sailboat, ensuring smooth and even coverage. Add additional coats as needed.
4. When necessary, seamlessly blend the base colors together. This can be achieved by gently mixing the colors with either a clean brush or a palette knife, resulting in a gradual gradient .
5. Throughout the painting process, refer to your chosen image or sketch to ensure accurate color placement and shading.
6. Before proceeding to add details and highlights to the sailboat, allow the base colors ample time to dry completely .
By following these steps attentively, you will lay a solid foundation for your sailboat painting by effectively and accurately incorporating the base colors.
Adding Details and Highlights
When adding details and highlights to a sailboat painting with acrylics , consider techniques that enhance the realism and quality of the artwork.
1. Use a smaller brush size .
2. Mix the appropriate colors .
3. Apply thin layers of paint.
4. Focus on light and shadows.
5. Use a dry brush technique for highlights .
6. Add finer details with a fine liner brush .
7. Step back and assess the painting regularly.
Following these guidelines, artists can create depth and dimension in their sailboat paintings while capturing the essence of light and highlighting important elements of the subject.
Refining the Painting
To refine a sailboat painting with acrylics, the first step is to assess the sailboat’s composition and proportions. It is important to adjust as necessary in order to accurately represent the sailboat. Once the basic structure of the sailboat is in place, it is time to refine the details. This can be done by adding fine lines, curves, and shading for depth.
To make the painting more visually appealing, highlights should be added to catch the light, such as on the sail edges and hull. In order to achieve a realistic effect, it is important to blend colors seamlessly. After the sailboat itself is refined, attention should be turned to the background. Evaluate and enhance the background colors to ensure they complement the sailboat. If necessary, improve the water texture and depth to add more dimension to the painting.
To truly bring the painting to life, consider adding additional details like seagulls or waves. After all the refinements have been made, step back and evaluate the final painting. Make any touch-ups or adjustments as necessary to perfect the artwork. The process of refining the painting is crucial for capturing the beauty and intricacies of a sailboat with acrylics. These final touches will truly make the artwork special and bring it to life.
Finishing Touches and Sealing the Painting
To complete the sailboat acrylic painting, follow these steps for the finishing touches and sealing :
1. Remove any masking tape or painter’s tape used to create clean lines.
2. Inspect the painting for touch-ups or additional details. Use small brushes and acrylic paint to carefully add necessary final touches.
3. Allow the painting to dry completely before proceeding to sealing.
4. Use a varnish or sealant specifically made for acrylic paintings. Apply a thin, even coat using a soft brush. Follow the manufacturer’s instructions .
5. Let the varnish dry completely, which typically takes several hours.
6. Inspect the painting for any missed areas during the sealing. Touch up these spots with more varnish .
7. Consider applying a second coat of varnish for extra protection and a glossier or matte finish. Follow the manufacturer’s instructions and let each coat dry completely.
8. Once the painting is fully sealed and dry, you can frame or display it as desired.
By following these steps, you can add the finishing touches and seal your acrylic sailboat painting to protect and enhance its appearance.
Tips and Tricks for Painting a Sailboat with Acrylics
Here are some practical tips and tricks for painting a sailboat with acrylics:
1. Prepare your workspace by covering it with newspaper or a drop cloth to avoid paint splatters or spills.
2. Start by sketching the sailboat outline on your canvas using a pencil as a guideline.
3. Mix your acrylic paints on a palette to achieve the desired colors for the hull, sails, and details.
4. Use a larger brush to paint the background and base colors of the sailboat. Apply thin layers of paint and let each layer dry before adding another.
5. Once the base colors are dry, use a smaller brush to add details like windows , ropes , and flags . Pay attention to the intricate features of the sailboat.
6. Create depth and dimension by adding shadows and highlights . Use lighter shades for areas that catch the light and darker shades for areas in shadow.
7. To add texture to the water surrounding the sailboat, use a palette knife or dry brush technique for a more realistic and dynamic look.
8. Allow the painting to dry completely before adding final touches or varnish to protect it.
By following these tips and tricks, you can create a beautiful sailboat painting with acrylics.
Some Facts About How To Paint A Sailboat With Acrylics:
- ✅ Acrylic paint is commonly used for painting sailboats due to its versatility and quick drying time.
- ✅ Sailboat paintings created with acrylics can capture the vibrant colors of the water and sky.
- ✅ Using different brush techniques and layering, artists can create texture and depth in their sailboat paintings.
- ✅ Acrylic paints are available in a wide range of colors, allowing artists to accurately depict the details of a sailboat.
- ✅ To protect the finished sailboat painting, artists often apply a varnish or sealant to ensure its longevity.
Frequently Asked Questions
Faqs for “how to paint a sailboat with acrylics”, q: how can i cancel my contracts or subscriptions with youtube.
A: To cancel your contracts or subscriptions with YouTube, you can visit the “Verträge hier kündigen” section on YouTube. This section provides information and instructions on how to terminate your agreements with YouTube.
Q: Can I participate in testing new features on YouTube?
A: Yes, you can! YouTube offers an opportunity for users to test new features before they are widely released. Simply go to the “Neue Funktionen testen” section and follow the instructions to opt-in for testing new features on YouTube.
Q: Where can I find the guidelines and safety measures for using YouTube?
A: You can find the guidelines and safety measures for using YouTube in the “Richtlinien & Sicherheit” section. This section provides detailed information on YouTube’s community guidelines, rules against harassment and hate speech, and other safety measures to ensure a positive and secure experience on the platform.
Q: What information does the NetzDG Transparenzbericht on YouTube provide?
A: The NetzDG Transparenzbericht on YouTube offers information about the company’s compliance with the NetzDG law in Germany. It provides transparency reports related to efforts in combating illegal content and hate speech on the platform.
Q: How does YouTube work? Can you provide an overview?
A: YouTube is a video-sharing platform where users can upload, view, and interact with videos. In the “Wie funktioniert YouTube?” section, you can find a comprehensive overview of how YouTube works, including instructions on creating an account, uploading videos, and engaging with other users.
Q: Who owns the copyright for content on YouTube?
A: Google LLC owns the copyright for content on YouTube until 2023, as indicated by the “© 2023 Google LLC” statement. Users should be aware of the terms and conditions regarding copyright ownership when using YouTube.
About the author

Leave a Reply Cancel reply
Your email address will not be published. Required fields are marked *
Save my name, email, and website in this browser for the next time I comment.
Latest posts

The history of sailing – from ancient times to modern adventures
History of Sailing Sailing is a time-honored tradition that has evolved over millennia, from its humble beginnings as a means of transportation to a beloved modern-day recreational activity. The history of sailing is a fascinating journey that spans cultures and centuries, rich in innovation and adventure. In this article, we’ll explore the remarkable evolution of…

Sailing Solo: Adventures and Challenges of Single-Handed Sailing
Solo Sailing Sailing has always been a pursuit of freedom, adventure, and self-discovery. While sailing with a crew is a fantastic experience, there’s a unique allure to sailing solo – just you, the wind, and the open sea. Single-handed sailing, as it’s often called, is a journey of self-reliance, resilience, and the ultimate test of…

Sustainable Sailing: Eco-Friendly Practices on the boat
Eco Friendly Sailing Sailing is an exhilarating and timeless way to explore the beauty of the open water, but it’s important to remember that our oceans and environment need our protection. Sustainable sailing, which involves eco-friendly practices and mindful decision-making, allows sailors to enjoy their adventures while minimizing their impact on the environment. In this…
Free Shipping On All Orders!
- Epoxy Resins
- Polyester Resin
- Urethane Resins
- Epoxy Project Supplies
- Antifouling Paints
- Topside Paints
- Thinners & Solvents
- Paint Supplies
- Wood Oils & Finishes
- Wood Finishing Supplies
- Cleaning & Polishing
- Accessories

Table Top Epoxy

Clear High Performance Epoxy Kits

5:1 Traditional Epoxy Resin Kits
- Thinners & Solvents

Wet Edge Topside Paint

Premium Marine Topside Primer

Spartan Multi-Season Antifouling Paint
- Wood Finishes
- Wood Oils & Finishes

Gleam 2.0 Marine Spar Varnish

Lust Rapid Recoat Marine Spar Varnish

Halcyon Water-Based Marine Varnish

TotalBuff Rubbing Compound

TotalShine Finishing Compound

White Knight Fiberglass Stain Remover
- TotalBoat Gear

FlexFit Fitted Mesh Back Baseball Cap

Men’s Long Sleeve T-Shirt Hoodie

Women’s Long Sleeve T-Shirt Hoodie
FREE SHIPPING with a minimum puchase of $1,200.00 You are $10.00 away from your free shipping!
Shipping, taxes, and dicount codes calculated at checkout.
Which Bottom Paint Should I Use?

What is Boat Bottom Paint?
Bottom paint is applied below the waterline on your boat, and typically refers to antifouling paint that prevents marine growth from clinging to your hull. Barnacles and slime can slow you down and increase your fuel costs because the engine has to work harder to move your boat through the water. A bottom full of barnacles and weeds can also put you in harm’s way because it can seriously hamper your ability to maneuver.
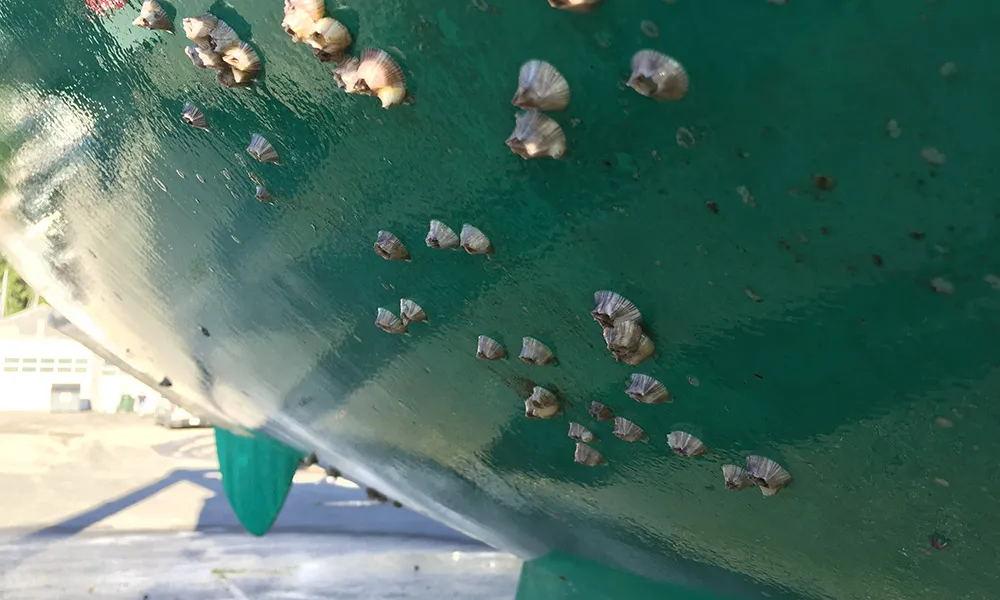
The key antifouling ingredient is some type of biocide for deterring hard marine growth such as barnacles and mussels. Some antifouling paints also include an algaecide for preventing soft growth like algae, slime and weeds. There are many different antifouling coatings, making it hard to choose the paint that’s right for your boat and your budget. Some coatings work better in different locations, including fresh or salt water. Some are more environmentally friendly than others, and some cost more based on the amount and type of biocide, and the protection they provide.
Do I Need Bottom Paint on My Boat?
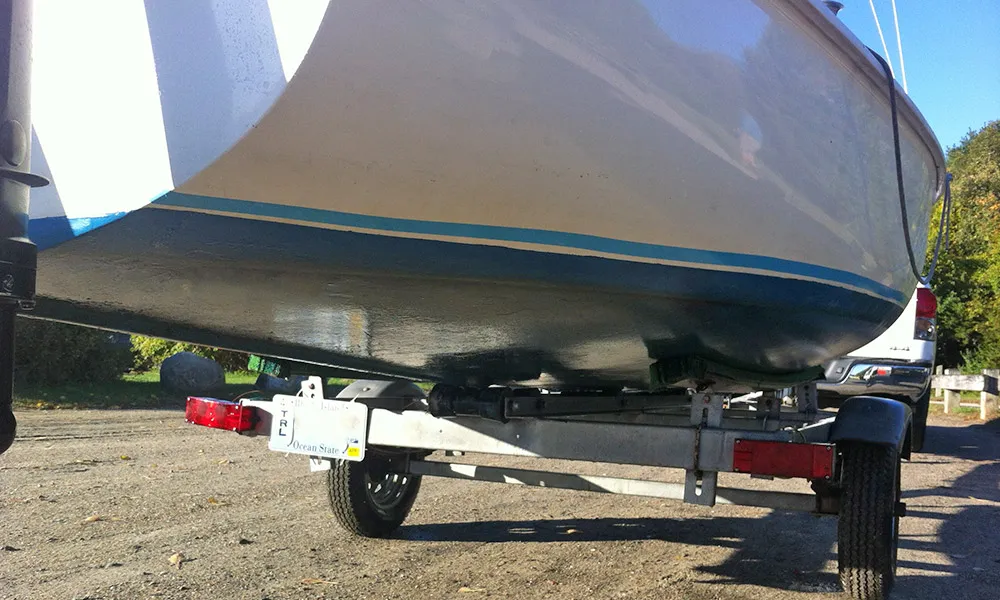
If you pull your boat out of the water every time you use it, you probably don’t need bottom paint. But if you keep your boat in the water all season, or if you take your boat out of the water periodically, such as on a trailer or lift, then yes, you should apply bottom paint to prevent hull fouling. Same goes whether you keep your boat in salt water or fresh water.
What are the Different Types of Antifouling Paints?
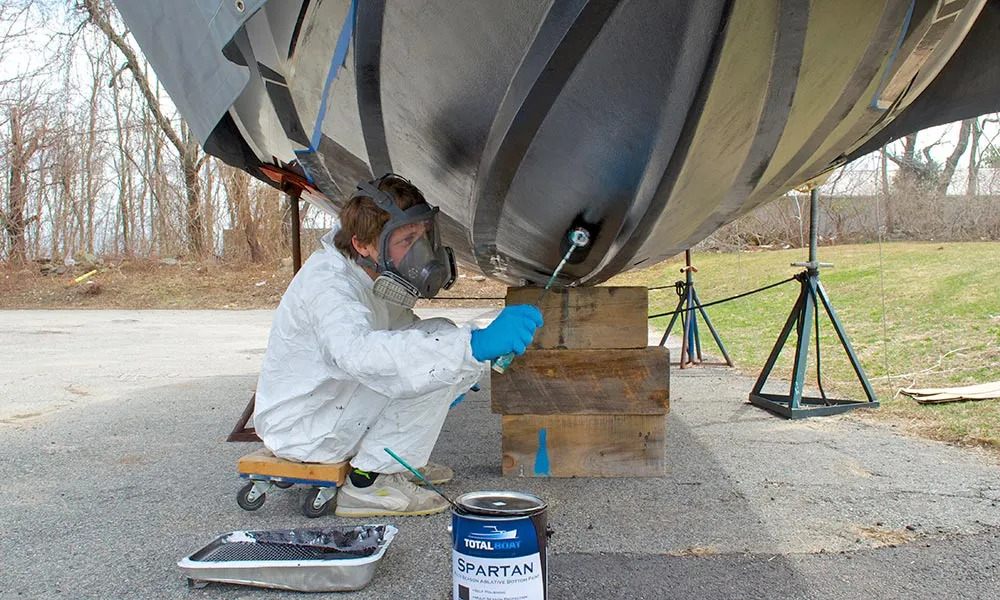
All bottom paints are not the same and will not be effective for all boats, in all waters and fouling conditions, and for all types of boating. Bottom paints are usually one of two types: hard or ablative, with variations that are effective based on how much time the boat spends in the water and how often it moves. For example, hard bottom paints are effective for a single season, and they build up season after season, eventually requiring costly removal. Ablative paints come in single-season and multi-season varieties and don’t build up.
Ablative Bottom Paint
Ablative paint is designed to gradually wear away as water flows beneath the hull, either from use or from the movement of tides and currents. Fresh biocide is exposed as the paint layers wear away, preventing marine fouling organisms from attaching to the surface. Some ablative paint formulas are for multi-season use, and some are effective for only a single season. Also, ablative bottom paint can be copper-based or copper-free, and water-based or solvent-based. For most ablative paints to work effectively, motion is required, so this paint is best if you use your gets frequent use.
Self-Polishing Copolymer Ablative Bottom Paint
This type of antifouling paint also wears away gradually to expose fresh layers of biocide, but the self-polishing properties of its controlled-release copper copolymer formula make it work whether the boat is at anchor or underway. Some copolymer ablatives are effective for multiple seasons, and need only a light scuffing to reactivate the antifouling in the spring, just before launching.
Hybrid Copolymer Ablative Bottom Paint
Hybrid bottom paints are self-polishing and release biocides at a controlled rate like copolymer bottom paints do, but hybrid paints can be burnished–like a hard bottom paint–for smoothness and speed. Unlike hard bottom paints, hybrid paints have less buildup to remove next season.
Hard Bottom Paint
A hard bottom paint coating doesn’t wear away like an ablative coating does, it just loses its biocide over time. The biocide in hard bottom paints leaches constantly while the boat is in the water, whether the boat is moving or not. Hard paints lose their effectiveness once all the biocide leaches out. Because hard bottom paint doesn’t wear away, it builds up and has to be sanded down before reapplying bottom paint the next season. Also, hard bottom paints generally become rendered inactive one the boat is hauled out of the water, so they’re best for boats that remain in the water for extended periods. They’re also ideal for racing boats or boats operated at faster speeds because the hard paint coating can be burnished to increase smoothness and speed.
Questions to Answer Before Buying Bottom Paint
What is my boat made of.
When it comes to choosing bottom paint, substrate (surface) is a big consideration. Do you have an aluminum, fiberglass, steel or wooden boat? Most bottom paints contain some type of copper biocide, which is suitable for fiberglass and wooden boats, but not for aluminum. The copper in the paint causes galvanic corrosion, which will destroy an aluminum boat or pontoon boat. For antifouling protection on aluminum boats and underwater metal parts, you have to apply a copper-free bottom paint .
Inflatable boats made of PVC, Hypalon or other materials also need bottom paint if they’re left in the water for long periods. Ablative bottom paints designed for inflatable boats won’t crack after drying or peel while you’re rolling up the inflatable for storage.
Where Do I Use or Keep My Boat? Location is Everything!

What are the fouling conditions in your area? By ‘area’ we mean not only the geographic location, but the specific harbor, and even your location in the harbor. Why? Because the fouling conditions can be that location-specific. Is the fouling light, moderate, or heavy in your part of the harbor? Typically, more biofouling occurs in waters that are warm and still, rather than colder waters where water flow is unrestricted.
Is My Boat in Fresh Water or Salt Water?
Barnacles, algae and slime are the bane of boat owners who do their boating in salt water. And even though boats left in freshwater don’t have to worry about barnacles, they can still get slimy and grow green beards. If algae slime and algae are a problem, you’ll want a paint that contains an algaecide such as zinc pyrithione (this applies to copper-free biocides, too). If you do your boating in freshwater lakes, look for bottom paints designed specifically for freshwater fouling. Why pay for extra protection you don’t need?
How Often Do I Use My Boat?
If you use your sailboat or power boat frequently, ablative bottom paint is a great choice because it’s most effective when the boat moves through the water to release fresh biocide. If you don’t use your boat as often and it spends a lot of time at the doc or on the mooring, your best bet would be a self-polishing copolymer paint that’s effective whether the boat is moving or not. In addition, brief boating seasons are suitable for a single-season antifouling paint , but for a longer boating season, it can be more effective and economical to apply a multi-season bottom paint . If you trailer your boat, a harder ablative antifouling paint that can withstand trailering and beaching might be the way to go.
Do I Want to Use My Boat for Racing?
If you want to race your boat or you just want to make your boat go faster, use a thin film bottom paint, a hard modified epoxy bottom paint, or a hybrid bottom paint that can be burnished. Burnishing involves wet sanding or using a Scotch-Brite® pad to make the surface smoother.
Should I Use Solvent-Based Bottom Paint or Water-Based Bottom Paint?
Environmental restrictions in some areas prohibit the use of solvent-based paints due to their high VOC (volatile organic compound) content. If this is the case, you can apply a water-based, low VOC bottom paint . Water-based bottom paint offers easy cleanup and is very effective against marine fouling.
A common misconception about water-based bottom paint is that it will dissolve and leave the hull with no antifouling protection once the boat is in the water. Not true. Once cured, the water in water-based bottom paint evaporates and leaves a protective film containing the biocide.
Should I Use Copper-Based or Copper-Free Bottom Paint?
Again, environmental restrictions may dictate the use of copper-free antifouling bottom paint. Typically, a higher percentage of copper in the paint means it’ll be more effective at combating shell fouling. But copper-free bottom paint containing the eco-friendly biocide Econea™ (tralopyril) has proven very effective on shell fouling such as acorn barnacles and zebra mussels. If you have an aluminum boat, you have to use a copper-free antifouling paint to avoid galvanic corrosion, which will destroy aluminum. Underwater metals also need bottom paint that’s copper free .
What Type of Bottom Paint is on My Boat Now?
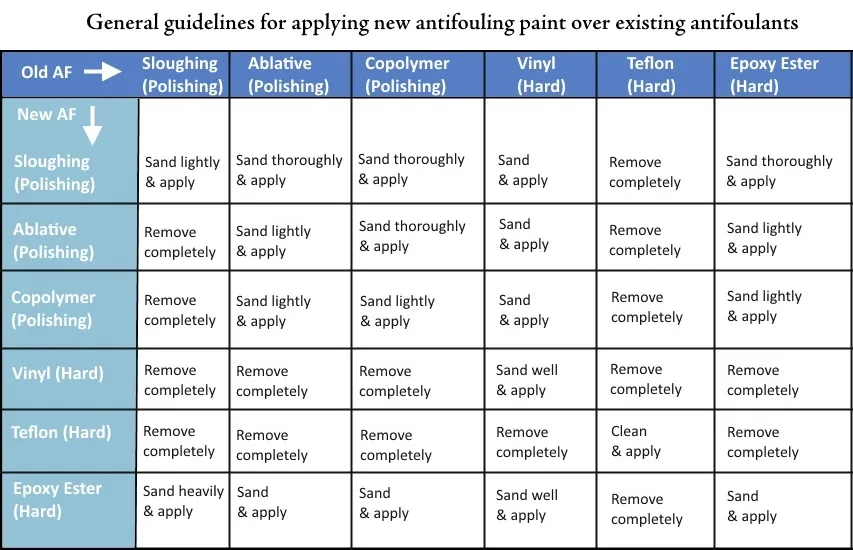
If there’s bottom paint on your boat now, it’s really important that your new bottom paint is compatible with the old bottom paint. You don’t want your new paint to peel, so you need to find out what the previous paint is. If you can’t determine that, you’ll need to strip off the old paint completely and start over. Antifouling paint formulas change often, but here are some general compatibility and surface preparation guidelines. For best results, read the bottom paint manufacturer’s recommendations.
How Much Do I Want to Spend On Bottom Paint?
Typically, the higher concentration of biocide a bottom paint has, the more expensive it will be. Hard bottom paints are typically less expensive than ablative antifouling paints. Among the ablative marine paints, the single-season ablatives are typically less expensive than the multiple season ablatives.
How Much Bottom Paint Do I Need?
The amount of bottom paint varies depending on how big your boat is and how heavily you apply the bottom paint. Refer to the paint manufacturer’s details on coverage amounts (typically given in square feet per gallon). Here’s an easy formula for figuring out the square footage of your hull below the waterline, where you’ll be applying bottom paint.
Length (in feet) x Beam (in feet) x .75 Here are some typical estimates for various types of boats. These estimates assume you’re applying two coats, and that you’ll be coating the surface as thickly as possible without drips or runs.
How Often Should I Bottom Paint My Boat?
How long does boat bottom paint last? Depends on the type of bottom paint you use and your boating conditions. Typically, you should apply bottom every year, but there are some bottom paints that last multiple seasons. If you use your boat regularly or keep it in the water, check it every year to see if you need to reapply bottom paint.
Hints to Help You Choose the Right Bottom Paint for Your Boat
- Ask other boaters in your local marina – they’re a prime source of information about what works and what doesn’t in your particular location.
- If you want to paint in the fall and launch in spring without repainting, choose a multi-season self-polishing copolymer paint . This type of bottom paint has an unlimited launch window.
- All bottom paint manufacturers have a chart that shows the compatibility of their bottom paints with those of existing brands. Be sure to take a look at the compatibility chart before you buy.
TotalBoat Bottom Paint Comparison Chart
* Krypton provides full-season protection in salt water, where the water flow is unrestricted. It can provide multi-season protection in fresh water conditions. If you have any questions about which bottom paint to use, please call our Tech Support Team at (800) 497-0010.

Krypton Copper-Free Antifouling Bottom Paint

JD Select Water-Based Bottom Paint

Underdog Boat Bottom Paint

TotalProtect Epoxy Barrier Coat Primer

TotalFair Epoxy Fairing Compound
Thanks for this content. Very helpful
Leave a comment
Related articles.

Refitting a Sailboat and Fixing Leaks with Ran-Day
Randall, or as you may know him as Ran-Day, from Yacht Hunters is an avid sailor and cyclist, embarking on a monumental project: refitting and modernizing an old Scheel 45...

Boat Building with Richard Honan and Friends
There's something magical about Sundays, isn't there? It's a day when time seems to slow down just enough for us to appreciate the simple joys of life. For TotalBoat Ambassador,...

TotalTread Transforms Decks on Slow Car Fast Ho...
Danielle and Tommy, from Slow Car Fast Home, are the proud owners of a 1978 SeaCamper - a 24ft trailerable houseboat that they are bringing back to life with a...

Arabella Gets a New Mizzen Boom!
Welcome back aboard Arabella! A few episodes back on Acorn to Arabella, Arabella’s mizzen boom broke on their trip to Harwich Port, MA. And, with Robin’s dad's shop just a...
- Choosing a selection results in a full page refresh.
- New Sailboats
- Sailboats 21-30ft
- Sailboats 31-35ft
- Sailboats 36-40ft
- Sailboats Over 40ft
- Sailboats Under 21feet
- used_sailboats
- Apps and Computer Programs
- Communications
- Fishfinders
- Handheld Electronics
- Plotters MFDS Rradar
- Wind, Speed & Depth Instruments
- Anchoring Mooring
- Running Rigging
- Sails Canvas
- Standing Rigging
- Diesel Engines
- Off Grid Energy
- Cleaning Waxing
- DIY Projects
- Repair, Tools & Materials
- Spare Parts
- Tools & Gadgets
- Cabin Comfort
- Ventilation
- Footwear Apparel
- Foul Weather Gear
- Mailport & PS Advisor
- Inside Practical Sailor Blog
- Activate My Web Access
- Reset Password
- Pay My Bill
- Customer Service

- Free Newsletter
- Give a Gift
How to Sell Your Boat

Cal 2-46: A Venerable Lapworth Design Brought Up to Date

Rhumb Lines: Show Highlights from Annapolis

Open Transom Pros and Cons

Leaping Into Lithium

The Importance of Sea State in Weather Planning

Do-it-yourself Electrical System Survey and Inspection

Install a Standalone Sounder Without Drilling

Rethinking MOB Prevention

Top-notch Wind Indicators

The Everlasting Multihull Trampoline

In Search of the Snag-free Clew

What’s Involved in Setting Up a Lithium Battery System?

Reducing Engine Room Noise

Breaking Point: What Can Go Wrong With Your Yanmar?

Mildew-resistant Caulks for Boats

Can We Trust Plastic Boat Parts?

Repairing Molded Plastics

Mailport: Marine plywood, fuel additives, through bolt options, winch handle holders

The Day Sailor’s First-Aid Kit

Choosing and Securing Seat Cushions

Cockpit Drains on Race Boats

Rhumb Lines: Livin’ the Wharf Rat Life

Safer Sailing: Add Leg Loops to Your Harness

Resurrecting Slippery Boat Shoes

Waxing and Polishing Your Boat

Tricks and Tips to Forming Do-it-yourself Rigging Terminals

Marine Toilet Maintenance Tips

Learning to Live with Plastic Boat Bits
- Boat Maintenance
Propeller Paints that Last
Prop antifouling research spins into new territory..

A cheap, effective antifouling paint for a propeller is as rare as a good pun. The coating must not only ward off all marine growth, it must present a smooth slick surface that can stand up to the constant water friction when the boat is under power. And in the case of a folding prop, the coating must also adhere in nooks and crannies and, in some cases, even withstand metal-to-metal contact. These demands are well beyond the reach of any run-of-the-mill marine coating. Thus, our search for-wait for it-a prop(er) paint.
Yes, you can paint a bronze propeller with conventional, copper-based hull paint, but it wont do much good, since the more noble metals in the bronze prop will eventually waste away the copper biocide. Dont even think about painting an aluminum outdrives or prop with a copper paint, or the reverse will occur-the more noble copper will attack the outdrive alloys. Even with the right preparation, regular bottom paint tends to wear quickly on a prop due to increased water friction.
Practical Sailors search for longer lasting prop paints has led us down many rabbit holes, and eventually to the Land Down Under. For the past several years, Practical Sailor tester Jonathan Neeves has been conducting a series of antifouling paint field trials on his 38-foot catamaran based in Sydney, Australia. Some of the work is aimed at supplementing our paint panel tests of hull paints, (see Bottom Paint Checkup , PS March 2016), but the main purpose of the most recent trials has been to evaluate the real-life performance of propeller paints.
Paints for Props and Running Gear
For the past few years, Neeves has been trying to find a paint for props, saildrives, and running gear that matches the life of the antifouling on his hull. The seasonal sailor who hauls and paints every year doesn’t need this level of performance, but for a year-round sailor, a good multi-season prop paint can yield big savings.
The selection of paints specifically for propellers is limited. Neeves has tested four different products on his boat: Velox, Prop Speed, PropOne (formerly known as Prop Gold), and Interlux Trilux. In separate trials aboard a monohull based on the Chesapeake, weve tested Prop Speed and Mussel Buster, a professionally applied bake-on coating. The results from these propeller paint tests are averaged in the adjacent table. (Another product, Prop Purr, has since entered the market that we will be testing for the first time this spring.)
In this report, we detail the results of Neeves most recent test-a comparison of Velox and Prop One. Like conventional bottom paint, Velox relies on biocides to fight marine growth. Prop One, like Prop Speed, is characterized as a foul-release coating-sometimes called a fluoropolymeric or silicone paint. It contains polytetrafluoroethylene (Dupont brand Teflon). Prop One depends on its rubbery, slick surface coating surface to prevent barnacles from latching on.
Application
The makers of Prop Speed and Prop One discourage amateur application. They prefer their products by applied by professional applicators. One reason for this is that the coating process requires special care. (Neeves went through a training course in order to become a qualified applicator for Prop One.) If you intend to apply either product yourself, we suggest you work very closely with the manufacturer, and ask specifically about any safety precautions to take when applying and removing the paint.
Applying Velox is more straightforward-prep, prime, and paint. An amateur can handle the job himself, although we recommend calling the maker (or qualified distributor) before painting. The instructions in the U.S., Australia, and Europe vary (and even can be contradictory).
Most props require very little paint. Even if you buy the smallest size kit available, youll have some left over, and you might not be able to re-use it. Weve reused Velox after more than a year, and Prop Speed and Prop Gold have an 18-month shelf life. Again, check with the manufacturer regarding shelf life before you plunk down $200 for more paint than you can ever use.
If you are re-applying Prop Speed or Prop Gold you need to strip off the old coating and get down to bare abraded metal every time you apply a new coating. If you are re-applying Velox, you can lightly sand the old paint using 120- grit sandpaper, re-apply primer where necessary and re-coat with the topcoats.
You can use a stainless steel wire brush on an angle grinder to remove old coating. Other PS testers recommend an 80-grit lap wheel. In either case, be sure to wear eye protection. After grinding, wash well with water and apply the primer coat. Do not touch the bare metal with your fingers, it will leave grease and the primer will lack adhesion. Neeves used latex gloves while cleaning and abrading. Do not use turpentine or other paint cleaners, which can contain oils that inhibit good adhesion.
Prop One also supplies an acid wash to complete the prep work, something that the makers of Velox discourage. After Neeves acid-cleaned the prop, he again lightly abraded it and rinsed well with water. (Prop Speed does not mention an acid-wash prep, although this would seem advisable.)
Folding props
Folding props require special attention. Neeves three-bladed folding Volvo prop needs to be completely removed to replace the sail drive anode. The prop assembly consists of 16 pieces, plus one saildrive anode, two bolts, three segmented hub anodes, and three Allen bolts. Each blade and hinge pin are marked so that the blades are returned to the exact same spot of the hub. Disassembly and re-assembly is not difficult-but does call for patience.
If this all seems excessive, five or six years ago when Neeves did not pay such close attention, most of the epoxy primer (Interprotect) and paint (Interlux Trilux) he had applied fell off within one week. With another silicone product, the paint peeled off like a plasticglove.
The actual painting with either Velox or Prop One is simple: apply the primer and topcoat following the makers instructions. These products can be professionally sprayed. Neeves used one-inch disposable paint brushes-one for primer and one for topcoat.
Velox suggest one coat of primer and two or three coats of the active topcoat. Prop One suggests two thin primer coats and one topcoat. Both require allowing at least 12 hours for the paint to dry before submerging.
One final word on application: Always remember that prop or shaft anodes must be masked and should not be painted over. Shaft anodes must also be bolted to bare, unpainted, metal, so it is best to completely assemble, mask and paint. Using Loctite to secure the anode bolts affords some piece of mind that the anode wont go anywhere.
Performance
In early 2015 we treated both sail drives and one prop with Velox and one prop with Prop One (then called Prop Gold). After about one year, Neeves beached the cat for inspection, and could detect no difference between the products. After a quick wipe-down, the boat went back into the water.
After 21 months, the two products again performed similarly. There were a few more barnacles on the Prop Gold, but they were small and isolated. Both props had soft growth that was easily wiped off. In Neeves view, both products lived up to expectations of 24-month protection, with Velox performing slightly better.
The main difference between the two products is when it comes time to re-apply, especially if you do it yourself. Most of the Velox primer was still intact, so after a powerwash and light sanding, the prop was ready for a new coat. The Prop One, on the other hand would need to be stripped back. For more on prop paints and bottom paint, check out the online version of this article, which contains links to past tests and reports.

Several past Practical Sailor tests involved antifouling paints designed for props, running gear, and aluminum saildrives. This table includes previous field trials on propellors, outdrives, and static paint panels. Only the seven paints with asterisks have been tested on props. In field trials, the difference between the foul-release coatings Prop One and Prop Speed was not distinguishable.

One of the biggest challenges with prop coatings is ensuring good adhesion, which is why some manufacturers recommend professional application. The surface must be free of grease and oil and carefully primed and prepped according to the maker’s instructions.
- It seems a shame to have to paint a shiny new prop. Even pros sometimes mistakenly paint the anode (see photo number five).
- The prop and saildrive was coated with Velox and checked after 21 months in the water (see photo number 3).
- The hull, painted with Jotun SeaQuantum Ultra was still clean after 13 months but the prop was already succumbing to soft growth. Growth was thickest at the sail drive skirt, which had been painted with Trilux 33.
- After 21 months in the water and a good power washing, the Velox coating on saildrive coating was in fair condition, but the blades had lost most of their paint, requiring a repeat of the full prep process for recoating.
- This propeller assembly has been coated with Prop Speed by “professionals” at a highly reputable yard. They also painted the anodes, which should never occur.
RELATED ARTICLES MORE FROM AUTHOR
This is an excellent article and the kind of info I have always enjoyed from PS. I plan to look deeper into these products. It appears Velox might be just the thing for my two blade flexofold prop.
Thanks for doing this testing, it is great to know ahead of time how well these expensive products work. I used Pettit Prop Coat this season and have had reasonable luck with it in the past. It seems to be very popular here in New England, perhaps because of our short seasons and cooler waters it is a decent option. Do you have any data or comparison of zinc based coatings vs those with biocides?
Also, I feel obligated to comment on photo 5, where the “professionals” made a major mistake. I had the misfortune of having my boat one of New England’s “premiere” yards this last winter and witness some of their work first hand. I was underwhelmed by the quality of their workmanship of nearly every job I saw. The takeaway is that even when you pay professionals to do a job, inspect their work. You may be surprised to see that you do better work.
I have tested a wide range of prop paints over the last few years including Prop Speed, Velox, Pettit Zinc Coat, Pettit Running Gear Guardian, and Prop Glide. None worked for more than a season due to some of the coating coming off, resulting in the need to strip and redo it every year. You can’t patch bare spots with those coatings. Last year, I stripped everything and used Rustoleum Cold Galvanizing Compound spray (at the suggestion of someone on one of the boating forums). It was easy to apply and worked great for the entire season. After power washing last fall, I just cleaned up a few spots and touched up the prop and shaft with the spray and my diver reports it is just as good as last year. Cheaper, easier and does the job!
Just a cautionary note:
Antifouls for hull and props (etc) are location and usage dependent. Most AFs require that the vessel is moved, used, and that the prop is used. Movement reduces the volume of fouling on the surface – simply the flow of water. The location also determines success of the AF – what works in one location will often not work in another, sometimes quite nearby. The type of fouling, the temperature and salinity of the water all seem to have an impact and any survey of AFs is commonly true on one location but may not be as successful in others. Similarly if you are unable to use your yacht regularly the AF will not be as successful as you hoped. This does not negate any of our AF tests – but you may need to try a couple of ‘our’ selection of ‘better’ product ts to find you what is the optimum for you.
Application is also critical – do what it says on the tin – the instructions are there for a reason! No need to ask how we know.
I used Velux this spring here in New England area. I was meticulous with the prep. Launched late May and dove on the outdrive 2 weeks ago. Drive seemed ok but folding props lost most of there paint.
LEAVE A REPLY Cancel reply
Log in to leave a comment
Latest Videos

Island Packet 370: What You Should Know | Boat Review

How To Make Starlink Better On Your Boat | Interview

Catalina 380: What You Should Know | Boat Review
- Privacy Policy
- Do Not Sell My Personal Information
- Online Account Activation
- Privacy Manager
Superior Paint For every job

• Designed for a tough and abrasion resistant finish. • Delivers outstanding hide and coverage • Easy application with a smooth and even finish
- Los Angeles (Main office)
- Chula Vista
- Culver City
- Garden Grove
- Hollywood (Mann Brothers)
- Long Beach (Smith Paint)
- Melrose (Studio Store)
- San Clemente
Sold exclusively at Shilpark Paint
COMMENTS
Shop Our Huge Selection of Sail Boat Metal Wall Art and Save Big Today! We Guarantee the Best Quality at the Lowest Prices. Buy Now and Pay Later with Affirm.
After you have finished with the 600 grit sandpaper, it is time to move on to 800, then 1200. This process is important so you will be painting on as smooth a surface as possible. It is then a good idea to wipe the surfaces of the boat down with a damp cloth to remove any of the dust and flakes of metal/wood.
To properly apply primer on a sailboat, follow these steps on how to apply primer: 1. Clean the surface: Before applying primer, it is important to ensure that the sailboat surface is thoroughly cleaned and free from any dirt, dust, or debris. To clean it effectively, use a mild cleaner or soap and water. 2.
Feb 17, 2006. 5,274. Lancer 27PS MCB Camp Pendleton KF6BL. May 25, 2020. #2. If those thru hulls are being used for bonding any groundings to seawater, do not paint. Otherwise, slather away. But, if you decide you need an electrical connection to the sea and you slather you thru hull, then you will be SOOL! Pagan Baby.
The basic idea is that the steel needs to be isolated from the "bottom" paint to prevent an unwanted reaction. Any bare Steel needs to be protected first. Above the waterline if you are going to strip (sand blast) to bare steel then I would use a 2 part epoxy like Ameron 235.
Gold Sailboat Metal Wall Art, Sailing Boat Wall Art, Boat Wall Art, Ship Wall Decor, Nautical Wall Art, Gold Wall Decor, Coastal Wall Art 4.8 (31) · a d ... Sailboat Landscape Painting, Lake Art Print, Modern Wall Art, Cottage Decor, Sailboat Wall Art, Bedroom Decor, Nautical Art, Cottage Art ...
Check out our sailboat metal wall art selection for the very best in unique or custom, handmade pieces from our wall hangings shops. ... Sole Deco Large Abstract Sailing Oil Painting On Canvas Sailboat Painting Wall Art Sailboat Painting Blue Ocean Painting Living Room Décor Maria. 5 out of 5 stars ...
Stratton Home Decor Metal Sailboats Decor Wall Décor, Large, Multi Color. Metal. 4.7 out of 5 stars. 24. $40.91 $ 40. 91. List: $127.99 $127.99. ... Ocean Nautical Yacht Picture Sailing Boat Surfing Canvas Coastal Beach Artwork Nature Sea Wave Print Seashore Scenery Painting Seascape Art for Bedroom. Wood. Options: 3 sizes. 4.3 out of 5 stars. 48.
Apply primer, if necessary, and resand. Apply the finish paint with a partner, using roller and brush. Let each coat dry completely before lightly sanding for the next, laying on a minimum of two coats. Protect yourself and the environment. A smooth application of bottom paint helps boat performance.
Check out our sailboats métal painting selection for the very best in unique or custom, handmade pieces from our paintings shops.
Paintings of Sailboats. Ali Wisch. Updated: Aug 2, 2017. Original: Dec 15, 2016. With water covering nearly seventy-one percent of the earth's surface, it is no surprise that people have been portraying the sea through marine art since prehistoric times. There are many marine artists who are keeping this tradition alive: here are six of them.
Learn how to paint a sailboat scene in this, step by step, acrylic painting tutorial with artist Ashley Krieger. This lesson will teach you the steps to take...
Painting your boat's bottom is a straightforward job: You, or your boatyard, apply new paint over old. But what about the running gear: struts, shafts, trim tabs, and propellers? Bare metal will sport a luxurious coat of underwater flora and maybe even barnacles by season's end, especially if you don't use your boat often. Excessive growth produces a domino effect: It creates unnecessary ...
Shop our metal sailboat selection from top sellers and makers around the world. Global shipping available. ... Monumental Sailboat Painting by Lee Reynolds of Vanguard studios. Minimalist design of sailboats in. Category Vintage 1970s Mid-Century Modern Paintings. Materials. Canvas, Wood, Paint. View Full Details.
Blocking in the background is an important step in painting a sailboat with acrylics. It establishes the composition and sets the tone for the rest of the painting. Here is a step-by-step guide on how to block in the background: 1. Choose the colors for the background based on the atmosphere and mood you desire.
Wooden Greek sailboat, colourful sailboat of wood, metal, twine, etc, unique, Greek folk art boat, red sailboat art object, wooden boat. (891) $67.18. Boats in a Harbor Printable Wall Art. Aerial View Print Nautical Wall Decor. Instant Download Boat Wall Art Yacht Print. Maritime Decor.
Length (in feet) x Beam (in feet) x .75 Here are some typical estimates for various types of boats. These estimates assume you're applying two coats, and that you'll be coating the surface as thickly as possible without drips or runs. Type of Boat. Bottom Paint. 14′ outboard.
Prop, Running gear, and Saildrive paint. Several past Practical Sailor tests involved antifouling paints designed for props, running gear, and aluminum saildrives. This table includes previous field trials on propellors, outdrives, and static paint panels. Only the seven paints with asterisks have been tested on props.
Stratton Home Decor Metal Sailboats Decor Wall Décor, Large, Multi Color. Metal. 4.7 out of 5 stars. 21. $40.91 ... BATRENDY ARTS Sailboat Metal Wall Art Silver and Blue Ocean Artwork Hand-crafted Ship and Lighthouse Aluminum Painting Framed 3D Hanging Sculpture for Bedroom Living Room. Aluminum. $99.90 $ 99. 90. $10.00 coupon applied at ...
Features • Designed for a tough and abrasion resistant finish. • Delivers outstanding hide and coverage • Easy application with a smooth and even finish
Waterways is an original 1920s-1930s signed framed oil painting of sailboats in off the coast of. Category 1920s American Impressionist Landscape Paintings. Materials. Oil, Canvas. View Full Details. Carl Lindin. Waterways (Lysekil, Sweden), 1930s Large Framed Seascape Landscape Oil Painting , circa 1930.
This partnership will assure that The Foss Company's long tradition of quality products and service will continue for years to come. For more information about our line of Foss Foam replacement rudders, please call (949) 646-0244 or contact us at our offices in Newport Beach, California.
Laguna Beach Oil Painting Sailboat Original Art California Landscape Impasto Artwork (108) Sale Price $64.00 $ 64.00 $ 80.00 Original Price $80.00 (20% off) FREE shipping Add to Favorites Tropical Beach Oil Painting Coastal Wall Art Laguna Hawaii Original Painting Seascape Ocean Artwork 9x12" Painting by Vika Slavinskaya ...