

Adding a staysail
A properly rigged staysail is a great passagemaking tool.
Sail selection is key for offshore sailing. You need a combination that provides speed without overburdening the boat and enough flexibility that you don’t have to make frequent sail changes.

Everyone knows what to do when the wind pipes up: take a reef in the main and roll in some headsail. If you are on an afternoon sail, a reefed headsail is OK, but it’s not perfect. The effect of rolling in the sail raises the center of effort, inducing more heel, and the sail shape and the sail suffer. Offshore, these attributes will slow you down and make for a miserable passage. A better solution is to use a staysail, the center of effort will be low and the shape perfect.
With the exception of bluewater battlewagons, you don’t see staysails on most boats these days, and for good reason. Placing a stay right in the middle of the foretriangle makes tacking the genoa difficult, and it’s a few thousand dollars of gear and weight that seldom get used on a coastal afternoon. But for offshore sailing, the extra hassle and cost are well worth it.
On a typical bluewater boat, a single reef and a staysail are perfect for going to windward in more than 25 knots. A deeper reef will allow you to make way in higher winds. A tough boat can forereach through about anything with a deep mainsail reef and a robust staysail setup.
There are three items that need attention when adding a staysail: the standing rigging, the running rigging and the sail itself.
In order to install a stayed staysail, you are essentially adding a second forestay about a third closer to the mast. The stay attaches to the deck about a third of the way back and to the mast around the upper spreader. It’s important, although not critical, that the staysail stay is parallel to the forestay. You can play with the angle a little, but it will look the best parallel.
While the stay seems simple, there are big forces at play here. When loaded up, the stay will pull upward on the deck and forward on the mast, and forces need to be opposed. A deck seems pretty strong, but it will deflect and fail if you attach a chainplate right in the middle of your foredeck. The most common way to reinforce the deck is by attaching the chainplate into a bulkhead, perhaps at the aft end of the chain locker. Another common solution is to use a tie rod attached to the hull, allowing the rod to transfer the load to the much stronger hull.
The next force to deal with is the one pulling the mast forward. Every stay on your boat has an equal and opposite partner balancing the loads. With the staysail pulling forward and to leeward, we need a stay that will pull backward and to windward, at roughly the same angle. The same angle part is important, people have tried to use aft led intermediate stays, but the angle on those is typically way too steep to be effective. You will need running backstays, and yes, they will get in the way of the main, but it won’t be a big deal.

The first decision to make is how you want the stay set up. Do you want a fixed wire stay, a furler or maybe a removable cordage stay? A fixed wire stay allows you to hank a staysail on directly and go to sea. It’s a bulletproof solution, but there are negatives. You’ll need to go on the foredeck and hank on a sail to use it. A deck bag can help, but it’s still a hassle. The less obvious problem is that a bare wire stay is hard to tack the genoa around because the sail will almost always hang up on the wire. A furler solves both these issues: you can deploy from the cockpit and the furled sail presents a more slippery surface to tack around.
If you want a hanked-on sail, a more modern solution is a cordage stay. These stays are typically made of heat-treated Dyneema like Dynice Dux or New England STS, and winch tensioned through a block mounted to a padeye on the deck (reinforced as previously discussed) and to a rope clutch winch. The main benefit here is that the stay is easily removable and stowed like a halyard. A wire stay will clank around, but the lightweight Dyneema will stow nicely. If you choose a cordage stay, you will need to use soft hanks on the sail as standard bronze hanks will quickly chafe the cordage.
With the stay figured out, running backstays need to be addressed. The runners will go from the mast to as far aft and outboard as you can run them, to get as much advantage as possible to oppose the staysail. On any boat longer than 40 feet, you’ll need to lead the runner tails to winches, as the loads are just too high for a tackle alone. Invariably wire runners will chafe on the main and clank around when tacking. Heat-treated Dyneema comes to the rescue again, the material is very strong and won’t chafe the main, but handles loads like stainless steel wire. The lightweight property of the cordage makes them very easy to stow as well.
Use tangs to attach the runners to the mast, where a slot to accept the tang has been created and reinforced. These fittings will securely connect the stay to the mast and provide a large radius bearing surface for the cordage to ride on, they attach easily with a through-bolt or T-Ball adapter.
Staysail running rigging is not a complicated matter, but you want to get it right. Sheets can be tricky to lead and you may have to install a new fixed block or lead to a car on a very short track. It’s important that the lead is good, avoiding chafing on the shrouds, cockpit coaming, dodger and anything else that gets in the way of a fair lead to the winch. Since a staysail is a great sail in a blow, expect this to be a high-load setup.
Work with a sailmaker to build a nearly bulletproof sail, built with heavy cloth and heavily stitched appropriate for the high winds you’ll be using it in. Also make sure to discuss the foot height with your sailmaker, as you want to keep the center of effort of the sail low to reduce heeling, but high enough off the deck to prevent it from catching green water that breaks over the deck.
Engineering a staysail for your boat can be a lot of work, but it adds a lot of flexibility and capability to your sailplan. Do the work carefully and it will pay dividends over many stormy miles.

Also in Technique
- Winch servicing
- Repairing delaminated core
- Splicing Dyneema
- DIY custom bug screens
- Anchoring and mooring a catamaran
- Co-owning a boat
- Installing a steering wheel
- Helming skills
- Captain your own charter
- Asymmetric spinnaker skills
Also from Bob Pingel
- How do I stop my mast from leaking?
- How should I rig a preventer?
- Tachometer troubles and lazy jack mounting questions
- Do I need to add running backstays?
- What’s with the sour smell on my boat?
- Why is there water in the bilge when I run the engine?
- How do I make sure my VHF works properly?
- Installing a boiler for cold-weather sailing
- How do I fix my hot water system?
- Yachting World
- Digital Edition

Staysails: 5 tips on using them to turbocharge your boat speed
- February 10, 2020
Andy Rice gets top tips on how to use a staysail to turbocharge your boat from Volvo Ocean Race winning skipper Mike Sanderson

Staysails really come into their own during long periods of strong winds, such as the Fastnet Race. Photo: Carlo Borlenghi / Rolex
As Mike Sanderson points out, staysails are hardly a new idea. The old clipper ships used to use multiple staysails. However, the past five years have seen staysails become a ‘must have’ item on high-performance raceboats, not least in the Volvo Ocean Race , where footage of triple-headed VO65s blasting along became some of the defining images of the 2017-18 edition.
As sailors are increasingly looking to gain smaller and smaller advantages in competition, staysail technology is trickling its way further down the sport. Mike looks at which kind of boats are best suited to deploying staysails, and how best to use them on the racecourse.
Genoa staysails tend only to appear on the highest performance raceboats that generate significant apparent wind. So here, Mike focuses his tips on spinnaker staysails, which are more applicable to a wider range of boats.
1. What ’ s your angle?
It’s surprising how little you need to ease sheets from close-hauled to start feeling the benefit of adding a genoa staysail. Provided the wind is more than 7 knots, even just bearing away 10° or 12° from fully upwind means you can start to feel the benefits of a genoa staysail.
Spinnaker staysails tend to come into play once you’re sailing at an apparent wind angle between 38-90°. Provided your boat experiences that kind of apparent wind angle (AWA) with a spinnaker or gennaker up when VMG running, chances are that a staysail will improve your performance.
A staysail will continue to work until quite a deep angle, but not when you’re getting close to dead downwind. Once you go beyond 150° to 155° true wind angle, you’re often better off furling it away.
Article continues below…

How to balance speed and comfort when sailing – top tips from Pip Hare
Most of us now rely on some form of routeing software when sailing offshore. These packages calculate the fastest theoretical…

Helming downwind: Pip Hare’s top tips on how to maximise your speed
For me, helming downwind, particularly in big breeze, is one of the absolute joys in this world. It is a…
2. No penalty power
The beauty of the staysail is that rating rules like IRC and ORC don’t penalise you for using it. It’s measured as a jib, so you’re getting added power for no penalty.
On a Maxi 72, a spinnaker staysail will give another 100m 2 of sail area, which powers up the boat more, bringing the apparent wind forward. It’s a very efficient way of increasing the flow across the sail plan, enabling you to sail faster and deeper downwind.
3. Use the jib
Once it gets windy on a high-performance boat, you might want to just leave the jib up and have that working as your staysail. If you’re racing on a short windward/leeward course, the risk of sending the bowman up on a white water foredeck might not be worth it.
You’ll notice that small sportsboats like J/70s and SB20s tend to keep their jibs flying downwind in most conditions, because it provides added power and improves the flow over the back of the mainsail, just like a dedicated staysail would do.
If you’ve got 100 miles of strong wind straight line sailing ahead of you in a Fastnet Race , for example, then the staysail is a no-brainer. In rough conditions, if in doubt, stick to the jib, and save yourself the potential jeopardy of stuffing up the staysail.
On slower, lower performance boats, you will want to keep the staysail flying for longer, most of the way up the wind range until you’re thinking about using the J4 jib. In many cases the staysail is an easier sail than the jib to handle through gybes as it can be furled.
4. Spec your staysail
When ordering your staysail, we talk about percentage of STL, or the bowsprit length. The longer the bowsprit, the closer to the headstay you can mount the attachment for your staysail.
That’s the case on a Maxi 72, for example, but if you’re operating with a short prod then you will need to mount the attachment further aft along the foredeck. Otherwise it will interfere with the flying of the gennaker and can also be a real hassle for the bowman to get the jib down and furl the staysail – dealing with the bulk of the jib and the risk of the furler line jamming in the jib and so on. This means you’ve got a trade-off to consider between performance versus boathandling.
5. Trim for speed
Trim the staysail like you would trim the jib. If in doubt about how much to sheet on, it’s better to have the luff slightly luffing rather than oversheeting it, but really just keep focussed on the telltales, especially around the middle of the sail.
If you have a fixed, non-adjustable sheeting point then you may want to have a series of strops for the tack of the sail so you can adjust the lead position by raising or lowering the whole sail off the deck at the tack, which achieves the same effect as adjusting the lead.
About the expert
Mike Sanderson is one of the most respected professional sailors on the circuit, having skippered ABN Amro to victory in the 2005/06 Volvo Ocean Race and sailed with Oracle in the America’s Cup . These days Mike is chief executive of Doyle Sails and races on board the Maxi 72 Bellamente .
First published in the February 2020 edition of Yachting World.
Cruising Sail Trim Guide: Staysail
Cruising with your staysail can add horsepower and ease, giving you options in a variety of conditions. Learn how to make the most of your cruising experience with Quantum expert Dave Flynn’s staysail trim guide.

The staysail plays three roles:
- It augments sail power.
- It helps break down total sail area into smaller working components for ease of handling.
- The smaller sail units allow for different combinations, giving sailors a variety of options for different conditions.
To make the most of your staysail, learning how to trim it is key. First though, it helps to know the right conditions for using a staysail.
As part of the overall sail power of your boat, the staysail is most useful in the middle range of reaching angles, from a close reach to the point where the wind is slightly aft of the beam (50-130 degrees apparent wind angle). As the boat sails at broader angles, the blanket of the mainsail, as it is eased out, limits the effectiveness of the staysail. Eventually, the staysail will be hidden behind the mainsail. At closer angles, when sailing to windward, the staysail can help augment horsepower.
As the headsail, staysail, and mainsail are trimmed in, the gap (slot) between them narrows, and they begin to affect each other. In lighter conditions (under 10-12 knots apparent), the staysail may inhibit, not help, upwind performance. In the middle ranges, the staysail can be more helpful, depending on factors like sail shape and sheeting angle. In windy conditions, as the mainsail has to be eased, lowering the staysail will allow the mainsail to breathe and reduce back-winding, helping to keep the boat on its feet. In short, the optimum conditions for the staysail (when adding horsepower), are at apparent wind angles of 50-130 with a minimum apparent wind velocity of 10-12 knots.
Trim of the staysail is really no different than any other headsail. When reaching, keep in mind the first rule of sail trim: when in doubt, let it out.
Most sailors tend to over trim. Make sure the sail is eased to the point of luffing, then trim to barely remove luff. If your boat is not equipped with a Hoyt club boom, the sheet lead should be moved to the outboard rail as the sail is eased out. The lead position should follow the clew, moving slightly forward and outboard.
If your boat is equipped with a Hoyt boom, the staysail’s tendency to twist (leech opening up and causing the top of the sail to luff before the bottom) can be controlled by the boom. The Hoyt boom makes the staysail more useful at broader wind angles since sail shape is maintained and the sail is extended straight away from the boat as it is eased. There is less interference with the mainsail as a result.
Upwind, trim in tight, but be careful. When looking up the sails from the aft quarter, the slot between the three sails should be roughly parallel. The genoa should be trimmed in almost to the spreader – trim the staysail to match this profile.
If your boat has a conventional jib track, make sure the lead isn’t too far forward. If it is, the foot of the sail will be round and full. This will just create back winding in the mainsail. Drop the lead aft until the foot of the staysail is flat. With a Hoyt boom, make sure the outhaul is pulled tight to achieve flat foot sections.
When it gets windy, the staysail is the perfect sail. Used in combination with a partially-furled genoa or working jib and a reefed mainsail, the staysail provides plenty of power. Various combinations of reefs and headsail size allow the boat to be balanced in every condition.
Don't miss Quantum's trim guides for your headsail , mainsail , and asymmetrical sail .
Dave Flynn Quantum Sails – Cruising Guru 410-268-1161 [email protected]
The Discussion

Us, too. We pour that passion into each of our newsletters to help you enjoy sailing even more.
- New Sailboats
- Sailboats 21-30ft
- Sailboats 31-35ft
- Sailboats 36-40ft
- Sailboats Over 40ft
- Sailboats Under 21feet
- used_sailboats
- Apps and Computer Programs
- Communications
- Fishfinders
- Handheld Electronics
- Plotters MFDS Rradar
- Wind, Speed & Depth Instruments
- Anchoring Mooring
- Running Rigging
- Sails Canvas
- Standing Rigging
- Diesel Engines
- Off Grid Energy
- Cleaning Waxing
- DIY Projects
- Repair, Tools & Materials
- Spare Parts
- Tools & Gadgets
- Cabin Comfort
- Ventilation
- Footwear Apparel
- Foul Weather Gear
- Mailport & PS Advisor
- Inside Practical Sailor Blog
- Activate My Web Access
- Reset Password
- Pay My Bill
- Customer Service

- Free Newsletter
- Give a Gift
How to Sell Your Boat

Cal 2-46: A Venerable Lapworth Design Brought Up to Date

Rhumb Lines: Show Highlights from Annapolis

Open Transom Pros and Cons

Leaping Into Lithium

The Importance of Sea State in Weather Planning

Do-it-yourself Electrical System Survey and Inspection

Install a Standalone Sounder Without Drilling

When Should We Retire Dyneema Stays and Running Rigging?

Rethinking MOB Prevention

Top-notch Wind Indicators

The Everlasting Multihull Trampoline

How Dangerous is Your Shore Power?

DIY survey of boat solar and wind turbine systems

What’s Involved in Setting Up a Lithium Battery System?

The Scraper-only Approach to Bottom Paint Removal

Can You Recoat Dyneema?

Gonytia Hot Knife Proves its Mettle

Where Winches Dare to Go

The Day Sailor’s First-Aid Kit

Choosing and Securing Seat Cushions

Cockpit Drains on Race Boats

Rhumb Lines: Livin’ the Wharf Rat Life

Re-sealing the Seams on Waterproof Fabrics

Safer Sailing: Add Leg Loops to Your Harness

Waxing and Polishing Your Boat

Reducing Engine Room Noise

Tricks and Tips to Forming Do-it-yourself Rigging Terminals

Marine Toilet Maintenance Tips

Learning to Live with Plastic Boat Bits
- Inside Practical Sailor
The DIY Solent Stay or Inner Forestay

Among the many rigging improvements I’m pondering for my Yankee 30 Opal the year ahead is installing a second forestay to allow more flexibility in my sail plan.
A few years ago we dove into this topic in a two-part series on headsails. Two articles discussed the advantages of retrofitting a sloop with an inner forestay so that a smaller headsail could be set in higher winds. In the first part, technical Editor Ralph Naranjo discussed the Solent stay. In the the second part if the series , sailmaker Butch Ulmer wrote about the advantages of an inner forestay or staysail stay.
A Solent stay is a stay that sets between the mast and the forestay. It connects to the mast at a point that is only slightly below the existing backstay, and meets on the deck only slightly abaft of the existing forestay. Under such an arrangement, the mast requires no additional support. The existing backstay provides adequate tension to counteract the loads of any sail that is set from the new stay. Because it requires no additional backstay support, a Solent stay is a slightly less expensive option than the more common staysail stay, and it offers many of the same advantages.
An staysail stay also sets between the mast and the forestay. As the name implies, a staysail stay is where you would set a staysail, although it is also commonly used for setting a storm jib. In this modification, the forestay joins to the mast much closer to the deck than the Solent stay, so that some support aft is needed, usually in the form of running backstays-backstays that can be tensioned when needed, and slacked out of the way when they are not required. The staysail stay meets at the deck further aft than the Solent stay, thus bringing the center of effort further aft, which is usually desirable in heavy weather.
Why add an additional stay? As we saw in part one of our report, a Solent sail or staysail stay resolves the difficulty in managing a boat in winds at the upper range of a roller-furling jib’s designed parameters (usually above around 30 knots). The failings of a roller-reefed headsail become especially apparent when trying to work to windward. Even the best-cut furling jib will not furl down to the same efficient shape of a sail designed to perform in higher winds. There is also the risk of the furling gear itself failing, or the jib unfurling to its full dimensions.
It is important to keep in mind that most coastal sailors don’t need to bother with either of these stays. If you a prudent near-shore sailor, a well-designed and constructed furling jib will usually serve just fine. Butch Ulmer’s report discussed several methods sailmakers use to improve the performance of the roller-furling headsail when reefed down. A padded foam luff, conservative sizing (so reducing the size of the furled sail), stiffer sail material, and more sophisticated construction can all help make the furled sail more efficient. However, several of the sailmakers we spoke with suggested that a second forestay would be a welcome addition aboard a boat that has aspirations for a long offshore cruise.
The most common question we were asked in the wake of our recent two-part series on headsails was, “How do I install an inner forestay or Solent stay?” Because either of these stays might one day be depended upon in the direst of circumstances, and because every boat presents different challenges for this project, it’s important to do your research and investigate other boats that have carried out this retrofit. Once you have a general idea of what features you like, consult a rigger for the initial design.
The rigger can also help you source the parts you need, and hopefully point out other details you might overlook, such as where to install the sheet leads, how to prevent corrosion of the new hardware, and what deck reinforcements might be required. If you are having a sail made for the new stay, then getting the sailmaker involved in the design will also help.
Once you have your measurements and hardware, you can carry out the installation, depending upon your ability. In some cases, you may need some fiberglassing skills, since the padeye/chainplate for the new stay must be adequately reinforced. Usually, fiberglass work can be avoided by transferring the load to the hull or a stout bulkhead, but as Brion Toss demonstrated in his recent article on the hidden causes of rig failure , this requires a general understanding of common installation errors and potential trouble spots.
For those who are considering an upgrade here are some other resources to consult as you begin your search.
- Don Casey’s This Old Boat Casey’s comprehensive book on upgrading an old sailboat dedicates several pages to adding an inner forestay. This comprehensive book is a must-have for anyone planning to turn a run-down sailboat into the pride of the marina. You can probably find a used copy on Amazon, but if you buy new from our bookstore , it helps support more Practical Sailor tests and special reports.
- PS Advisor Adding a Staysail Back in 1999, when former editor Dan Spurr was refitting his sloop Viva , he pitched this same question to naval architect Eric Sponberg, who offered some sage advice. This article also references three books that will be of help to anyone considering a retrofit, among the Understanding Rigs and Rigging by Richard Henderson.
- Whence Thou Comest, Highfield? We don’t know what was in the (former) editors water bottle when he came up with the headline for this test of quick releases for stays and shrouds back in 1999. After evaluating several devices, the test team concluded that ABI’s Highfield lever to be the best of the bunch. The company has since gone out of business, but the as the Rigging Company describes, three other worthy substitutes are now available. We routinely turn to the Rigging Company for advice on hardware and installations and its website has a section dedicated to installing an inner forestay that covers many of the hardware details, including devices for storing the inner forestay when not in use.
- Spar specialists Selden has a number of informative articles on rigging installation and maintenance. It offers step-by-step advice on installing an inner forestay fitting (nose tang) on the mast. For those who are dealing with a classic boat, fabricating their own chainplates or tangs, or simply enjoy digging into archaic, yet still valuable advice. Skene’s Elements of Yacht Design offers tips on calculating loads and fabricating hardware. It is still relevant enough to pick up from a used book store. Rig-Rite also offers a selection of staysail tangs.
- Rigger and sailmaker websites In addition to its discussion of stay releases the Rigging Company has additional information on adding a Solent stay. Brion Toss’s Spartalk discussion board (log-in required) has several threads dealing with inner forestays, Solent stays, and related hardware. Among them is Toss’s rant against the ABI forestay release . He prefers the babystay releases from Wichard (see page 9 of the catalog), available in wheel, ratchet, or lever designs, depending on the size of the boat. And sailmaker Joe Cooper describes a lightweight Solent stay retrofit using fiber instead of wire for the stay. (Because of unknowns regarding fiber stays, PS still prefers wire for this use.)
- Owner retrofits A number of blogs and archive articles from old magazines offer insight into what a retrofit entails. The Windrope family has done an excellent job documenting the addition of a Solent stay to Aeolus , their Gulf 32 Pilothouse sloop.
RELATED ARTICLES MORE FROM AUTHOR
Dear Darrell,
A smaller headsail, or storm jib is indeed preferable to rolling up a Genoa when heading windward in winds over even 20 knots But adding it on as a retrofit brings up the issue of the lines to control it. Ideally it could be fitted on to a self-tacking rail, but these are quite awful if not installed in the original design, just one more thing to trip over and mess up a clean foredeck. I had researched this and apparently there are a number of simple solutions using a rigging set up based on the foot of the mast and clew of the jib, providing just one line astern through a deck organiser to the cockpit ‘piano’. This line simply controls how tight the jib will be and can be left alone when tacking upwind to act as self tacking jib. We sail in the Aegean where wind can be anything from ‘nothing’ to 35 knots sometimes with quick changes, so it pays to be adaptable. If you have any comments or recommendations for such rigs, it may well interest other readers as well and indeed myself as well.
I had a cutter, a Kelly Peterson 44. Great sailing cruiser. However, I would have rather have had a Solient over the traditional cutter. Not even including that yes, it required running back stays, the boat would balance better with a rolled jib over the staysail alone, even with double reefed main. Of course the set of the rollered 110 was not that great. A solient would have been my preference. Walter Cronkite had an interesting custom arrangement on his boat. He had his jib and solient on two stays separated an appropriate distance to properly function and both were on a yoke that would swivel. Just one attachment at masthead and one on stem. Of course hi-thrust bearings on both. The active sail would swivel aft when in use and the inactive would swivel forward complete out of the way! Clever arrangement. Yes, you would get a little “dirty” air from the inactive but everything is a trade off. Probably one that I would take if I could afford all that custom work.
I also have a cutter; CSY 44. When tacking, the jib would not come thru the innerforestay cleanly and would hang up. I installed a quick disconnect and when I know I will be beating it is set up that way. Makes it a lot easier to tack. I see hanging up as a problem with a the double forestay unless you carry the smaller sail on the most forward. However, is this where you want a storm jib? Should I need the storm jib, the staysail stay is the perfect place.
We had a custom rig built for our boat, a Valiant 40′ cutter with a bowsprit that sets the forestay two foot further forward. It was designed to allow both a Solent sail and/or a Staysail. We sail the boat as a Cutter and have no problem at all with the inner forestay interfering with the genoa and jib sheet, (just backwind the staysail until the clew of the genoa has moved to the leward side). The Staysail is roller-reefing too, and is small and very easy to handle, even in a blow. (don’t need the self-tending feature.) When in high winds, the furling staysail is perfect. As for the solent, I consider it more appropriate for a drifter, perhaps wing & wing with the genoa for downwind sailing.
Great Article, Darrell. Your advice to consult a rigger is spot on to address mast support issues. I helped deliver a beautiful Outbound to the Caribbean several years ago from New England. Once we turned south, the skipper set the hank-on Solent staysail on the inner stay. Sweet indeed. Easy to hoist and dowse. Nothing complex about a hank-on headsail. They go up and come down every time.
Interesting article, Darrell. Thank you. But my lord, does anybody proofread this stuff?
As I research adding a solent stay on our Tartan 27 I find many riggers are recommending a 4 to 1 purchase rather than a Highfield lever. They like the ability to adjust the tension at will. For our little sloop with a tabernackle the solent is much simpler and would remain stowed most of the time.
As a cutter sailor I must make a point of clarification. Installing an inner stay or staysail to your sloop design does NOT make it a cutter. A true feature of a cutter is that the mast is further aft than on a sloop in addition to the staysail feature. That is paramount to moving the center of effort further aft as the designer intended.
I have seen a number of cutter owners removing the staysail to sail the boat as a sloop simply because they don’t know how to sail it properly as a cutter. On the other hand, one unnamed circumnavigational sailor calls her boat a cutter when it is simply a sloop with inner stay…the manufacturer never made that boat design as a cutter. Last but not least one prominent cutter manufacturer offered their design as both a sloop and as a cutter; I called them to verify the fact that the mast was still in the original design location as a cutter. Can you begin to imagine what would be involved to design and build a sailboat with optional mast locations or even modify a sailboat from one rig location to the other?
LEAVE A REPLY Cancel reply
Log in to leave a comment
Latest Videos

Island Packet 370: What You Should Know | Boat Review

How To Make Starlink Better On Your Boat | Interview

Catalina 380: What You Should Know | Boat Review
- Privacy Policy
- Do Not Sell My Personal Information
- Online Account Activation
- Privacy Manager
Sailboat Stays and Shrouds: Essential Rigging Components Explained
by Emma Sullivan | Aug 21, 2023 | Sailboat Maintenance
Short answer: Sailboat stays and shrouds
Sailboat stays and shrouds are essential components of the rigging system that provide support and stability to the mast. Stays run from the masthead to various points on the boat, preventing forward and backward movement, while shrouds connect the mast laterally to maintain side-to-side stability. Together, they help distribute the forces acting on the mast and ensure safe sailing .
Understanding Sailboat Stays and Shrouds: A Comprehensive Guide
Introduction: Sailing is an exhilarating experience, but it requires a deep understanding of the various components that make up a sailboat . One crucial aspect that every sailor should grasp is the concept of stays and shrouds. These vital elements not only provide support and stability to the mast but also play a significant role in determining the overall performance of the sailboat. In this comprehensive guide, we will explore everything you need to know about sailboat stays and shrouds.
What are Stays and Shrouds? Stays and shrouds are essential rigging components that hold the mast in place and control its movements during sailing. They primarily serve two distinct purposes – providing support for the mast against excessive sideways forces (known as lateral or side-to-side loads) while allowing controlled flexing, and keeping the mast aligned with respect to both pitch (fore-aft) and roll (side-to-side) axes.
The Difference between Stays and Shrouds: Although often used interchangeably, stays and shrouds have specific functions on a sailboat rigging system. Stays usually refer to those wires or cables that run forward from the head of the mast, attaching it to various points on the bow or foredeck. They help resist fore-and-aft loads placed upon the mast, such as when sailing upwind, preventing it from bending too much under pressure.
On the other hand, shrouds typically refer to rigging lines connecting laterally from both sides of the masthead down towards deck level or chainplates located on either side of the boat’s cabin top or hull. Unlike stays, they primarily counteract side-to-side forces acting on the mast due to wind pressure exerted against sails during different points of sail.
Types of Stays: A typical sailboat may consist of different types of stays based on their location on the mast. Some of the common types include:
1. Forestay: The forestay is a prominent stay that runs from the top of the mast to the bow or stemhead fitting at the boat’s front . It is responsible for supporting most of the fore-and-aft loads acting upon a sailboat rigging system, keeping the mast in position while under tension from sails .
2. Backstay: The backstay runs from the top of the mast to either stern or transom fittings at the aft end of a sailboat. It acts as an opposing force to counteract forward bending moments occurring on larger boats when sailing into a headwind or during heavy gusts.
3. Inner Stays: Found on some rigs with multiple masts or taller sailboats, inner stays run parallel to and inside other stays (such as forestay and backstay). These provide additional support and rigidity when deploying smaller headsails closer to centerline during specific wind conditions.
Types of Shrouds: Similar to stays, shrouds can vary based on their positioning on each side of the masthead and hull structure. Some commonly used shroud types are:
1. Upper Shrouds: These are positioned higher up on a sailboat mast , connecting near its upper section down towards deck level or chainplates for lateral stability against the force exerted by sailing sails.
2. Lower Shrouds: Positioned lower down on a sailboat’s mast , these connect near its midpoint and extend towards lower deck sections or chainplates. They serve mainly as reinforcing elements against lateral forces experienced while sailing in strong winds .
3. Jumpers/Checkstays: Jumpers (or checkstays) are typically temporary shroud additions used when depowering or controlling mast bend in certain wind conditions or point of sail, especially during racing events where fine-tuning sail shape is critical.
Conclusion: Sailboat stays and shrouds are essential components that provide critical support, stability, and control to the mast. Understanding their purpose and types is crucial for every sailor looking to optimize their vessel’s performance while ensuring safe sailing. By comprehensively knowing the role of stays and shrouds, you can confidently navigate the waters while harnessing the power of wind in pursuit of your sailing adventures.
Step-by-Step Instructions for Proper Installation of Sailboat Stays and Shrouds
Installing sailboat stays and shrouds may seem like a daunting task, but with the right knowledge and proper instructions, it can be accomplished smoothly. Stays and shrouds are crucial components of a sailboat’s rigging system that provide support and stability to the mast. In this step-by-step guide, we will walk you through the process of installing these vital elements for safe and efficient sailing.
Step 1: Prepare your Equipment
Before beginning any installation, ensure that you have all the necessary tools and materials at hand. This includes stay wires, turnbuckles, cotter pins, wire cutters, measuring tape, swage fittings (if applicable), wrenches appropriate for your boat’s hardware sizes, and a well-organized workspace. Having everything prepared ahead of time allows for smoother progress throughout the installation procedure.
Step 2: Measure & Cut Stay Wires
Accurate measurements are crucial when it comes to stays and shrouds installation. Using a measuring tape, determine the required length for each stay wire by taking precise measurements from their designated attachment points on deck to the masthead or other relevant attachment points. It is important to leave room for tension adjustment using turnbuckles later on.
After obtaining accurate measurements, use wire cutters to trim each stay wire accordingly. Be sure to trim them slightly longer than measured lengths initially indicated because precision can only be achieved once all connections are made.
Step 3: Attach Wires to Mast Fittings
Now that you have your measured and cut stay wires ready, it’s time to attach them securely to the appropriate mast fittings . Depending on your boat’s design and specific rigging details, this step can vary slightly. Look for pre-existing attachment points designed specifically for stays or fittings specifically configured for thread-on stays if applicable.
Ensure each connection is secure by threading or whatever means necessary as per your boat’s requirements . Double-check that there is no unwanted slack while leaving space for later tension adjustments.
Step 4: Deck Attachment Points
Move on to attaching the stay wires to their designated deck attachment points. These points are usually found near the bow area, and there may be specific fittings designed just for this purpose. Follow your operational manual or consult experienced sailors if you are unsure about the correct attachment points.
Again, double-check that all connections are securely fastened, without any excess slack. It is always better to have a slight bit of extra wire length here than have inadequate length at this stage.
Step 5: Install Turnbuckles
With the stays securely connected at both ends, it’s time to insert turnbuckles. Turnbuckles are essential tools for adjusting the tension in stay wires. Attach these devices to each stay wire by screwing them into the corresponding threaded fitting on either end of the stays. Ensure they are tightened securely but not over-tightened at this stage; you still need room for adjustments and tuning.
Step 6: Secure with Cotter Pins or Locking Nuts
To prevent accidental loosening of turnbuckles due to vibrations or rough sail conditions, make sure to secure them using cotter pins or locking nuts provided by your boat’s manufacturer. Place a cotter pin through the hole located in one side of the turnbuckle and bend it back upon itself, ensuring that it does not interfere with adjacent rigging components or sails.
Alternatively, locking nuts can be used by tightening them against each side of the turnbuckle threads once adjusted correctly –This provides an additional layer of security against unexpected loosening during sailing adventures !
Step 7: Inspect & Adjust Tension
Before hitting the water and setting sail , take a moment to inspect all connections thoroughly. Verify that each wire is properly aligned and does not show signs of damage like frays or kinks—Pay attention to potential chafe points where movement can wear against another object or surface.
To adjust tension, gradually tighten or loosen the turnbuckles as necessary. Be cautious and make small adjustments while periodically checking for an evenly balanced mast, ensuring that it remains straight and true.
By following these step-by-step instructions meticulously, you can ensure a proper installation of sailboat stays and shrouds. Remember to take your time, double-check all connections, and consult with professionals or experienced sailors if any doubts arise. With a meticulous approach and attention to detail, your sailboat rigging will be safe, stable, and ready for smooth sailing adventures!
Frequently Asked Questions about Sailboat Stays and Shrouds: Everything You Need to Know
Have you ever found yourself marveling at the majesty of a sailboat, wondering how it is able to harness the power of the wind and navigate through vast oceans? If you are a sailing enthusiast or considering embarking on a sailing adventure, understanding the intricacies of sailboat stays and shrouds is paramount. In this comprehensive blog post, we will address frequently asked questions about sailboat stays and shrouds, equipping you with everything you need to know.
1. What are Sailboat Stays and Shrouds?
Sailboat stays and shrouds are vital components of a boat’s standing rigging system that help support the mast while ensuring stability during sailing. Simply put, they prevent the mast from toppling over under excessive pressure from the sails or adverse weather conditions. While these terms may sound interchangeable to novices, there are important distinctions between them.
Stays: Stays are tensioned cables or wires attached to various points on the mast and radiate outwards in multiple directions supporting it against fore-and-aft movement. The most common types include forestays (located at the bow), backstays (attached to the stern), side stays (running sideways along both port and starboard sides), and inner forestays.
Shrouds: On the other hand, shrouds provide lateral support to counteract sideways forces acting on the mast. They run diagonally from their connection points on deck-level chainplates outwards towards optimized positions along the spreaders near midway up the mast.
2. What materials are used for Sailboat Stays and Shrouds?
Traditionally, steel wire was predominantly used for both stays and shrouds due to its strength and durability. However, modern advancements have introduced alternative materials such as synthetic fibers like Dyneema or carbon fiber composites. These lightweight alternatives possess remarkable tensile strength while offering corrosion resistance advantages over traditional wire options.
3. How tight should Sailboat Stays and Shrouds be?
Maintaining the appropriate tension in your sailboat’s stays and shrouds is crucial for maintaining integrity and overall sailing performance. Correct tension ensures that the mast remains properly aligned while allowing it to flex as required, absorbing dynamic forces from wind gusts.
To determine optimal tension, consult your sailboat’s manufacturer guidelines or consult with a professional rigging specialist. Adjustments may also vary depending on sea state or anticipated weather conditions . Proper tuning necessitates periodic evaluation to ensure the stays and shrouds’ tension remains within specifications.
4. How do Sailboat Stays and Shrouds affect sailing performance ?
The correct alignment, tautness, and positioning of sailboat stays and shrouds significantly impact sailing performance due to their influence on mast bend characteristics. Adjusting stay tension can control how much a mast bends under load: tightened stays flatten the mainsail’s profile for increased pointing ability in light winds, while looser tensions promote fuller profiles for enhanced power in heavier winds .
Shroud positions also dictate sideways motion of the mast; fine-tuning their tension governs how efficiently a boat can maintain a desired course when encountering various wind strengths and angles.
5. What are some common signs of wear or damage in Sailboat Stays and Shrouds?
As essential as they are, sailboat stays and shrouds are subjected to immense loads that can lead to wear over time. Routine inspection is vital to identify any potential issues before they escalate into major rigging failures.
Signs of wear or damage may include rust or corrosion on metal components, cracked insulation around terminals, broken strands on wire rigging, visible rigging deformation or elongation under load, unusual vibrations onboard while sailing, or creaking noises originating from the mast during maneuvers.
In such instances, swift action should be taken by replacing affected parts immediately or seeking assistance from experienced rigging professionals.
By familiarizing yourself with the essentials of sailboat stays and shrouds, you empower yourself to enjoy a safer and more rewarding sailing experience. Remember to conduct regular inspections, adhere to manufacturer recommendations, and consult professionals when necessary. Now, set sail with confidence as you venture into the salty unknown!
Exploring the Importance of Sailboat Stays and Shrouds in Ensuring Safety at Sea
When it comes to sailing, safety should always be the number one priority. The open waters of the sea can be unpredictable and unforgiving, making it crucial for sailors to have a thorough understanding of their sailboat ‘s rigging system. One vital component of this system is sailboat stays and shrouds, which play a significant role in ensuring safety onboard.
Sailboat stays and shrouds are specialized cables or wires that support the mast, providing stability and preventing it from collapsing under the pressure of wind forces. These essential rigging elements act as a lifeline for the entire vessel, keeping everything intact during even the toughest conditions at sea.
The primary purpose of stays and shrouds is to distribute the load evenly throughout the mast structure. By doing so, they prevent excessive stress on specific areas and reduce the risk of structural failure. This balance is especially critical when sailboats encounter strong winds or rough seas that can exert immense pressure on the mast.
Imagine cruising along peacefully when suddenly you encounter strong gusts of wind. Without properly tensioned stays and shrouds, your mast could bend or break under these intense forces, compromising your safety and potentially causing severe damage to your vessel. Well-maintained stays and shrouds ensure that your mast remains stable even in adverse weather conditions by withstanding these forces without deformation.
However, ensuring that your sailboat’s rigging is reliable isn’t just about maintaining functionality—it demands meticulous attention to detail as well. Stays and shrouds need periodic inspection to identify any signs of wear or corrosion that may weaken their integrity over time. A frayed cable or rusty hardware might not seem like much at first glance, but they could lead to catastrophic failures when put under stress.
Safety at sea also requires understanding how different types of stays and shrouds work together to optimize performance in varying sailing conditions. While staying safe is crucial, performance matters too! Different sailboat designs accommodate different rigging configurations, and knowledgeable sailors carefully select the right combinations to enhance their vessel’s maneuverability. The strategic placement of stays and shrouds aids in controlling the shape and orientation of sails, enabling efficient sailing even in challenging weather.
In this era of advanced technologies, some sailors may wonder if traditional stays and shrouds are still essential with other innovations available. However, it’s crucial to remember that age-old methods often endure for a reason: their reliability. Modern alternatives might offer convenience or weight-saving benefits, but they seldom match the robustness and simplicity of time-tested techniques.
The exploration of the importance of sailboat stays and shrouds ultimately emphasizes the significance of investing time and resources into proper knowledge, maintenance, and selection. As a sailor, prioritizing safety by ensuring the integrity of these critical components can mean all the difference between a pleasurable voyage adrift on calm seas versus surviving treacherous storms.
So, before embarking on any maritime adventure, take a moment to appreciate the unsung heroes that uphold your mast—the sailboat stays and shrouds—and make sure they are ready to bear any challenges that await you on your journey to ensure both safe passage and endless memories at sea.
How Sailboat Stays and Shrouds Impact Performance: Tips for Maximizing Efficiency
Sailboats are fascinating vessels that harness the power of the wind to propel through the water. While many factors contribute to a sailboat’s performance, one often overlooked aspect is the impact that stays and shrouds have on its efficiency. In this blog post, we will dive into the intricacies of sailboat stays and shrouds, exploring how they affect performance and providing valuable tips for maximizing efficiency.
To understand the significance of stays and shrouds, let’s first clarify their definitions. Stays are essentially wires or ropes that provide support to keep a mast in place, preventing excessive bending or swaying. Shrouds, on the other hand, refer specifically to those stays that extend from either side of the boat to stabilize the mast laterally.
While seemingly simple components, stays and shrouds play a crucial role in determining a sailboat’s overall performance. Here’s how:
1. Structural stability: Sailboat stays act as primary supports for the mast, ensuring it remains upright against powerful winds . Without adequately tensioned stays and shrouds, masts can buckle or sway excessively under load, compromising sailing performance and even risking structural damage.
2. Sail shape control: Proper tensioning of stays and shrouds directly influences the shape of your sails while underway. By adjusting their tension appropriately, you can manipulate how your sails fill with wind , optimizing their aerodynamic profile for maximum efficiency. Expert sailors effectively use this control mechanism to fine-tune their boat ‘s speed and responsiveness.
3. Windward performance: Efficiently rigged sailboat stays help maintain proper alignment between mast and sails when sailing upwind (also known as pointing). Tensioned shrouds ensure that minimal lateral movement occurs during tacking or jibing maneuvers when changing direction against the wind. This prevention of excess mast movement translates into less energy lost due to unnecessary drag – ultimately improving windward efficiency .
Now that we’ve established the importance of sailboat stays and shrouds let’s delve into some tips for optimizing their performance:
1. Regular inspections: Routine visual inspections are essential to identify any signs of wear, corrosion, or fatigue on your stays and shrouds. Replace frayed ropes or wires promptly, ensuring that all components remain robust and reliable.
2. Correct tensioning: Achieving the optimal tension in your stays and shrouds is vital. Too loose, and you risk mast instability; too tight, and excessive stress loads are placed on the rigging components. Aim for a tension that allows slight flexibility while maintaining structural integrity – seeking advice from an experienced rigger can help find the sweet spot.
3. Invest in quality materials: The quality of your rigging directly impacts its longevity and performance . Opt for high-quality stainless steel wires, synthetic fibers like Dyneema, or carbon fiber alternatives when replacing old rigging components, as these materials offer superior strength-to-weight ratios.
4. Tuning adjustments: To maximize sail shape control, experiment with adjusting the tension of your stays and shrouds during different weather conditions or sailing angles. Fine-tuning these tensions can lead to significant improvements in both speed and responsiveness while ensuring optimum aerodynamic performance at all times.
5. Seek professional advice: Don’t hesitate to reach out to experts in yacht rigging or naval architects for specialist input regarding optimizing your sailboat’s rigging setup. Their expertise can guide you towards refined techniques tailored to suit specific vessel designs or sailing goals.
In conclusion, understanding how sailboat stays and shrouds impact performance is crucial for any sailor aiming to maximize efficiency on the water. By recognizing their significance as key structural supports influencing sail shape control and windward performance, you can optimize your vessel’s potential while enjoying more thrilling voyages than ever before! So make sure to prioritize regular inspections, correct tensioning methods, high-quality materials, tuning adjustments, and professional guidance to unlock the true potential of your sailboat.
Essential Maintenance Tips for Maintaining the Integrity of Sailboat Stays and Shrouds
Sailboat owners and enthusiasts know the importance of regular maintenance to keep their vessels in top condition. Among the vital components that require particular attention are the stays and shrouds – key structural elements that ensure the integrity of a sailboat’s mast and rigging system.
Stays and shrouds are essentially wires or cables that provide crucial support to the mast, allowing it to properly withstand wind pressures and maintain stability during sailing. As they play such a pivotal role in your sailboat’s performance and safety, it is essential to implement regular maintenance practices to ensure their longevity and functionality.
To help you maintain the integrity of your sailboat’s stays and shrouds, we have compiled some essential tips that will not only enhance their lifespan but also contribute to your overall sailing experience:
1. Visual Inspection: Regularly conduct visual inspections of all stays and shrouds with an eagle eye for any signs of wear or damage. Look for frayed or broken strands, corrosion, stretched areas, or loose fittings. It is better to address minor issues early on rather than waiting for them to become major problems.
2. Tension Monitoring: Check the tension of your stays regularly using a suitable tension gauge or by following manufacturer guidelines. Proper tension ensures optimal performance while avoiding excessive strain on both mast and rigging components.
3. Corrosion Control: Saltwater exposure can accelerate corrosion on metal components like turnbuckles, shackles, or terminals. Routinely clean these parts using freshwater after each outing while inspecting them for signs of rust. Applying protective coatings like anti-corrosion sprays can also significantly extend their lifespan.
4. Lubrication: Maintaining a smooth operation within turnbuckles is crucial for proper tension adjustment as well as preventing corrosion seizing between threaded components (e.g., adjusters). Apply marine-grade lubricants periodically, ensuring even distribution across all moving parts.
5. Regular Rig Tuning: Appreciate the importance of proper rig tuning to optimize sail shape and overall stability. Work with a professional rigger to adjust the tension on your sails and shrouds, correcting any sag or excessive flex.
6. Replacing Components: If you notice any signs of wear that cannot be resolved through cleaning, lubrication, or tension adjustment, consider replacing the affected components immediately with high-quality replacements. Neglecting worn stays or shrouds can compromise your sailboat ‘s safety and performance.
7. Professional Rig Inspection: Schedule a professional rig inspection at least once every two years, especially if you engage in more frequent or rigorous sailing activities. Rigging experts have the experience and knowledge to detect potential weaknesses that may not be readily evident to an untrained eye, helping you avoid costly breakdowns during crucial moments.
Remember, maintaining the integrity of sailboat stays and shrouds should be an ongoing priority for all passionate sailors. By following these essential maintenance tips and providing regular care to these vital elements, you can ensure your vessel is ready to conquer waves with reliability and grace. So set sail with confidence knowing that your rigging system is in optimal condition!
Recent Posts

- Sailboat Gear and Equipment
- Sailboat Lifestyle
- Sailboat Maintenance
- Sailboat Racing
- Sailboat Tips and Tricks
- Sailboat Types
- Sailing Adventures
- Sailing Destinations
- Sailing Safety
- Sailing Techniques

- CLASSIFIEDS
- NEWSLETTERS
- SUBMIT NEWS
The question of staysails - how to make them work for you

Related Articles

- English - United Kingdom
Adding a Staysail? Inner Forestay Setup Options
Published date: august 20 2020.

Are you considering upgrading your sail plan to include a staysail? It is an increasingly popular choice, offering considerable performance benefits, which is explored in more detail in our previous blog here . In this blog we focus on the various setup options and some things to watch out for when considering an inner forestay retrofit.
The primary considerations are fixed or removable stay and furling vs hanked-on. In each case there are pro’s and cons, and multiple set-up options.
Forestay with hanks
Many blue water cruisers, and racers alike, are advocates of the hanked-on staysail – see our previous guest blog on the subject here. There are several variations to consider.
Fixed or removable The simplest option is a permanent, fixed stay with a turnbuckle providing tension. The downside of this setup is that the stay can inhibit tacking with the main genoa, as the clew and sheets must pass around the inner forestay.
To address this, a common solution is a semi-permanent inner forestay. The upper end of the stay is permanently attached to the mast but a quick release fitting at the bottom allows the stay to be brought back to the mast when not in use. Options for tensioning the stay include a highfield lever or 2:1 / 3:1 purchase system led back to a clutch/winch.
N.B. Consideration should be given to the length of the stay. If the length is maximised to the available space, then it will be over-length when brought back to the mast. Alternatively, the stay can be made to fit snugly at the mast and the tensioning system makes up the additional length when in use.
Wire or Composite Inner Forestay Modern materials can provide much nicer and more practical solutions. For a fixed inner forestay on a turnbuckle, the least expensive option is often a wire stay. The same setup is also possible with a fixed composite stay built from PBO or Kevlar. While the cost of these materials may be inhibiting, the benefit of a composite stay is a 75% weight saving plus the soft cover of the cable is kinder on both your staysail and the genoa passing across it during tacking. The staysail should be hoisted on soft hanks.

Another advantage we have seen with this setup is that when the sail is lowered to the deck, the purchase line, on the bottom of the stay, can be eased off and the sail pulled back using the sheet. This pulls the stay towards the mast and can facilitate easier tacking without removing the sail / stay. To re-hoist the staysail – simply tension the stay, release the sail ties and hoist away!
All of the above options also require a staysail halyard sheave box in the mast and sail luff tension is adjusted via the halyard. Furling system
The alternative to a stay with hanked-on sails is a furling staysail. There really is no right or wrong here and it comes down to a personal preference. It is possible to rig a permanent inner forestay with a traditional genoa reefing furler & aluminium luff foils…. But, here at Upffront.com, we like to think these days are over (too much weight!), and a continuous line (bottom-up) furler with torsional cable is the right solution for the vast majority of our customers. There are two primary furler setup options: Hoist on a halyard or into a lock.
The furling unit is clipped directly to a deck padeye. The furled sail is hoisted on the staysail halyard to the required tension. It is common to use a 2:1 halyard to increase control and reduce compression in the mast. A benefit of this setup is that it maximises luff length and allows the sail to sit close to the deck.
This is the simplest and most cost-effective retrofit furling solution. Assuming you have a staysail halyard sheave, the only additional requirement is a dead-end attachment just above the sheave box.
There two options here: Internal or external (hanging) lock:

- An internal lock is the cleanest solution but requires some work on the rig to install the lock. However, this can be done by most good refit yards with some technical verification from your mast maker. The furling swivel is clipped directly to the lock bullet (preferably with a short soft connector) and then a 2/3:1 purchase is required at the tack, to provide stay tension.
- A simpler retrofit is an external / hanging furling lock , lashed to an eye on the mast. The hoist line can run to deck level externally or led into the mast, via a small slot just below the lock, and exited at the mast base with the other halyards. Again, a 2/3:1 purchase system is required at the tack for stay tension.
Karver KF Staysail Furler with purchase system
Retrofit Checklist
Adding a staysail can be a relatively straightforward performance improvement but there are some key checks you should make to ensure the integrity of your mast and rigging.
Deck attachment point - this is fundamental. If you do not have a staysail deck chainplate, talk to your local boatbuilder or refit yard about your options and any structural modifications required to ensure your deck is strong enough to support the inner forestay loads.
Mast fittings – If you do not have the necessary hardware on your mast for the staysail you should seek the advice of your mast maker who can confirm whether any mast stiffening will be required.
Aft rigging – at the same time your mast maker can advise on any requirements for additional aft rigging to counteract the inner forestay loads. On most modern rigs with swept back spreaders this is not generally a structural problem but it is something that needs to be ticked off the check list prior to proceeding with a retrofit project
If you have any questions about code zero and asymmetric furlers, please feel free to email us at [email protected] , or click the link below to see our full range:

Phil Anniss
- There are no suggestions because the search field is empty.
We are constantly reporting on the latest innovations in the marine industry which offer weight savings whilst, at the same time, increasing safety factors. The result: lighter, faster, safer and more exciting sailing.

Recent Posts
Popular posts.
- Furling (55)
- Code Zero Furling (43)
- Karver (40)
- Ronstan (30)
- Electronics (29)
- Blocks and Sheaves (25)
- Sheets (25)
- Winches (25)
- Facnor (24)
- Halyards (24)
- Harken (24)
- Control Lines (23)
- Gottifredi Maffioli (23)
- Dyneema® (22)
- All Purpose Blocks (20)
- Soft Shackles (18)
- Spars and Rigging (17)
- Upffront (17)
- Jib Furlers (16)
- Manual Winches (16)
- Clutches and Organisers (13)
- Mooring and Anchoring (13)
- Spinlock (13)
- Upffront News (13)
- Andersen (12)
- Furling Lines (12)
- Instrument Systems (12)
- Electric Winches (11)
- Loop Products (11)
- Shackles and Fixings (11)
- Armare Ropes (10)
- Morfrac Systems (10)
- Sailing GPS Computers (10)
- Toolkit (10)
- Bowsprit (9)
- Halyard Locks (9)
- Spinnaker Gear (9)
- Winch Handles (9)
- Fenders (8)
- Kohlhoff Rigging (8)
- Standing Rigging (8)
- Structural Furlers (8)
- Tips and Tricks (8)
- Ubi Maior Italia (8)
- Code Zero Furling Sets (7)
- Cyclops Marine (7)
- Oleu Watersports (7)
- Rope Clutches (7)
- Sailing Shackles (7)
- Tylaska (7)
- Velocitek (7)
- Boat Anchors (6)
- Cylindrical Fenders (6)
- Furling Sets (6)
- KZ Race Furler (6)
- Navigation Lights (6)
- PROtect Tapes (6)
- Profurl (6)
- Rigging Projects (6)
- Rope Cleats (6)
- Rope Jammer (6)
- Torsion Cables (6)
- Wichard (6)
- Allen Brothers (5)
- Autopilots (5)
- Boat Compasses (5)
- Code Zero and Asymmetric Furler Accessories (5)
- Deck Organisers (5)
- Mooring Lines (5)
- Outils Ocean (5)
- Premium Ropes (5)
- Racing Halyards (5)
- Racing Sheets (5)
- Robline (5)
- Round Fenders (5)
- Runner Blocks (5)
- Sailmon (5)
- Top-Down Furler Sets (5)
- Trogear (5)
- Anchor Chains (4)
- B&G (4)
- Backstay Cables (4)
- Cam Cleats (4)
- Digital Load Cells (4)
- Electric Furlers (4)
- Fenderess (4)
- Ferrules and Rings (4)
- Headfoils (4)
- Industry News (4)
- Morfblock (4)
- Reef Hooks (4)
- Snap Shackles (4)
- Structural Furler Accessories (4)
- Backstay (3)
- Bottom-up Furler Sets (3)
- Bullet Locks (3)
- Calypso Electronics (3)
- Cousin Tresec (3)
- Electric Winch Accessories (3)
- Fairleads (3)
- Flat Fenders (3)
- Foot and Cheek Blocks (3)
- Headsail Furling (3)
- Individual parts (3)
- Instrument Displays (3)
- Internal Locks (3)
- Life Jackets (3)
- Lifelines (3)
- Lopolight (3)
- Novasail (3)
- Race Computers (3)
- Sail Hanks (3)
- Sail Hardware (3)
- Sailing instruments (3)
- Snatch Blocks (3)
- Snuffers (3)
- Tiller Extensions (3)
- Tuff Luff and Harken Sets (3)
- TuffLuff (3)
- UK Sailmakers (3)
- Wireless Modules (3)
- Autopilot Drives (2)
- Black Box Snuffers (2)
- Boat Fairleads and Organisers (2)
- Clutch units (2)
- Cutter Rig (2)
- Ewincher (2)
- Excrusion Only (2)
- External Locks (2)
- Fiddle Blocks (2)
- Fixed Tiller Extensions (2)
- Foredeck Club (2)
- Future Fibres (2)
- Grab Bags (2)
- Hall Spars (2)
- Handheld VHF Radios (2)
- Ino-rope (2)
- Lash Thimbles (2)
- Life Jacket Accessories (2)
- Main Halyard Shackles (2)
- Mainsheet Purchase systems (2)
- Mantagua (2)
- PTFE Tapes (2)
- Padeyes (2)
- Polyform fenders (2)
- Resins, Lubes and Gels (2)
- Rope Bags (2)
- Safety Lines (2)
- Sailing Dogbones (2)
- Seasure (2)
- Sheaves (2)
- Soft Hanks (2)
- Solent Rig (2)
- Southern Spars (2)
- Storm Sails (2)
- Tellescopic Tiller Extensions (2)
- Tiller Pilots (2)
- Top down sets with stay (2)
- Winch Feeders (2)
- fendress (2)
- 3:1 Purchase (1)
- ACR Electronics (1)
- Alphalock (1)
- Autohelm Processors (1)
- Backstay Tensioners (1)
- Boom Vangs (1)
- Bow Shackles (1)
- Carbo-Link (1)
- Clevis pins (1)
- Clutch Parts (1)
- Clutch Repair Kits (1)
- Continuous Furling Lines (1)
- D-Shackles (1)
- DCSolar (1)
- DrSails (1)
- Dyneema® Covers (1)
- Electronics Accessories (1)
- Fendertex (1)
- Fids and Spikes (1)
- Flipper (1)
- Fourthcape (1)
- Halyard Blocks (1)
- Horn Cleats (1)
- Jackline (1)
- Jib Furler Accessories (1)
- Lead blocks (1)
- Life Jacket Spares (1)
- Low Friction Rings (1)
- Mainsail Furling (1)
- Manual Genoa Furlers (1)
- Navisafe (1)
- Polyform (1)
- Polyform US (1)
- Prism 2 (1)
- Reckmann (1)
- Rigging Tools (1)
- Rigid Boom Vangs (1)
- Rope Covers (1)
- Rope Purchases (1)
- Sailing Dinghy Tape Kits (1)
- Sailserver (1)
- Schaefer Marine (1)
- Single Furling Lines (1)
- Smartlink (1)
- Smarttune (1)
- Solar Power (1)
- Staysail (1)
- Strops and Loops (1)
- Swivel Locks (1)
- Tikal Tef-Gel (1)
- Top-Down Adapters (1)
- Torsion Ropes (1)
- Vakaros (1)
- Winch Service Accessories (1)
- Wired Navigation Lights (1)
- fender covers (1)
- Customer Support
Payment Methods
- Testimonials
- News & Blog
- Download Centre
- Image Credits
- Terms & Conditions
- Privacy Policy
- Interest Based Ads
- +49 431 2202140
- : [email protected]

- MarketPlace
- Digital Archives
- Order A Copy
Adding a staysail
Staysails are an evolution of the many different jibs flown by commercial ships in the age of sail. Their history on yachts has had many incarnations. Many voyaging sailboats could benefit from the addition of a staysail to a single headsail sailplan.
Adding a staysail gives a boat a small jib that can balance the boat in heavier wind and sea conditions. We’ll take a look at some of the factors to be considered for this sort of an improvement.
Sometimes staysails are flown with a loose foot, and sometimes on a boom or “club.” They are also set up self-tacking to a jib-horse or track, and sometimes set overlapping the mast so that they need to be tacked around like a genoa. On larger foredecks skippers often fly them inside a full jib, sailing the boat as a double-headed rig and gaining reaching power. Still others use them as small jibs for heavy weather because they consolidate the sailplan and lower its center of effort, while giving the crew a more central and safe location at which to work when taking seas on deck.
Take the example of a voyaging couple who bought an older Tartan 34. They purchased the boat in Long Island Sound and decided to use their summer vacation to deliver it home to New Jersey via Newport and Long Island’s south shore.
On the leg from Block Island to Ambrose Light, the couple discovered that their boat had a tendency toward lee helm, even with just a full main and a working jib set. In this case, a smaller sail, set further aft on the foredeck would help to balance out the helm, making the boat manageable in a seaway in heavy air.
As with any rig alteration or addition, we want to consider the balance of the boat, so that we can maintain desirable helm with the new sail combination. If we can decide what wind ranges we aim to use the sail in, then we can get some idea of what sail combinations we would fly in those conditions, and, therefore, how the boat will balance with a given staysail.
A copy of a boat’s sailplan – obtained from the designer or builderandmdash;can be used to determine how a staysail will affect overall sailing characteristics. Our voyaging couple received their boat’s sailplan from the builder and it quickly revealed the cause of their ill-balanced helm. The boat was originally designed as a yawl. In the early 70s, when the boat was built, this configuration was not popular and the boat was offered as a sloop rig, which moved the sailplan’s center of effort farther forward.
Consideration should be given to where the new inner forestay is intersecting the foredeck and rig. I like to keep the new inner forestay parallel to the primary headstay for aesthetic reasons. The more room one has between the inner and outer headstays, the less the inner headstay will interfere with the tacking of a full genoa. Also, the farther back on the foredeck the sail is, the more protected crewmembers will be when setting and dousing the sail in bad weather. Conversely, the farther aft along the deck the tack is, the smaller the sail will be, and the less power it will generate. If one makes the sail too small, it will only be useful as a heavy weather sail.Rig considerations
Adding an inner forestay to a rig means that one is introducing forward and leeward bending moments to the spar in a place where it was probably not designed to deal with them. Remember that most spars are designed to take compression, all horizontal loads must be accounted for by the standing rigging.
If one has a double-spreader rig, and the new inner forestay intersects the spar at or close to the upper spreader, then a set of running backstays can be used to support the rig when the staysail is set. Spectra or an aramid rope is a good choice for the runners for several reasons: they add only a fraction of the weight aloft, don’t punish the rig and mainsail as severely as wire, and are easily spliceable. The drawbacks are that they can cost a bit more and probably won’t last as long as well-maintained wire.
The Tartan 34 rig has only a single-spreader rig, but the relatively small size of the required staysail allowed us to bring the forestay in just a little ways above the spreader. This particular rig, for example, had only one set of lower shrouds and no intermediate fore and aft support. Because of that, the addition of running backstays will greatly reduce the rig’s tendency to pump (something those old CCA rigs are very good at). Tying the runners into the deck as far forward as possible, while still maintaining a 15 degree shroud angle (the angle between the mast and the wire), helped us give the rig a bit more transverse rigidity to deal with the new load.
If the forestay intersects the spar at a point somewhere in the middle of a panel, then a set of diamonds or an intermediate shroud to give the section support athwartships might be a good idea.
Whatever is done, one will have to add a fitting to the spar that can take up the new forestay. This fitting must conform to the forward shape of the spar section and should probably have holes in it where one can attach toggles or link plates to the after corners of the fitting and pick up the running backstays. A local rigger can help in ordering a fitting from a place like Metal Mast Marine in Putnam, CT. I prefer to fasten the fitting to the mast with machine screws by drilling and tapping the spar, but many riggers prefer rivets. Whichever type of fastener is chosen, it’s still a good idea to bed the fitting in a polysulfide compound.
A new forestay can be terminated in any manner but I prefer the Norseman or Stalock style of mechanical fasteners. They are very strong, can be done at home, and the whole thing is reusable (with the exception of the cone, which is relatively inexpensive).
Make sure that the connections are toggled top and bottom to allow a free range of motion. Otherwise, the fittings and the wire will be unduly stressed and will tend to fatigue at the connection point to the terminal fitting.
One option is making the lower end of the forestay removable. This way, it can be released and set aside to the shrouds when not in use. Release fittings for inner forestays are commercially available, but expensive. Many people just use a turnbuckle with a quick pin. (Make sure to retain the quick pin on a lanyard to avoid losing it.)
If the inner forestay is set up to be removable, be sure to protect the spreaders and the mast from abuse by the wire. I’ve seen poorly secured inner forestays, and wire halyards wear through the leading edge of spreaders as they slap and chafe against a pitching spar.Tying in to the deck
An inner forestay needs a chainplate to provide secure integration into the boat’s structure in the same way as the primary headstay and shrouds.
Sometimes it is convenient to tie this headstay into an existing bulkhead, such as the one that divides the v-berth from the forepeak on many boats. In this case, we must remember that the bulkhead, even if structural, is not designed to take the afterward shear loads that will be placed on it by the chainplate. The fastening should be braced from pulling aft so that the deck is not loaded excessively. If improperly done, it can lead to leaking at the chainplate and deterioration of the deck core and the bulkhead. Proper fastening can be accomplished by attaching the chainplate to the deck in the form of a through-bolted extra heavy padeye, backed by an angle bracket that is tied to the bulkhead. This approach will both clamp the deck with a sealant gasket and distribute the chainplate’s bite over a larger section of deck.
The inner forestay does not always fall at a convenient spot on the deck, and it is under these circumstances that we must take the time to supplement the structure of the boat to securely tie the headstay into the boat. If there is no V berth up forward and the space is used for sail stowage, we may be able to get away with a simple “tie rod” from the under side of the deck to the keel. Tie rods can be made of rod or chain of at least two-and-a-half times the strength of the wire that will be used in the rigging. The tie rod should carry the same angle as the headstay it is reinforcing. If tying into the boat’s keel or stem is impractical, than we can split the tie and carry the load to inward-facing, heavy-duty padeyes that are above the waterline on both sides of the hull. Full backing plates and plenty of polysulfide caulking to seal and reinforce these bottom padeyes is the way to go if this approach is employed. One should also glue some heavy plywood to the inside of the hull to help spread out the new loads. On the top end the loads can be transmitted through the deck by two heavy padeyes back to back with lots of polysulfide.
A tie rod arrangement will also need an appropriately-sized turnbuckle in the equation to take up any slack and even pretension the deck so that the new stay has no chance of lifting the deck.
At other times, as when a belowdecks tie would interfere with accommodations, an alternate approach is to laminate a beam under the foredeck and across the boat. Such beams can be tied into the hull with stainless steel angle brackets at both ends.
Again we must make sure that there is enough material where the brackets tie into the hull to insure that there won’t be any deterioration of the hull laminate due to localized stresses. The new beam should also be screwed and bonded to the deck all along its run so that it distributes its loads over the widest area, and as evenly as possibly.
The original drawings for our voyaging couple’s boat brought the staysail in over the forward end of their V berth. This meant that there was no bulkhead, and a tie rod would have rendered the bunk useless. I initially hoped that they would laminate in a beam, but their busy schedules didn’t afford them the time. By the time spring had rolled around they had decided to move the chainplate forward a foot or two to a bulkhead and use the first approach described above.
We have to make sure that anywhere bolts are run through a cored laminate, we use compression spacers to protect the laminate. This is a good idea in balsa- and plywood-cored decks where leakage can result in moisture wicking, core rot, and delamination.Sheet control
We must also take into consideration the clew end of the sail. How are we going to lead the sheets, and what will secure them to the deck? Perhaps the simplest approach is to have two padeyes, one port and one starboard, rove with double sheets like a genoa. But this arrangement will not allow the sail to tack without the same sheet attention a genoa requires.
To solve this problem many designers have used jib booms or clubs with the sheet leading to a small traveler or a block and padeye on the centerline. I am not particularly fond of adding another spar to the boat, particularly one that can whack me in the shins. This is, however, a good solution to an often annoying problem.
If a boat should happen to have a flush foredeck then it may be possible to install a traveler. Using a traveler, the sheet can run through a traveler-car with a centerline adjustment. Remember that the track should be level, or even curved upwards at the ends; if it curves down, following the boats deck curvature, there will be a centering tendency for the car when the sail pulls upward on the sheet. This will make it difficult to control the sheeting angle, and can slowly drive one mad.
Remember that a traveler should have at least eight degrees between the centerline of the boat, the tack, and the outboard end of the traveler when viewed from above. Otherwise the sheeting angle of the sail will always be too closed, and will have to be twisted off in order to get it to set reasonably
It may also be appealing to use a Camber Spar when it is not possible to have a deck track. A Camber Spar is a pre-formed aluminum spar that fits inside a special pocket on the sail. It runs at right angles to the headstay reaching from the luff to the clew. It is something of a cross between a batten and a boom. Of course, the sail must be specially constructed for this sort of an arrangement. A Camber Spar will allow one to tack the staysail in a self-tending manner, while having the sheet lead through a fixed point on the centerline. It will also help prevent the sail from twisting-off excessively when reaching; and it stows with the sail, leaving no booms or clubs on deck. (My shins feel better already.)
We can see that adding a staysail will probably prompt most people to consult a professional boatyard or rigging shop. However, with a little bit of forethought and research, most of the preliminary work can be done at home with pencil and paper. Once the design and approach is clear, one can even do some of the installation (provided one has the nerve to actually drill holes in one’s boat).
Paul Cohen, who has worked as a sailmaker and a rigger in Europe and the U.S., is building a 60-foot Dave Gerr design for the 1994 BOC Challenge.

By Ocean Navigator
How to Tune a Sailboat Mast
Here are some general guidelines for tuning your mast’s standing rigging . please see our blog on how to properly adjust a turnbuckle before you begin. as always we recommend seeking the advice of a professional rigger for more specific tips and tricks regarding tuning your boat’s rigging..
Your boat must be in the water. Begin by just slacking off all of the side shrouds as evenly as possible, so that all stays can be adjusted by hand. Once loose, try and adjust all turnbuckles so that they are pretty much equally open (or closed) from port to starboard respectfully. Also go ahead and line up the cotter pin holes (if present) in the studs so that they are in a pin-able position. Now is also the time to balance out the threads, between the upper and lower studs of the turnbuckle, IF they are not even. Do this by unpinning the turnbuckle from the chainplate – BE CAREFUL HERE – to ensure the mast is secure before unpinning any one stay. Lastly, loosen all halyards or anything that may pull the mast to port, starboard, forward or aft.
1. Check by sighting up the backside of the mast to see how straight your spar is side to side. You can take a masthead halyard from side to side to ensure that the masthead is on center. Do this by placing a wrap of tape 3′ up from the upper chainplate pin hole on each upper shroud. Cleat the halyard and pull it to the tape mark on one side, mark the halyard where it intersects the tape on the shroud. Now do this to the other side, the mark on the halyard should also intersect the tape similarly. Please note: when the mast is equipped with port and starboard sheaves, instead of just one center-line sheave, it will appear slightly off to one side. Just keep this in mind……
2. Using the upper shrouds as controls, center the masthead as much as possible using hand tension only. Some masts are just crooked. If yours is(are) crooked, it will reveal itself when you loosen all of the stays and halyards initially and sight up the mast. Although you should use hand tension only, you can use a wrench to hold the standing portion (the stay portion) of the turnbuckle. If for some reason the shroud is totally slack and you still can’t turn the turnbuckle by hand then the turnbuckle may need to be serviced, inspected, and maybe replaced.
3. Tune the mast from the top shroud on-down, making sure the mast is in column. Remember: as you tension one shroud by adjusting the turnbuckle, to loosen the opposing shroud the same amount.

4. Once the mast is fairly straight from side to side, tighten the shrouds all evenly using tools for tensioning. Typically, for proper tension, the shrouds should be tightened using these guidelines; uppers are the tightest, and then fwd. lowers, then the aft lowers and intermediates should be hand tight plus just a turn or two. ~ With an in-mast furler it is recommended to tension the aft lower a bit more to promote a straighter spar (fore and aft) for better furling.
5. Now you can tension the aft most backstay (s). If the backstay has an adjuster it should be set at a base setting (500-1000 lbs). If the backstay simply has a turnbuckle then it should be tightened well. After this has been done, in either situation (adjustable or static backstay), one should site up the mast from a-beam and notice that the masthead has a ‘slight’ aft bias. If there is no aft bias, too much, or the mast is inverted (leaning forward), then the forward most forestay (s) will most likely need to be adjusted to correct this. If a furler is present then seek the council of a professional rigger or refer to your furler’s manual for instructions on how to access the turnbuckle if there is one present.
6. Finally, sight up the mast one last time and make any necessary adjustments.
7. MAKE SURE ALL TURNBUCKLES AND PINS HAVE COTTER PINS AND ARE TAPED NEATLY TO PREVENT CHAFE!
Read HERE for how to use a LOOS & Co. Tension Gauge!
Here is a little vid from our friend Scott at Selden Masts (click the link then hints and advice for more info) on rig tune…..
[youtube http://www.youtube.com/watch?v=rcCALZ4x6R4&w=420&h=315]
Is your mast fractionally rigged, only has a single set of lowers or is just plain different? Be sure to leave any questions or comments below.
Similar Posts
Chain plate service anyone.
YIKES! [youtube http://www.youtube.com/watch?v=7iKRiBShhlQ&w=420&h=315] If it inspired you to consider your chainplates then read here for more information on chainplate service and inspection. ~T.R.C.
The Dreaded Halyard Swivel!
~You may find that I am poking a bit with this one. Perhaps the British might call it “a bit cheeky”, but I assure you it is all in good fun… THE HALYARD SWIVEL I just wanted to take a minute and chime-in on the “halyard swivel phenomenon” that has (apparently) taken the sailing world by storm. I…
Looks like the MOD 70’s experienced yet another capsize just a couple of weeks ago while practicing for the Transat Jacques Vabre. It’s pretty serious when these things go over as Team Spindrift can vouch for with their spill back in June in Dùn Laoghaire, Ireland. [youtube=http://www.youtube.com/watch?v=iqO-pzROfPs&w=420&h=315] ~Video courtesy of SailingNews’ YouTube Channel Virbac Paprec…
Views from Aloft
Aloft on the South River at Liberty Marina. I am conducting an aloft inspection for insurance. The boat is a quite large Tayana 55 It turns out that the lower shroud tang has cracked! Bummer. An electric winch and a beautiful day once again from 75′ in the air. Thanks for taking a…
Keeping Up With The Cup
The Americas Cup gets rolling in less than 80 hours. Make sure you catch the live coverage of day one right here (courtesy of americascup.com and youtube.com) The teams have had some good time off since Newport. I don’t know about you, but I am getting anxious for the excitement to resume in San Francisco. This should be a great venue….
Foiling Upwind? Not a Problem…….
Yesterday could have marked the end for the American team. However, with a solid win in the first race, living by the old adage “win the start and extend your lead”, Oracle held them off once more. A race cancellation due to wind strengths just prior to the 2nd start…
Leave a Reply Cancel reply
Your email address will not be published. Required fields are marked *
Save my name, email, and website in this browser for the next time I comment.
54 Comments
I have a 1965 Alberg 30. On a starboard tack the boat has more weather helm than on a port tack. I have not been able to achieve a balanced helm on either tack. New full batten main, new 150 roller furl genoa.
Other than the boat being evenly ballasted from port to starboard, e.g. holding tanks, fuel tanks, below deck furnishings, and storage items, I would check the rig from side to side. A crooked mast or poor static tune can result in the boat sailing differently on both tacks. A good way to test this is either sighting up the mast at the dock to ensure that the mast is relatively straight side to side and in column. You can also see that when beating (aka hard on the wind), you have to make adjustment’s to the mainsail sheet tension (NOTE: the traveler will likely need to be adjusted to mirror the same setting as on the previous tack). If notice that with the traveler in the same position on each respective tack that the sail is bubbling or flogging more on one tack than on the other, it is likely necessary to re-tune the mast. This can be done at the dock by following the guidelines in the article once the everything has been appropriately loosened to tension.
Let us know if this helps.
Any Hints, tips for tuning a 1977 Whitby 27 sloop 1/4 ton rig?
Nothing special that I can think of. Just follow the guidelines in the article. From what I can gather there are only a single set of lowers correct? Are the spreaders aft swept at all or just straight out? If it is single lowers and no sweep to the spreaders you’ll need to set the rake using the forestay adjustment to set the rake and the backstay to control the forestay tension. If you are interested in optimizing sail tuning, like in racing situations: higher wind sailing conditions will desire more tension on the shrouds, a bit more tension on the lower than the upper, but only slightly; and in lighter winds loosen them up a bit, a tad looser on the lower than the upper.
Hope that helps, and good luck.
How do I tune /2 in rigging. Neither of the loos gaug s are large enough?
Thanks for the question. Yes, I think the Loos gauges only go up to 3/8″ wire. First let me say that a tension gauge is not a must for proper tuning, more for tension recording and also not exceeding max tension which is typically hard to achieve without additional fulcrums or wrench extensions. Having said that, if you know that you need one simply search google for cable tensioning gauges. There are a few others like this one https://www.checkline.com/product/136-3E , pricing is not easily apparent and may be excessive for your needs.
My recommendation is that if you have a good local rigger have them do a static dock-side tune and perhaps sail-tune in the boat’s ideal conditions. Perhaps they can provide a tutorial on their process for you to be able to make rigging adjustments over time.
Hope that helps.
Hi. Nice article. I have a Mirage 27 (the Bob Perry design). It’s a masthead rig with single spreaders and the shrouds on each side come to the same chainplate. I have been tuning so that tension on the lower and uppers is the same and trying to set them so that (as you say) the leeward shrouds are just slightly slack. But how do I induce mast rake? I have a split backstay with a 6:1 purchase on the adjuster; should the mast have rake even with the adjuster off? or do I just haul on it? or should the tension on the inners and outers be different?
HI Michael,
You will need to lengthen the headstay and shorten the backstay. This can be done a few ways either with turnbuckle adjustment or actually shortening and lengthening cables, sometimes you can add or remove toggles also.
Hope that helps!
- Pingback: Buying a second-hand luxury yacht? Here’s what you need to look for - Phuketimes news
I recently purchased a 1988 Catalina S&S 38 and experienced my first launch this season, including stepping the mast and tuning the rig. As we prepared, we found that the Cap Shroud and Intermediate Shroud were clamped together at the four spreader ends. The folks at the yard had never seen that, and I certainly didn’t know why it was there … possibly to keep the spreader ends and shrouds consistent? Anyway, as I am learning how to tune my rig, it seems to me that these clamps would prevent me from tuning the cap shroud and intermediate separately and correctly Thoughts? Should I remove them and re-tune the rig?
So it is a double spreader rig I take it? The upper shroud wire should run freely through the first spreader, or the closest one to the deck, and be clamped at the top spreader. The intermediate shroud wire should be clamped at the lower spreader.
Before stepping, if this was done correctly, both upper spreader and lower spreader should be clamped equal distance from the mast attachment point, when looking at the mast from port and starboard.
In other words, you should measure the distance from where the upper shroud attaches to the mast to the end of the upper spreader and it should be the same distance on the other side, port to starboard. Then the same goes for the intermediate shroud and the lower spreader. The upper shroud should run freely through the lower spreader although it is covered by the clamp, but not actually clamped at the lower spreader, j ust the top one.
If all 4 spreaders are clamped equally port to starboard. You should be good to tune from there. The spreaders should show a slight up angle, to be specific slightly more up at the upper spreader than at the lower, but all of them should be just ever so slightly pointing up. You even want to think about clamping them slightly higher than that before tensioning, as this will pull them down and into their preferred angle, just slightly up. Specific angles are really only determined on the spar builders drawing and vary for manufacturer to manufacturer. Generally it is pretty clear where they want to sit. With the shrouds loose if you find that angle that appears to be the right one, and push them up slightly from there then clamp. This will allow them to be pulled down slightly once tensioned.
Kind of a tricky thing to explain in writing but hopefully it helps.
Have further questions? Give us a call 443-847-1004, or email us [email protected]
I have a Catalina 275 fractional rig with single swept back spreaders and an adjustable backstay. My questions are: how much rake, tension on cap and lower shrouds and on chain plate should cap shroud be forward and lower aft. I am racing and want the best performance. Thanks for any help. Bill
If the two shrouds are on the same plate, right next to each other, and the pin holes are the same diameter, and the plate is configured in a fore and aft configuration, I would choose the aft hole for the lower shroud and the forward one for the upper shroud.
In terms of specific rake, you will need to look towards the maker of your sails and or the boat manufacturer. I discuss how to measure rake in the preceding comments.
“You can measure rake by hanging a small mushroom anchor from the main halyard, with the boat floating on its lines, if you wish”
For racing I would start off with a good static tune at the dock by following the points in the article. If you know it’s going to be light day, start off with light rig tension. Be sure to use either Velcro wrap style cotter pins or simply lash the upper and lower shroud turnbuckles together to secure them. This will give you access to removing the pins or lashing while sailing and adjusting the stays.
From there you will need to sail tune for that days specific conditions, your shrouds will tell you what needs to be tighter and looser. I have answered how to do this a few times already in the comments below, please take your time to peruse the comments section to see what sail tuning entails. Doing this will always ensure that the cable tensions are set up ideally for the conditions and the boat can be sailed at maximum potential.
“For racing, ideally once the static tune at the dock (the part we just talked about) is done, go out and sail tune. Do this by going hard on the wind and checking to see if the leeward shrouds are just starting to dance, this is ideal. If they are swaying about they are too loose for the current conditions. If the leeward shrouds are tight, they may be a touch to tight. Tension and loosen as needed; count what you did and to what shroud, then tack and do the same to the other side.
ALWAYS secure the turnbuckles when you are finished adjusting them.”
Just hit ‘Ctrl F’ and search the page for “sail tune” and “rake”
I am trying to tune a Hallberg Rassy HR36 masthead rig. The rig has two in-line spreaders. The cap shroud is 3/8 inch and terminates at the lower spreader. From the lower spreader, the cable transitions to a 5/16 inch cable passing over the upper spreader to the masthead. A second 9/32 inch cable runs from the lower spreader to the mast (just below the upper spreader). The Selden rigging suggests that the “upper shroud” be at 15 percent of the breaking strength of the cable. In this situation, is it 15 percent of the 3/8 inch lower portion? If so, how should the upper 5/16 inch and 9/32 inch cables be tensioned?
Thanks for your help.
Hi Bryant, good question. Once proper alignment and centering of the spar has happened (static tune), and you are perhaps a hair tighter than hand tight on all shrouds, you can begin to tension things to a percentage of breaking strength. Do this by using the cables at the deck and use their diameters to determine the tensioning amount.
The V1 (aka cap shroud) in your case is a 3/8″ cable which supports the two cables above ii, hence its large diameter. The 5/16 V2,D3 and the 9/32 D2 total 19/32. So if 15% of the 3/8 cable is achieved you will below that threshold for the cables aloft. Does that make any sense?
With that in mind there is a range of acceptable tension from light air to heavy air. 15% sounds like a good middle of the road tension. Generally you do not want to exceed 30%. Sail tuning in ideal conditions is generally the best way to determine the right tension, but 15% of breaking strength sounds like a good place to start.
Don’t forget your cotter pins and tape, especially aloft.
Hope that helps and thanks for the question.
T.R.C. Thanks you for the clarification regarding the V2,D3 and D2 load distribution. When I set the V1 tension to 15%, the tension on the V2,D3 was at 8 %. I then tensioned the forward shroud to 12 % and the aft shroud to 10 %. Then I tensioned the backstay to 14 %. After doing this, I measured the tension on the V1 to be 10 %. The only information I could find regarding tension on the D2 was that is did not have to be tensioned much. I tensioned it to 5%. The mast sights straight and I used a bossen seat on a halyard to measure to the lower part of the V1, which also indicated that the mast was straight. Did I overtension the fore and aft stays? Is the tension in the D2 too much or too little? Again, I appreciate your advice.
When you tighten the backstay it usually induces a bit of aft bend in the mast which will soften the upper shroud (V1) a bit. You can just take up on it again to get it back to 15% if you like. As I said there is a acceptable range for all of the stays, which you are well within. Everything else sounds like you did a pretty good job. Next up sail tune and see if there is excessive waggling on the leeward side, but in moderate breeze. The shrouds will begin to sway as the breeze builds, this could be a telltale to either reduce sail a bit or you can add some tension to the shrouds all the way around.
Should be all good as they say.
Cheers, ~T.R.C.
T.R.C., your advice has been invaluable. I took her out in 12-15 knots and was very happy with the sail luff and stiffness of the rig. Thanks for you help!😁⚓️
Hi , can you provide any tuning guides for a Swan 38 Tall mast single spreader rig with baby stay, I am keen to set the rig up for new North sails and race her competitively. The mast is an exact Nautor factory replacement in 1998. She shall not have furling sails.
Hi Peter and thanks for the comment.
Unfortunately we do not have a guide for that boat. I would ask the sailmaker however to see what info he or she might have. Alternatively you can always start with a good static tune and then sail tune the boat as I describe in some of the comments below. This is the best way. I may use a Swan 45 Tuning guide as the template and then just fill in my own numbers over time. This is ideal, but infidelity start with asking the sailmaker you are working with, he should have some good info.
This may seem like a silly question, but it has me perplexed. How long should my cotter pins be? Long enough to ‘jam’ against the surrounding body, to prevent rotation? Otherwise, I don’t see how they’ll prevent my stays from loosening.
The length should be the minimum amount to just be able to bend the legs. Too long and they get caught up on things, too short and you can’t adequately bend the legs to keep the pin in place. The head of the pin is a actually providing the security.
Does that help?
Great article to get me started, thanks! I just have a few questions…
I originally owned a Tanzer 7.5. Her mast was rigid and simple to tune with a LOOS and an eyeball. I however now own a Mirage 33 (1982) and things are a bit more complex (but not too much). When I bought her the mast was already stepped and the owners said they replaced the forestay (inside the furler) 1 season ago. I went about the boat tuning the rig as best I could but I started second guessing the rake. I found noticeable rake in the mast with virtually no backstay tension on. So I think my forestay stretched (being “new”) and I need to bring it forward.
How do I measure how much rake (at rest on the tensioner) is enough? With my rig as is I felt worried that if I pulled down on the backstay tensioner I might buckle my mast by bending it too far. It seems to me it’s ALOT of downward pressure on the column when you pull down on her especially if the mast was already raked or maybe in my case leaned too far back to start? She has a babystay too, I wasn’t sure how far to tension that other than to assist adding bend\rake but since I had too much already I just lightly tightened it and hoped for the best!
Thanks for the question. With the backstay tensioner completely off, you should be able to adjust the static/ base tension of the backstay with a turnbuckle (s). Loosen the Baby Stay so that it is completely loose, sloppy, to take it out of the equation. Then mark furling line spool direction and remove the line. Next, open the furler up to gain access to the turnbuckle inside, if present. Remove all cotter pins or locking nuts to free the turnbuckles on the headstay and the backstay. You should then loosen things so that the headstay and the backstay can be adjusted by hand. Close the headstay turnbuckle and open the backstay turnbuckle to reduce rake, and vice versa if wanting to add rake.
You can measure rake by hanging a small mushroom anchor from the main halyard, with the boat floating on its lines, if you wish. Then once you achieve the desired mast rake go ahead and tension the forestay and backstay a few turns equally with tools; not too tight, but a good base light air setting, or as loose as you can imagine the headstay ever needing to be. Lastly, tension the baby stay a bit until it just starts to tug on the mast, helping induce bend. From here the backstay tensioner will do the rest: wind it on and it will tension the headstay and induce mast bend via the baby stay. You may have to take the boat sailing and adjust things as you find out how it performs at various degrees of rake and bend.
I hope that’s not too wordy, but helps explain it all a bit. Feel free to email or call with further questions.
Regards, ~T.R.C.
Can you provide some specific information regarding rig for 1980 C&C 32. Looking to purchase new main and want to get the most from it for Wednesday nights. Boat currently does not have a pony stay, it has been removed. Can replace that track/car. What should initial bend look like, keel step is fixed so assume I need to some chock aft of mast at deck? Have rod rigging but no Loos gauge for same, should I acquire one? Love this site, very helpful RayK
Thanks for the compliment. This may be less technical than you might expect. I would start with the basic guidelines given in the article to ensure a good base, static tune setting. A Loos gauge is good but not needed. If you focus on getting the spar straight, side to side, with a slight aft bias and then the tension is set so that it feels fairly tight. I know that sounds vague, but keep this in mind: if you are anticipating heavier wind make things a bit tighter, and loosen things up if less windy. The order of tension, in regards to the which shroud (upper vs intermediate vs lower) is important; more so than the amount of tension. Make sure nothing is so loose it is just flapping about.
The headstay should have some good slack to it with the backstay adjuster totally off. Adjust the backstay and headstay turnbuckles, with them in the slack position until the masthead is favoring a slight aft lean or rake, but only slight. From there, tension the backstay adjuster very tight and see what the headstay tension feels like, should be very tight.
PLEASE NOTE: if the backstay adjustment is totally bottomed out at this point, the backstay needs to be shortened a bit. Just pay attention to how this affects the rake. …
This part is where the pony stay or the baby stay will play a critical part, for mast bend. You may even find the pony stay to be good for mast pumping in light air and waves. Making this baby stay removable is a good idea, as well as, we’ve found that Dynema rope is the best choice here.
So… a centered mast head, side to side. A straight, in column mast from the top on down. A slight aft rake to start with…and as you begin to wind on the backstay and the baby stay you will add some rake but also a good bit more bend.
Take this set up for a few test sails and see how things act, in different conditions. After that you can make some adjustments here and there as needed: weather helm, shroud tension, mast rake, pre bend, etc…Moving chocks and using a Loos gauge.
ADDT’L TIP: Chocks and mast step position affect bend and rake properties. Want more rake? Chock mast aft in collar and move step forward. Want more bend? Chock mast forward in collar and move mast aft. As all things, there is more to it than that, but that’s the gist of the whole chocks and mast step thing…
“Sail Tuning” is a blog we are in the works of, but the punchline is that if hard on the breeze, and the leeward shrouds are excessively loose, and you are sure you aren’t over canvased…then go ahead and take turns on the leeward side until they just stop waggling, count what you’ve done, tack and mirror the turns on the other side.
Once the boat is set up for that specific condition, and you return to the dock, you should take your loose gauge and record these settings…creating a tension gauge setting for various conditions.
Hi, Thanks for your information. I have a Dehler 34. 1986… How much mast prebend and rake is recommended? The boat is new to me in March. Raced ok but I want to get a new main and want it to fit a well tuned mast. What do you think of a 2 degree rake and 4″ prebend at the speaders? Also, I have a Harken furler, How do you measure the forestay tension? Thanks, Duke
The answer, this boat is pretty sporty so it should show some rake. The spreaders are swept slightly aft so this will produce some natural bend just to tension the headstay.
Head-stays are always tough to measure with any sort of gauge, there are some class specific tricks for using a gauge in funky ways in order to get data, but they aren’t really reliable in my opinion. If you live in a typically windy area, go for bit more shroud tension, headstay tension and mast bend, and see how the boat feels. This will take some trial and error. If the forestay feels too stiff, slot too tight, loosen the uppers a bit, thus reducing bend and slackening the headstay.
Once the boat is sailing well in the ideal conditions, record that bend and those tensions. This is where I would leave things set, record it, and then just adjust shroud tension to affect bend and headstay in order to compliment different wind strengths and sea states. It takes quite a bit of back and forth, and documentation to get it right. One designers have already worked all of this out and then they share it for others…..very helpful. The rest of us will have to be the trailblazers for this type of information for other boat owners with the same (similar) boats to benefit.
Hope that helps, thanks for the kind words, and good luck. Once you figure things out post a link here for others with the same boat…..would be helpful.
Hello, Thanks for all of this great info. I just purchased a 37′ boat with a 3/4 fractional rig and a tapered mast. I was wondering if there were any special considerations when tuning the fractional rig? Currently the stays and shrouds are a little loose and can be wiggled (borderline flopping) by hand although the mast stands and is visually centered. (We are in SW Florida and the boat went through a direct hit by hurricane Irma like this and still stands tall!) Also is it advisable to increase shroud tension in small increments first on one side and then do the same on the opposing side? Thanks so much for any info
Hi Nathan. There are some thoughts, so fractional masts are usually fitted with aft swept shrouds and spreaders. If so, this means that the uppers also tension the headstay and create mast bend. The lowers then also act to reduce mast bend, so the tighter you make them you are actually reducing mast curve, thus powering the mainsail up. So be conscious of these two thoughts when tensioning the shrouds. The rest is fundamentally the same as the guide suggests. Loose or wiggling shrouds (excluding the scenario where we are talking about the leeward shrouds under sail), should be tightened. Doing things in increments is definitely a good idea.
Hope that helps. Thanks for the questions.
Thanks!! Now that you say that about the swept spreaders helping create mast bend it makes perfect sense. I had an ‘oh duh’ moment. I’ll probably err on the side of looser lower shrouds knowing if we need more power we can always tighten them up. Thank you again this helped immensely!
I want to buy a tension gage. Most familiar with Loos. But do I need Pt 1 or 2? (Pretty sure I don’t need 3 or Pro.) I have two rigs to tune: a 1972 Morgan 27 and a Catalina 22, I think 73 or thereabouts. The Morgan 27 is mine, fresh water for life, and 99.9% most likely factory wire. The Catalina 22 is a borrower in the Gulf, but pretty sure the owner has never tuned it. My problem is I can’t find the gage of wire for either standing rigging anywhere! Any help?
I think this one will do… https://sep.yimg.com/ca/I/yhst-70220623433298_2270_120385950 . The Morgan is likely 3/16″ wire and the Catalina is likely 5/32″, that’s an educated guess. Hope that helps.
I just purchased a 1980 C&C 40. I was told that I need to replace the rod rigging as it is “too old”. The mast is down and the rod rigging seems ok but I have not done any penetration testing. Does rod rigging need to be replaced due to age? Thanks Rigging Co.
Not replaced, but re-headed. This can mean that some stays need to be replaced as a whole, but not typically not the whole set. There are instances where you’ve almost replaced all of it anyways, so full replacement just makes sense. Other than those scenarios, full replacement is due after a certain mileage with rod…60,000 NM. Please keep in mind these standards are very general recommendations. It sounds like in your case, you should send in the rod, tangs, and chainplates for service and inspection. once we receive everything we will make a quote for the recommended services and/or replacement.
Hope that helps and give us an email for more info.
I have had a problem with securing the spreaders to the shrouds, resulting in the spreaders dropping. I am using stainless wire to seize them but still having a problem. Any tips on how to do this properly?
Seizing the wire onto spreaders with hinged spreaders is a bit of a trick of the trade that requires some practice. We use the X’s and O’s method. The end result should be something that looks like this… https://theriggingcompany.files.wordpress.com/2011/11/2012-06-07_14-26-09_899.jpg?w=900 . A trick to make the wire bite into the spreader end a bit more is to wedge a small piece of leather between the spreader and the wire before seizing. Also parceling and serving the wire where it intersects the spreader will help create more bite too. Lastly, and I don’t like this method but you can install a bull dog cable clamp beneath the spreader, nuts facing in, to keep it from dropping when slack.
I hope that helps a little. Thanks for commenting.
I am struggling to get enough rake into my mast. 33 foot Charger 33 keel stepped. Have loosened forestay and moved mast foot forward by about 10 mm. Should the chocks in the collar be adjusted? Runners and 2 spreaders, and check spreader. Spreaders do not have much aft angle. Move mast step more forward? Outers are tight with inners looser. Thoughts?
Hey Bernard,
Yeah, it sounds like chocks are the last thing. Maybe remove the chocks with the rigging slack and see if you can get the mast to sit where you like it with just hand tension. Then chock it where it wants to sit. It sounds like you are on the right track everywhere else, perhaps add a toggle into the headstay and shorten the backstay is next. Good luck and I hope that helps somewhat.
Hi, We have a Lagoon Catamaran with fractional rig, upper and lower shrouds, fore stay and upper and lower diamonds. No back stay. The mast has a degree of pre-bend. I do not plan to drop the mast.
I may have to do some work on the port side upper diamond. Is it as easy as just undoing the turnbuckle? Or do I need to loosen the starboard one at the same time. If it needs replacement should I also replace the starboard one even if in good condition?
As a further question, what happens if a diamond breaks, does it result in mast failure?
You would need to loosen the other counterpart to that stay for sure. It is just good practice, will keep the mast straight, and also make your life easier for removal install. Now, do you replace both? I don’t know. How old is the standing rigging? Why are you replacing the one? If it is not all due for replacement and you are just replacing due to damage, just do the one, but loosen both sides to do this.
Hope that helps and thanks for the visit.
Hello! I recently purchased a keel-stepped 1982 Goman Express 30 which came with an Alado Furler. I have been sailing it since May of this year. My question is this: Despite relocating mast wedges at the cabin roof to bias the lower mast aft about 2″, I still have a pronounced backward bend (10 degrees or so) just above the highest spreader. When sailing on jib alone, most wave action causes the mast to pump right at the bend point. I have a split backstay that is as un-tensioned as possible and the forestay only has another inch of adjustment left. There is no baby stay.
How can I get the bend out of the mast? How concerned should I be that the mast might break at that point?
Thanks in advance for your reply!
Eric Hassam – Delta Flyer
Thanks for taking the time to comment on our site. It sounds like you are on the right track. So one other adjustment that you have is the mast step position. This greatly affects mast bend on keel stepped masts. For a stronger bend and less rake, move the mast butt aft. For more rake and less bend (probably what you need to try), move the mast step forward a bit. If neither of these help, you may be off to have your headstay shortened and this means it is too long. This is likely not the case, but it is a possibility.
Keep in mind….A mast should have a slight aft rake bias along with a small amount of mast bend. This is quite normal. You can send us a picture if you’d like a second opinion on if it is over-bent. Having said all of that, even if you remove all of the mast bend, the mast may still pump. This is a design flaw in many spar designs that lots of end users have experienced. This can be remedied by redesigning the stay lay out. Is there a place for a staysail stay and/ or runner backstays? If so add them. Is there a place for a baby stay? If not, that may be a consideration.
Thanks again and I hope that helps.
Hi, I have a 48 foot yawl with a 7/8 fractional rig, is the tuning procedure the same as a masthead rig? I seem to have trouble getting aft rake and proper headstay tension. Also, is there a particular tension number the upper shrouds should have? many thanks in advance
Hi Bill, thanks for taking the time. 7/8 is very close and I would treat it like a masthead rig, especially if the none of the spreaders are aft swept. Tesnsion the headstay using the backstay(s). This should pull the top of the mast aft. If there are any other forward stays, i.e. stay sail stay, forward lowers, or anything else that could be holding the mast forward, go ahead and loosen those completely. You then may need to tighten the Tri-attic (the stay that connects the top of the mizzen and top of the main) if present. OR if the mizzen needs more rake too, then lossen all forward stays and pull it back using the available aft stays for this as well.
Hope this helps and please email us and send some pictures if you need more help.
I have a 1972 Morgan 27, which has both forward and after lower shrouds. I wish to remove the forward lowers so I can trim a 110% jib inside the stays. I see a lot of boats without forward lowers and think this will work OK, but wonder if I should increase the size of the aft lowers and beef up the chain plates. Any suggestions?
THANKS FOR YOUR INPUT. I AM GOING TO REMOVE THEM ANYWAY AND SEE WHAT HAPPENS. “HOLD MY BEER, WATCH THIS….” FAMOUS LAST WORDS.
Lol! Good luck. Call us if you need assistance.
I have rod rigging on my Beneteau 32s5
Any other guidance on tuning them vs wire rigging
Hi and thanks for commenting.
Just follow the guidelines in the write up. The over all goal is that the mast needs to be straight and in-column when looking at it from side to side.
Fore and aft, the mast should show a very slight lean aft. Depending on whether or not the spreaders are in-line or aft swept; you should also see some slight bend if there is any aft sweep to the spreaders just from the tension of the uppers.
A Rod stay tends to run a bit tighter than wire, so keep that in mind.
For racing, ideally once the static tune at the dock (the part we just talked about) is done, go out and sail tune. Do this by going hard on the wind and checking to see if the leeward shrouds are just starting to dance, this is ideal. If they are swaying about they are too loose for the current conditions. If the leeward shrouds are tight, they may be a touch to tight. Tension and loosen as needed; count what you did and to what shroud, then tack and do the same to the other side.
ALWAYS secure the turnbuckles when you are finished adjusting them.
- Pingback: Tuning a Sailboat Mast | ChesapeakeLiving.com
- Pingback: Rig Tuned | middlebaysailing
Wow, I would hate to be charged by her for three trips up the rig and forget the screw driver the rubber plugs that are sacraficial and replaced everytime removed just to clean the stainless 1×19 rigging.
Username or Email Address
Remember Me
Lost your password?
Review Cart
No products in the cart.
- Privacy Overview
- Strictly Necessary Cookies
This website uses cookies so that we can provide you with the best user experience possible. Cookie information is stored in your browser and performs functions such as recognising you when you return to our website and helping our team to understand which sections of the website you find most interesting and useful.
Strictly Necessary Cookie should be enabled at all times so that we can save your preferences for cookie settings.
If you disable this cookie, we will not be able to save your preferences. This means that every time you visit this website you will need to enable or disable cookies again.
- BOAT OF THE YEAR
- Newsletters
- Sailboat Reviews
- Boating Safety
- Sailing Totem
- Charter Resources
- Destinations
- Galley Recipes
- Living Aboard
- Sails and Rigging
- Maintenance
- Best Marine Electronics & Technology
Backstays to the Future
- By Alvah Simon
- Updated: March 28, 2013
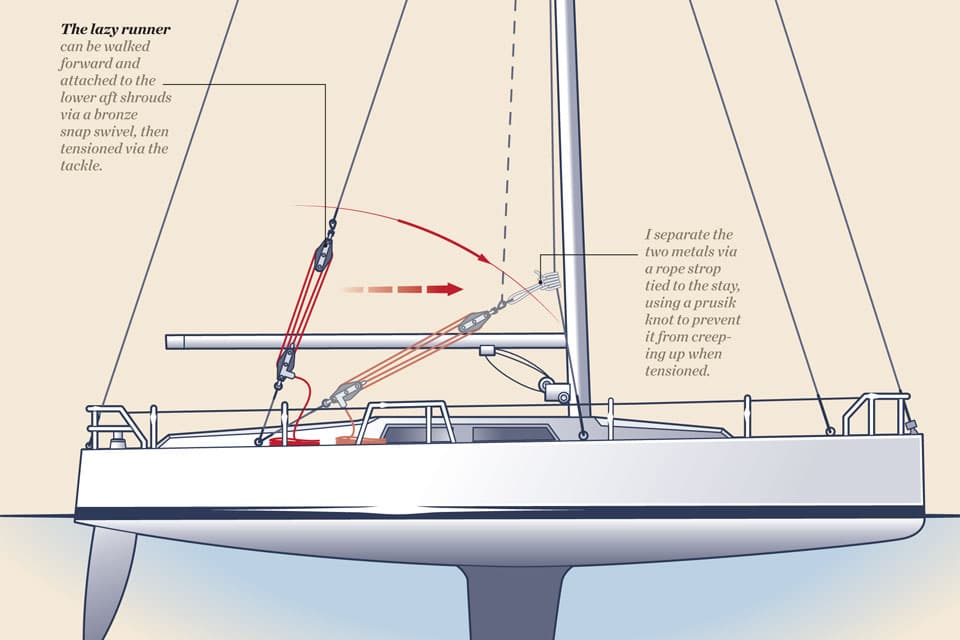
backstay setup
A running backstay is a removable stay that provides aft support to the mast from either the masthead or the point at which an inner forestay is attached. It originated as a response to the material limits of the period. At that time, solid wooden masts, for example, were either too weak or too heavy to be made particularly tall. Therefore, to achieve an acceptable area of sail for the heavy-displacement boats of the day, either the boom had to be extended beyond the transom or a gaff had to be added to the top of the sail—or both. This precluded the use of fixed backstays because the boom and gaffs had to be free to swing across the vessel when it tacked and jibed. As a tack or jibe was initiated, the burdened backstay had to be released and, as the spars swung through, the new, now windward, stay had to be fastened quickly before the entire rig came tumbling down.
With the advent of hollow masts, first of wood and then of alloy, and stainless-steel wire, the aspect ratio of the rigs began to extend to 3-to-1 and beyond. This allowed for the development of the Bermuda or Marconi rig, which eliminated gaffs and shortened the booms considerably without the loss of sail area or performance.
Running backstays, or runners, were then generally found only on cutter-rigged vessels. But through the 1960s and 1970s, the sloop became the rig du jour, and running backstays fell from favor. With the introduction of Freedom Yachts’ freestanding mast and Hunter’s B&R rig, the trend veered toward eliminating backstays, running or not, altogether.
Where are we today? Are running backstays now simply anachronisms that add unnecessary weight, windage, and clutter? I think not, especially in the context of bluewater cruising.
Sloops are fast around the buoys, but in the open sea, they display two disadvantages. First, the sail area is shared by only two large and therefore more difficult to handle sails. Second, in storm conditions, a sloop’s headsail, no matter how much it’s furled, still leaves the center of effort too far forward and too high to produce a safe and comfortable motion.
The cutter rig distributes the sail area over an additional sail, and that inner forestay is a superior position from which to hank on a low-flown storm sail. But with any real force upon it, the inner forestay can distort the shape of the mast; this will require a countereffort. Enter the intermediate running backstay. The arguable benefit of a staysail aside, this lower triangulation of support adds strength and stability to the mast, which translates into a better chance of coming up from a knockdown with the rig intact. Think sailing in the South Atlantic Ocean —it matters.
But alas, when you’re sailing off the wind, these same runners will have to be attended to on each and every tack. In open-ocean situations, this might not happen for days at a time. In confined waters, however, it’s necessary to have a quick and efficient method for setting and stowing runners.
Ideas and hardened opinions on running backstays are diverse and plentiful enough to keep seaside barstools warm all night. See the accompanying images and diagrams to learn about some of the most common approaches to setup and stowage.
If you’re considering adding an inner forestay and running backstays, I recommend that you get professional advice addressing the minimum engineering angles required, appropriate deck hardware, proper tangs and toggles needed at the mast, and wire types and diameters.
I don’t mean to imply that running backstays are suitable for all boats and applications. But if your interests lie in bluewater passagemaking and you take a belt-and-suspenders approach to your safety, I believe that you’ll agree that the added weight, windage, cost, and inconvenience are more than justified.
Alvah Simon, a CW contributing editor, is the author of North to the Night .
Click here for more pictures of running backstay setups . Click here to read about how an inner forestay and staysail can help you beat along in a blow.
- More: How To , seamanship , ship's systems
- More How To

3 Clutch Sails For Peak Performance

It’s Time to Rethink Your Ditch Kit

8 Ways to Prevent Seasickness

How To De-Winterize Your Diesel Engine

Kirsten Neuschäfer Receives CCA Blue Water Medal

2024 Regata del Sol al Sol Registration Closing Soon

US Sailing Honors Bob Johnstone

Bitter End Expands Watersports Program
- Digital Edition
- Customer Service
- Privacy Policy
- Email Newsletters
- Cruising World
- Sailing World
- Salt Water Sportsman
- Sport Fishing
- Wakeboarding
The Ultimate Guide to Sail Types and Rigs (with Pictures)
What's that sail for? Generally, I don't know. So I've come up with a system. I'll explain you everything there is to know about sails and rigs in this article.
What are the different types of sails? Most sailboats have one mainsail and one headsail. Typically, the mainsail is a fore-and-aft bermuda rig (triangular shaped). A jib or genoa is used for the headsail. Most sailors use additional sails for different conditions: the spinnaker (a common downwind sail), gennaker, code zero (for upwind use), and stormsail.
Each sail has its own use. Want to go downwind fast? Use a spinnaker. But you can't just raise any sail and go for it. It's important to understand when (and how) to use each sail. Your rigging also impacts what sails you can use.

On this page:
Different sail types, the sail plan of a bermuda sloop, mainsail designs, headsail options, specialty sails, complete overview of sail uses, mast configurations and rig types.
This article is part 1 of my series on sails and rig types. Part 2 is all about the different types of rigging. If you want to learn to identify every boat you see quickly, make sure to read it. It really explains the different sail plans and types of rigging clearly.

Guide to Understanding Sail Rig Types (with Pictures)
First I'll give you a quick and dirty overview of sails in this list below. Then, I'll walk you through the details of each sail type, and the sail plan, which is the godfather of sail type selection so to speak.
Click here if you just want to scroll through a bunch of pictures .
Here's a list of different models of sails: (Don't worry if you don't yet understand some of the words, I'll explain all of them in a bit)
- Jib - triangular staysail
- Genoa - large jib that overlaps the mainsail
- Spinnaker - large balloon-shaped downwind sail for light airs
- Gennaker - crossover between a Genoa and Spinnaker
- Code Zero or Screecher - upwind spinnaker
- Drifter or reacher - a large, powerful, hanked on genoa, but made from lightweight fabric
- Windseeker - tall, narrow, high-clewed, and lightweight jib
- Trysail - smaller front-and-aft mainsail for heavy weather
- Storm jib - small jib for heavy weather
I have a big table below that explains the sail types and uses in detail .
I know, I know ... this list is kind of messy, so to understand each sail, let's place them in a system.
The first important distinction between sail types is the placement . The mainsail is placed aft of the mast, which simply means behind. The headsail is in front of the mast.
Generally, we have three sorts of sails on our boat:
- Mainsail: The large sail behind the mast which is attached to the mast and boom
- Headsail: The small sail in front of the mast, attached to the mast and forestay (ie. jib or genoa)
- Specialty sails: Any special utility sails, like spinnakers - large, balloon-shaped sails for downwind use
The second important distinction we need to make is the functionality . Specialty sails (just a name I came up with) each have different functionalities and are used for very specific conditions. So they're not always up, but most sailors carry one or more of these sails.
They are mostly attached in front of the headsail, or used as a headsail replacement.
The specialty sails can be divided into three different categories:
- downwind sails - like a spinnaker
- light air or reacher sails - like a code zero
- storm sails

The parts of any sail
Whether large or small, each sail consists roughly of the same elements. For clarity's sake I've took an image of a sail from the world wide webs and added the different part names to it:

- Head: Top of the sail
- Tack: Lower front corner of the sail
- Foot: Bottom of the sail
- Luff: Forward edge of the sail
- Leech: Back edge of the sail
- Clew: Bottom back corner of the sail
So now we speak the same language, let's dive into the real nitty gritty.
Basic sail shapes
Roughly speaking, there are actually just two sail shapes, so that's easy enough. You get to choose from:
- square rigged sails
- fore-and-aft rigged sails
I would definitely recommend fore-and-aft rigged sails. Square shaped sails are pretty outdated. The fore-and-aft rig offers unbeatable maneuverability, so that's what most sailing yachts use nowadays.

Square sails were used on Viking longships and are good at sailing downwind. They run from side to side. However, they're pretty useless upwind.
A fore-and-aft sail runs from the front of the mast to the stern. Fore-and-aft literally means 'in front and behind'. Boats with fore-and-aft rigged sails are better at sailing upwind and maneuvering in general. This type of sail was first used on Arabic boats.
As a beginner sailor I confuse the type of sail with rigging all the time. But I should cut myself some slack, because the rigging and sails on a boat are very closely related. They are all part of the sail plan .
A sail plan is made up of:
- Mast configuration - refers to the number of masts and where they are placed
- Sail type - refers to the sail shape and functionality
- Rig type - refers to the way these sails are set up on your boat
There are dozens of sails and hundreds of possible configurations (or sail plans).
For example, depending on your mast configuration, you can have extra headsails (which then are called staysails).
The shape of the sails depends on the rigging, so they overlap a bit. To keep it simple I'll first go over the different sail types based on the most common rig. I'll go over the other rig types later in the article.
Bermuda Sloop: the most common rig
Most modern small and mid-sized sailboats have a Bermuda sloop configuration . The sloop is one-masted and has two sails, which are front-and-aft rigged. This type of rig is also called a Marconi Rig. The Bermuda rig uses a triangular sail, with just one side of the sail attached to the mast.
The mainsail is in use most of the time. It can be reefed down, making it smaller depending on the wind conditions. It can be reefed down completely, which is more common in heavy weather. (If you didn't know already: reefing is skipper terms for rolling or folding down a sail.)
In very strong winds (above 30 knots), most sailors only use the headsail or switch to a trysail.
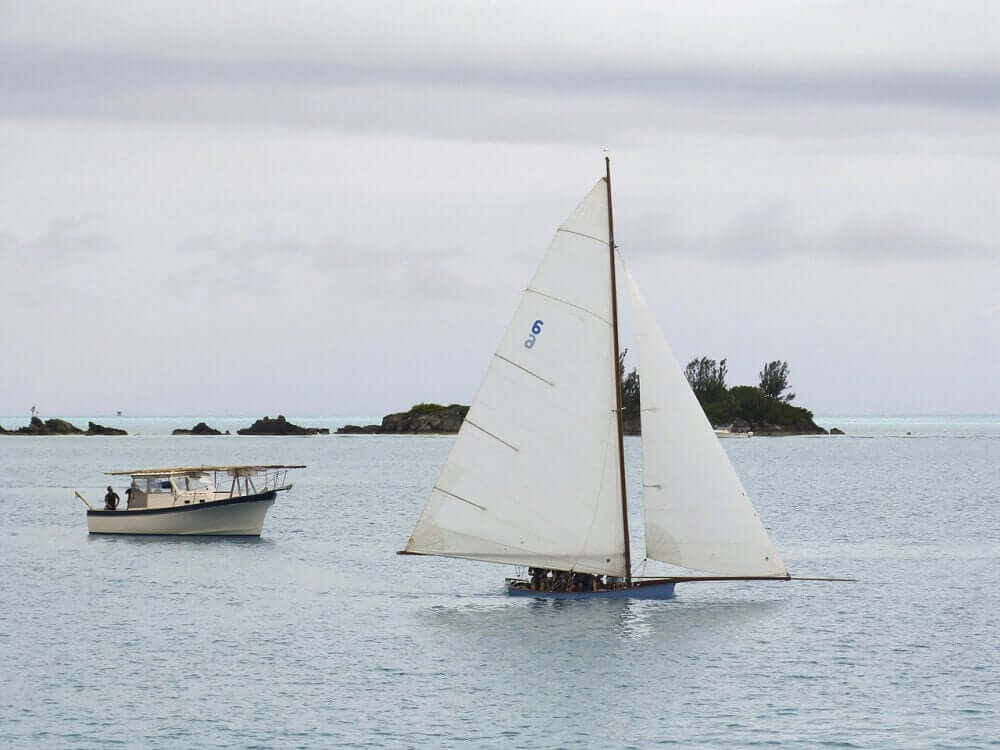
The headsail powers your bow, the mainsail powers your stern (rear). By having two sails, you can steer by using only your sails (in theory - it requires experience). In any case, two sails gives you better handling than one, but is still easy to operate.
Let's get to the actual sails. The mainsail is attached behind the mast and to the boom, running to the stern. There are multiple designs, but they actually don't differ that much. So the following list is a bit boring. Feel free to skip it or quickly glance over it.
- Square Top racing mainsail - has a high performance profile thanks to the square top, optional reef points
- Racing mainsail - made for speed, optional reef points
- Cruising mainsail - low-maintenance, easy to use, made to last. Generally have one or multiple reef points.
- Full-Batten Cruising mainsail - cruising mainsail with better shape control. Eliminates flogging. Full-length battens means the sail is reinforced over the entire length. Generally have one or multiple reef points.
- High Roach mainsail - crossover between square top racing and cruising mainsail, used mostly on cats and multihulls. Generally have one or multiple reef points.
- Mast Furling mainsail - sails specially made to roll up inside the mast - very convenient but less control; of sail shape. Have no reef points
- Boom Furling mainsail - sails specially made to roll up inside the boom. Have no reef points.
The headsail is the front sail in a front-and-aft rig. The sail is fixed on a stay (rope, wire or rod) which runs forward to the deck or bowsprit. It's almost always triangular (Dutch fishermen are known to use rectangular headsail). A triangular headsail is also called a jib .
Headsails can be attached in two ways:
- using roller furlings - the sail rolls around the headstay
- hank on - fixed attachment
Types of jibs:
Typically a sloop carries a regular jib as its headsail. It can also use a genoa.
- A jib is a triangular staysail set in front of the mast. It's the same size as the fore-triangle.
- A genoa is a large jib that overlaps the mainsail.
What's the purpose of a jib sail? A jib is used to improve handling and to increase sail area on a sailboat. This helps to increase speed. The jib gives control over the bow (front) of the ship, making it easier to maneuver the ship. The mainsail gives control over the stern of the ship. The jib is the headsail (frontsail) on a front-and-aft rig.
The size of the jib is generally indicated by a number - J1, 2, 3, and so on. The number tells us the attachment point. The order of attachment points may differ per sailmaker, so sometimes J1 is the largest jib (on the longest stay) and sometimes it's the smallest (on the shortest stay). Typically the J1 jib is the largest - and the J3 jib the smallest.
Most jibs are roller furling jibs: this means they are attached to a stay and can be reefed down single-handedly. If you have a roller furling you can reef down the jib to all three positions and don't need to carry different sizes.

Originally called the 'overlapping jib', the leech of the genoa extends aft of the mast. This increases speed in light and moderate winds. A genoa is larger than the total size of the fore-triangle. How large exactly is indicated by a percentage.
- A number 1 genoa is typically 155% (it used to be 180%)
- A number 2 genoa is typically 125-140%
Genoas are typically made from 1.5US/oz polyester spinnaker cloth, or very light laminate.

This is where it gets pretty interesting. You can use all kinds of sails to increase speed, handling, and performance for different weather conditions.
Some rules of thumb:
- Large sails are typically good for downwind use, small sails are good for upwind use.
- Large sails are good for weak winds (light air), small sails are good for strong winds (storms).
Downwind sails
Thanks to the front-and-aft rig sailboats are easier to maneuver, but they catch less wind as well. Downwind sails are used to offset this by using a large sail surface, pulling a sailboat downwind. They can be hanked on when needed and are typically balloon shaped.
Here are the most common downwind sails:
- Big gennaker
- Small gennaker
A free-flying sail that fills up with air, giving it a balloon shape. Spinnakers are generally colorful, which is why they look like kites. This downwind sail has the largest sail area, and it's capable of moving a boat with very light wind. They are amazing to use on trade wind routes, where they can help you make quick progress.
Spinnakers require special rigging. You need a special pole and track on your mast. You attach the sail at three points: in the mast head using a halyard, on a pole, and on a sheet.
The spinnaker is symmetrical, meaning the luff is as long as its leech. It's designed for broad reaching.

Gennaker or cruising spinnaker
The Gennaker is a cross between the genoa and the spinnaker. It has less downwind performance than the spinnaker. It is a bit smaller, making it slower, but also easier to handle - while it remains very capable. The cruising spinnaker is designed for broad reaching.
The gennaker is a smaller, asymmetric spinnaker that's doesn't require a pole or track on the mast. Like the spinnaker, and unlike the genoa, the gennaker is set flying. Asymmetric means its luff is longer than its leech.
You can get big and small gennakers (roughly 75% and 50% the size of a true spinnaker).
Also called ...
- the cruising spinnaker
- cruising chute
- pole-less spinnaker
- SpinDrifter
... it's all the same sail.

Light air sails
There's a bit of overlap between the downwind sails and light air sails. Downwind sails can be used as light air sails, but not all light air sails can be used downwind.
Here are the most common light air sails:
- Spinnaker and gennaker
Drifter reacher
Code zero reacher.
A drifter (also called a reacher) is a lightweight, larger genoa for use in light winds. It's roughly 150-170% the size of a genoa. It's made from very lightweight laminated spinnaker fabric (1.5US/oz).
Thanks to the extra sail area the sail offers better downwind performance than a genoa. It's generally made from lightweight nylon. Thanks to it's genoa characteristics the sail is easier to use than a cruising spinnaker.
The code zero reacher is officially a type of spinnaker, but it looks a lot like a large genoa. And that's exactly what it is: a hybrid cross between the genoa and the asymmetrical spinnaker (gennaker). The code zero however is designed for close reaching, making it much flatter than the spinnaker. It's about twice the size of a non-overlapping jib.

A windseeker is a small, free-flying staysail for super light air. It's tall and thin. It's freestanding, so it's not attached to the headstay. The tack attaches to a deck pad-eye. Use your spinnakers' halyard to raise it and tension the luff.
It's made from nylon or polyester spinnaker cloth (0.75 to 1.5US/oz).
It's designed to guide light air onto the lee side of the main sail, ensuring a more even, smooth flow of air.
Stormsails are stronger than regular sails, and are designed to handle winds of over 45 knots. You carry them to spare the mainsail. Sails
A storm jib is a small triangular staysail for use in heavy weather. If you participate in offshore racing you need a mandatory orange storm jib. It's part of ISAF's requirements.
A trysail is a storm replacement for the mainsail. It's small, triangular, and it uses a permanently attached pennant. This allows it to be set above the gooseneck. It's recommended to have a separate track on your mast for it - you don't want to fiddle around when you actually really need it to be raised ... now.

Why Use Different Sails At All?
You could just get the largest furling genoa and use it on all positions. So why would you actually use different types of sails?
The main answer to that is efficiency . Some situations require other characteristics.
Having a deeply reefed genoa isn't as efficient as having a small J3. The reef creates too much draft in the sail, which increases heeling. A reefed down mainsail in strong winds also increases heeling. So having dedicated (storm) sails is probably a good thing, especially if you're planning more demanding passages or crossings.
But it's not just strong winds, but also light winds that can cause problems. Heavy sails will just flap around like laundry in very light air. So you need more lightweight fabrics to get you moving.
What Are Sails Made Of?
The most used materials for sails nowadays are:
- Dacron - woven polyester
- woven nylon
- laminated fabrics - increasingly popular
Sails used to be made of linen. As you can imagine, this is terrible material on open seas. Sails were rotting due to UV and saltwater. In the 19th century linen was replaced by cotton.
It was only in the 20th century that sails were made from synthetic fibers, which were much stronger and durable. Up until the 1980s most sails were made from Dacron. Nowadays, laminates using yellow aramids, Black Technora, carbon fiber and Spectra yarns are more and more used.
Laminates are as strong as Dacron, but a lot lighter - which matters with sails weighing up to 100 kg (220 pounds).
By the way: we think that Viking sails were made from wool and leather, which is quite impressive if you ask me.
In this section of the article I give you a quick and dirty summary of different sail plans or rig types which will help you to identify boats quickly. But if you want to really understand it clearly, I really recommend you read part 2 of this series, which is all about different rig types.
You can't simply count the number of masts to identify rig type But you can identify any rig type if you know what to look for. We've created an entire system for recognizing rig types. Let us walk you through it. Read all about sail rig types
As I've said earlier, there are two major rig types: square rigged and fore-and-aft. We can divide the fore-and-aft rigs into three groups:
- Bermuda rig (we have talked about this one the whole time) - has a three-sided mainsail
- Gaff rig - has a four-sided mainsail, the head of the mainsail is guided by a gaff
- Lateen rig - has a three-sided mainsail on a long yard

There are roughly four types of boats:
- one masted boats - sloop, cutter
- two masted boats - ketch, schooner, brig
- three masted - barque
- fully rigged or ship rigged - tall ship
Everything with four masts is called a (tall) ship. I think it's outside the scope of this article, but I have written a comprehensive guide to rigging. I'll leave the three and four-masted rigs for now. If you want to know more, I encourage you to read part 2 of this series.
One-masted rigs
Boats with one mast can have either one sail, two sails, or three or more sails.
The 3 most common one-masted rigs are:
- Cat - one mast, one sail
- Sloop - one mast, two sails
- Cutter - one mast, three or more sails
1. Gaff Cat

2. Gaff Sloop
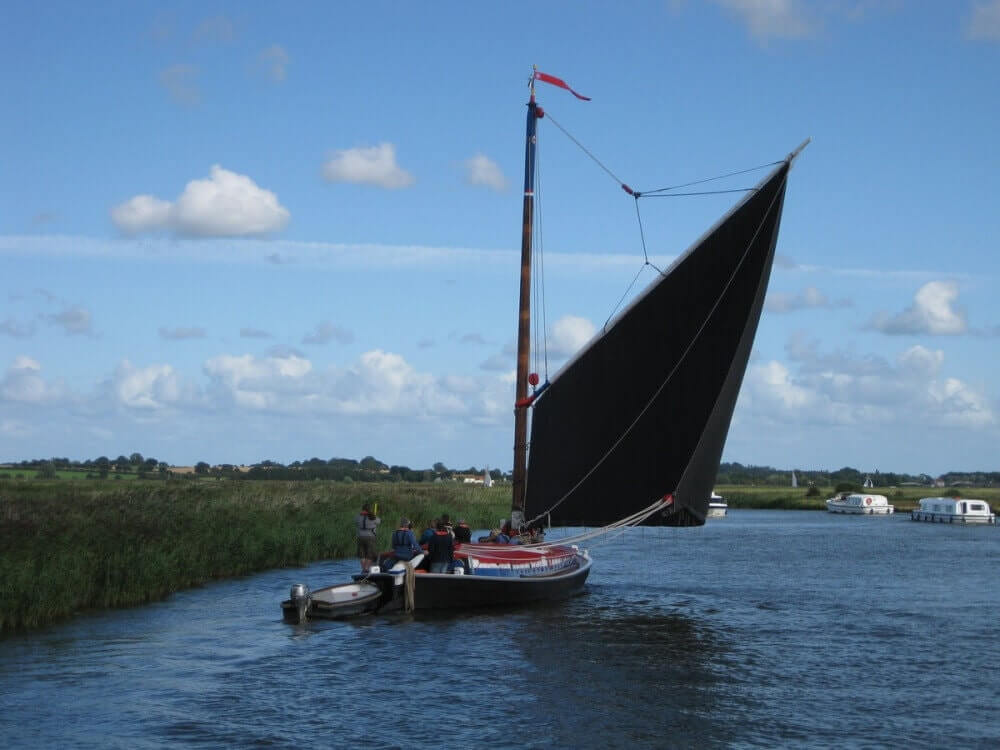
Two-masted rigs
Two-masted boats can have an extra mast in front or behind the main mast. Behind (aft of) the main mast is called a mizzen mast . In front of the main mast is called a foremast .
The 5 most common two-masted rigs are:
- Lugger - two masts (mizzen), with lugsail (cross between gaff rig and lateen rig) on both masts
- Yawl - two masts (mizzen), fore-and-aft rigged on both masts. Main mast much taller than mizzen. Mizzen without mainsail.
- Ketch - two masts (mizzen), fore-and-aft rigged on both masts. Main mast with only slightly smaller mizzen. Mizzen has mainsail.
- Schooner - two masts (foremast), generally gaff rig on both masts. Main mast with only slightly smaller foremast. Sometimes build with three masts, up to seven in the age of sail.
- Brig - two masts (foremast), partially square-rigged. Main mast carries small lateen rigged sail.

4. Schooner

5. Brigantine

This article is part 1 of a series about sails and rig types If you want to read on and learn to identify any sail plans and rig type, we've found a series of questions that will help you do that quickly. Read all about recognizing rig types
Related Questions
What is the difference between a gennaker & spinnaker? Typically, a gennaker is smaller than a spinnaker. Unlike a spinnaker, a gennaker isn't symmetric. It's asymmetric like a genoa. It is however rigged like a spinnaker; it's not attached to the forestay (like a jib or a genoa). It's a downwind sail, and a cross between the genoa and the spinnaker (hence the name).
What is a Yankee sail? A Yankee sail is a jib with a high-cut clew of about 3' above the boom. A higher-clewed jib is good for reaching and is better in high waves, preventing the waves crash into the jibs foot. Yankee jibs are mostly used on traditional sailboats.
How much does a sail weigh? Sails weigh anywhere between 4.5-155 lbs (2-70 kg). The reason is that weight goes up exponentially with size. Small boats carry smaller sails (100 sq. ft.) made from thinner cloth (3.5 oz). Large racing yachts can carry sails of up to 400 sq. ft., made from heavy fabric (14 oz), totaling at 155 lbs (70 kg).
What's the difference between a headsail and a staysail? The headsail is the most forward of the staysails. A boat can only have one headsail, but it can have multiple staysails. Every staysail is attached to a forward running stay. However, not every staysail is located at the bow. A stay can run from the mizzen mast to the main mast as well.
What is a mizzenmast? A mizzenmast is the mast aft of the main mast (behind; at the stern) in a two or three-masted sailing rig. The mizzenmast is shorter than the main mast. It may carry a mainsail, for example with a ketch or lugger. It sometimes doesn't carry a mainsail, for example with a yawl, allowing it to be much shorter.
Special thanks to the following people for letting me use their quality photos: Bill Abbott - True Spinnaker with pole - CC BY-SA 2.0 lotsemann - Volvo Ocean Race Alvimedica and the Code Zero versus SCA and the J1 - CC BY-SA 2.0 Lisa Bat - US Naval Academy Trysail and Storm Jib dry fit - CC BY-SA 2.0 Mike Powell - White gaff cat - CC BY-SA 2.0 Anne Burgess - Lugger The Reaper at Scottish Traditional Boat Festival
Hi, I stumbled upon your page and couldn’t help but notice some mistakes in your description of spinnakers and gennakers. First of all, in the main photo on top of this page the small yacht is sailing a spinnaker, not a gennaker. If you look closely you can see the spinnaker pole standing on the mast, visible between the main and headsail. Further down, the discription of the picture with the two German dinghies is incorrect. They are sailing spinnakers, on a spinnaker pole. In the farthest boat, you can see a small piece of the pole. If needed I can give you the details on the difference between gennakers and spinnakers correctly?
Hi Shawn, I am living in Utrecht I have an old gulf 32 and I am sailing in merkmeer I find your articles very helpful Thanks
Thank you for helping me under stand all the sails there names and what there functions were and how to use them. I am planning to build a trimaran 30’ what would be the best sails to have I plan to be coastal sailing with it. Thank you
Hey Comrade!
Well done with your master piece blogging. Just a small feedback. “The jib gives control over the bow of the ship, making it easier to maneuver the ship. The mainsail gives control over the stern of the ship.” Can you please first tell the different part of a sail boat earlier and then talk about bow and stern later in the paragraph. A reader has no clue on the newly introduced terms. It helps to keep laser focused and not forget main concepts.
Shawn, I am currently reading How to sail around the World” by Hal Roth. Yes, I want to sail around the world. His book is truly grounded in real world experience but like a lot of very knowledgable people discussing their area of expertise, Hal uses a lot of terms that I probably should have known but didn’t, until now. I am now off to read your second article. Thank You for this very enlightening article on Sail types and their uses.
Shawn Buckles
HI CVB, that’s a cool plan. Thanks, I really love to hear that. I’m happy that it was helpful to you and I hope you are of to a great start for your new adventure!
Hi GOWTHAM, thanks for the tip, I sometimes forget I haven’t specified the new term. I’ve added it to the article.
Nice article and video; however, you’re mixing up the spinnaker and the gennaker.
A started out with a question. What distinguishes a brig from a schooner? Which in turn led to follow-up questions: I know there are Bermuda rigs and Latin rig, are there more? Which in turn led to further questions, and further, and further… This site answers them all. Wonderful work. Thank you.
Great post and video! One thing was I was surprised how little you mentioned the Ketch here and not at all in the video or chart, and your sample image is a large ship with many sails. Some may think Ketch’s are uncommon, old fashioned or only for large boats. Actually Ketch’s are quite common for cruisers and live-aboards, especially since they often result in a center cockpit layout which makes for a very nice aft stateroom inside. These are almost exclusively the boats we are looking at, so I was surprised you glossed over them.
Love the article and am finding it quite informative.
While I know it may seem obvious to 99% of your readers, I wish you had defined the terms “upwind” and “downwind.” I’m in the 1% that isn’t sure which one means “with the wind” (or in the direction the wind is blowing) and which one means “against the wind” (or opposite to the way the wind is blowing.)
paul adriaan kleimeer
like in all fields of syntax and terminology the terms are colouual meaning local and then spead as the technology spread so an history lesson gives a floral bouque its colour and in the case of notical terms span culture and history adds an detail that bring reverence to the study simply more memorable.
Hi, I have a small yacht sail which was left in my lock-up over 30 years ago I basically know nothing about sails and wondered if you could spread any light as to the make and use of said sail. Someone said it was probably originally from a Wayfayer wooden yacht but wasn’t sure. Any info would be must appreciated and indeed if would be of any use to your followers? I can provide pics but don’t see how to include them at present
kind regards
Leave a comment
You may also like, 17 sailboat types explained: how to recognize them.
Ever wondered what type of sailboat you're looking at? Identifying sailboats isn't hard, you just have to know what to look for. In this article, I'll help you.

How Much Sailboats Cost On Average (380+ Prices Compared)
Own your first boat within a year on any budget.
A sailboat doesn't have to be expensive if you know what you're doing. If you want to learn how to make your sailing dream reality within a year, leave your email and I'll send you free updates . I don't like spam - I will only send helpful content.
Ready to Own Your First Boat?
Just tell us the best email address to send your tips to:
Standing Rigging (or ‘Name That Stay’)
Published by rigworks on november 19, 2019.
Question: When your riggers talk about standing rigging, they often use terms I don’t recognize. Can you break it down for me?
From the Rigger: Let’s play ‘Name that Stay’…

Forestay (1 or HS) – The forestay, or headstay, connects the mast to the front (bow) of the boat and keeps your mast from falling aft.
- Your forestay can be full length (masthead to deck) or fractional (1/8 to 1/4 from the top of the mast to the deck).
- Inner forestays, including staysail stays, solent stays and baby stays, connect to the mast below the main forestay and to the deck aft of the main forestay. Inner forestays allow you to hoist small inner headsails and/or provide additional stability to your rig.
Backstay (2 or BS) – The backstay runs from the mast to the back of the boat (transom) and is often adjustable to control forestay tension and the shape of the sails.
- A backstay can be either continuous (direct from mast to transom) or it may split in the lower section (7) with “legs” that ‘V’ out to the edges of the transom.
- Backstays often have hydraulic or manual tensioners built into them to increase forestay tension and bend the mast, which flattens your mainsail.
- Running backstays can be removable, adjustable, and provide additional support and tuning usually on fractional rigs. They run to the outer edges of the transom and are adjusted with each tack. The windward running back is in tension and the leeward is eased so as not to interfere with the boom and sails.
- Checkstays, useful on fractional rigs with bendy masts, are attached well below the backstay and provide aft tension to the mid panels of the mast to reduce mast bend and provide stabilization to reduce the mast from pumping.
Shrouds – Shrouds support the mast from side to side. Shrouds are either continuous or discontinuous .
Continuous rigging, common in production sailboats, means that each shroud (except the lowers) is a continuous piece of material that connects to the mast at some point, passes through the spreaders without terminating, and continues to the deck. There may be a number of continuous shrouds on your boat ( see Figure 1 ).
- Cap shrouds (3) , sometimes called uppers, extend from masthead to the chainplates at the deck.
- Intermediate shrouds (4) extend from mid-mast panel to deck.
- Lower shrouds extend from below the spreader-base to the chainplates. Fore- (5) and Aft-Lowers (6) connect to the deck either forward or aft of the cap shroud.
Discontinuous rigging, common on high performance sailboats, is a series of shorter lengths that terminate in tip cups at each spreader. The diameter of the wire/rod can be reduced in the upper sections where loads are lighter, reducing overall weight. These independent sections are referred to as V# and D# ( see Figure 2 ). For example, V1 is the lowest vertical shroud that extends from the deck to the outer tip of the first spreader. D1 is the lowest diagonal shroud that extends from the deck to the mast at the base of the first spreader. The highest section that extends from the upper spreader to the mast head may be labeled either V# or D#.
A sailboat’s standing rigging is generally built from wire rope, rod, or occasionally a super-strong synthetic fibered rope such as Dyneema ® , carbon fiber, kevlar or PBO.
- 1×19 316 grade stainless steel Wire Rope (1 group of 19 wires, very stiff with low stretch) is standard on most sailboats. Wire rope is sized/priced by its diameter which varies from boat to boat, 3/16” through 1/2″ being the most common range.
- 1×19 Compact Strand or Dyform wire, a more expensive alternative, is used to increase strength, reduce stretch, and minimize diameter on high performance boats such as catamarans. It is also the best alternative when replacing rod with wire.
- Rod rigging offers lower stretch, longer life expectancy, and higher breaking strength than wire. Unlike wire rope, rod is defined by its breaking strength, usually ranging from -10 to -40 (approx. 10k to 40k breaking strength), rather than diameter. So, for example, we refer to 7/16” wire (diameter) vs. -10 Rod (breaking strength).
- Composite Rigging is a popular option for racing boats. It offers comparable breaking strengths to wire and rod with a significant reduction in weight and often lower stretch.
Are your eyes crossing yet? This is probably enough for now, but stay tuned for our next ‘Ask the Rigger’. We will continue this discussion with some of the fittings/connections/hardware associated with your standing rigging.
Related Posts
Ask the Rigger
Do your masthead sheaves need replacing.
Question: My halyard is binding. What’s up? From the Rigger: Most boat owners do not climb their masts regularly, but our riggers spend a lot of time up there. And they often find badly damaged Read more…
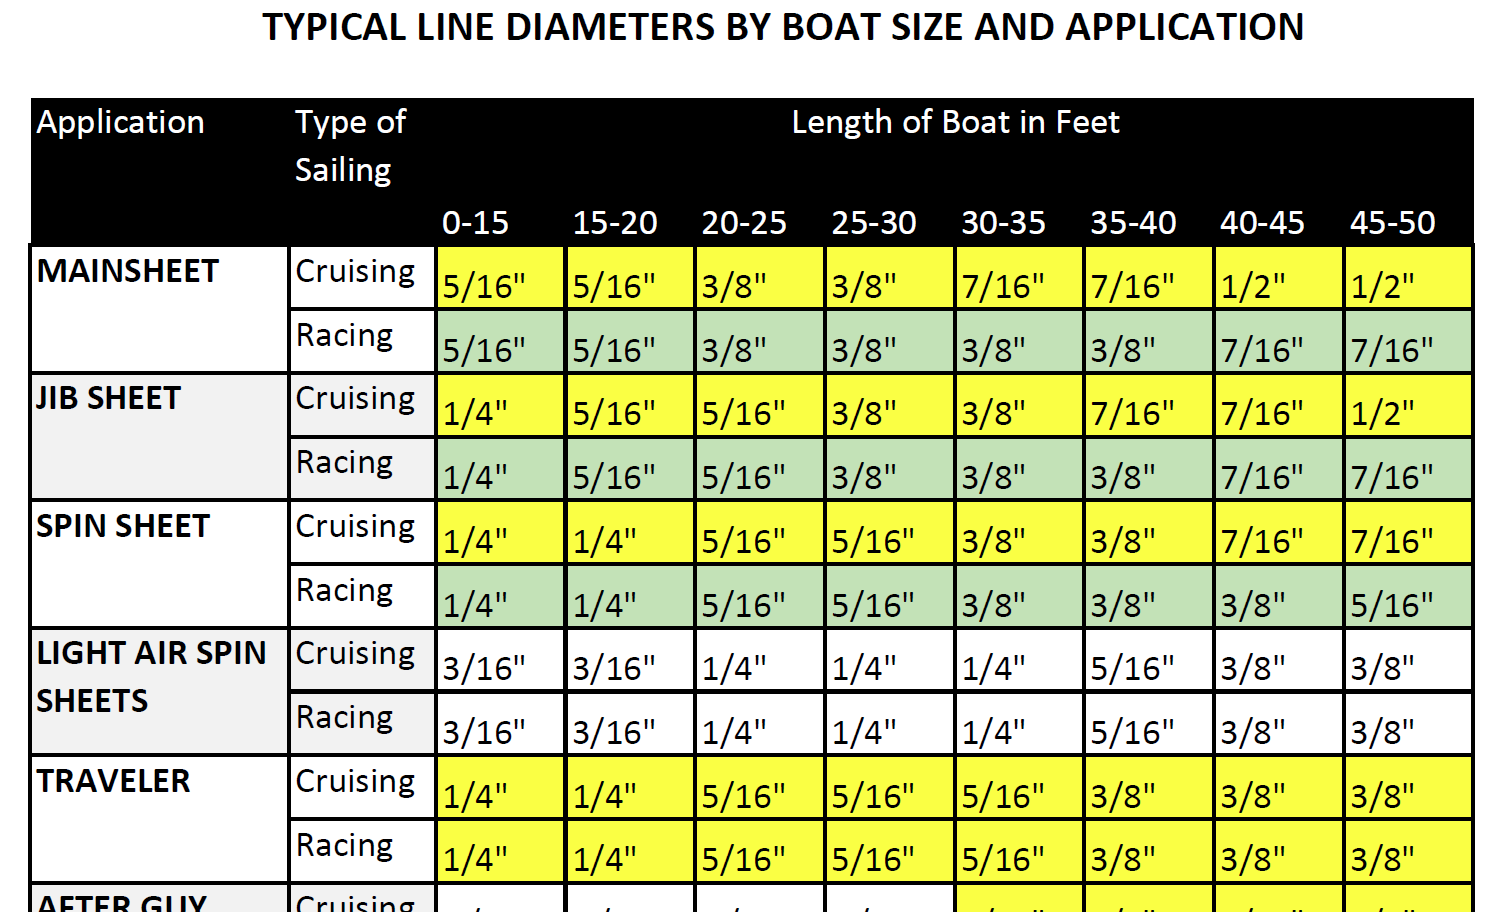
Selecting Rope – Length, Diameter, Type
Question: Do you have guidelines for selecting halyards, sheets, etc. for my sailboat? From the Rigger: First, if your old rope served its purpose but needs replacing, we recommend duplicating it as closely as possible Read more…
Spinlock Deckvest Maintenance
Question: What can I do to ensure that my Spinlock Deckvest is well-maintained and ready for the upcoming season? From the Rigger: We are so glad you asked! Deckvests need to be maintained so that Read more…
No products in the cart.
Sailing Ellidah is supported by our readers. Buying through our links may earn us an affiliate commission at no extra cost to you.
The Most Popular Types Of Sails On A Sailboat
A sloop-rigged sailboat typically features a mainsail, a headsail, and an additional light-wind sail, such as a spinnaker or Gennaker. The mainsail is rigged aft of the mast, while the headsail is attached to the forestay. The two most commonly used headsails are the Genoa and Jib.
The sails are vital parts of a sailboat since you obviously couldn’t sail without them! There are many different sails depending on the type of sailboat and its rig configuration, and we’ll walk through them together in this article.
The different types of sails on a sailboat
We can divide the selection of sails on a sailboat into three categories:
- Standard sails
Light-wind sails
- Storm sails
Each category serves different purposes depending on the vessel’s rig configuration and the sail’s functionality.
The standard sails
The standard sails usually form a sailboat’s basic sail plan and include :
- The Mainsail
- The Staysail
- The Mizzen sail
These sails are the ones that are used most frequently on sloop, ketch, and cutter-rigged sailboats and are usually set up to be ready to use quickly.
Headsails are often rolled up on a furler, while the main and mizzen sail are stored on the boom or furled into the mast.
The halyards and sheets are kept within easy reach, making these sails the primary choice in most situations. Let’s dive further into each of them.
The mainsail is a triangular sail that flies behind the mast on top of the boom . Although it may not always be the largest sail on the vessel, we commonly refer to it as “the main.”
It is a vital sail, and keeping the sail shape trimmed properly on every point of sail is crucial for the stability and performance of the boat.
A Jib sail is a headsail that does not overlap the mainsail. It is typically between 100% and 115% of the foretriangle but can also be smaller. The foretriangle is the triangular area formed by the mast, deck, and forestay. The Jib is often used with a self-tacking system involving a sheet traveler in front of the mast.
This sail is often seen on newer boats with fractional rigs, which typically have a larger mainsail area than the headsail area. However, the Jib is versatile and also used in other configurations.
People often mix the terms Genoa and Jib. Many refer to any headsail as a Jib, which is incorrect. I personally prefer to use the correct terms to avoid confusion .
A Genoa sail resembles a large Jib but extends past the mast and overlaps the mainsail. Genoas are usually larger than 115% of the foretriangle , with sizes ranging from 120% to 150%. They are often used on vessels with masthead rigs and smaller mainsails but are also common on fractional rigs.
The Staysail is typically found on cutter rigs and is set on the inner forestay or cutter stay. It can be combined with other sails, such as a Jib, Genoa, or Yankee, or on its own in stronger winds.
The Staysail is also useful when sailing downwind, as it can be paired with a headsail and extended to opposite sides of the boat using a pole.
The Yankee sail resembles a Genoa and Jib but has a high-cut clew. This shape allows for improved airflow when used with another headsail. The Yankee is often used on cutter-rigged boats in combination with a staysail and is known for its versatility in different wind conditions.
Mizzen Sail
A mizzen sail is similar to the mainsail, only smaller . It is set on the aft mast of a boat with multiple masts, such as a ketch rig. The mizzen sail is usually used to provide balance and stability to the vessel and provides additional power when sailing downwind.
Another handy usage is to fly the mizzen at anchor to keep the bow up against waves and swell.
The light-wind sails are large, made of thin nylon, and typically shaped like a half-balloon. They are a type of headsails that are great when the winds are too light to fill the standard headsail and are often used when sailing downwind.
The four most commonly used light-wind sails are:
- The Spinnaker
- The Gennaker
- The Code Zero
- The Parasailor
They all provide excellent forward propulsion on a sailboat but usually require some extra rigging to be set.
Experienced cruisers love to use light-wind sails in nice weather, but they have a critical weakness to be aware of. These sails easily get overpowered when the wind increases, and I strongly advise being careful and observant of the wind conditions when flying them.
(Yes, I have managed to rip mine on one occasion due to getting overpowered, but that’s a different story…)
Let’s continue and take a closer look at each of the light wind sails.
A Spinnaker sail is a large, lightweight downwind sail used at deep angles between 120 and 180 degrees. It is symmetrical in shape with two clews and is often brightly colored.
The Spinnaker is set by using a pole to extend the sail’s clew to the vessel’s side. Then, a sheet is attached to the other clew and led back to the stern of the boat.
A Gennaker sail combines the characteristics of the Genoa and Spinnaker. It is made of nylon like the Spinnaker but is asymmetrical like a Genoa and rigged slightly differently. The tack is attached to the bow, and the clew has a sheet led aft to the cockpit. The Gennaker can be equipped with a snuffer to make it even easier to set up and take down.
It is popular among cruisers because it is simpler to use than a spinnaker and it doesn’t require a pole. The sail is effective at angles between 90 degrees and almost all the way down to 180 degrees, making it versatile for various light-wind conditions.
A Parasailor is similar to the Spinnaker in many aspects but has some distinct differences. It has a double-layer wing that inflates as the sail is filled with air, creating a batten-like effect pushing the leech out while providing lift to the bow.
The wing also helps to prevent the rolling movements you get with a Spinnaker and the collapsing of the leech that can occur with a Gennaker at deep angles.
This makes the parasailor effective at sailing angles between 70 and 180 degrees dead downwind. Parasailors can be set like a Gennaker when reaching or with a pole like the Spinnaker for running downwind.
A Code Zero sail combines some elements of the Genoa and Gennaker. Unlike the Gennaker, the Code Zero has a different shape, allowing it to be used while sailing upwind.
Another benefit is that it can be used with a furler which makes it easy to roll in and out. However, it can’t replace the Gennaker or Spinnaker entirely, as it is not effective at sailing angles deeper than 120 degrees.
If you see a big yacht with three forestay’s, the forward one probably holds a code zero sail. A bow spirit allows the ability to fly additional light wind sails as well!
Storm Sails
The storm sails consist of a small Mainsail and Jib in heavy-duty materials designed for rough conditions. These sails enable us to maintain speed and stability in the boat in severe weather too strong for the standard sails.
Storm sails are often brightly colored , such as red, orange, or yellow, to make them more visible at sea.
Storm Mainsail
A storm mainsail is used when the reefing setup doesn’t allow the standard mainsail area to be reduced enough to prevent overpowering. The sail can handle rough conditions and is excellent for maintaining stability.
A storm Jib is used when the headsail has been furled to the point where it is no longer effective. It is especially useful for sailboats rigged with a Genoa, as the Genoa gets inefficient when heavily reefed. As the storm Jib is smaller than the standard headsail, it also lowers the center of gravity, making the vessel heel less and become more stable.
Explaining the terms for the parts of a sail
Let us talk some more about sails. The goal is to go sailing, right?
Identifying the different parts of the sails is crucial to understanding which lines go where.
Let’s zoom in on a sail and break down the terms :
The head is the top corner of the sail . Most mainsails have a headboard or plate where the halyard is connected, while headsails use a metal ring. A halyard is a line we use to raise and lower sails with.
The leech is the aft part of a sail , located between the clew and head. We use a combination of the outhaul, main sheet, and traveler to trim and adjust the leech on the mainsail.
The headsail’s leech is trimmed by adjusting sheet tension and angle according to the wind speed and direction. A traveler is a track with a movable car or pulley system for adjusting the position and angle of a sheet, and most sailboats have one main traveler for the mainsail and car tracks along the side decks for the headsail.
The luff of a sail is the front part of the sail between the tack and head. On a mainsail, the luff runs vertically along the mast and along or close to the forestay on a headsail. Headsails are often equipped with luff foam to help maintain their shape when partially reefed on a furler.
Battens are slats or tubes inserted into pockets on the mainsail to help the sail maintain its shape and increase its lifespan . A traditional sail hoisted and lowered on the boom typically has horizontal battens. Vessels with in-mast furling can use vertical battens instead of horizontal ones.
- A fully battened Mainsail has the battens run through the entire sail length from the luff to the leech.
- A standard battened main sail has the battens along the sail’s leech.
Telltales are small ropes, bands, or flags attached to a sail to give an indication of the airflow around the sail. They help us understand how the wind affects the sail and allow us to fine-tune the trim for optimal performance. Telltales are usually found on the mainsail’s leech and in the front of the headsail’s leech.
The clew of a sail is the lower aft corner and where the outhaul is connected on a mainsail. Headsails have sheets attached to their clew for controlling and trimming the shape and tension.
The tack is the lower, forward corner of a sail. On a traditional Mainsail, the tack is attached to the Gooseneck, a hinge in front of the boom attached to the mast.
With in-mast furling, the tack is connected to the furling mechanism. This mechanism is used to roll the sail into the mast.
The headsails tack is connected to a furler drum on the forestay on most sailboats. Vessels using traditional hank-on headsails connect the tack to a fixed point on the bow.
The foot of the mainsail is the bottom portion of the sail between the clew and the tack. It is trimmed using the outhaul, a line attached to the clew, and used to adjust the tension on the foot of the sail. Some mainsail are configured loose-footed, and others are attach-footed.
The foot of the headsail is trimmed by adjusting the tension and angle of the sheets, which are the lines used to control the headsail’s clew. We use cars, or pulleys, to adjust the angle of the sheets and thus the trim of the headsail.
Traditional and less commonly seen sails
We’ve now looked at the most commonly used sails and walked through the different parts of them. But what about the less common ones? The art of sailing has a rich history, with some unique sail designs that we rarely see today.
Read on if you want to peek into some traditional sails, or skip straight to popular sail and mast configurations here.
Square sails
Square sails are rectangular and usually set across a ship’s mast, mostly seen on traditional square-rigged sailing ships and Viking ships. These sails are efficient for downwind sailing and are hung from horizontal spars called yards. Though not as agile as modern fore-and-aft sails when sailing upwind, they were central to naval exploration for centuries. Today, they’re mainly seen on traditional vessels and tall ships, symbolizing maritime heritage.
If you’ve been to Martinique in the summer, you may also have noticed the round skiff sailboats the local fishermen traditionally used for fishing in the Atlantic Ocean with their distinctive big squared sails. Tour de Martinique des Yoles Rondes is a popular yearly event where the locals race and show off these beautiful old boats with colorful sails!
A gaff sail is a traditional four-sided sail held up by a horizontal spar called the “gaff.” They are used on classic gaff-rigged sailboats and allow for a larger sail area with a shorter mast. Gaff-rigged boats were traditionally popular and usually carried 25% more sail area than the equivalent Bermudan rig, making them fast on a downwind run. The Gaff rig could also carry a topsail between the gaff and the mast.
However, they don’t sail well to windward, and modern designs have shifted towards triangular sails for better upwind performance.
Jib-headed topsail
The Jib-headed topsail is a small triangular sail used on gaff rigs and is set between the gaff and the top of the mast.
A lug sail is an angled, four-sided sail that attaches at a point on its top side, making it hang tilted. The sail is simple to use and often found on smaller or older boats. There are different types, like standing, dipping, and balance lugs, each hanging differently around the mast.
The lug sail evolved from the square sail to improve how close the vessels could sail into the wind. Because of their upwind performance, fishermen used them widely in Europe from the seventeenth through the nineteenth centuries.
Sprit sails
The spritsail, with its unique four-sided design, stands out thanks to a diagonal support called the “sprit.” It was traditionally popular in Thames sailing barges due to its ability to accommodate high-deck cargo. These days, it’s primarily found in smaller boats like the Optimist dinghy in a variant called “leg of mutton spritsail.”
The spritsail was also used in traditional wooden boats like the fearing version of the Oselvar wooden boat traditionally used in western Norway.
It is also commonly used by the indigenous Guna Yala tribes in Panama in their dugout Ulu’s up to this day. We saw plenty of them when we cruised along the coast, and some of them approached us to sell us their delicious catch of the day!
Lateen sails
A lateen sail is a triangular sail set on a long spar angled on the mast. It was originally popular in the Mediterranean and on Arab shows, and its design enhanced maneuverability and played a crucial role in historic sea exploration.
The lateen sail was used on lateen rigs, the predecessor to the Bermuda rig – one of today’s most commonly used rigs!
Which brings us to the following topic:
Popular sail and mast configurations
There are many different rigs and sail configurations between sailing vessels. From the old-school square rigs to schooners, gaff rigs, and more. However, this article will focus on the three most popular rigs seen on modern sailboats:
- The Bermuda Sloop Rig
- The Cutter Rig
- The Ketch Rig
The three rigs have similarities and differences between their sail and mast configurations. We’ll walk through each of them to understand how they utilize their different types of sail.
If you want to learn more about other rigs, take a look here .
Bermuda Sloop Rig
The Bermuda sloop rig is the most common rig on modern vessels. It is characterized by a single mast, a triangular mainsail, and a headsail. This rig is named after the Bermuda Islands, where it was developed in the 17th century.
Some of the key features of the Bermuda sloop rig:
- The mast is typically tall and raked, which allows for a large sail area and excellent stabilit y.
- The mainsail is attached to the mast and boom. It is usually combined with a single headsail at the front of the boat, making it powerful and easy to sail.
- The Sloop is usually equipped with a masthead or fractional rig and flies a Jib or Genoa as its primary headsail.
The Bermuda Sloop rig is known for its simplicity, is often used for racing and cruising, and is popular among sailors worldwide.
The cutter rig is very similar to the sloop rig. The significant difference is that it has a single mast and two headsails – a Staysail and a Yankee. The cutter rig is known for its versatility due to the multiple options in sail plans and the double headsail setup.
Some key aspects that separate the Cutter from the Sloop:
- The rig is often more robust than its Sloop sister because of the additional cutter stay and running backstays.
- The mast is located closer to the center of the boat.
- The Cutter has a staysail on the inner forestay and a Yankee sail on the outer. The sails can be used in combination with each other or independently.
- Tacking the headsail between the forestay and cutter stay is more involved than on a sloop.
- The Cutter rig has two similar variations: the Slutter rig and the Solent rig.
Like the Sloop, the Cutter rig is relatively easy to operate. Still, the additional headsail and rigging make it costlier to maintain. It is also less suitable for racing than the Sloop, but the added versatility helps in different weather conditions and makes it an excellent choice for cruisers.
The ketch rig is also similar to the Sloop but has an additional mizzen mast placed further aft of the main mast. Another mast gives it the advantage of even higher versatility in sail plans. The ketch typically uses three sails. The mizzen sail, a mainsail, and a headsail. The mizzen mast also allows it to fly a second light-wind sail.
Here are a few more distinctions of the ketch rig:
- The ketch typically carries a smaller mainsail than a similarly sized sloop and a smaller mizzen sail.
- A small mizzen and a medium mainsail are easier to handle than one large mainsail.
- The additional mizzen sail makes the vessel easy to balance and gives extra stability downwind.
- The ketch usually doesn’t point as close to the wind as the Sloop and Cutter.
The headsail setup on a ketch is generally the same as for the Sloop. But the ketch can also be rigged as a cutter ketch, which gives it the benefits of the cutter rig! The tradeoff with a cutter-rigged ketch is the higher complexity and additional rigging, hardware, and sails required.
Final words
Well done, you now have a good grasp of the most common sails and their strengths. We have discussed a few rigs and how they utilize different kinds of sails in various sail plans. Remember that more sail types, other rigs, and even more variations are available. It is a complex topic, but this guide covers the basics and gives you a great starting point.
If you still have questions, look below at the FAQ, or leave me a comment. I’m more than happy to help you out!
A sailboat is only as good as its sails, and sails need wind to work. The next logical step is learning how the wind works when we sail and practicing some wind awareness! Head to the following guide to continue your research: Learn The Difference Between True And Apparent Wind Speed.
FAQ: The Different Types of Sails On A Sailboat
What is the foretriangle on a sailboat.
The foretriangle on a sailboat refers to the triangular area formed between the mast, forestay, and deck. If you want to order a new headsail, for example, you’ll have to measure and supply the sailmaker with these details.
What is the difference between a loose-footed and attached-footed mainsail?
A loose-footed mainsail is attached to the boom only at its corners, leaving the rest of the sail’s bottom edge free. An attached-footed mainsail, on the other hand, is secured to the boom along its entire length. The main difference lies in how the bottom of the sail connects to the boom, with the loose-footed design offering more adjustability in the sail shape.
What is a high-cut clew on a sail?
A high-cut clew refers to the design of a foresail, such as a jib or genoa, where the back lower corner (the clew) is raised or “cut” higher above the deck compared to standard designs. This design allows for better visibility beneath the sail and makes it easier to sail over waves without the sail touching the water, which is especially beneficial for offshore or blue-water cruising. Very high-cut clews are commonly seen on yankee sails on cutter-rigged sailboats.
What is luff foam on a sail?
Luff foam is a padded strip sewn into the forward edge of roller furling sails. It ensures the sail is appropriately shaped when partially rolled up, especially in strong winds. This foam not only helps with sail performance but also protects the sail when it’s furled.
What are the most common sails?
The sloop rig sailboat is the most common and usually features a mainsail, a headsail, and an additional light-wind sail, such as a spinnaker or Gennaker.
What are the different types of sails?
There are several different types of sails, and we can divide the most common into three categories:
The standard sails:
- Mizzen sail
The light-wind sails
The storm sails:
- Storm mainsail
- Storm jib
What is a spinnaker sail?
A Spinnaker sail is a large, lightweight downwind sail used at deep angles between 120 and 180 degrees.
What is a Jib sail?
A Jib sail is a headsail that does not overlap the mainsail and is set on the forestay. The Jib can also be set up with a self-tacking system, making it very effective when sailing into the wind.
Is Genoa sail the same as a jib?
People often mix the terms Genoa and Jib. The Genoa is different from a Jib sail as it is larger and overlaps the mainsail, whereas the Jib is smaller and does not overlap the mainsail.
What is a Genoa sail?
A Genoa is a headsail larger than the Jib extending past the mast and overlapping the mainsail. The advantage over the Jib is the larger sail area, making it more effective when sailing off the wind.
How many types of sail plans are there?
Sail plans refer to the configuration and arrangement of sails on a boat or ship. While there are countless customizations and variations, the three most common sail plans are:
Sloop: Characterized by a single mast, a triangular mainsail, and a headsail.
Cutter: Similar to a sloop but has a single mast and carries two or more headsails.
Ketch: Features two masts, with the aft mast (called the mizzen) shorter than the main mast.
What is a Mainsail?
The mainsail is a triangular sail that flies behind the mast on top of the boom.
What is a Gennaker?
A gennaker is basically an asymmetrical spinnaker. A hybrid sail that combines the characteristics of a Genoa and a Spinnaker, designed for sailing off the wind and often used in light to moderate wind conditions.
What is a Storm Jib?
A storm jib is a small, heavy-duty sail used in strong winds or stormy conditions. It is commonly used when the headsail has been furled to the point where it is no longer effective.
What factors determine the type of sail to be used?
The type of sail to be used depends on various factors such as wind conditions, points of sail, sailboat size , and sailing experience. It’s smart to choose the appropriate sail for optimal performance. A Jib, for example, will be more effective than a Genoa while sailing to windward, and vice versa.
How do sails affect the performance of a sailboat?
Sails are the engine of a sailboat. Their design, size, and trim influence the boat’s speed, direction, and stability. Properly adjusted sails capture wind efficiently, allowing the boat to move faster and in the desired direction.
The balance and condition of the sails also impact comfort and safety, with well-maintained sails ensuring optimal performance. The sails are essential in determining how a sailboat performs in various wind conditions.
Sharing is caring!
Skipper, Electrician and ROV Pilot
Robin is the founder and owner of Sailing Ellidah and has been living on his sailboat since 2019. He is currently on a journey to sail around the world and is passionate about writing his story and helpful content to inspire others who share his interest in sailing.
Your article gave me a lot of inspiration, I hope you can explain your point of view in more detail, because I have some doubts, thank you.
What specifically do you want my point of view on?
Leave a Reply Cancel reply
Your email address will not be published. Required fields are marked *
4-Day, 4-Park Magic Ticket from $99 Per Day, Plus Tax (Total Price from $396, Plus Tax)
View All Special Offers

Experience 4 days of magic and thrills across the Walt Disney World theme parks when you purchase a specially priced 4-Park Magic Ticket starting from US$99 per day , plus tax (total price starting from US$396, plus tax).
This ticket does not require a theme park reservation to enter a park.
Date-based ticket with start dates from April 2 through September 22, 2024. Ticket must be used within 7 days of selected start date.

Fun in the Theme Parks
Discover new experiences and classic favorites in all 4 Walt Disney World theme parks when you purchase a 4-Park Magic Ticket. Read More
Discover new experiences and classic favorites in all 4 Walt Disney World theme parks when you purchase a 4-Park Magic Ticket.
As a reminder, the 4-Park Magic Ticket provides one visit to each of the 4 Walt Disney World Resort theme parks (one theme park per day).
- NEW! Stroll along a lush trail where you can explore the wonders of water and discover its playful personality at Journey of Water, Inspired by Moana .
- NEW! Watch the skies come alive in Luminous The Symphony of Us , a nighttime spectacular with fireworks, fountains, lights and music.
- Spring into fresh flavors, lively entertainment and fun for all ages at EPCOT International Flower & Garden Festival —now through May 27, 2024.
- Sip, savor and celebrate a world of flavor at EPCOT International Food & Wine Festival —returning in fall 2024.
- Bring the whole family to zip, dash and scurry through Gusteau's kitchen as you take in the sights, sounds and even smells from Remy's world on Remy's Ratatouille Adventure .
- Board an ancient Norwegian vessel and be whisked away to the kingdom of Arendelle during a Frozen Ever After adventure.
- Soar across the sky during a hang-gliding adventure on Soarin' —with spectacular sights, pleasant scents and the graceful sensation of flight that take you to incredible heights.
Disney's Animal Kingdom Theme Park
- Celebrate the magic of nature at Pandora - The World of Avatar . Here, you can fly on the back of a banshee on Avatar Flight of Passage, hike amid floating mountains in the Valley of Mo'ara and take a mystical boat ride into a bioluminescent rainforest on the Na'vi River Journey.
- Set off in an open-air vehicle across a lush African savanna teeming with exotic animals on Kilimanjaro Safaris.
- Witness Finding Nemo: The Big Blue... and Beyond! —a vibrant stage show set in the underwater world of Finding Nemo .
- Speed through the Himalayas on a runaway train while avoiding the clutches of the Yeti on Expedition Everest - Legend of the Forbidden Mountain .
- Behold Festival of the Lion King —a larger-than-life show filled with pageantry, puppetry and classic songs from The Lion King .
- Splash your way through a lush Asian jungle on Kali River Rapids .
Magic Kingdom Park
- Leave the real world behind for a high-stakes race across the Grid—the dark, computerized world from TRON —on TRON Lightcycle / Run presented by Enterprise.
- Explore iconic attractions and experiences in 6 incredible lands—including Seven Dwarfs Mine Train , a swaying family coaster ride that will have you racing through a diamond mine.
- Be dazzled by music, dancing and vivid pageantry during the Festival of Fantasy Parade —a grand tribute to the tales and inhabitants of Fantasyland.
- Meet some of your favorite Disney pals , enjoy a royal reception from Disney princesses and so much more. You may even spot Mirabel or Bruno from the animated film Encanto !
- Take off on an exhilarating coaster ride on Space Mountain and Big Thunder Mountain Railroad .
- Rediscover beloved classic Disney attractions such as Jungle Cruise, Haunted Mansion and more.
- Feast your eyes on a nighttime fireworks spectacular featuring lights, lasers and special effects.
Disney's Hollywood Studios
- Live your adventure in a galaxy far, far away at Star Wars : Galaxy's Edge ! Experience 2 thrilling attractions, build your own droid or lightsaber, savor Batuu's tasty food and beverages, shop for themed merchandise and more!
- Discover big fun for kids and grown-ups alike at Toy Story Land . Take a wild ride on Slinky Dog Dash and go for a whirl on Alien Swirling Saucers.
- Pack your imagination, switch tracks and take a ride on the cartoon side like never before when you hop aboard Mickey & Minnie’s Runaway Railway.
- Hurtle up and down on a haunted elevator ride at The Twilight Zone Tower of Terror™.
- See some favorite Characters around the park—including Toy Story Characters, Disney Junior pals, Frozen friends and Star Wars Characters.

Stay in the Magic... and Save!
Turn your visit into an unforgettable vacation with a special offer at select Disney Resort hotels. Read More
Turn your visit into an unforgettable vacation with a special offer at select Disney Resort hotels.
Stay in the magic with the Disney Resorts Collection—and save with this offer:
Spring and Early Summer Room Offer
Save up to 30% on rooms at select Disney Resort hotels when you stay 5 nights or longer, valid for stays most nights through July 7, 2024. Other savings may be available for shorter stays. View offer details .
Why Stay in the Magic?
When you book this room offer, you can enjoy a Walt Disney World vacation filled enchantment.
As a Disney Resort hotel Guest, you can:
- Experience the same legendary storytelling, detail and service found in the Walt Disney World theme parks
- Stay close to the theme parks
- Enjoy extra time in the theme parks — view details about this benefit for Disney Resort hotel Guests
- Get around Walt Disney World Resort with ease using complimentary transportation options—like bus, boat and monorail services
- Delight in other great benefits !
Check out Walt Disney World room offers to learn more about these benefits—and save on your stay!

Make the Most of Your Day
Save time waiting in line with Lightning Lane entry .
- Admission is subject to capacity closures and other restrictions.
- Parks, attractions and other offerings are subject to availability, closures and change or cancellation without notice or liability. Admission to a theme park is not guaranteed.
- Tickets are subject to the Walt Disney World Resort Ticket Store Terms and Conditions .
Stay in the Magic at Select Walt Disney World Resort Hotels by booking a non-discounted room with a discounted 4-Park Magic Ticket now through 9/22. To book, call 407-934-7639 and speak with a vacation planning expert or call your travel agent. The number of rooms allocated for this offer is limited.
†Guests under age 18 must have parent or guardian permission to call.
Other Offers You May Like

Use CoBrowse to Share Your Screen?
Even as the Disney Cast Member guides you around our site, they will be unable to access or view any files or information on your device or anything you type.
To stop the session, click the X in the screen-sharing window at any time. You can remain on the phone with the Cast Member.
Enter the code provided by the Cast Member and Accept to get started.
Invalid code. Please reenter
Not on the Phone with a Cast Member?
Indonesian fishermen rescue dozens of Rohingya after boat capsizes
The Reuters Daily Briefing newsletter provides all the news you need to start your day. Sign up here.
Reporting by Stanley Widianto; Editing by Clarence Fernandez and Gareth Jones
Our Standards: The Thomson Reuters Trust Principles. , opens new tab

US says Arunachal Pradesh is part of India, amid Indo-China tensions
The U.S. government recognizes Arunachal Pradesh as part of India and "strongly opposes" any unilateral attempts to advance territorial claims in the northeastern Indian state that shares a border with China, the U.S. State Department said on Wednesday.

IMAGES
VIDEO
COMMENTS
16 - forestay 17 - boom vang. Stays are ropes, wires, or rods on sailing vessels that run fore-and-aft along the centerline from the masts to the hull, deck, bowsprit, or to other masts which serve to stabilize the masts. [1] A stay is part of the standing rigging and is used to support the weight of a mast .
A sailboat stay is a cable or line that supports the mast. Stays bear a significant portion of the mast load. Stays are a significant part of a sailboat's standing rigging, and they're essential for safe sailing. Stays support the mast and bear the stress of the wind and the sails. Losing a stay is a serious problem at sea, which is why it's ...
There are three items that need attention when adding a staysail: the standing rigging, the running rigging and the sail itself. In order to install a stayed staysail, you are essentially adding a second forestay about a third closer to the mast. The stay attaches to the deck about a third of the way back and to the mast around the upper spreader.
Rig for a Staysail. Adding an inner forestay and staysail will give you the sail plan you need for beating along in a blow. Any bluewater-bound sloop with a genoa on a roller furler should be equipped with a removable inner forestay and carry a heavy-weather staysail that can be easily and rapidly set up when it starts to blow.
Staysail. A staysail ("stays'l") is a fore-and-aft rigged sail whose luff can be affixed to a stay running forward (and most often but not always downwards) from a mast to the deck, the bowsprit, or to another mast.
2. No penalty power. The beauty of the staysail is that rating rules like IRC and ORC don't penalise you for using it. It's measured as a jib, so you're getting added power for no penalty ...
Forestay. On a sailing vessel, a forestay, sometimes just called a stay, is a piece of standing rigging which keeps a mast from falling backwards. It is attached either at the very top of the mast, or in fractional rigs between about 1/8 and 1/4 from the top of the mast. The other end of the forestay is attached to the bow of the boat.
The Staysail. First and foremost the furling staysail is your heavy-weather headsail. The maximum size the sail should be is 5% of the height of the foretriangle squared. For a boat with a 53-foot foretriangle height—typical of a masthead 40-footer—the maximum area of the staysail would be 140 square feet.
When looking up the sails from the aft quarter, the slot between the three sails should be roughly parallel. The genoa should be trimmed in almost to the spreader - trim the staysail to match this profile. If your boat has a conventional jib track, make sure the lead isn't too far forward. If it is, the foot of the sail will be round and full.
A Solent stay is a stay that sets between the mast and the forestay. It connects to the mast at a point that is only slightly below the existing backstay, and meets on the deck only slightly abaft of the existing forestay. Under such an arrangement, the mast requires no additional support. The existing backstay provides adequate tension to ...
The spinnaker staysail is a tall, narrow, very light sail used under a symmetrical or asymmetrical spinnaker when the apparent wind direction is within a range from 5 or 10 degrees forward of the beam to 20 or 25 degrees behind the beam. The sail is intended to have its tack set on the center-line of the foredeck about one quarter to one third ...
Short answer sailboat stays: Sailboat stays, also known as rigging stays, are structural wires or ropes used to support the mast of a sailboat. They provide lateral stability and prevent excessive vertical movement of the mast. Stays generally run from various points on the mast to different parts of the hull or deck, ensuring the
Short answer: Sailboat stays and shrouds Sailboat stays and shrouds are essential components of the rigging system that provide support and stability to the mast. Stays run from the masthead to various points on the boat, preventing forward and backward movement, while shrouds connect the mast laterally to maintain side-to-side stability. Together, they help distribute
When under spinnaker or gennaker when you decide to try the staysail an important tip is to take one's time. Check your boat speed for a good few minutes before hoisting. Check your rudder angle if you can. Then hoist and set the staysail, settle down and check the trim, then over another extended period check hull speed and rudder angle.
This pulls the stay towards the mast and can facilitate easier tacking without removing the sail / stay. To re-hoist the staysail - simply tension the stay, release the sail ties and hoist away! All of the above options also require a staysail halyard sheave box in the mast and sail luff tension is adjusted via the halyard. Furling system
Ocean Navigator January 1, 2003. Staysails are an evolution of the many different jibs flown by commercial ships in the age of sail. Their history on yachts has had many incarnations. Many voyaging sailboats could benefit from the addition of a staysail to a single headsail sailplan. Adding a staysail gives a boat a small jib that can balance ...
1. Check by sighting up the backside of the mast to see how straight your spar is side to side. You can take a masthead halyard from side to side to ensure that the masthead is on center. Do this by placing a wrap of tape 3′ up from the upper chainplate pin hole on each upper shroud. Cleat the halyard and pull it to the tape mark on one side ...
A running backstay is a removable stay that provides aft support to the mast from either the masthead or the point at which an inner forestay is attached. It originated as a response to the material limits of the period. At that time, solid wooden masts, for example, were either too weak or too heavy to be made particularly tall.
The headsail is the front sail in a front-and-aft rig. The sail is fixed on a stay (rope, wire or rod) which runs forward to the deck or bowsprit. It's almost always triangular (Dutch fishermen are known to use rectangular headsail). A triangular headsail is also called a jib. Headsails can be attached in two ways:
A sailboat's standing rigging is generally built from wire rope, rod, or occasionally a super-strong synthetic fibered rope such as Dyneema ®, carbon fiber, kevlar or PBO. 1×19 316 grade stainless steel Wire Rope (1 group of 19 wires, very stiff with low stretch) is standard on most sailboats. Wire rope is sized/priced by its diameter which ...
A sloop-rigged sailboat typically features a mainsail, a headsail, and an additional light-wind sail, such as a spinnaker or Gennaker. The mainsail is rigged aft of the mast, while the headsail is attached to the forestay. The two most commonly used headsails are the Genoa and Jib. The sails are vital parts of a sailboat since you obviously ...
Know how: Sailing 101. To begin You don't need to know much about how a piston engine works in order to drive a car. You get in, turn on the engine, shift into gear, step on the gas, and off you go. In a sailboat, though, you play a far more active role in harnessing the energy that propels you forward. You can get.
Stay in the Magic at Select Walt Disney World Resort Hotels by booking a non-discounted room with a discounted 4-Park Magic Ticket now through 9/22. To book, call 407-934-7639 and speak with a vacation planning expert or call your travel agent. The number of rooms allocated for this offer is limited.
Indonesian fishermen were scrambling on Wednesday to rescue dozens of Rohingya after high tides capsized their boat in waters off the province of Aceh, a regional fishing chief said, making them ...
A bobstay is a part of the rigging of a sailing boat or ship. Its purpose is to counteract the upward tension on the bowsprit from the jibs and forestay. A bobstay may run directly from the stem to the bowsprit, [1] or it may run to a dolphin striker, a spar projecting downward, which is then held to the bowsprit or jibboom by a martingale stay.
Russian President Vladimir Putin is widely expected to sail to re-election in a nationwide vote that begins on March 15, securing a fifth term in office and a full third decade as Russia's ...